When building complex blending, layered, or compressed animation systems, there may be cases where this causes extra and undesired movement (known as "swimming") on character limbs, typically on hands and feet. Virtual Bones, used in combination with IK nodes, can be used to correct this unwanted behavior.
This document provides an overview of how to create Virtual Bones in your Skeleton, and use them within your Animation Blueprint.
Prerequisites
-
Your project contains a Skeletal Mesh Actor.
-
You have a basic understanding of working in Animation Blueprints.
Virtual Bone Overview
Virtual Bones are Bones that follow the transforms of another Bone, but in a different Bone space. In most cases this means that a Virtual Bone would be parented to the root Bone, but following an end Bone, like a hand or foot. In other words, Virtual Bones can directly follow a target Bone, without receiving the additional effects of the forward kinematic (FK) hierarchy of all joints leading to that target. Using this feature, you can set up inverse kinematic (IK) systems which make the character limbs follow the Virtual Bone, resolving "swimming" and other limb wobbling problems from complex animation systems.
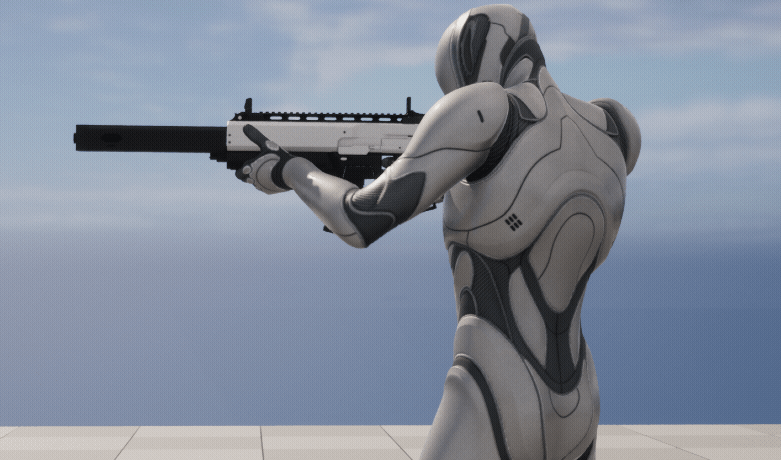
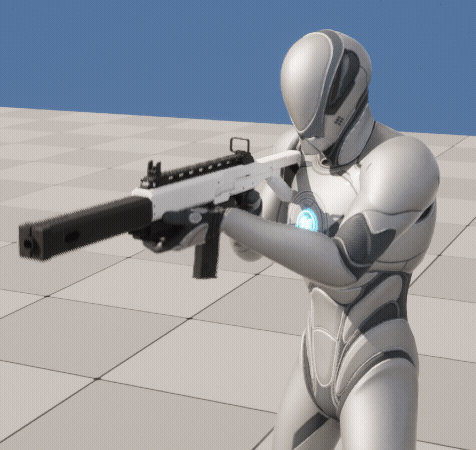
In this example, Virtual Bones with IK are being used to maintain the rifle and hand positions while an additive head-look animation is playing. Without it, the hands and weapon will "swim" causing unintended movement.
 |
 |
| Using Virtual Bones | No Virtual Bones |
Differences from Traditional IK
One of the main aspects of Virtual Bones is that they follow the target bone. This makes it so that you can still play an animation in which the target bone can move, changing the position of the Virtual Bone. Such a setup can be superior to traditional IK-only systems where IK can interfere with animation. For example, if you were to set up a system where the hands were IK-attached to a weapon, you would have to perform extra steps to disable IK in certain situations, such as reloading.
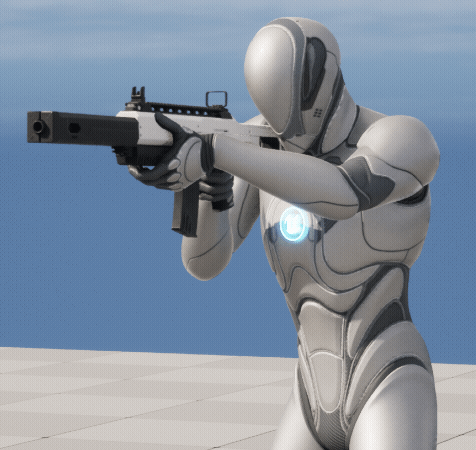
In this example, Virtual Bones with IK are still able to allow for base hand movement relative to another object, even with the additive animation playing. Although a traditional IK setup might resolve the "swimming" issue, the result will pin the hands in place at all times, forcing you to create extra logic to turn off IK during cases like this.
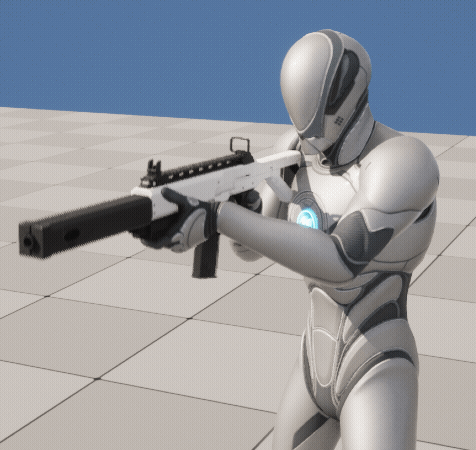 |
 |
| Virtual Bones allowing for base hand movement | IK-only setup which pins the hands in place |
Creating Virtual Bones
You can create Virtual Bones in the Animation Editor's Skeleton Tree. Right-click on a Bone, which will be the parent, and then select Add Virtual Bone. Select a Bone from this list to specify the target. In this example, a Virtual Bone is being created parented to the root Bone, then targeting the hand_l Bone.
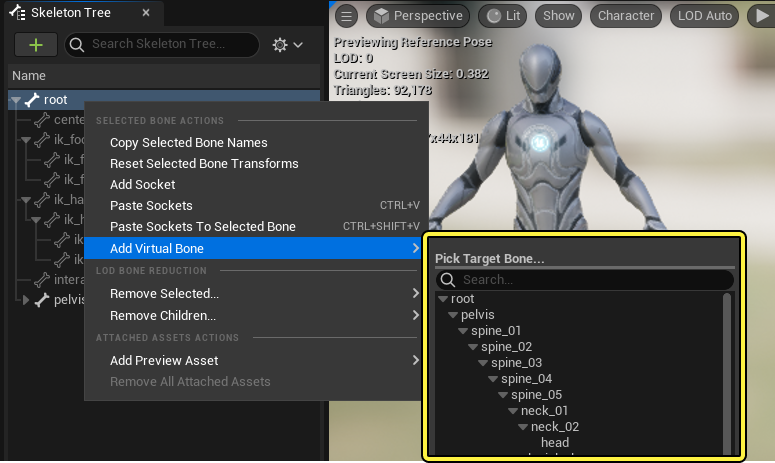
Once created, you should now see the Virtual Bone as a child of the parent Bone, but matching the transform of the target Bone. By default, Virtual Bones are automatically named as VB <Parent>_<Target> for their naming convention.
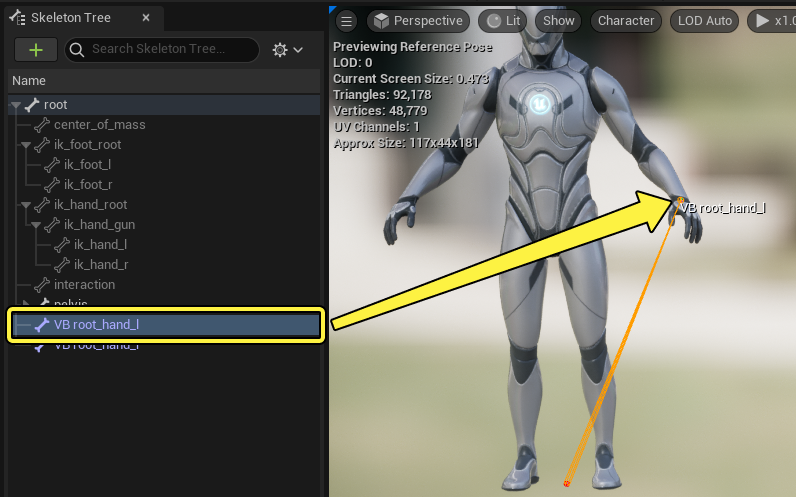
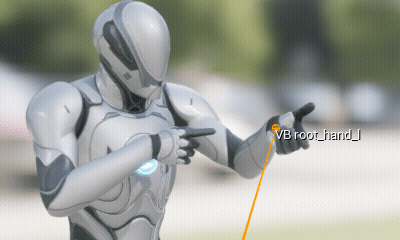
You can also preview an Animation Sequence and observe the Virtual Bone following the target Bone for the duration of the animation.
Animation Blueprint Setup
Once you have created your Virtual Bones, you can set up logic for them in Animation Blueprints. Due to the arbitrary nature of Virtual Bones, there are many different ways you can use them. This section will demonstrate how to create a basic weapon override and additive animation setup for Virtual Bones.
Slot Setup
First, in your Animation Blueprint Anim Graph, create two Slot nodes. Slots are proxy areas in your Animation Blueprint where you can insert one-off animations, and will be used to differentiate between your base and additive animation layers.
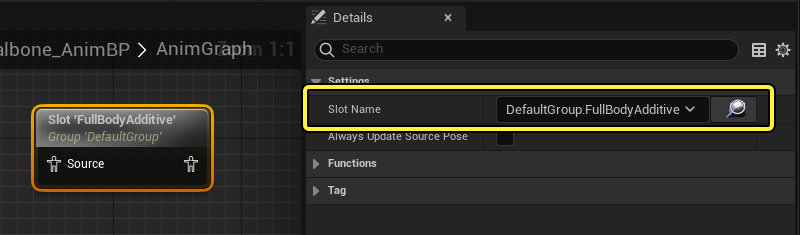
Right-click in the Anim Graph and select Montage > Slot 'DefaultSlot' to create a Slot.
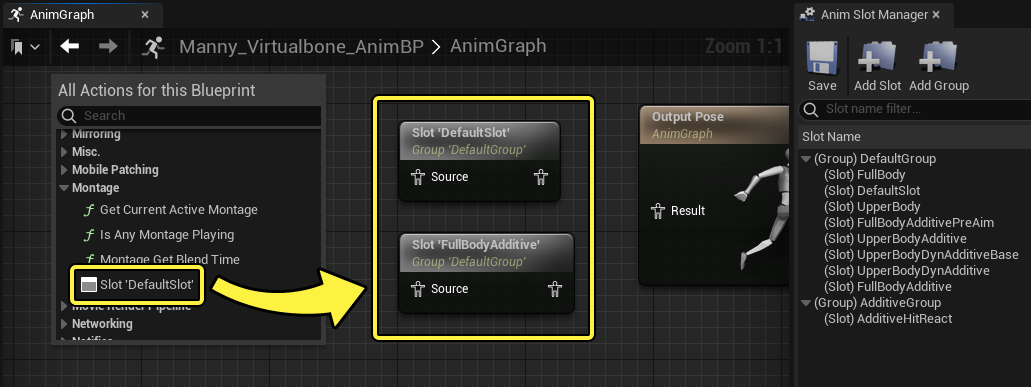
For the second Slot, select it and set the Slot Name property in the Details panel to a different value other than DefaultSlot, so that the animations diverge correctly.
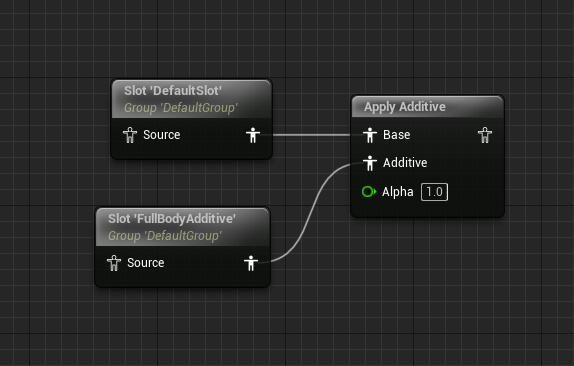
Connect your Slots to an Apply Additive node, connecting the default Slot to the Base pin, and the additive Slot to the Additive pin.
Exclude Virtual Bones
Next, you will need to create a Blend Mask in order to exclude the Virtual Bones from being evaluated from your additive Slot.
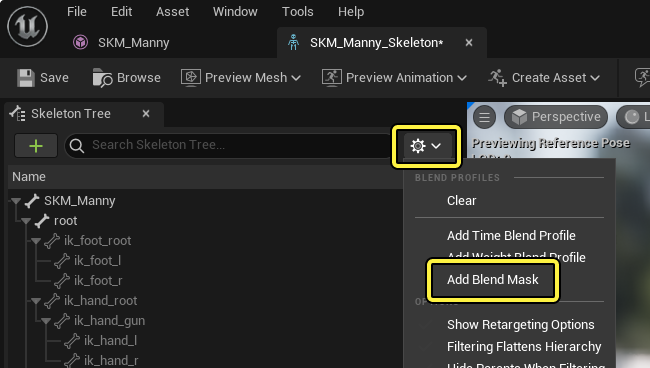
In the Animation Editor's Skeleton Tree, click the Options dropdown menu and select Add Blend Mask. Give it a name and press Enter.
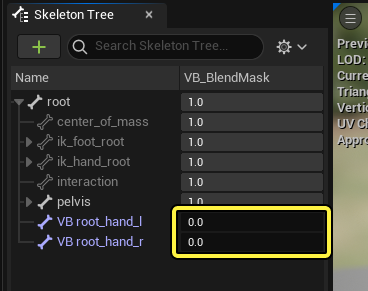
Next, navigate to your Virtual Bones and set their blend values to 0.0.
Returning to the Anim Graph, create a Layered Blend per Bone node and set the following properties on it:
- Set Blend Mode to Blend Mask.
- Set Blend Masks to your Virtual bone-excluding Blend Mask.
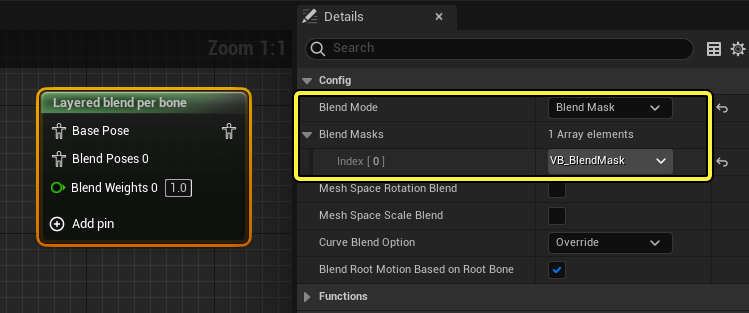
Connect this node so that it is in between your additive Slot and Apply to Additive node, connecting the Slot only to the Blend Poses pin. Now, as animation plays from this additive Slot, the Blend Mask will cause the additive animation to not affect the Virtual Bones.

IK Setup
Lastly, you will need to create an IK setup that causes the limb to follow the Virtual Bone, while the additive layer will exclude any extra Virtual Bone movement.
Create a Two Bone IK node and set the following properties on it in the Details panel:
- Set IKBone to your ending target Bone for this limb.
- Set Effector Location Space to Bone Space.
- Enable Take Rotation from Effector Space, which will add rotation to the IK Bone.
- Set Effector Target to your Virtual Bone for this limb.
- Set Joint Target Location Space to Parent Bone Space.
- Set Joint Target to the same value of IKBone.
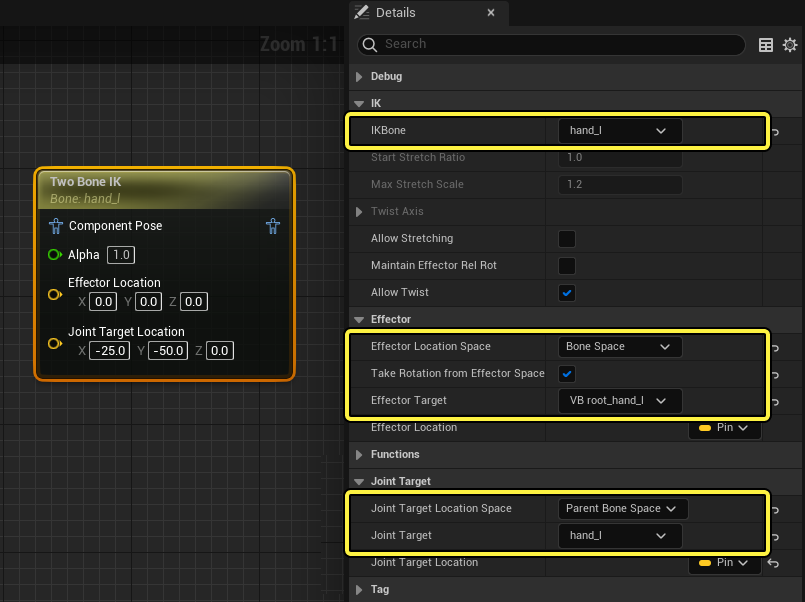
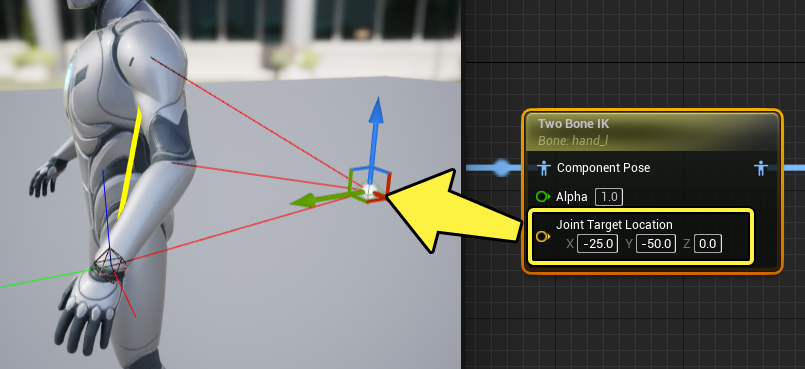
Joint Target Location is used to define the IK Pole Vector, which should be set to a position behind the elbow. Depending on your character's joints, this value may be different. For the default Unreal Engine mannequin, this value is set to:
- X: -25.0
- Y: -50.0
- Z: 0.0
Create additional Two Bone IK nodes for each limb you want to match to a Virtual Bone.
View Results
Once fully complete, your Anim Graph should look something like this, where you have:
- Slot nodes for your base and additive animation layers
- The Slots are connected to an Apply Additive node, and a Layered Blend per Bone node is being used to exclude the Virtual Bones from the Additive layer using a Blend Mask.
- IK nodes are being used on the limbs to attach to the final Virtual Bone location, which will use the base animation layer.
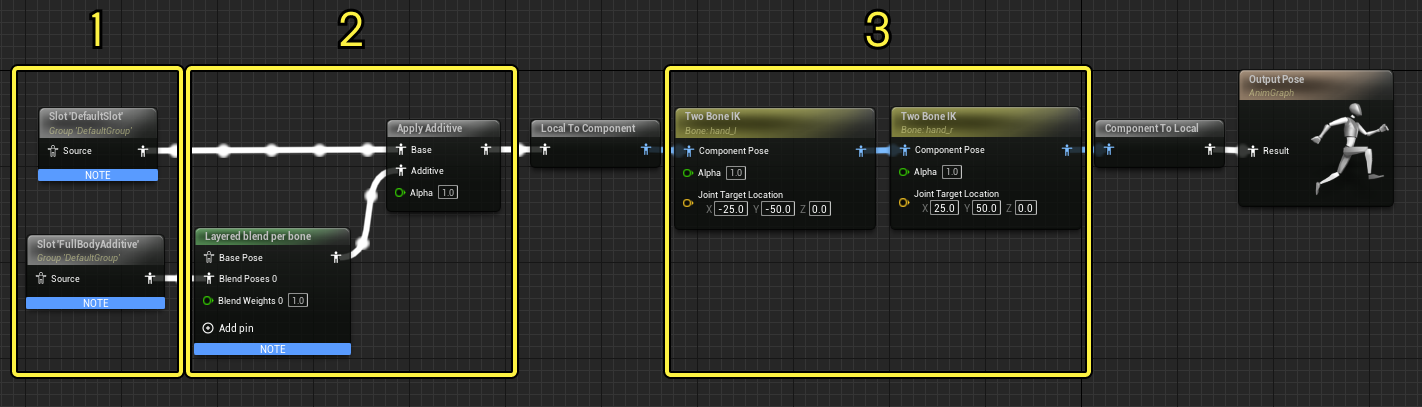
Now when playing your animations within this framework, you should see your character's limbs following the Virtual Bone position, while not being affected whenever additive animations are playing.