Valley of the Ancient is a short gameplay segment demonstrating early access features in Unreal Engine 5 (UE5). Players control Echo, who appeared in the UE5 announcement trailer, as she explores an arid landscape and finds a portal to a mysterious dark realm. Inside, she navigates through a series of obstacles and battles the massive Ancient One. This sample provides a snapshot of the many quality of life features, rendering enhancements, and workflow innovations available in UE5.
This document will take you on a guided tour through these exciting new features, and how the team at Epic Games used them to both push the limits of what is possible with real-time rendering technology while also greatly streamlining the workflow for building a vast, high-fidelity scene.
Overview
The highlights of Valley of the Ancient include:
- High-end visuals rendered with Nanite and Lumen.
- A large world crafted with a library of Megascans assets and our new geometry tools.
- Destructible assets created with an improved Chaos fracture workflow.
- New paradigms for organizing level files and actors that make it easier to collaborate with many team members on one map.
- Flexible real-time animation using full-body Inverse Kinematics (IK) and motion warping to fit character motion with gameplay.
- Modular gameplay systems that can be loaded and unloaded in their entirety at runtime.
- Procedural sound effects created using the new MetaSounds system.
- A dynamic music system using Quartz to synchronize gameplay and music.
Accessing the Valley of the Ancient Sample
To install the Valley of the Ancient sample project, follow these steps:
- Access the Valley of the Ancient sample from Fab and click Add to My Library for the project file to show in the Epic Games Launcher.
- Alternatively, you can search for the sample project from the Fab plugin for UE.
-
From the Epic Games Launcher go to Unreal Engine > Library > Fab Library to access the project.
Sample projects only appear in Fab Library when you have the compatible engine version installed.
- Click Create Project and follow the on-screen instructions to download the sample and start a new project.
To learn more about accessing sample content and the Fab plugin for Unreal Engine, see Samples and Tutorials.
Recommended System Specs
This sample is especially graphically intensive, and requires a powerful video card to run at a stable framerate. We also recommend installing it on an SSD, as Nanite and Virtual Textures depend on fast read speeds for the best possible results. The recommended hardware specifications are as follows:
| Recommended System Specs (100% Screen Percentage) | Minimum System Specs (50% Screen Percentage) |
|---|---|
|
|
Nanite is only supported by Nvidia Maxwell generation GPUs and AMD GCN generation GPUs or higher. Make sure you also have the most up to date drivers for your graphics card.
On lower spec systems, you can adjust the viewport screen percentage setting to get better performance. On the minimum spec, we recommend 50% or lower. You can set this in the Viewport Options Menu located in the upper-left corner of your editor viewport, using the Screen Percentage slider.
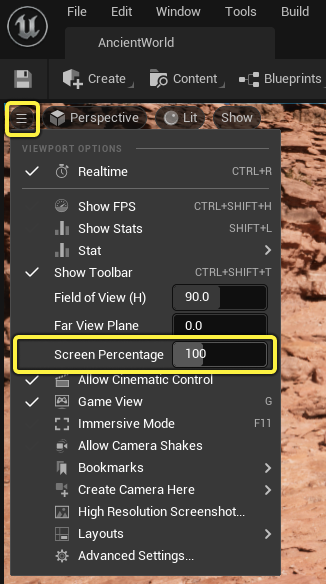
Alternatively, you can use the console command r.ScreenPercentage to set this value at runtime.
Familiarizing Yourself With the UE5 Editor
While the Unreal Editor in UE5 retains all the functionality from Unreal Engine 4, it has several workflow and user experience improvements which you should familiarize yourself with briefly before exploring the Valley of the Ancient sample.
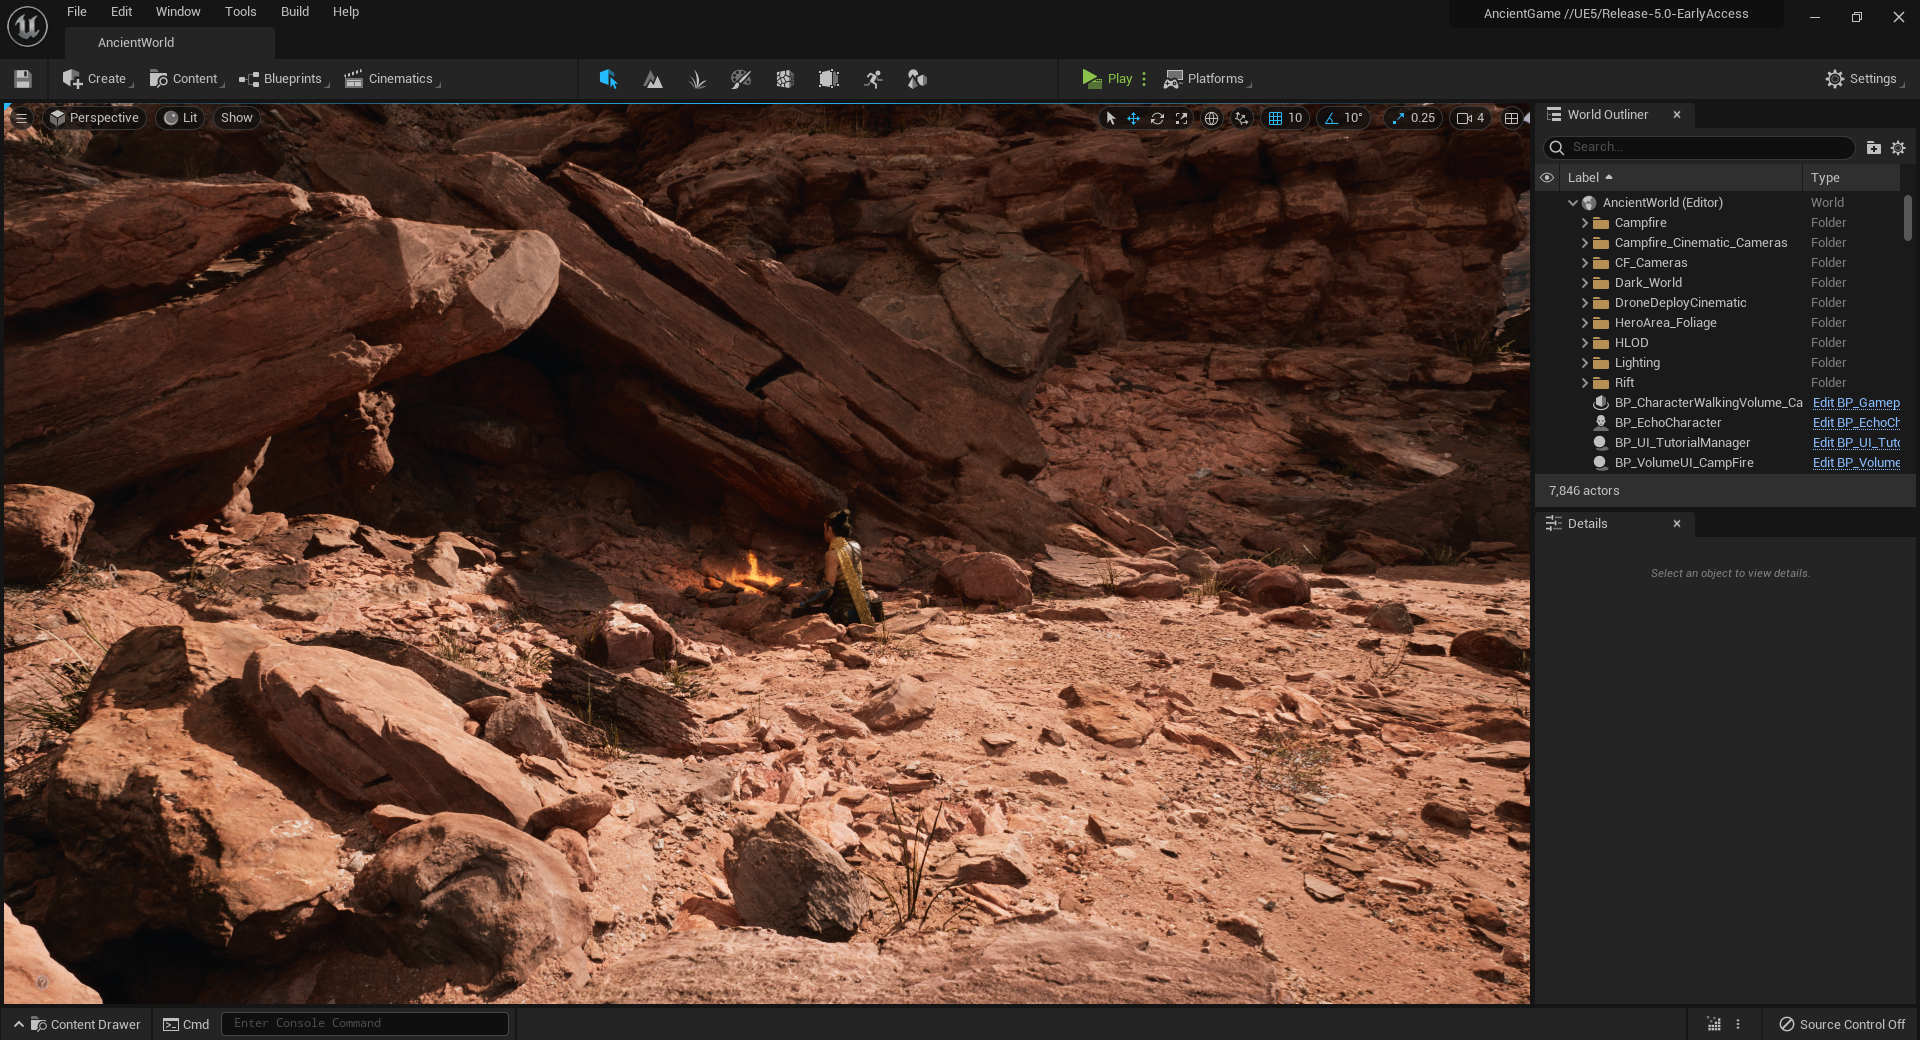
The Content Drawer
The Content Drawer is located in the lower left corner of the editor. You can click the button for the Content Drawer, or you can press CTRL+Spacebar to summon and dismiss it.
Clicking Dock in Layout will also create a permanently docked Content Browser, similarly to how it functioned in UE4. You can simultaneously use both a docked Content Browser and the Content Drawer, and you can also manage Content Browsers by clicking the Content dropdown in the main toolbar. This increases the flexibility of the content browser and provides more usable screen real estate inside the editor when it is not in use.
The Content Browser itself has a revised layout with a folder tree permanently displayed on the left hand side, as well as a new Settings menu where you can configure how it displays assets, including view types, thumbnail sizes, and content filters.
Accessing Editor Modes
You can now toggle Editor Modes using the icons in the main toolbar.
This includes modes that will be familiar to UE4 users, as well as several new modes with powerful new features. They are as follows:
| Number | Editor Mode | Description |
|---|---|---|
| 1 | Select | The default editing mode for selecting assets in the game world and editing their Details. |
| 2 | Landscape | Sculpt, paint, and manage landscapes. |
| 3 | Foliage | Paint and adjust foliage inside your environment. |
| 4 | Mesh Painting | Tools for vertex painting on meshes in your environment. Supports colors, weights, or textures. |
| 5 | Fracture | Tools for generating fractures in Static Meshes using the Chaos destruction system. |
| 6 | Brush Editing | Classic brush geometry editor. Use the pen tool to draw brushes in orthogonal viewports, then use other tools to refine shapes as desired. |
| 7 | Animation | Tools for manipulating Control Rigs, quickly applying poses, and setting up simple tweens. |
| 8 | Modeling | A full polygonal geometry editing suite. Model from basic primitives or modify individual meshes in your game world. |
Navigating the Sample
When the sample opens, it will start in the Startup map. Most content for the Valley of the Ancient is contained in the AncientWorld map, which you can find in the AncientContent > Maps folder.
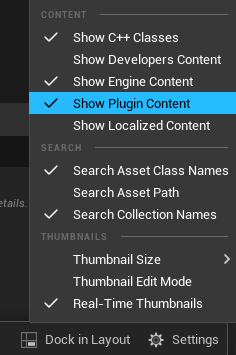
Most files supporting this world are located in the game's Content directory, but the assets for the Hover Drone and Ancient One are contained in Game Feature Plugins separated from the game's base project. The Hover Drone's assets are contained in the HoverDrone Content directory, while the Light Dart ability and the battle with the Ancient One are contained in the AncientBattle Content directory. To make these directories visible, click the Settings button in the Content Drawer, then toggle Show Plugin Content.
While Valley of the Ancient showcases a large world, there are no sub-scenes as you would traditionally use for level streaming in UE4. Instead, this sample uses World Partition and Data Layers to break up a scene into separate, editable parts.
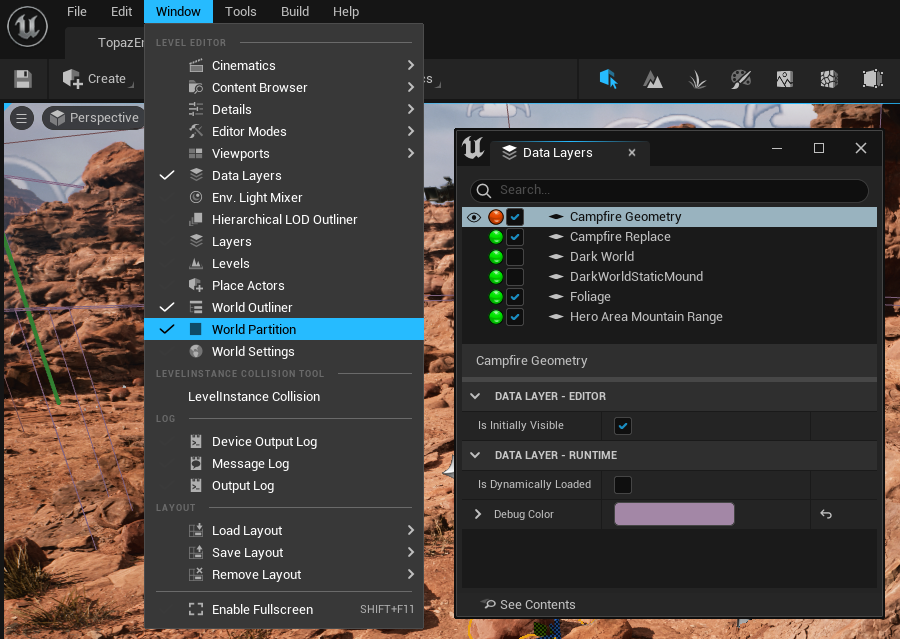
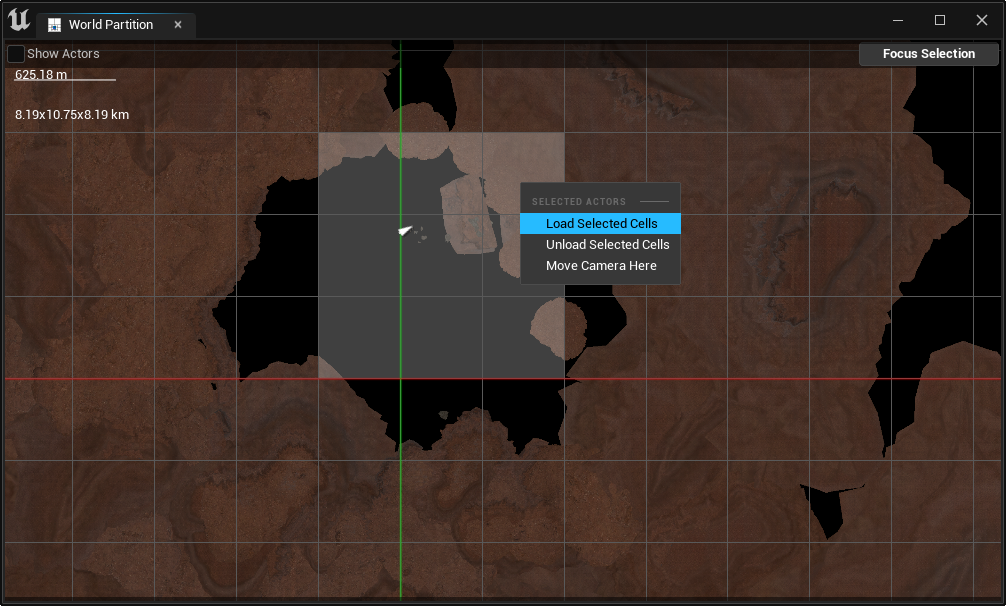
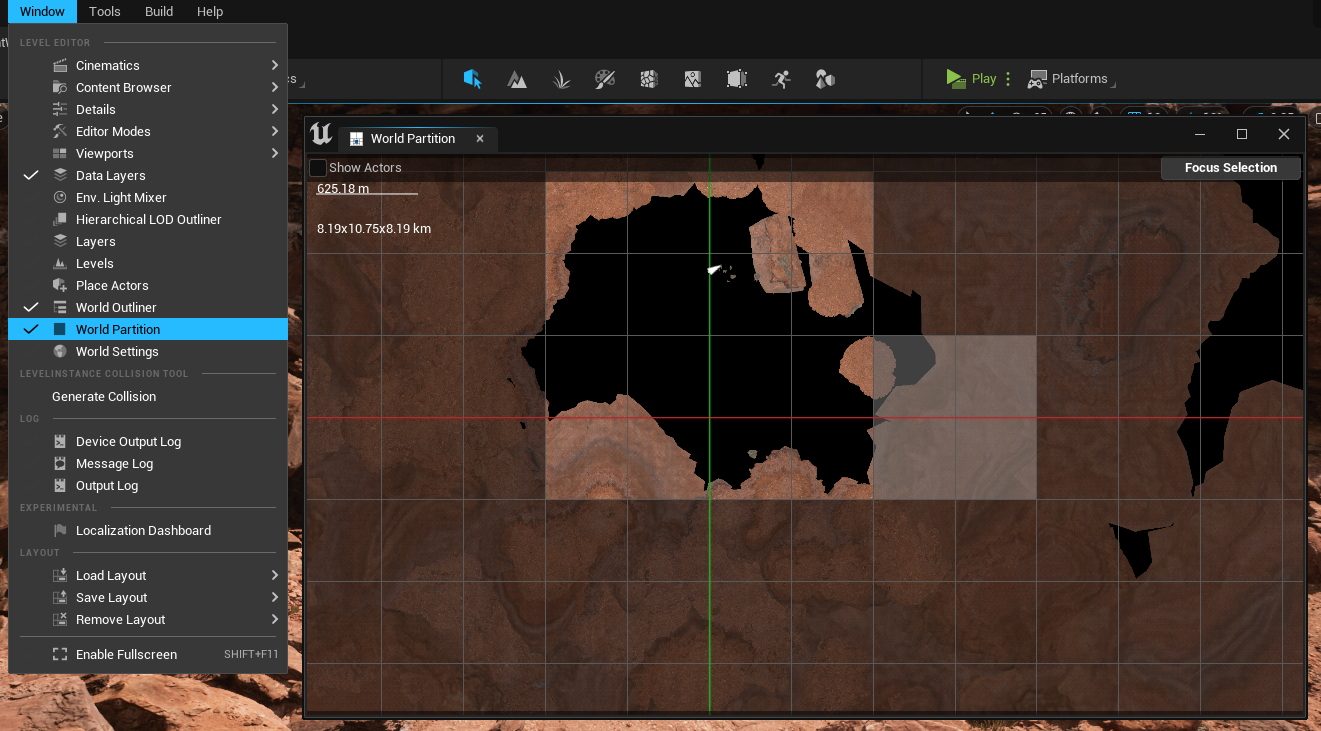
To navigate the world, click Window > World Partition. This will open the World Partition window, which displays a simplified map of your world.
You can use your mouse wheel to zoom in on different regions of the world, and you can click-drag through the cells in this map to select them. Right-click after selecting some cells, then click Load Selected Cells to load them up in the main viewport. Similarly, you can use Unload Selected Cells to remove cells that you do not want to be visible, reducing the load on your computer.
We recommend that you avoid loading all of the world partition cells at once, and that you load only the sections of the level that you want to view or edit. The number of cells you can load will depend on the amount of memory your system has available. See the World Partition section below for more details about this system.
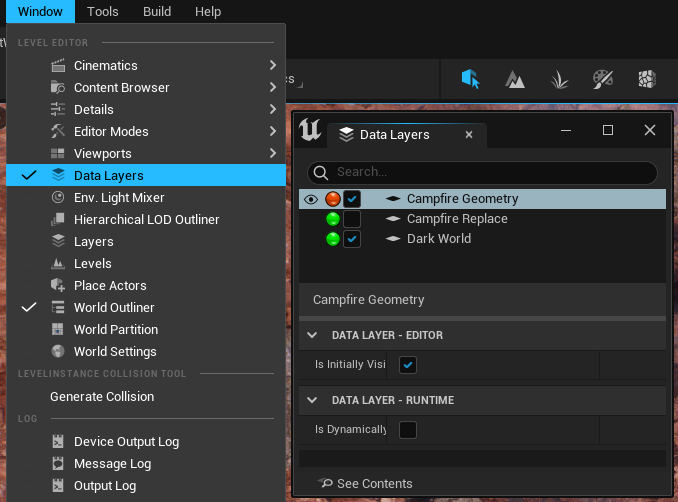
To view the layers that make up the dark and light worlds, click Window > Data Layers to bring up the Data Layers window.
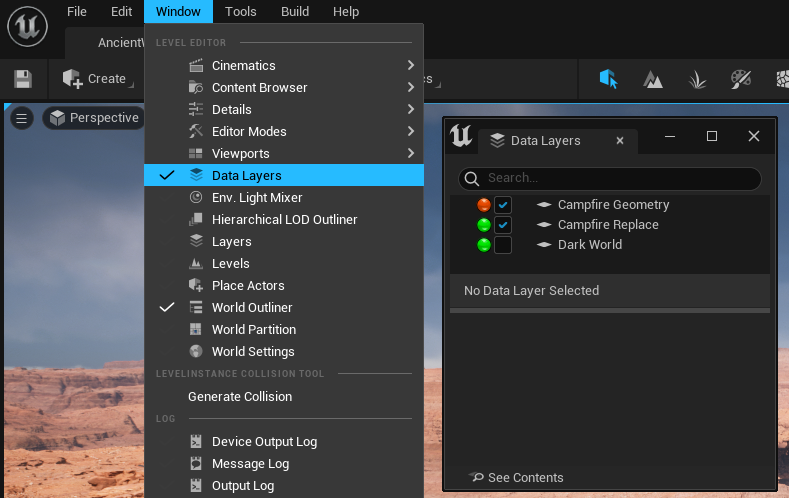
You can use this window to enable or disable any of the layers that make up the scene. To view the dark world, enable the Dark World data layer. To view the light world, enable the Campfire Replace, Foliage, and Hero Area Mountain Range data layers. The Campfire Geometry data layer should always be present. You can experiment with enabling and disabling these layers to compare both versions of the world.
More details about these systems, how they are implemented in the sample, and their workflow benefits are available in Collaboratively Constructing a Large World.
High-End Visuals, Fast Iteration
Unreal Engine 5 aims to provide not only a new standard in high-fidelity visuals, but also the most accessible pipeline for real-time high-resolution applications in the world. In this section, we will detail how UE5's new rendering features contributed to the level of detail in the Valley of the Ancient, as well as the speed and convenience of the team's process for constructing it.
A Direct Path to Quixel Megascans Assets
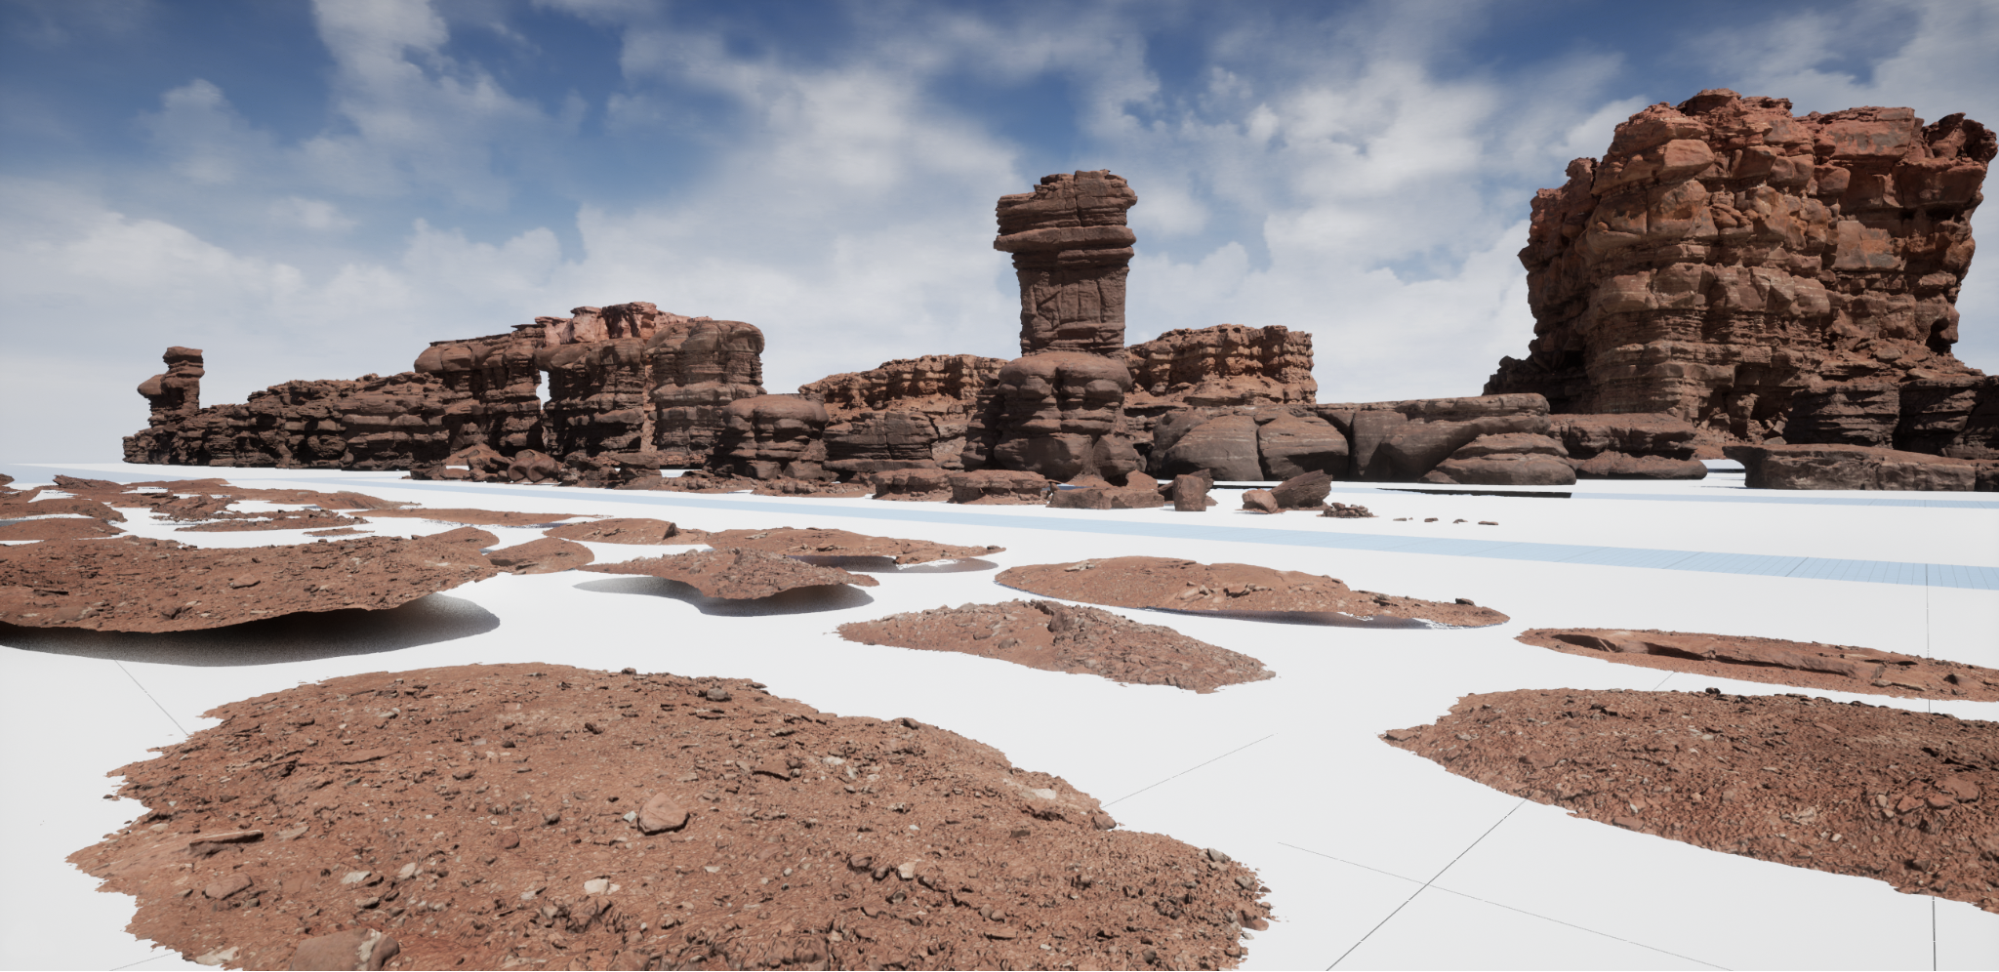
Quixel Megascans assets gathered from Moab, Utah make up the backbone of the static mesh and texture library for Valley of the Ancient, representing roughly 90% of the assets in the environment. These are located in the AncientContent > Megascans folder inside the Content Drawer.
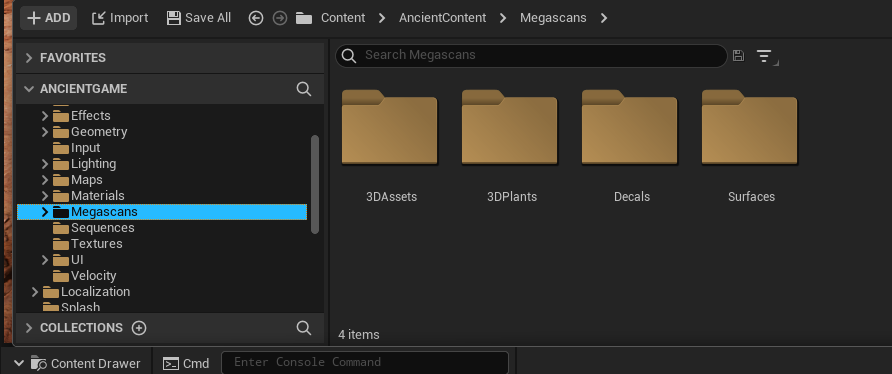
All of these are available in the Canyons of Utah Megascans pack. Moreover, Quixel Bridge is now integrated directly into Unreal Editor, removing the need for any external programs when importing or managing Megascans assets. UE5 automatically generates the needed material instances and meshes, and they can be used directly in-game. In the sections below, you will see not only how easily UE5 handles these high-resolution assets, but also how its tools gave the environment art team an impressive range of flexibility in crafting the landscape.
Nanite Virtualized Geometry
None of these assets use traditional LODs or require additional optimization. Instead, all of them have Nanite enabled. Nanite streams static mesh assets from disk, then represents them using virtualized geometry, dynamically scaling the number of polygons they use based on the resolution of the user's viewport. Virtual texturing behaves similarly for texture detail. This representation changes as the user moves through a scene, updating the level of detail on the fly. Closer objects receive more detail, while farther objects receive less -- but the total detail onscreen is roughly uniform.
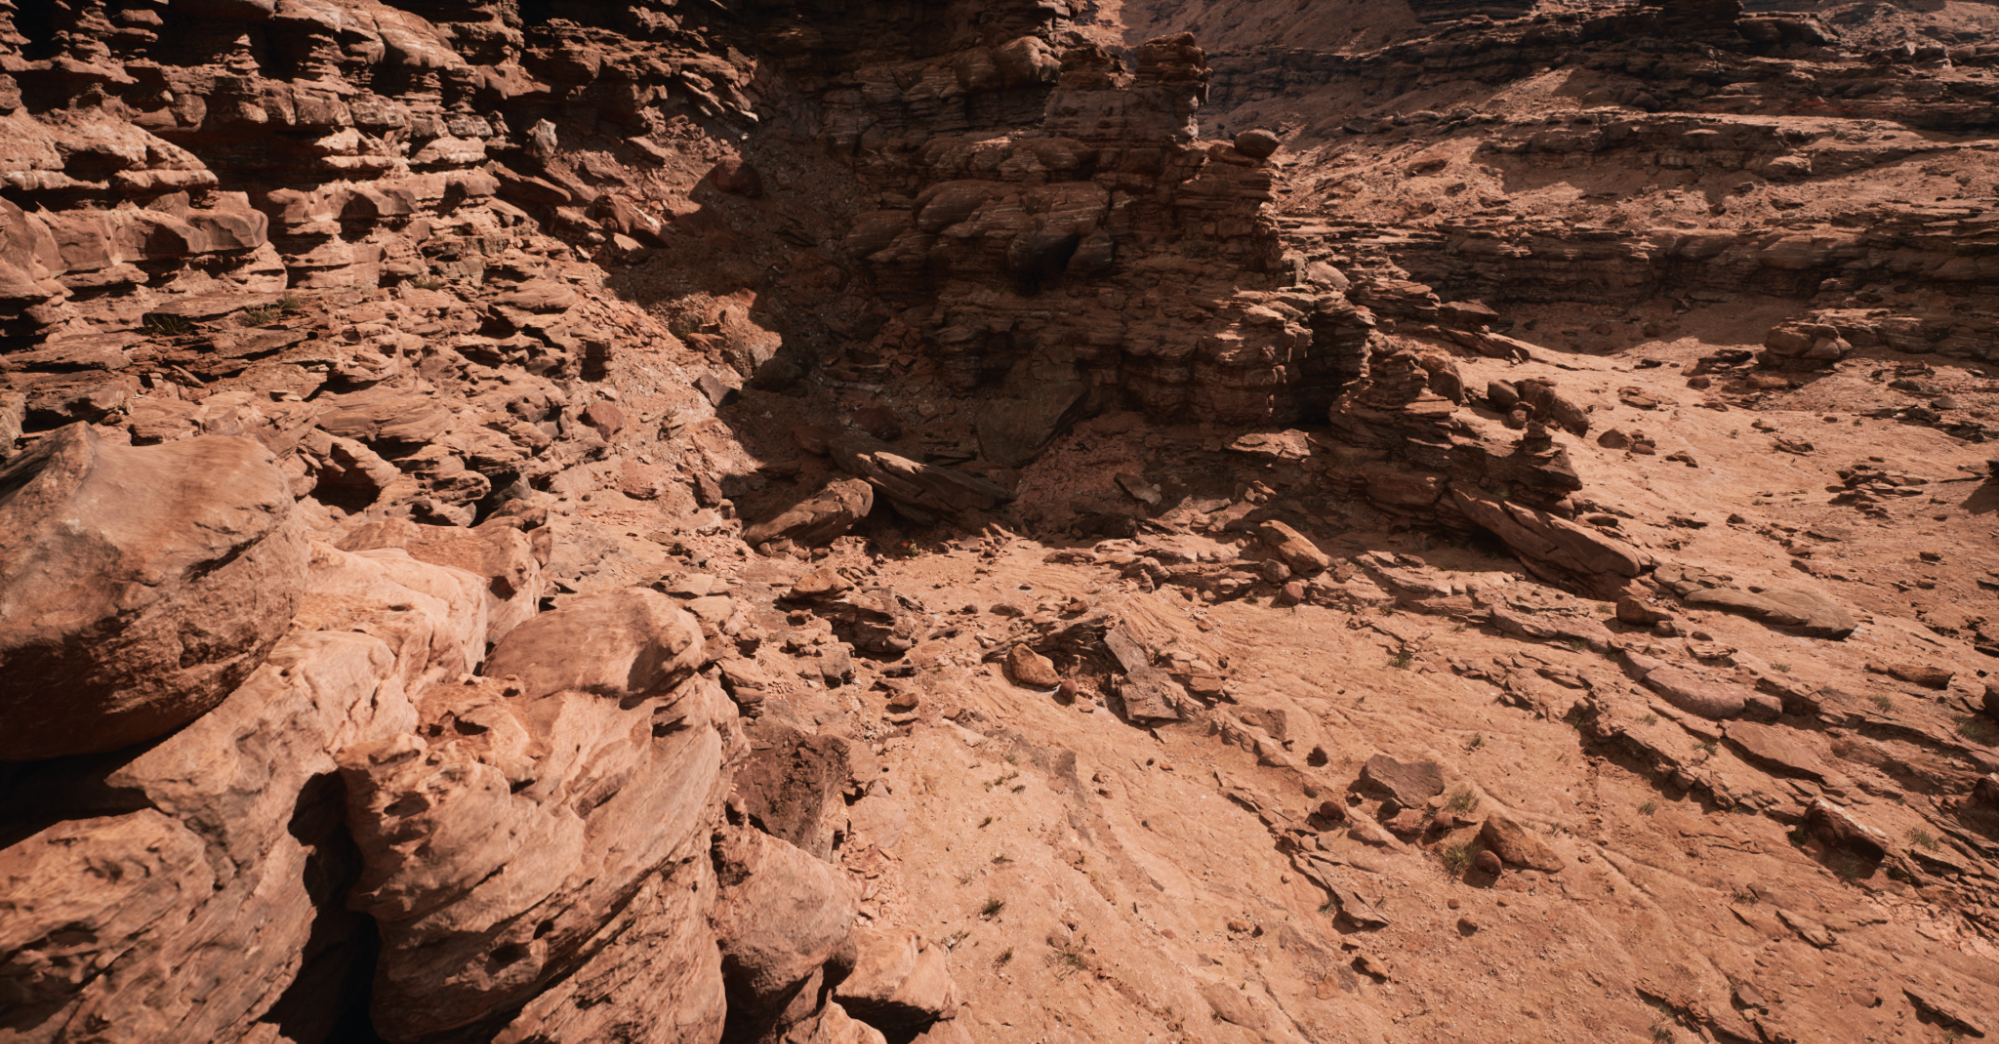
Thanks to Nanite, the Valley of the Ancient environment can use hundreds of incredibly polygon-dense Megascans assets directly in the scene without any additional preparation. Even cliff faces weighing in at tens of millions of polygons and using massive textures render instantly, with no additional setup necessary on the part of technical artists. Even a high-polygon Zbrush sculpt can be used directly in a game.
To see Nanite in action, click the View Mode dropdown and change it from Lit to Nanite Visualization > Triangles.
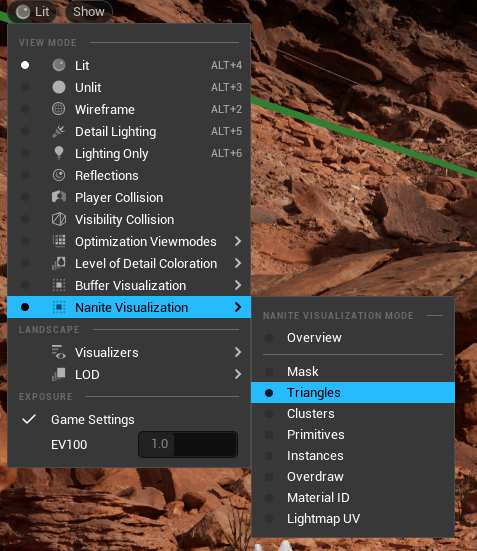
This will display the triangle output from Nanite in real time.
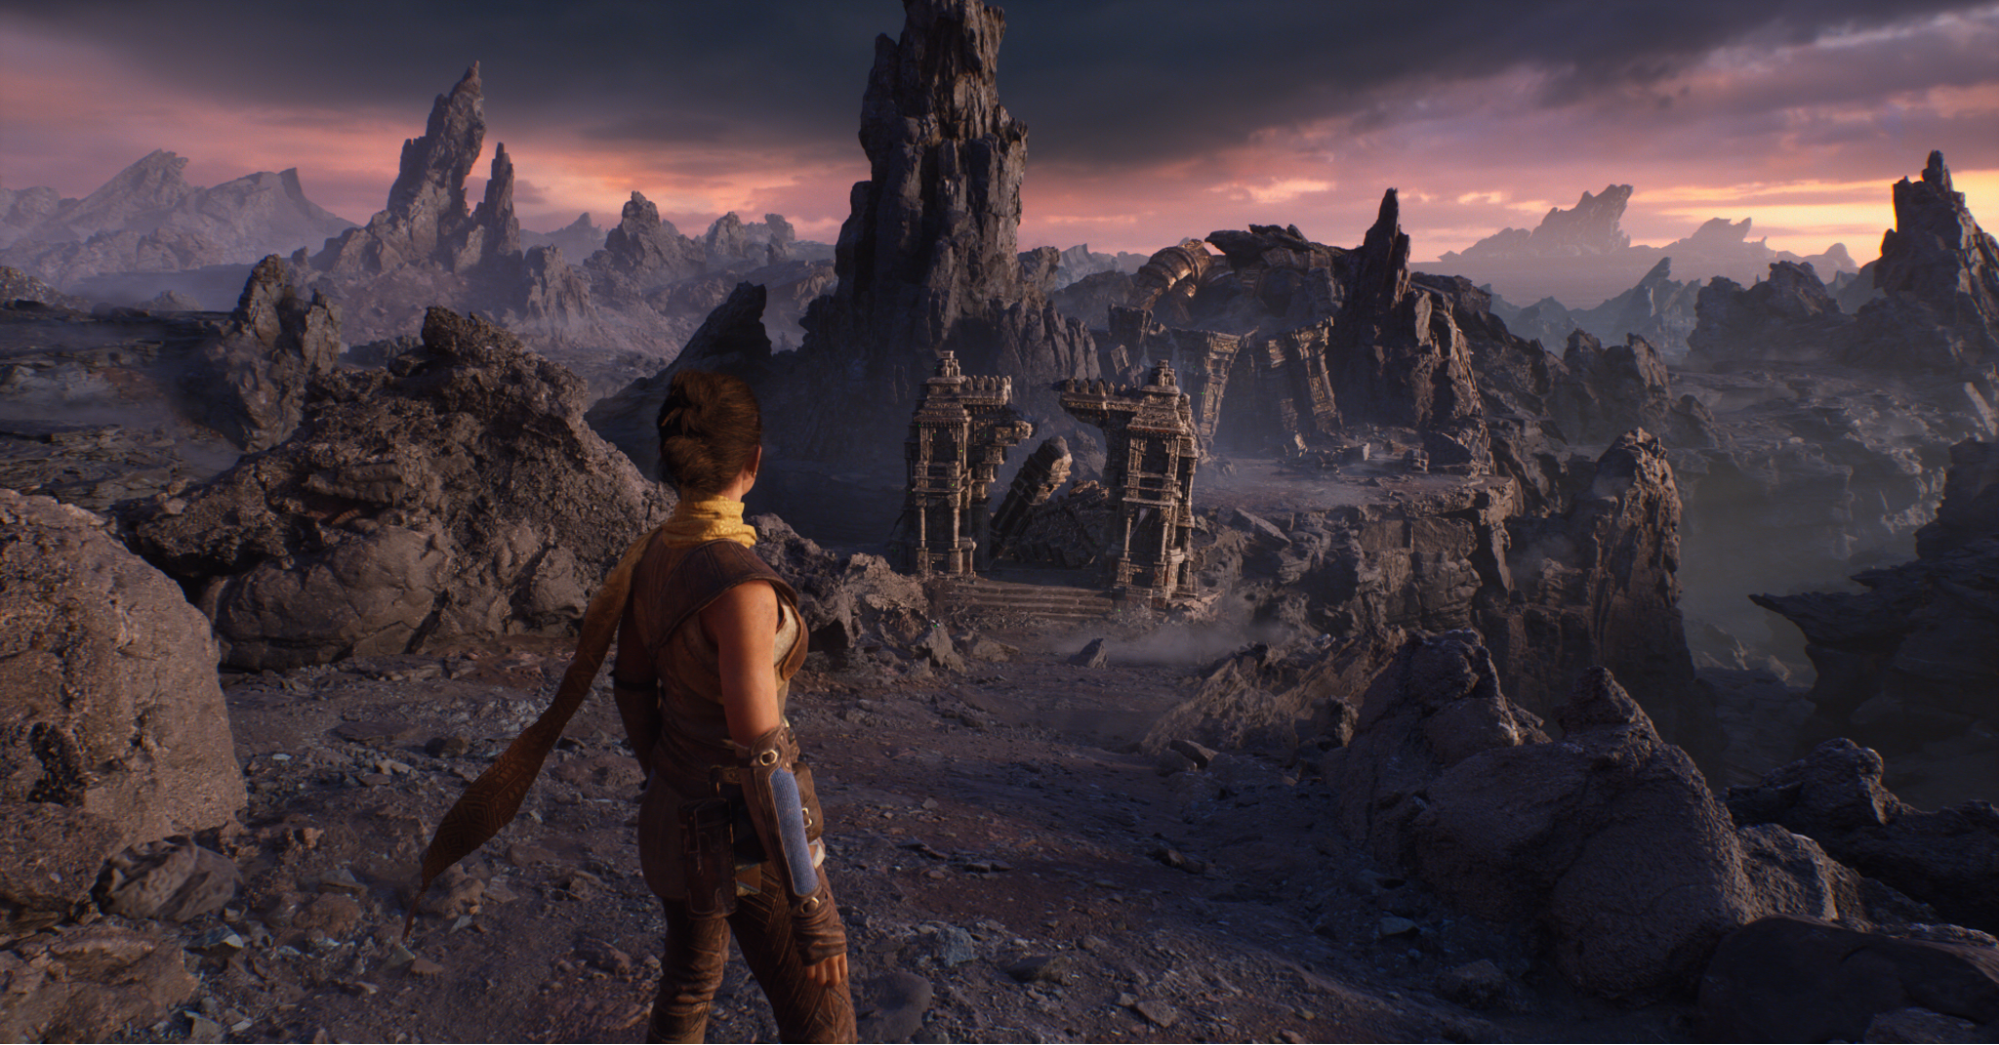
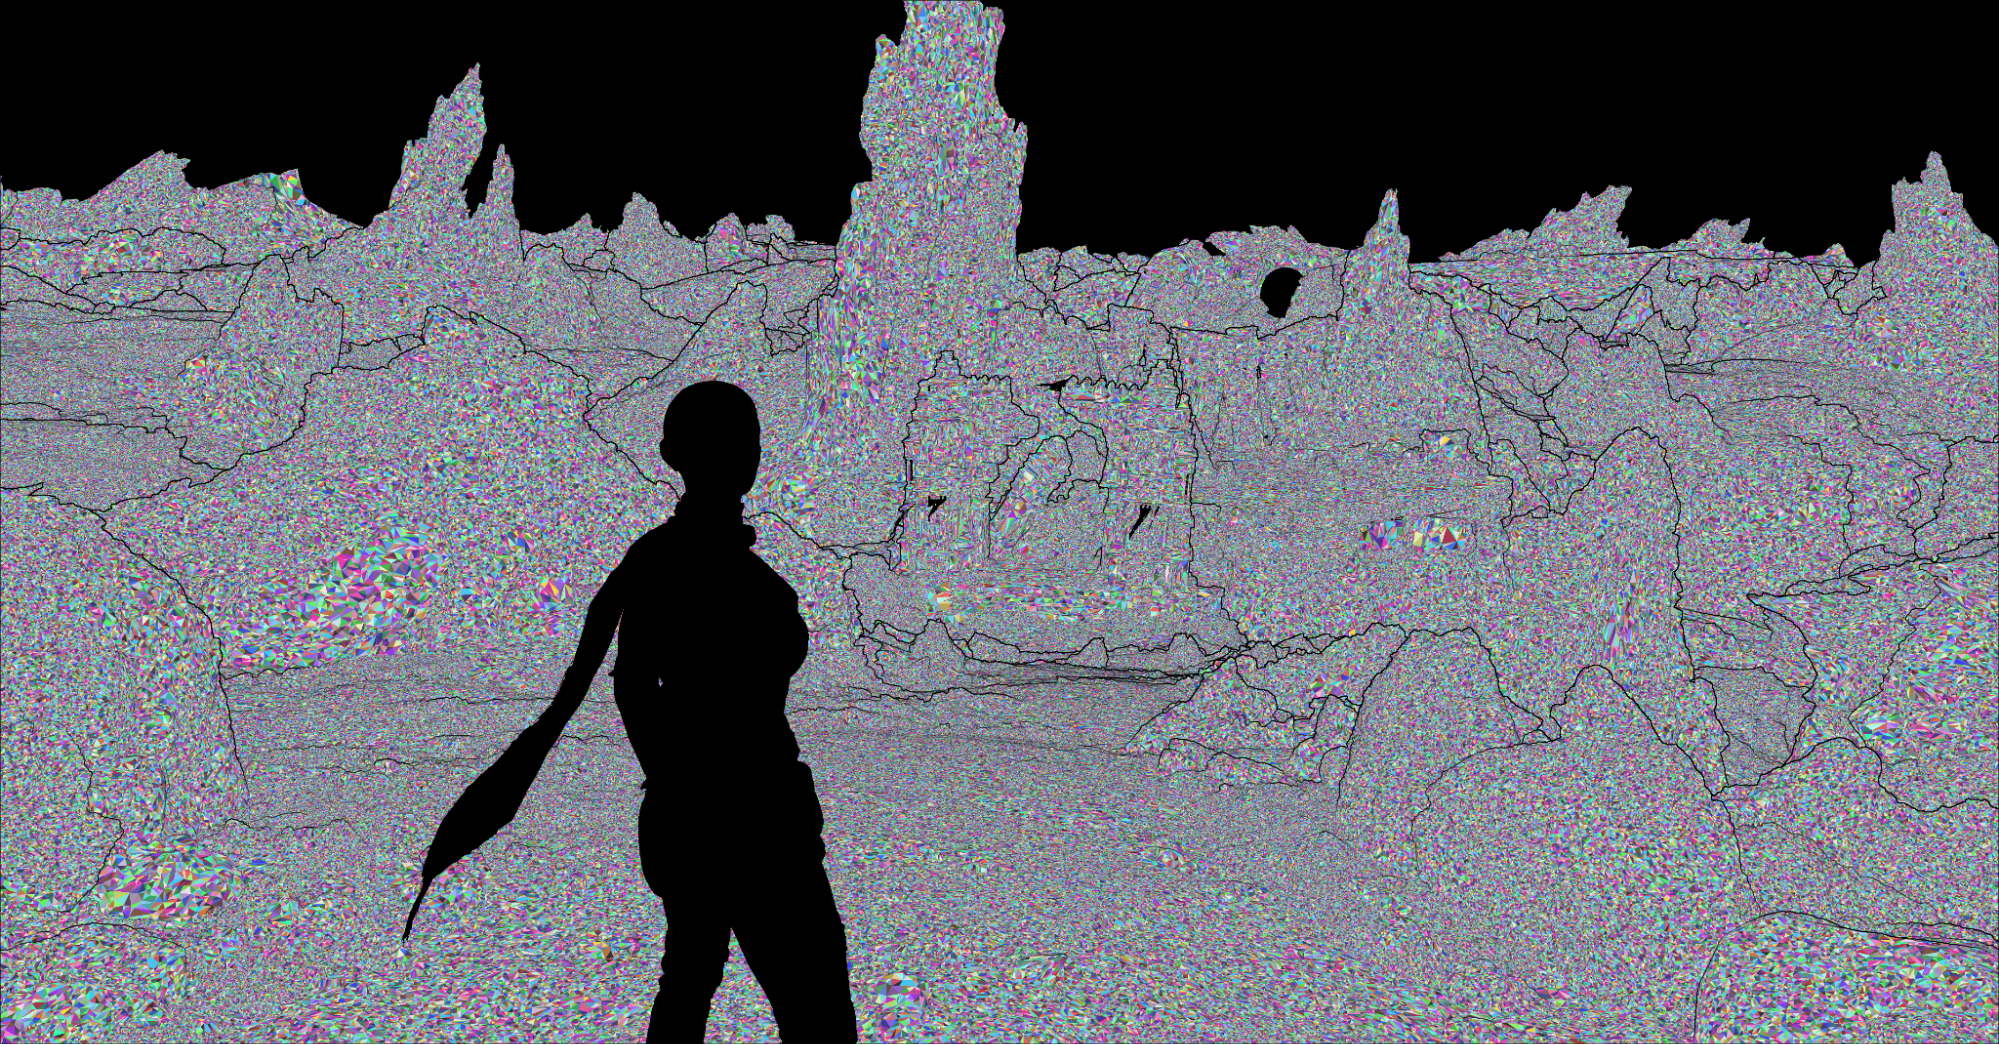
Nanite does not support deformations, so it functions only with static meshes. However, this is more than enough to vastly simplify the pipeline for developing environments. Meanwhile, although Nanite can not use skeletal deformations, the towering Ancient One in the finale uses static meshes attached to a skeletal mesh, taking advantage of Nanite to render its ultra-high-resolution armor.
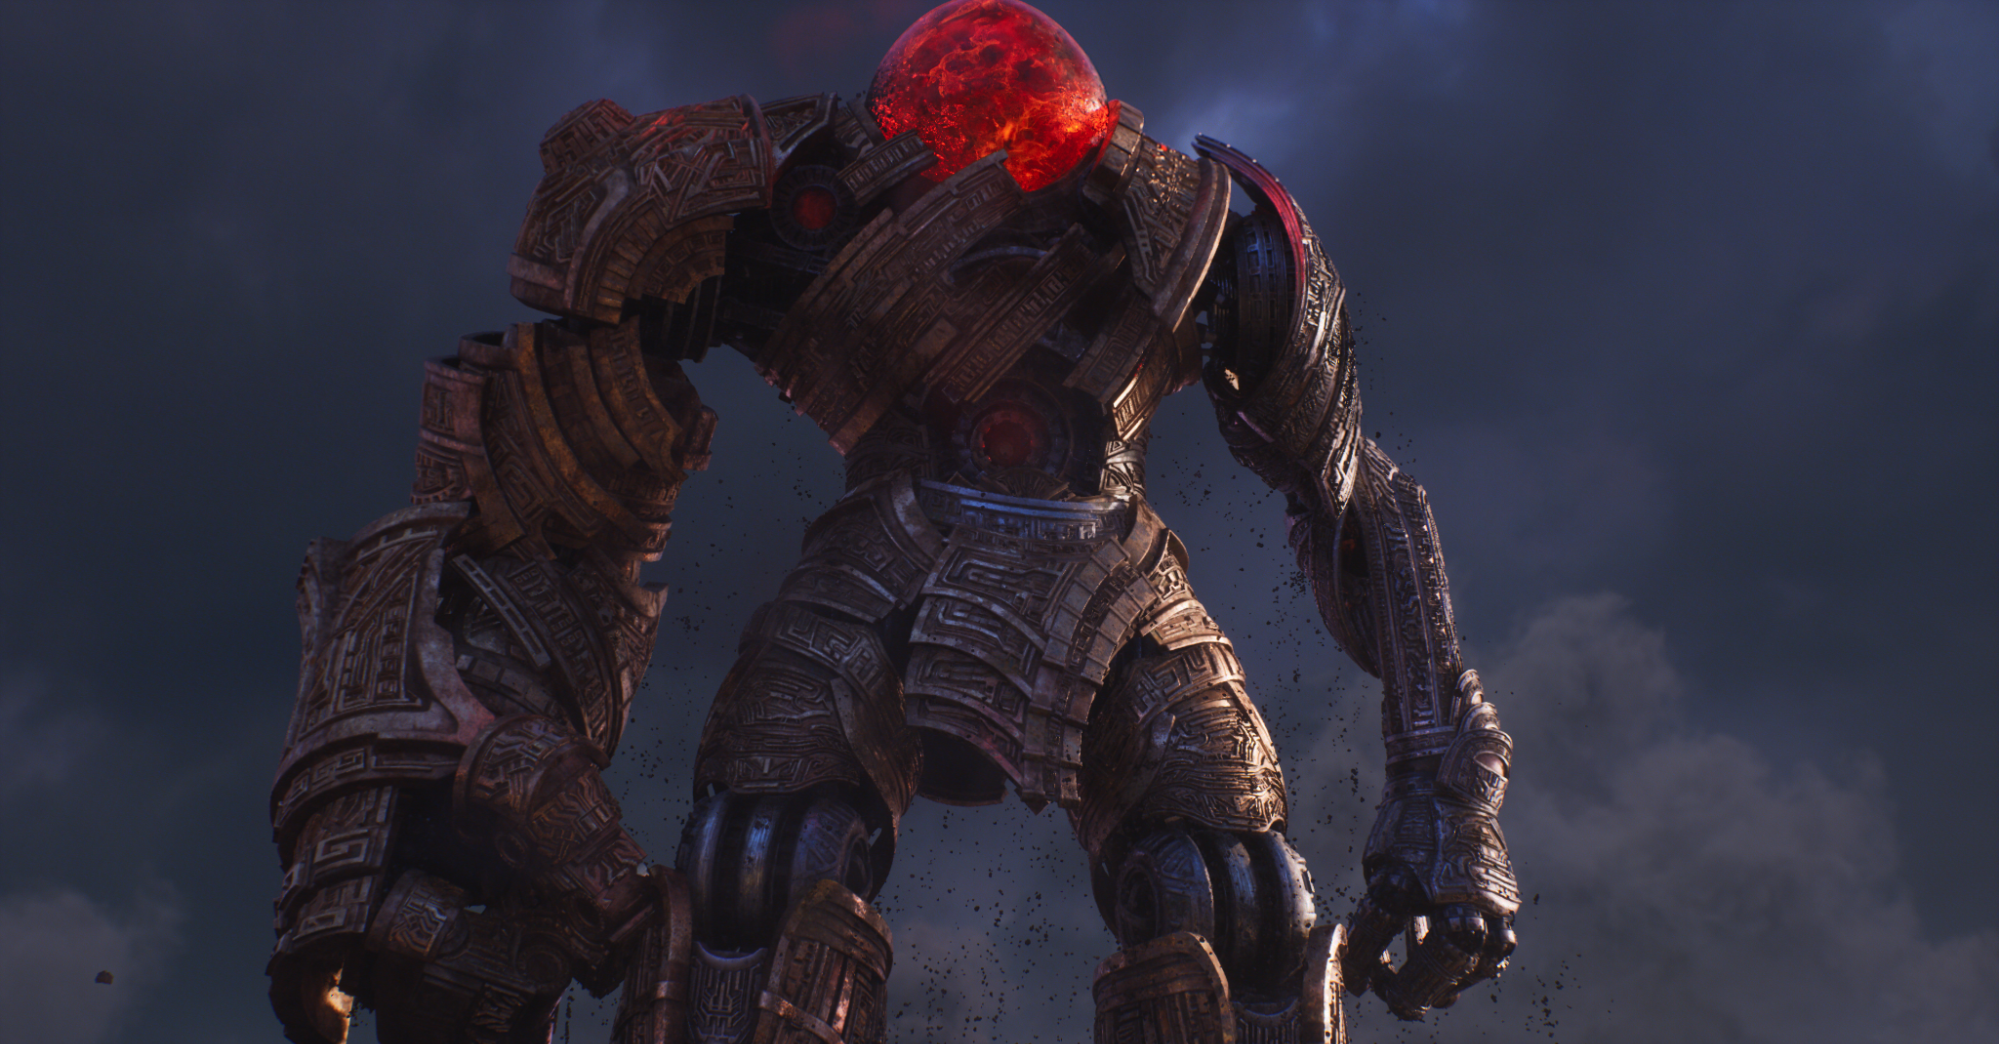
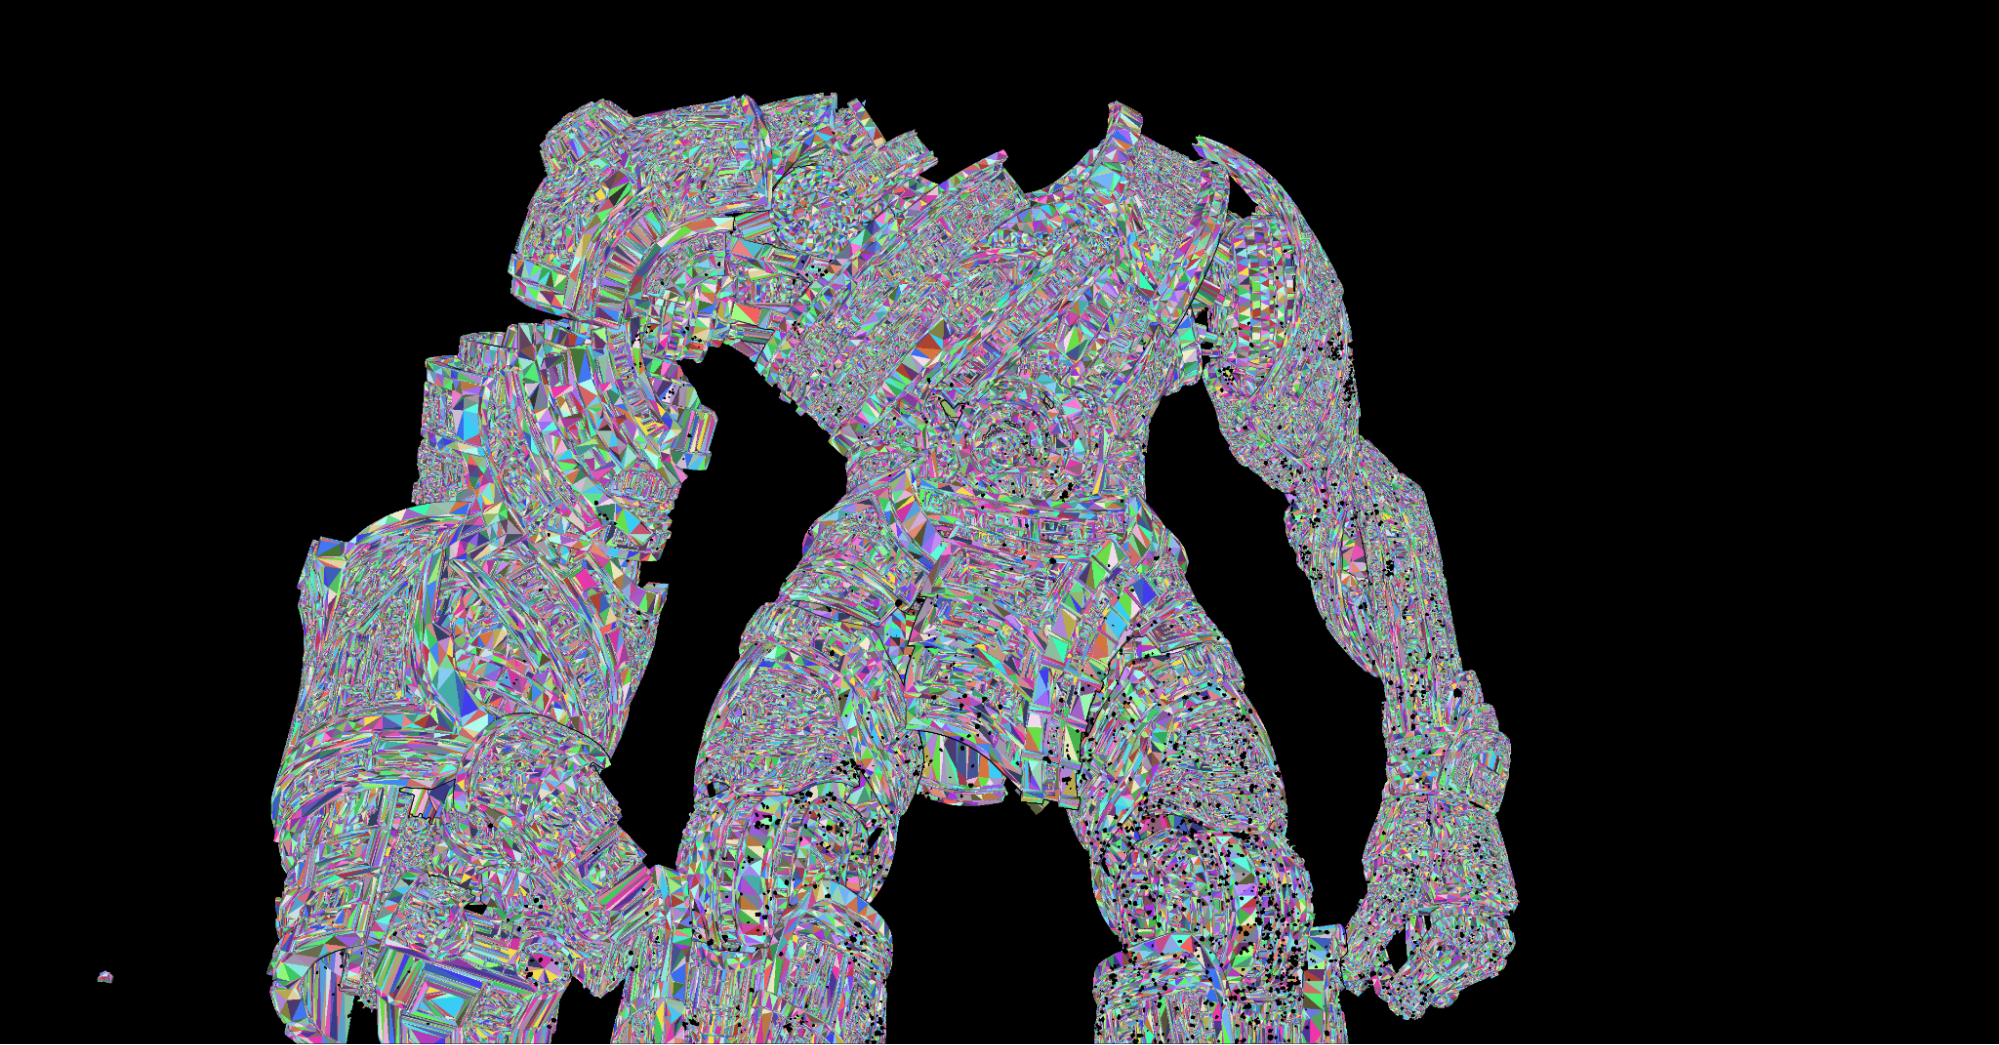
For more information about how to use and configure Nanite, refer to the Nanite documentation.
Lumen Global Illumination
Lighting for this detailed valley is powered by Lumen, Unreal Engine 5's new fully dynamic global illumination and reflections system. Lumen creates dynamic, believable scenes where indirect lighting adapts to changes in direct lighting and geometry, combining new and old techniques to achieve high-quality real-time results. Lumen is built with next-generation consoles and high-end PCs in mind, and is targeting 30-60 FPS on these platforms when Unreal Engine 5.0 ships.
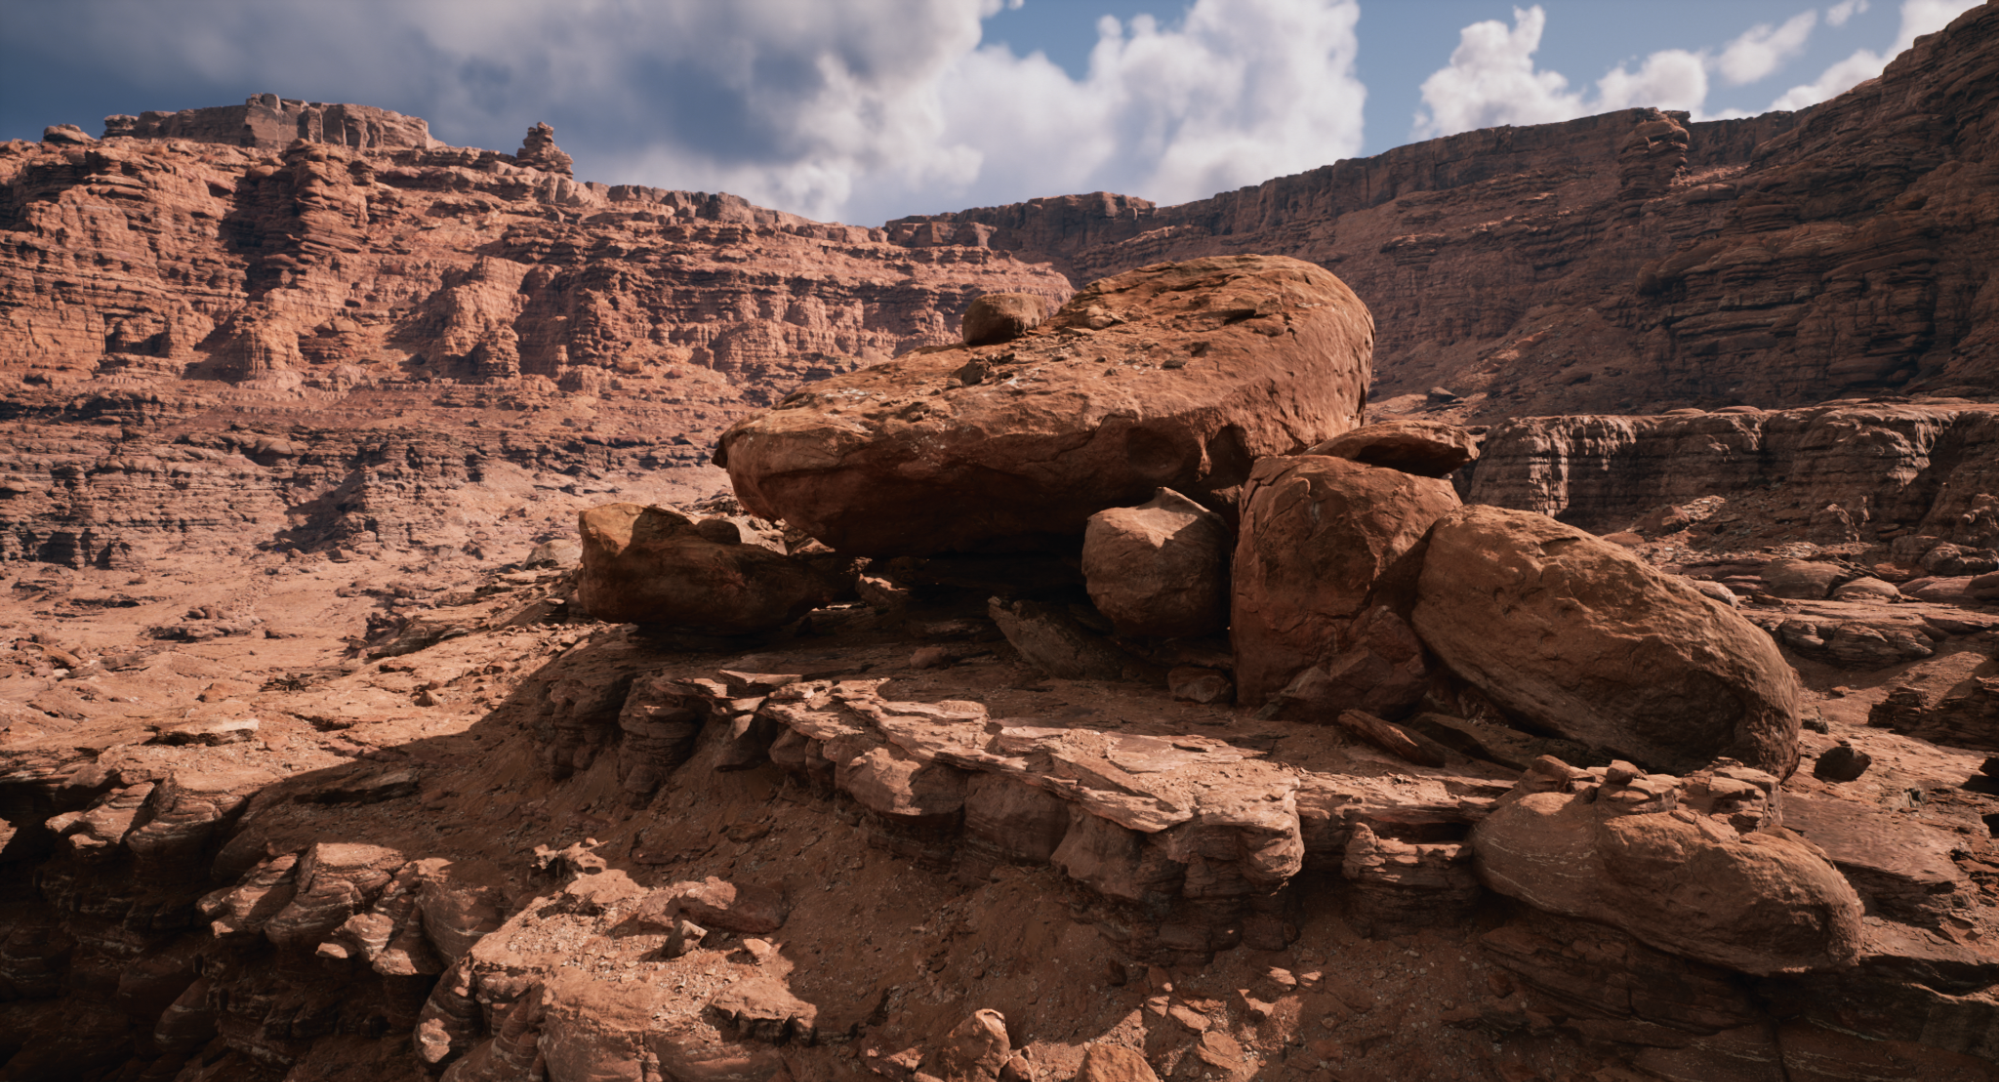
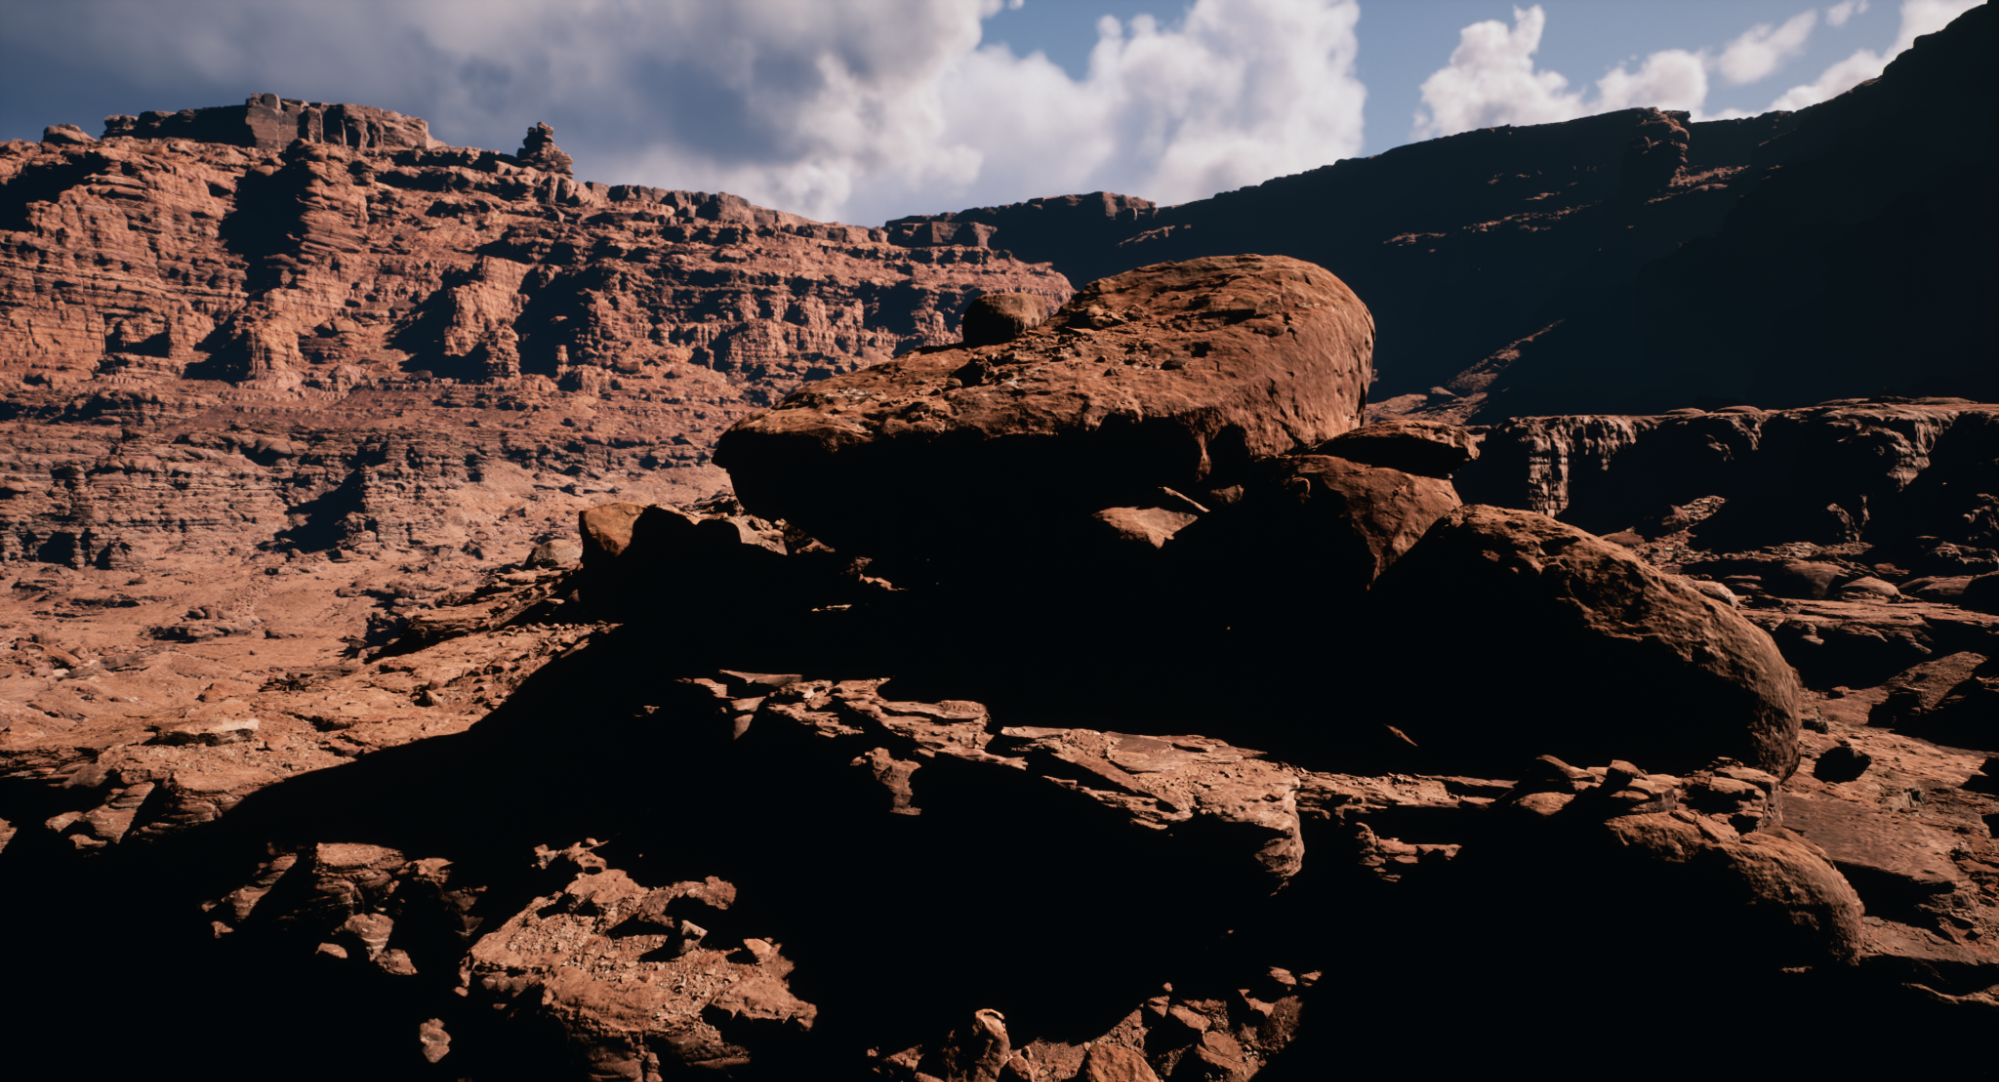
Lumen is scalable, and supports a wide range of DX11 and DX12-capable hardware using Software and Hardware Ray Tracing modes. Valley of the Ancient uses Software Ray Tracing, which combines Screen Traces (or screen space tracing) with a Surface Cache representation to generate indirect lighting in the scene. Lumen uses Screen Traces to cover the mismatch that can happen with the lower quality Surface Cache, which is generated from the individual mesh's Signed Distance Field. You can visualize the Surface Cache using Show > Visualize > Lumen Scene. The Surface Cache only operates for the first 200 meters before falling back to screen traces for the distance scene.
Lumen is versatile and has quality options that enable it to work with both Nanite's virtualized geometry and traditional Static Mesh geometry, and screen traces enable skinned meshes to receive and contribute to indirect lighting, but they are limited by what's visible on screen. You can visualize Lumen's combined techniques by clicking Show > Visualize > Lumen Global Illumination inside an editor viewport.
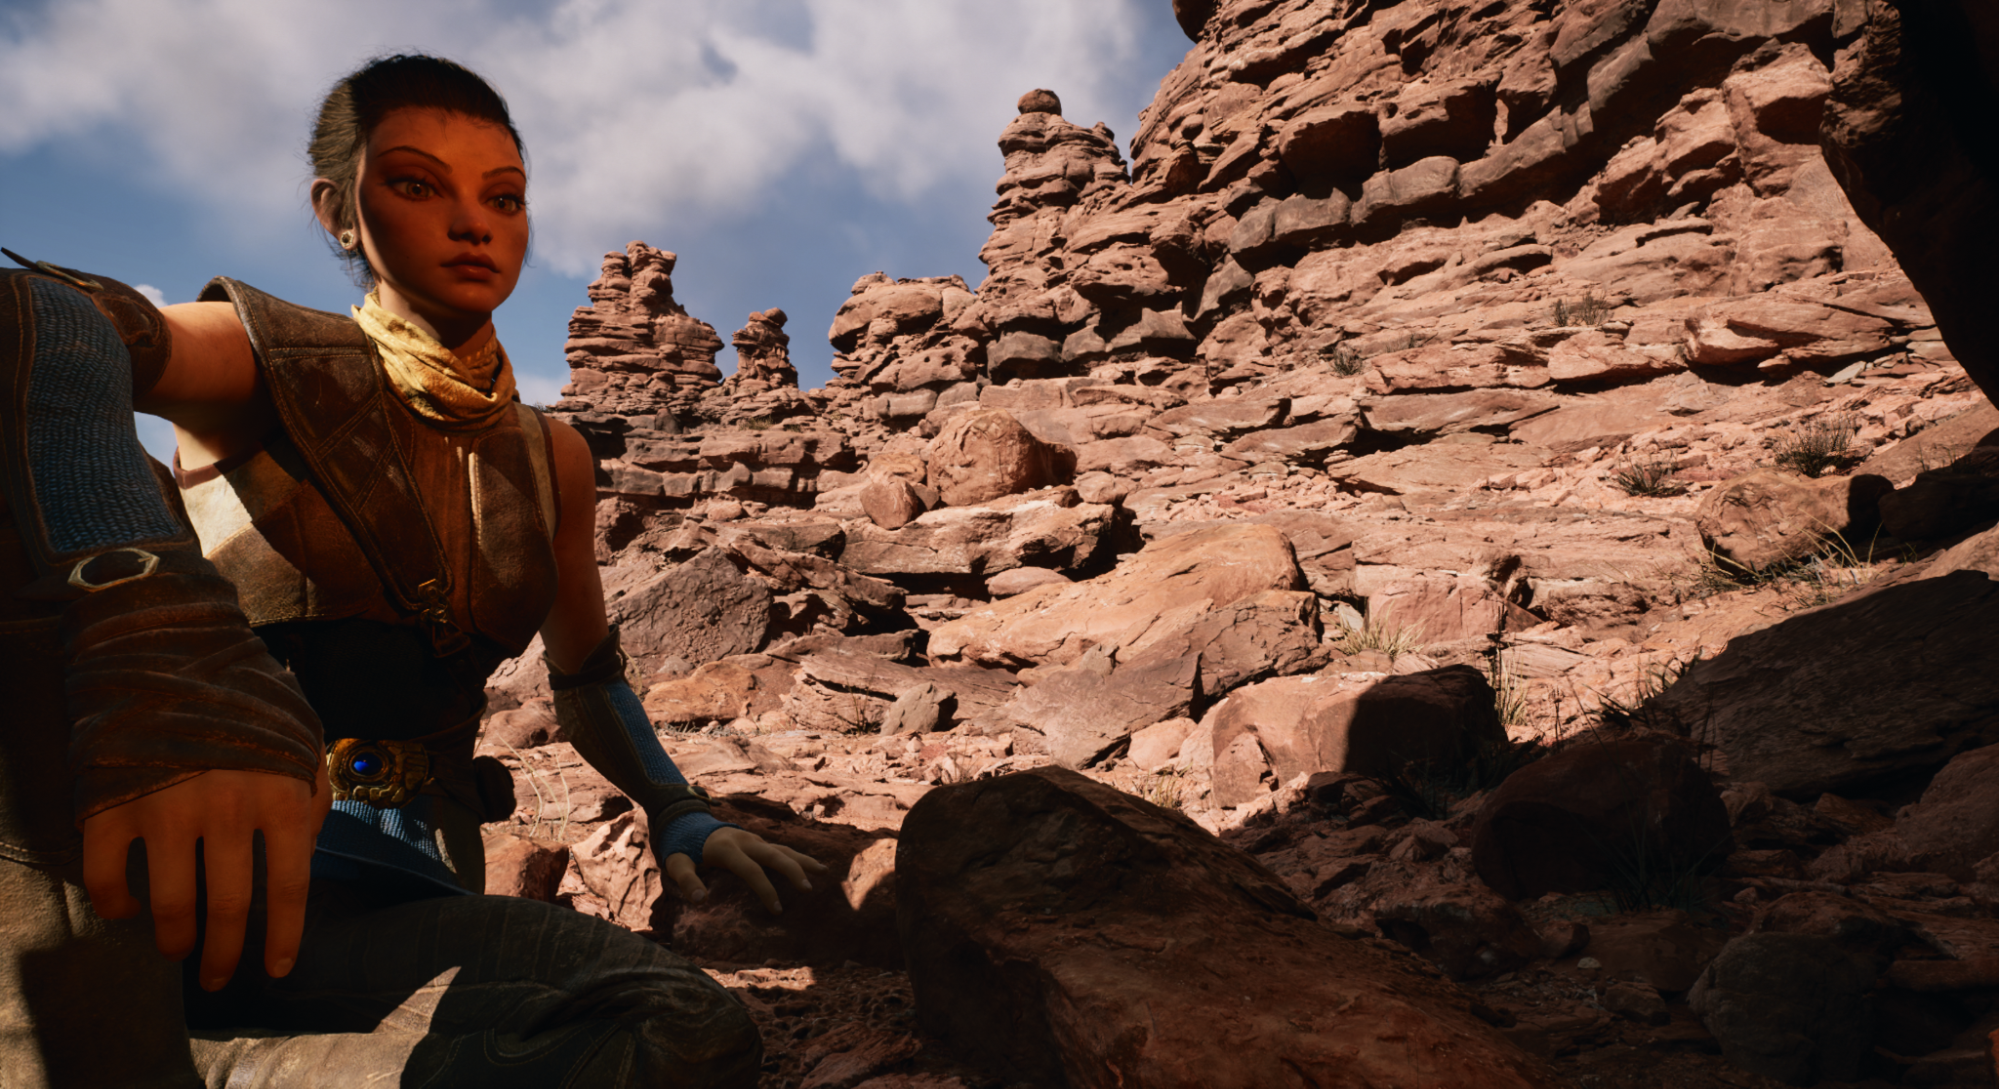
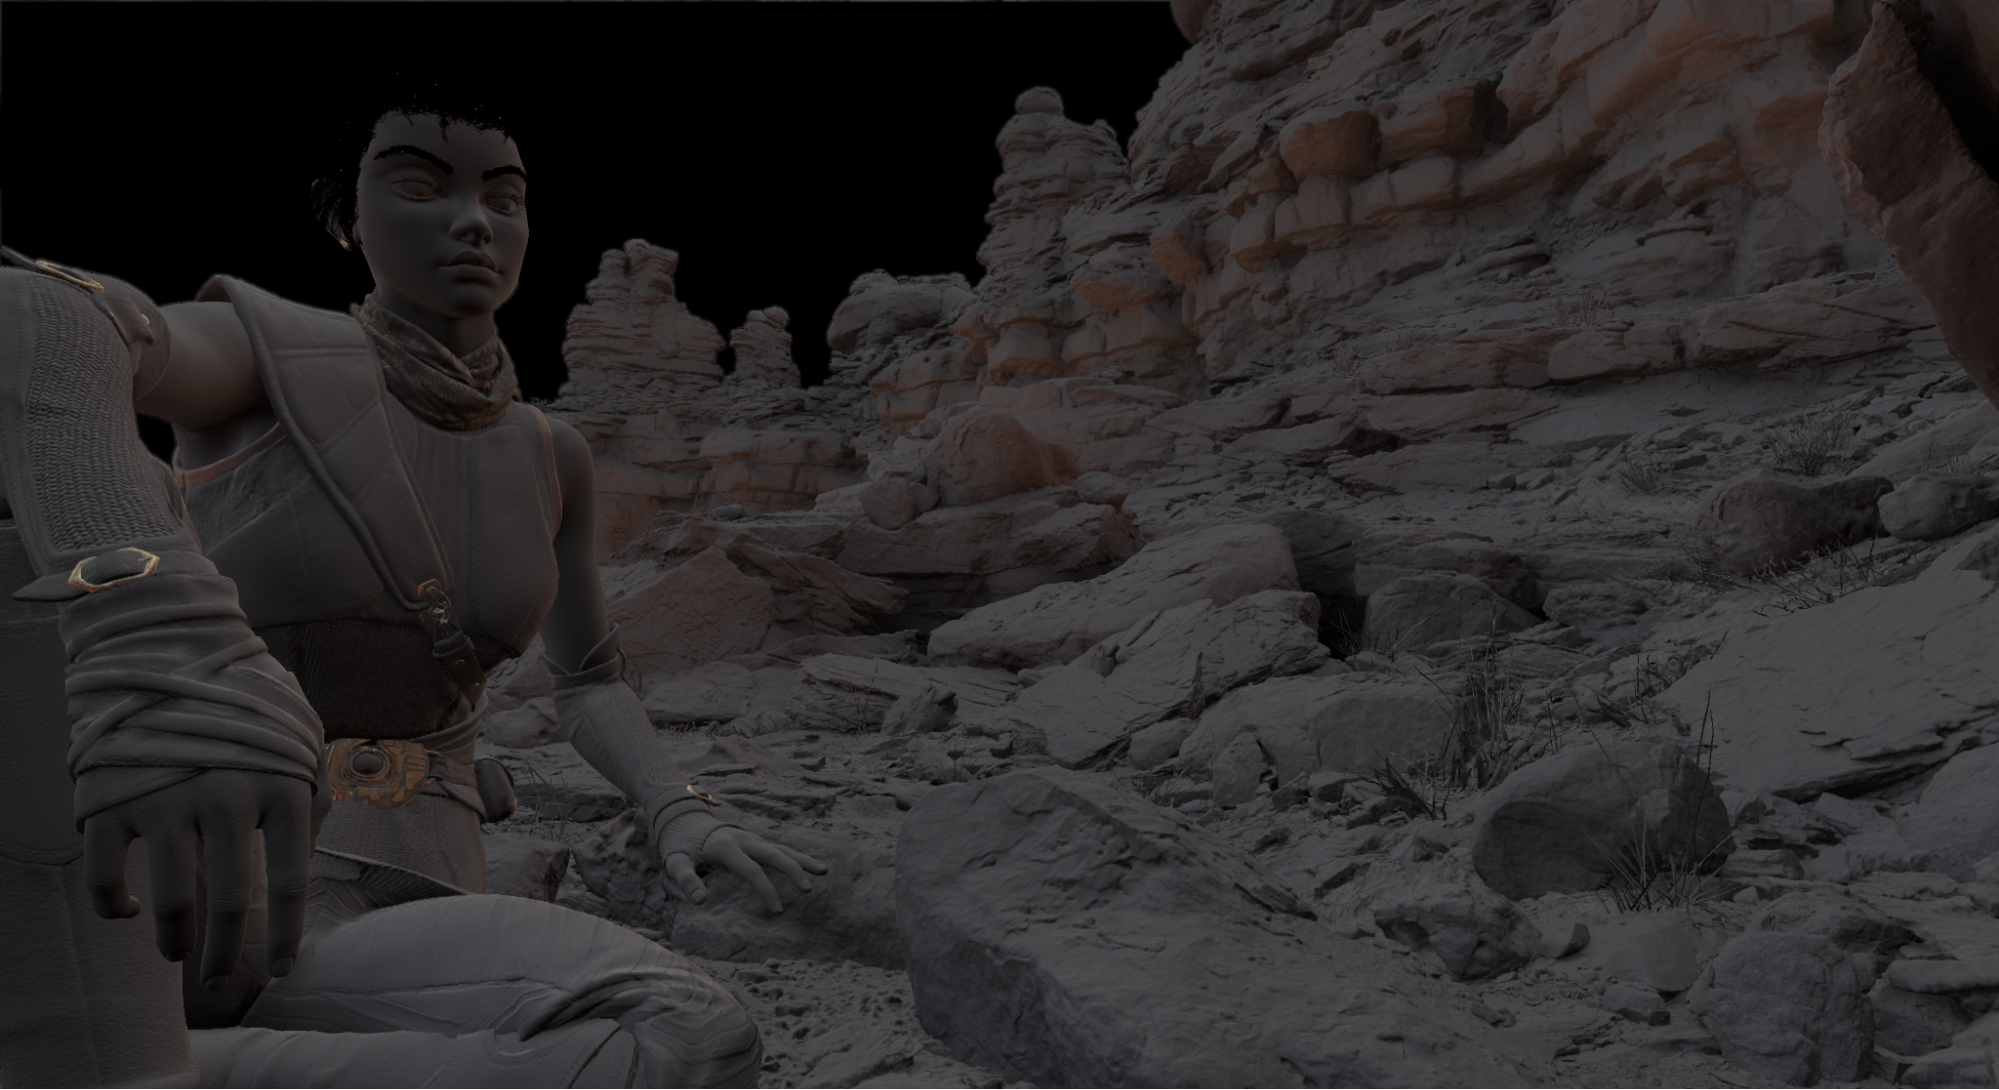
Lumen works with all movable light sources, including emissive materials as light sources. Skylighting uses Lumen's Final Gather for sky shadowing, which allows indoor areas to be much darker than outdoor areas, and helps bring out lightly-colored surfaces that reflect more light.
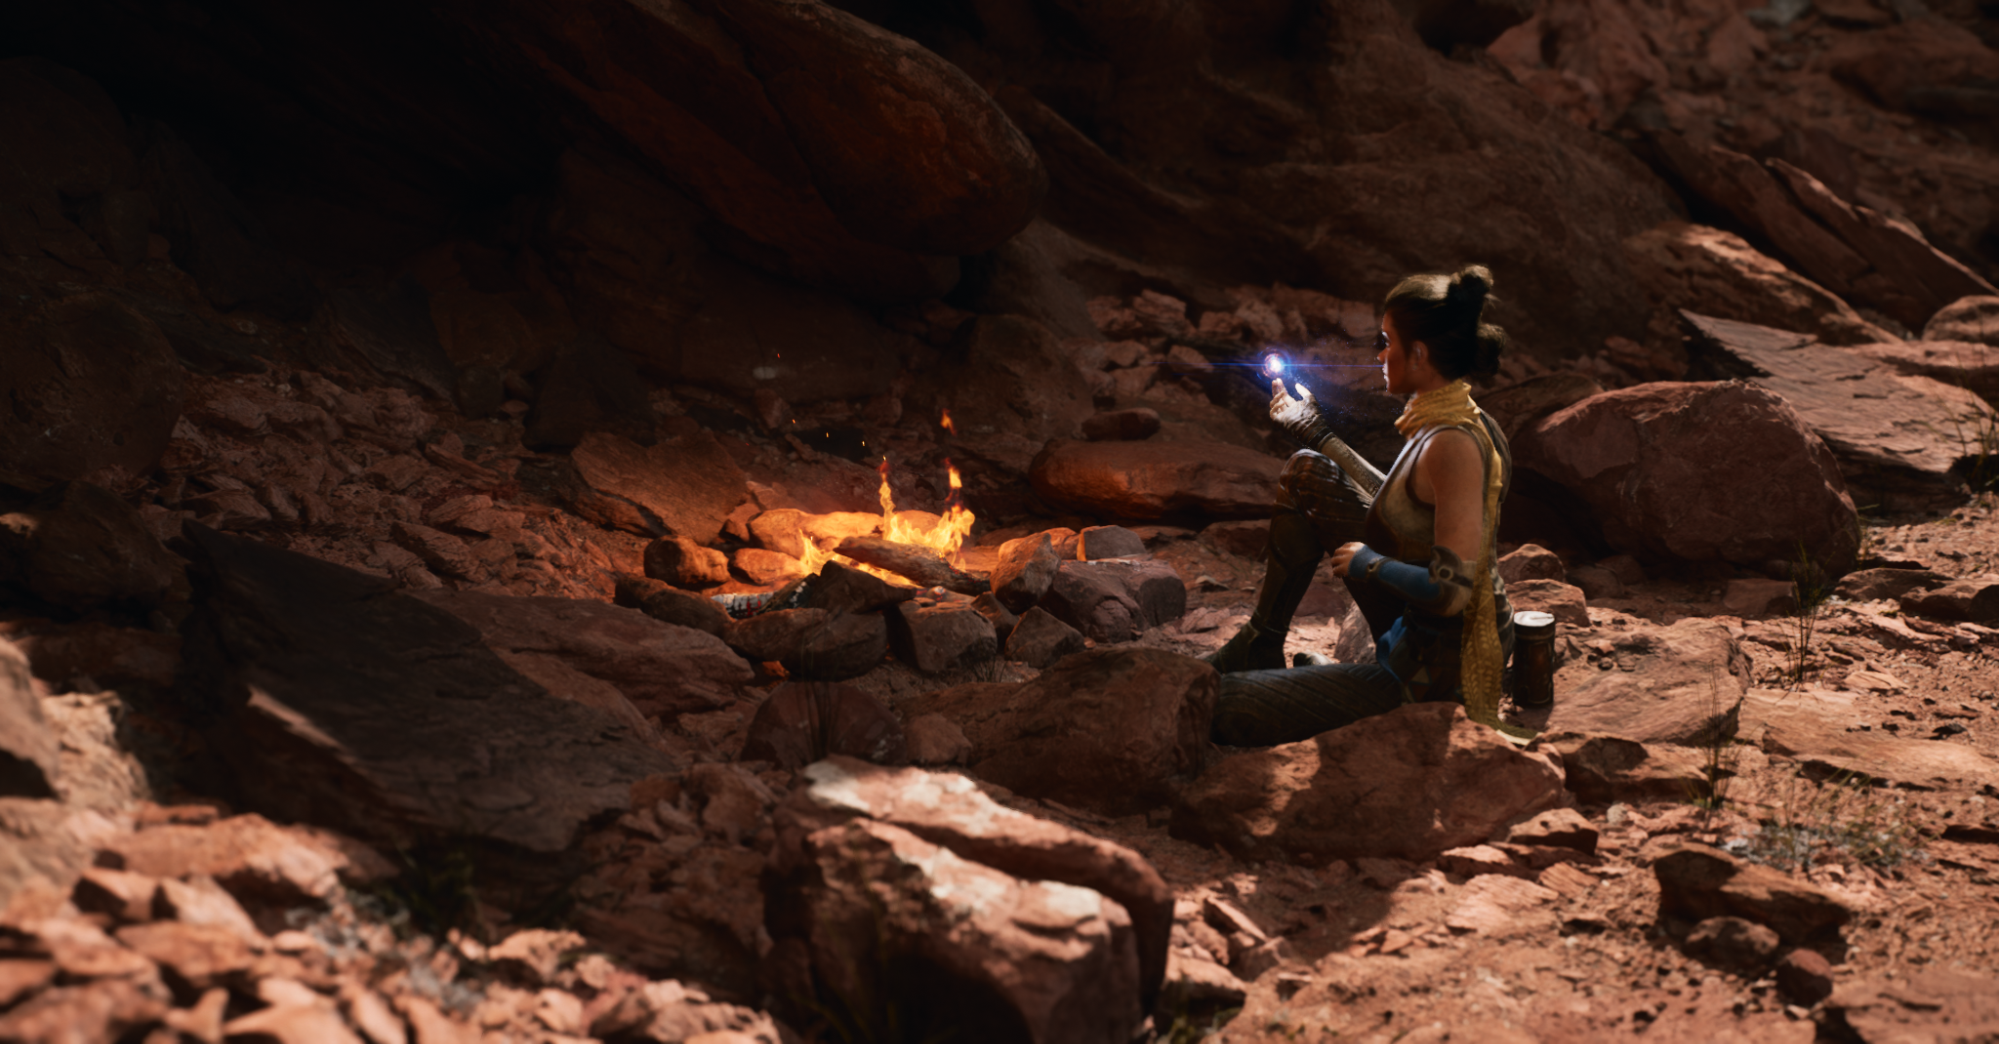
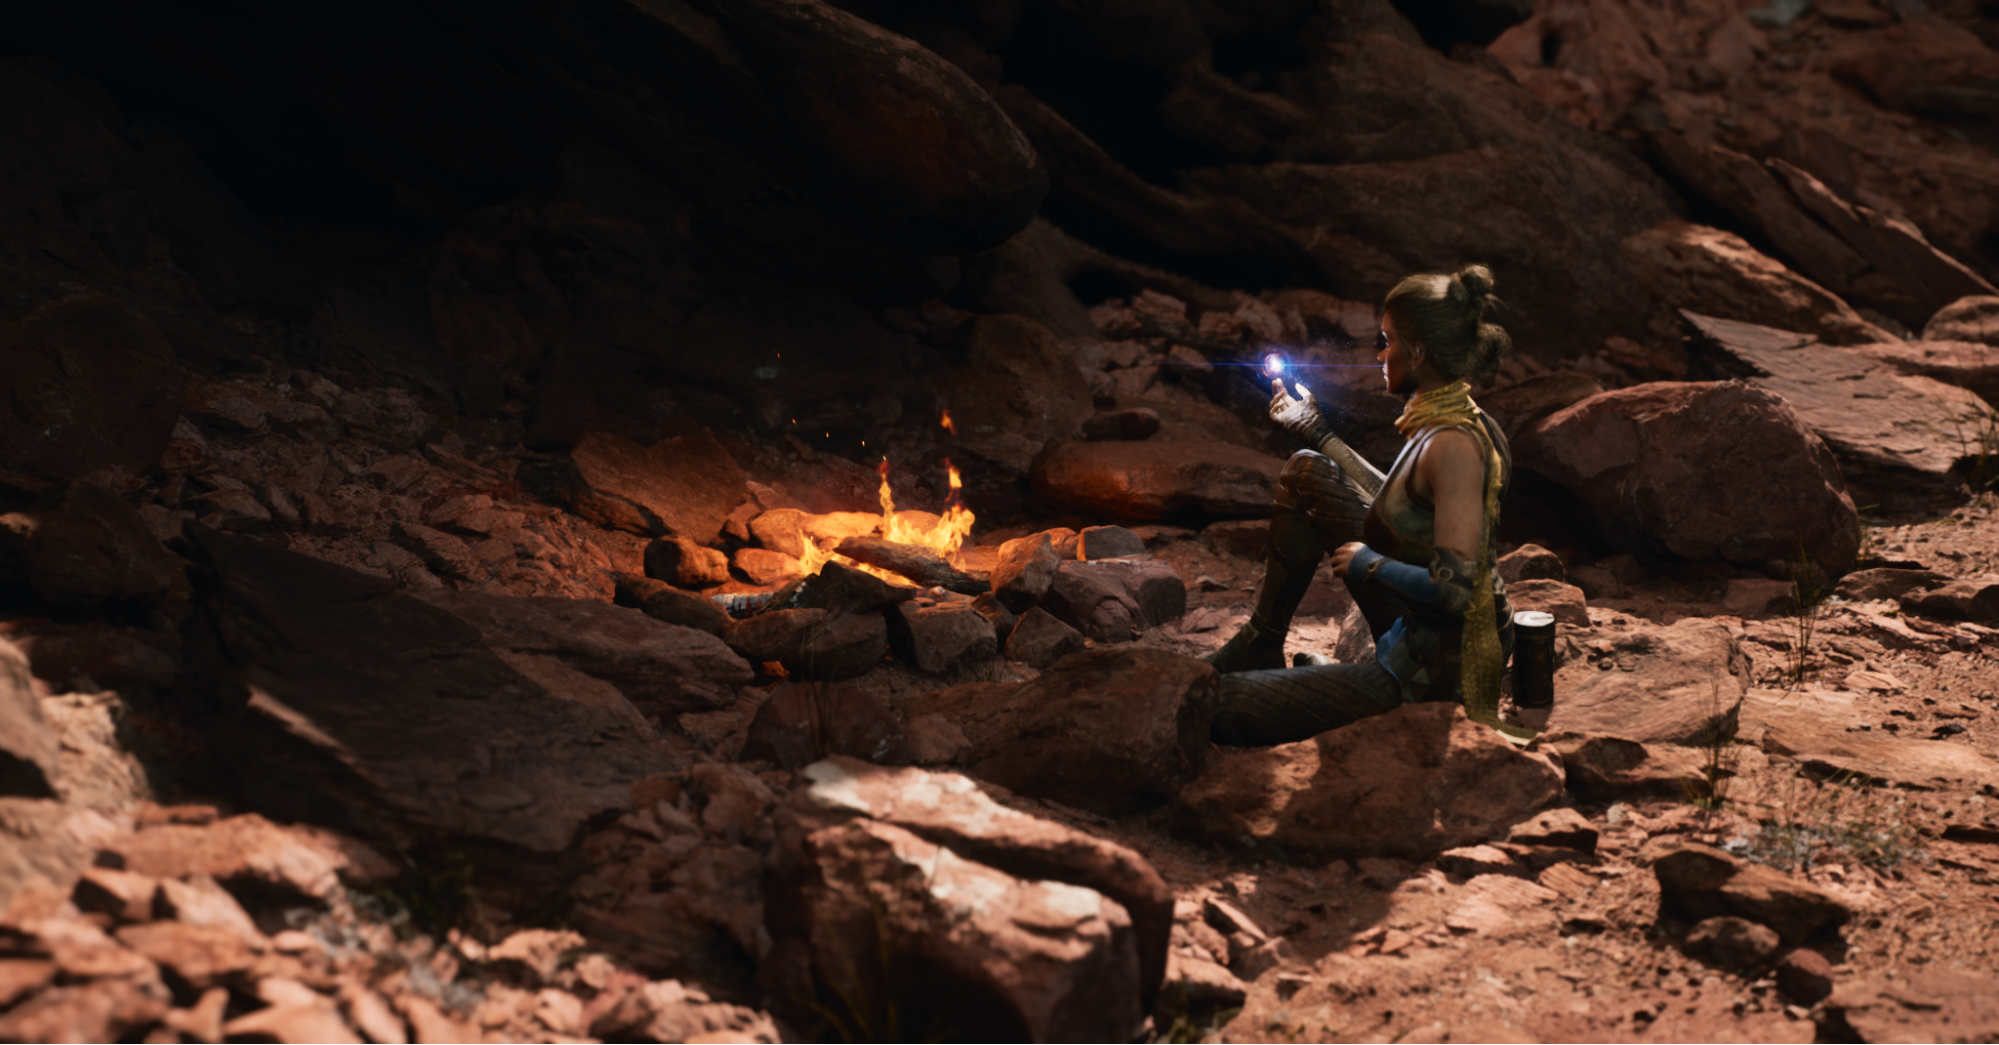
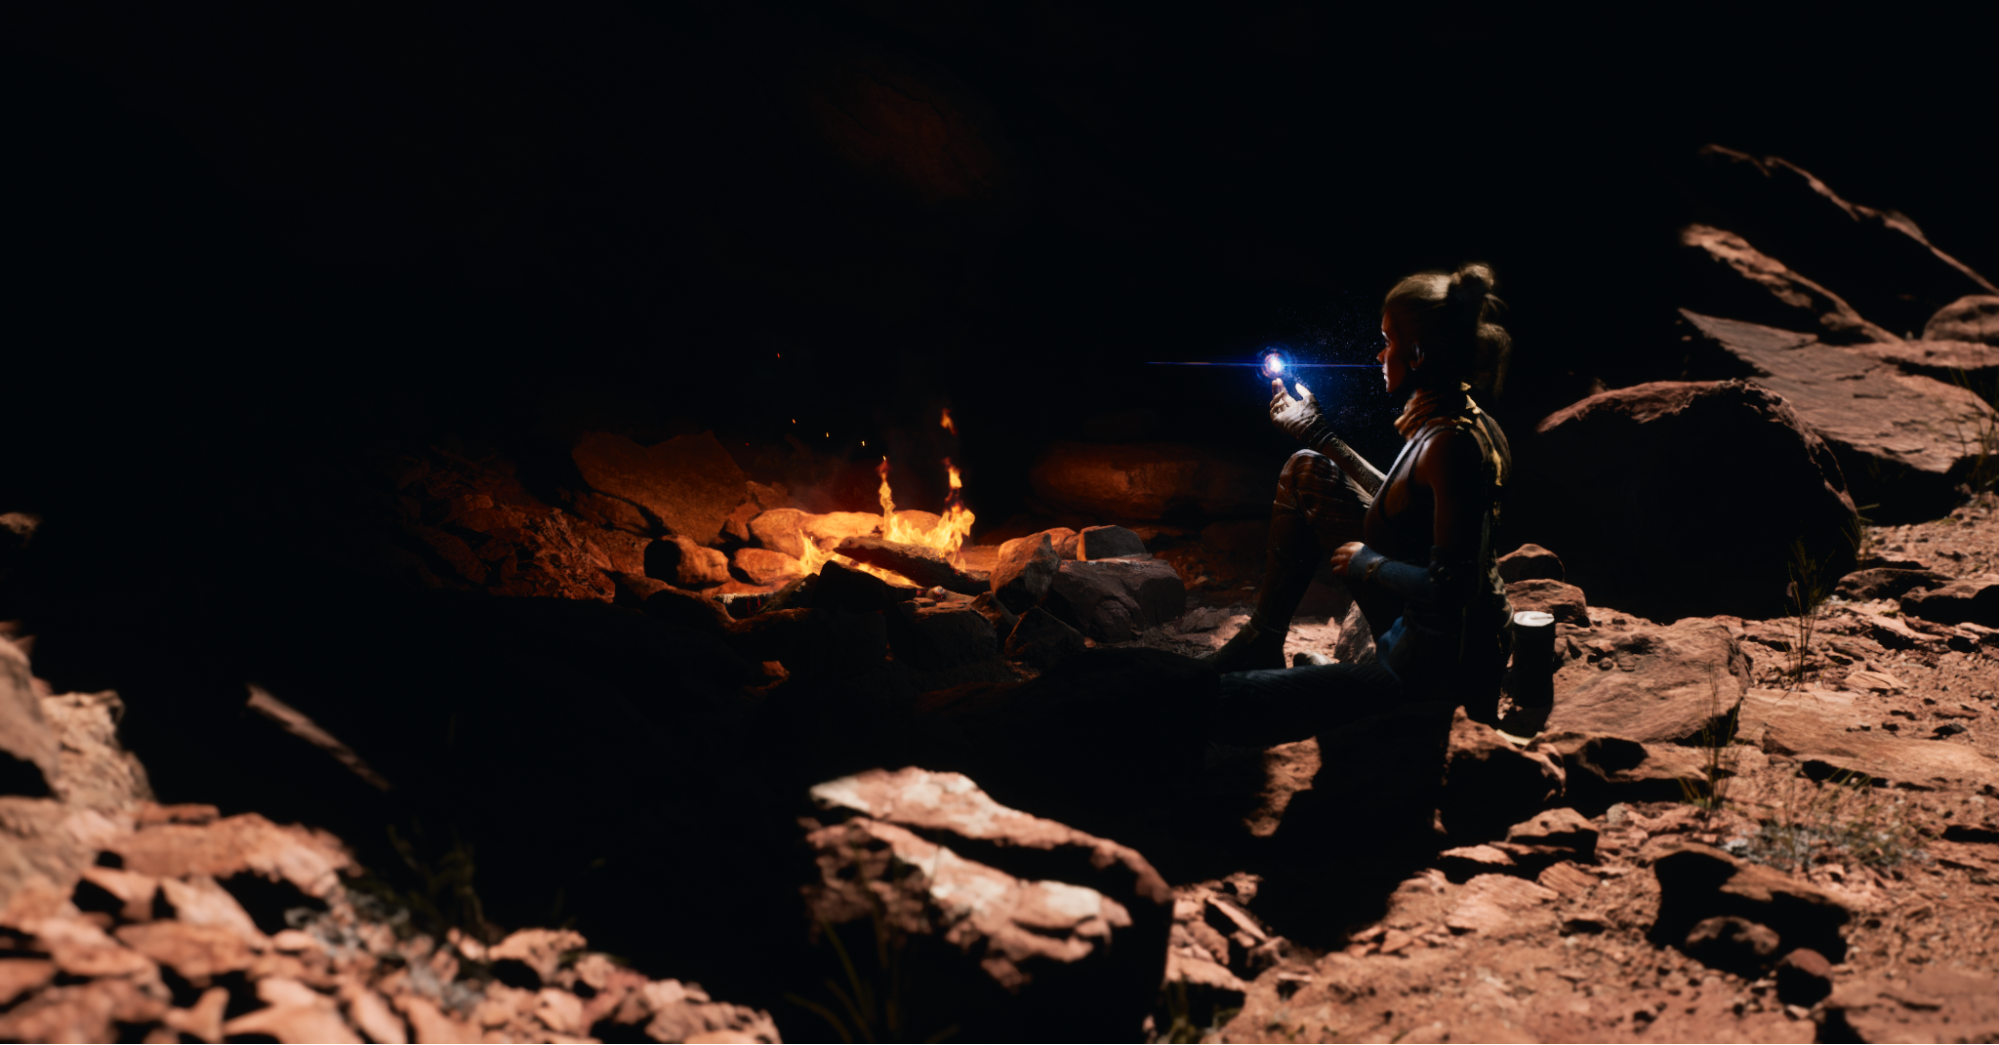
A comparison of the campfire area with Lumen/Skylighting enabled, Lumen disabled, and both Lumen/SkyLighting disabled.
Thanks to the balance of quality, speed, and the "it just works" nature of Lumen, the team was able to light Valley of the Ancient's massive landscape intuitively without needing to worry about all the configuration options that are present with traditional lighting techniques. For more information about Lumen and more details about how it works, see Lumen Global Illumination and Reflections and Lumen Technical Details.
Tailoring Meshes With New Modeling Tools
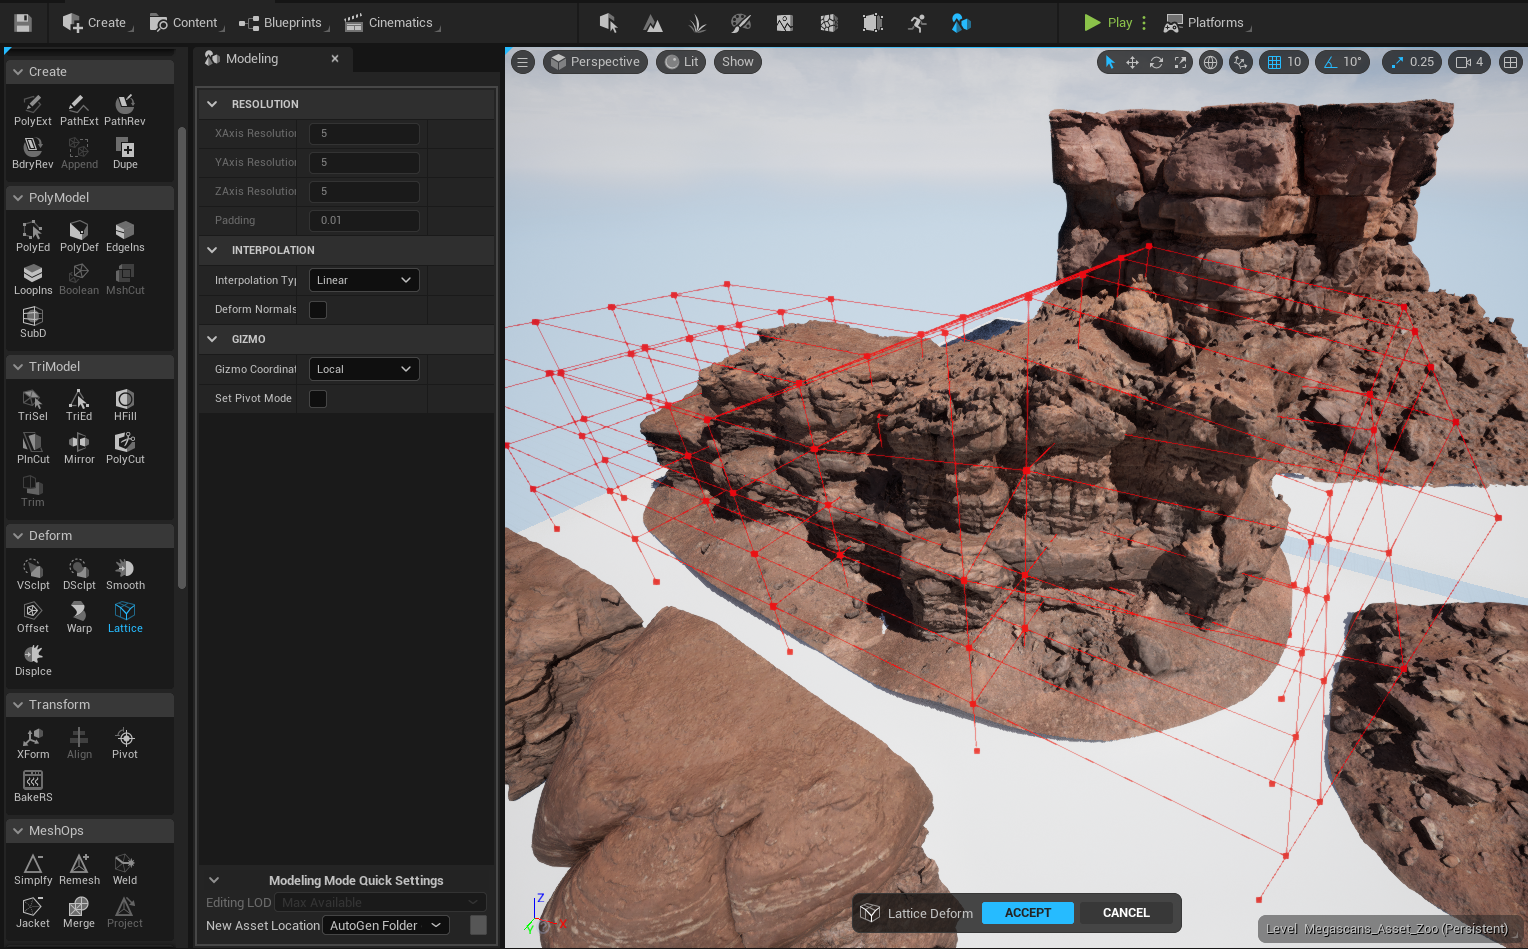
Many of the Megascans meshes in the environment are not "stock" meshes as originally imported, but rather have been altered inside Unreal Editor to suit the unique needs of the landscape. The environment artists for Valley of the Ancient achieved this with the new Modeling Editor Mode in UE5.
While you can use the modeling editor to build meshes from scratch the same way you would in any DCC tool, you can also select any static mesh or instanced static mesh in the environment and modify its geometry. While editing these on a per-polygon basis would be cumbersome, the Modeling editor mode features numerous deformers and sculpting tools that can perform quick alterations on dense meshes.
For example, let's say you have a cliff face asset like SM_umshejnga_High2, but you need a version of it that curves. You can toggle the Modeling editor mode, select that mesh in the viewport, and then apply a Bend deformer to it. After a few seconds of tweaking, you can apply your deformation to the mesh and see the result.
| Initial mesh. | Bend deformer active. | Final result with bend deformer applied. |
Click images for full size.
Without having to re-do any UVs, you can create a variety of unique meshes from one high-resolution base mesh, with comparable quality to the original. This enables artists to gain maximum flexibility from assets of any resolution, and realize concepts with unique needs, without ever leaving the level editor.
Populating a Landscape with Packed Level Instances
The landscape in the Valley of the Ancient is large enough that even with the tools discussed so far, it would take an exceptionally long time to construct an environment with so much detail by placing Megascans assets individually. The environment art team for Valley of the Ancient therefore leveraged Packed Level Instances to kitbash large-scale assemblies.
Level Instances are essentially nested levels that you can add to any world that implements the World Partition system. While you do not need to use Level Instances for World Partitions to work, they are a handy tool for organizing chunks of content in your world into reusable parts, or for breaking a level up into more manageable pieces for editing outside of your main level.
To create a Level Instance, select a group of objects in the world, right-click, and click Create From Selection.
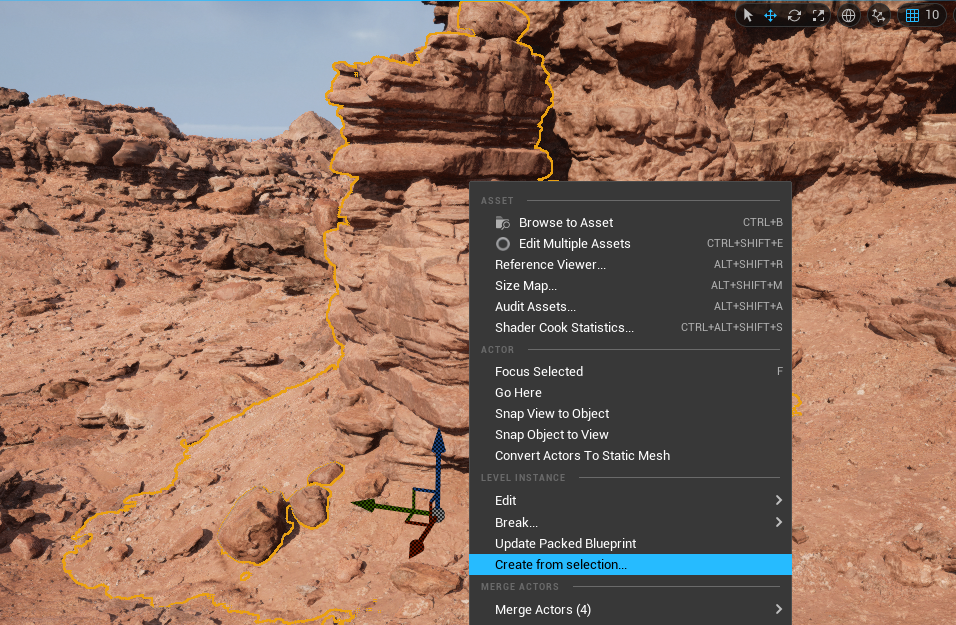
This opens the New Level Instance menu, where you can choose the type of Level Instance you want to create.
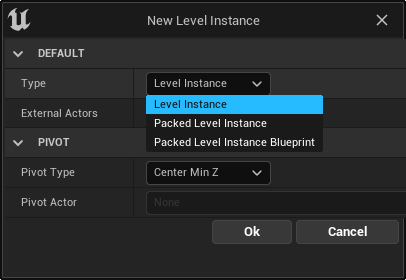
When you click OK, you can save your new Level Instance as a level file in your project, and it will generate a corresponding Blueprint asset along with it. All of the actors you selected will be replaced by a Level Instance actor that contains them. You can edit the Level Instance using its level file, and place a copy of the Level Instance using its Blueprint asset.
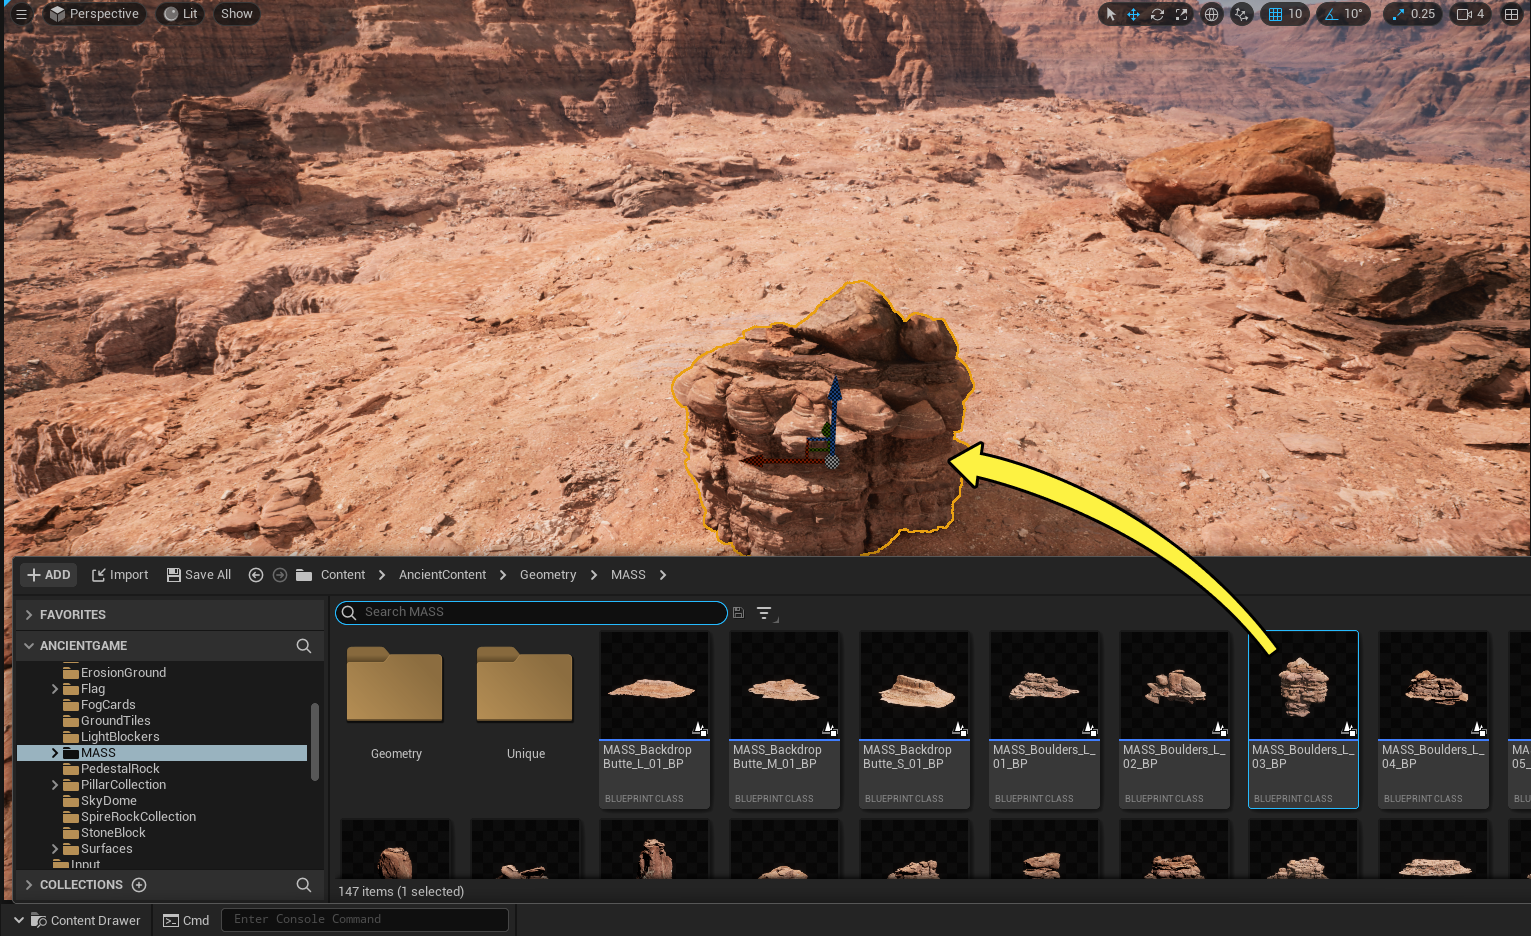
Manipulating Level Instances is as simple as manipulating other actors in your level. You can also edit the component parts of a Level Instance in-place. In the Details panel for a placed Level Instance, click the Edit button under Level Instance Editing to focus on that Level Instance. You can then edit the component parts of the Level Instance in the context of the rest of your world.
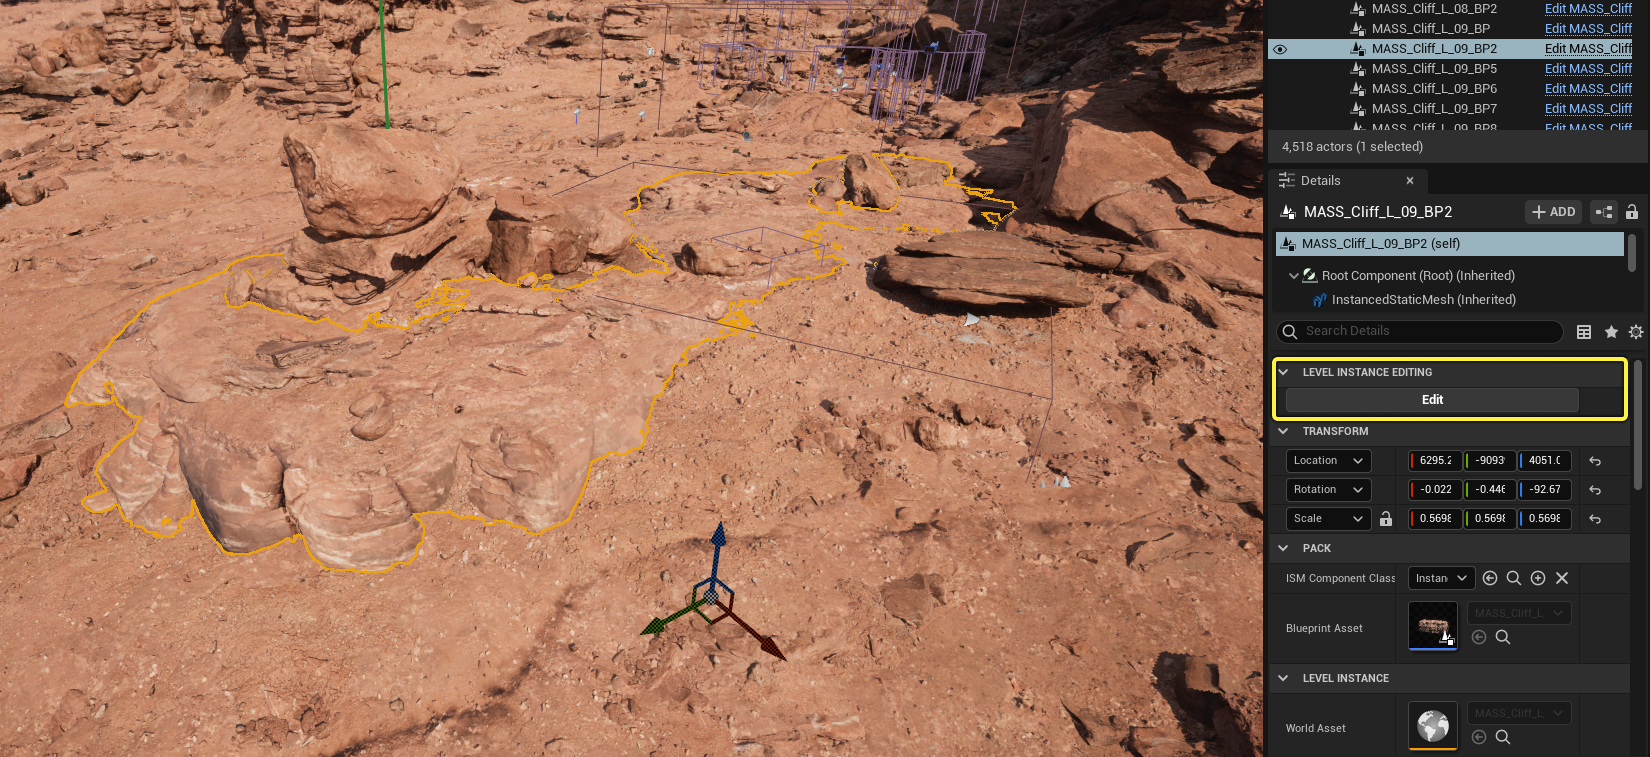
When you have finished, click Commit Changes to finalize your adjustments and return to editing your world. A prompt will appear to ask if you want to save your changes, and any copies of that Level Instance will take the same changes.
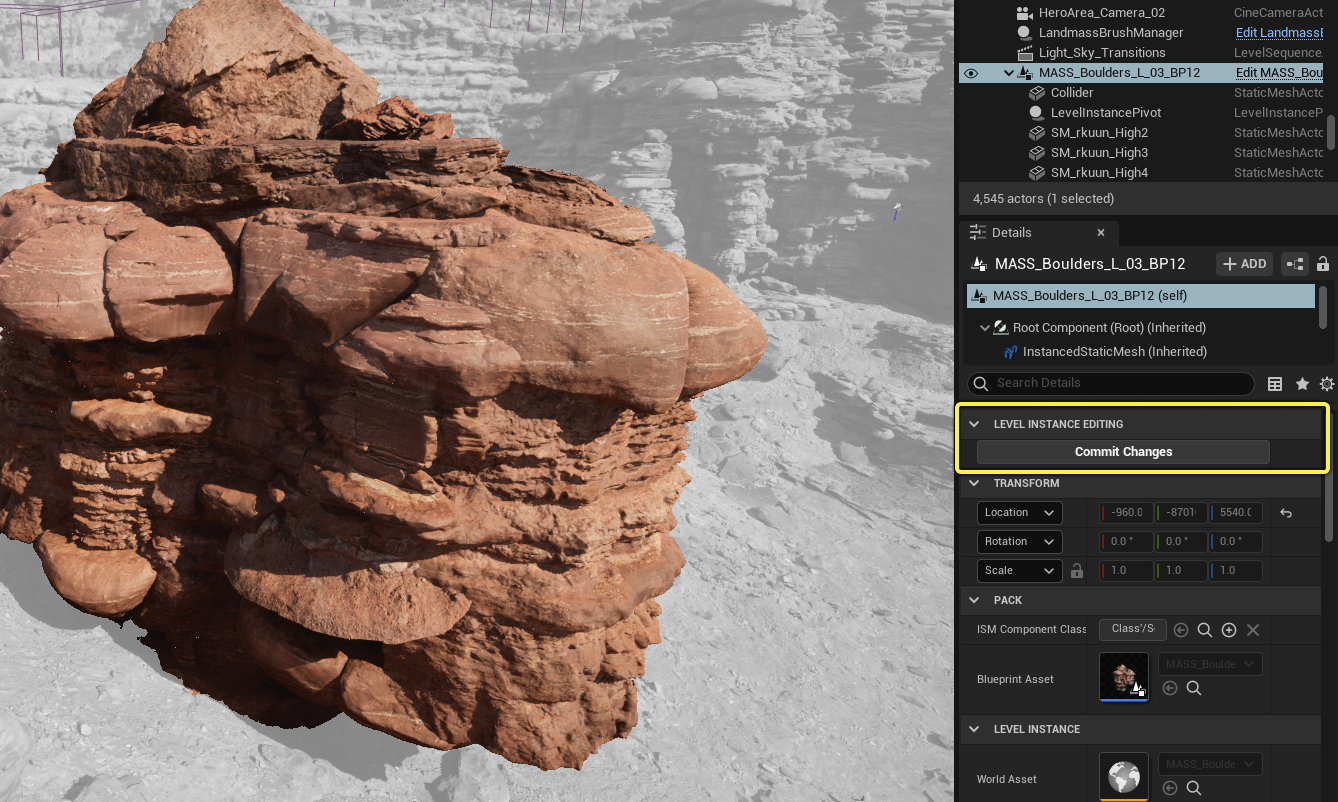
The Valley of the Ancient sample primarily uses Packed Level Instances to create assemblies. Unlike standard Level Instances, These ignore any actors that are not static meshes, and convert static meshes to instanced static meshes, reducing the number of draw calls created by their component assets.
This workflow provided a way for the environment art team to independently build a library of large-scale assemblies and edit them non-destructively. These varied from small, versatile assets that make up the observable landscape around the player, as well as massive geoforms that can compose large chunks of distant landscape. While many of these assemblies are composed with static mesh assets found inside the editor, some were custom-built by the team using the Megascans assets as a base. This gave the team a flexible assembly line to set-dress over four square kilometers of land with photo-realistic detail in just a few weeks.
You can find the map files for these assemblies in the AncientGameContent/Maps/MASS folder, and you can find the Level Instance actors that correspond to them in the AncientGameContent/Geometry folder. Refer to Level Instancing for more information about how to use these tools.
Chaos Destruction Workflow
The process of developing the destructible meshes for Valley of the Ancient, such as the columns in the dark world and the mound that the Ancient One rises from during the finale, drove many improvements to the Chaos Destruction workflow in UE5. The workflow that the team developed uses a combination of the new Modeling and Fracture editor modes.
The destruction team relied heavily on the Modeling tools to prepare the meshes and create targeted fractures. Simplify, Planar Cut (PlnCut), Offset, and Displace (to add a noisier surface) made it possible for the initial fractures to be sculpted from the source meshes themselves. The Boolean tool was used throughout this process to remove any overlapping Meshes penetrating through each other, leaving only the geometry on the surface. Stray polygons or floating islands of geometry were removed using the TriSel tool.
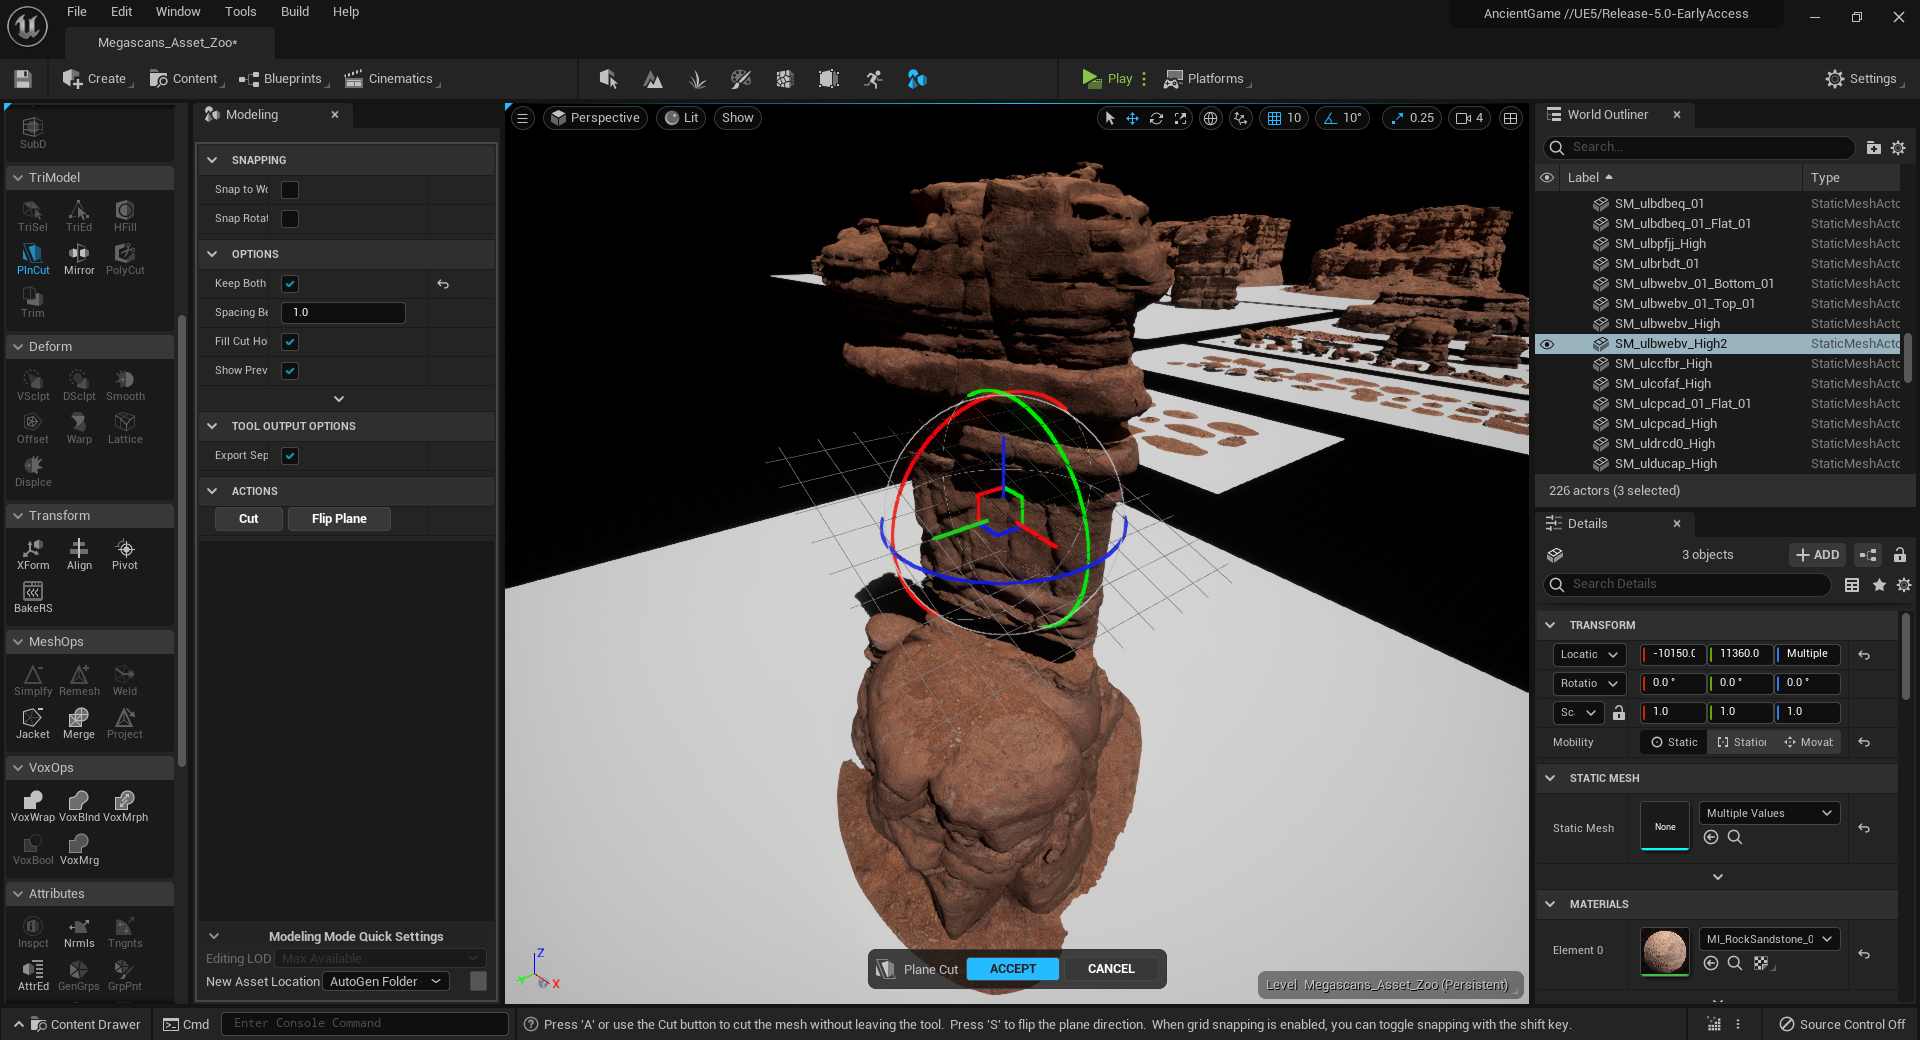
In the Fracture editing mode, the team used the Mesh Fracture tool to separate the destructible mesh into large chunks. This tool effectively uses another mesh to take a "bite" out of the geometry, functioning similarly to a Boolean subtraction tool, but leaving both parts of the mesh in place. The chunks created by this tool act as the primary fractures for the destructible object, providing a degree of control over how they look when they crumble. After creating these chunks, the team applied a more traditional, Voronoi fracture (using the Uniform or Cluster fracture tools) to break it into smaller pieces.
| Applying a mesh cut to a column. | Column after applying mesh cut. | Applying a voronoi fracture. |
Click images for full size.
Thanks to the Noise settings introduced in UE5, these fractures have natural-looking, non-uniform edges.
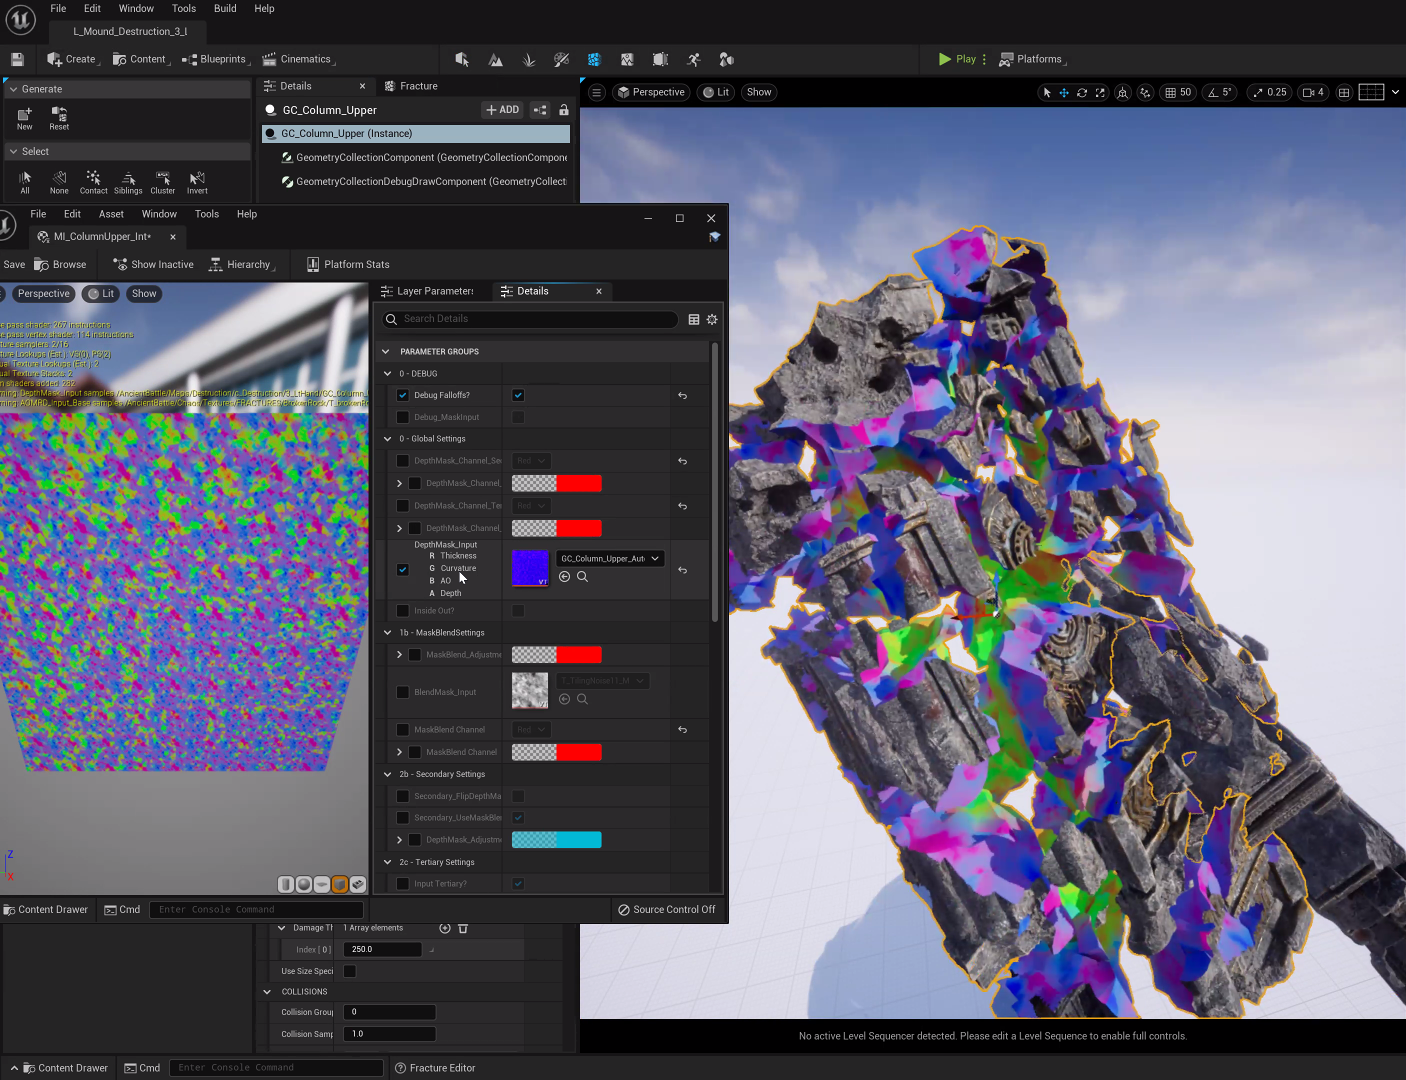
The team used the AutoUV tool to UV the internal surfaces of the fractured assets. This tool generates a texture that maps to a gradient based on the depth of the mesh. This provides a way to blend materials together to make different parts of the cross-section have different surface qualities based on depth, providing a more natural appearance. For instance, parts of the mesh deeper inside the cross-section can have a dustier, more dry look, while parts closer to the surface can look darker and more weathered.
Finally, the team cached the physics simulation for the assets using a Chaos Cache Manager. This is a system that can record a simulation in-editor and play it back ingame, ensuring that it proceeds the same way every time once it is triggered. This provides a way to show complex, detailed destruction in-game while conserving on processing, and also makes it possible to author destruction in a way that suits specific in-game needs for level design. For instance, the first column that Echo destroys will never fall in such a way that it will block the entrance, and the Ancient One's mound won't leave behind debris that prevents Echo from traversing the arena. After recording a simulation with a cache manager, placing a copy of it in a level will place all of the other assets associated with it.
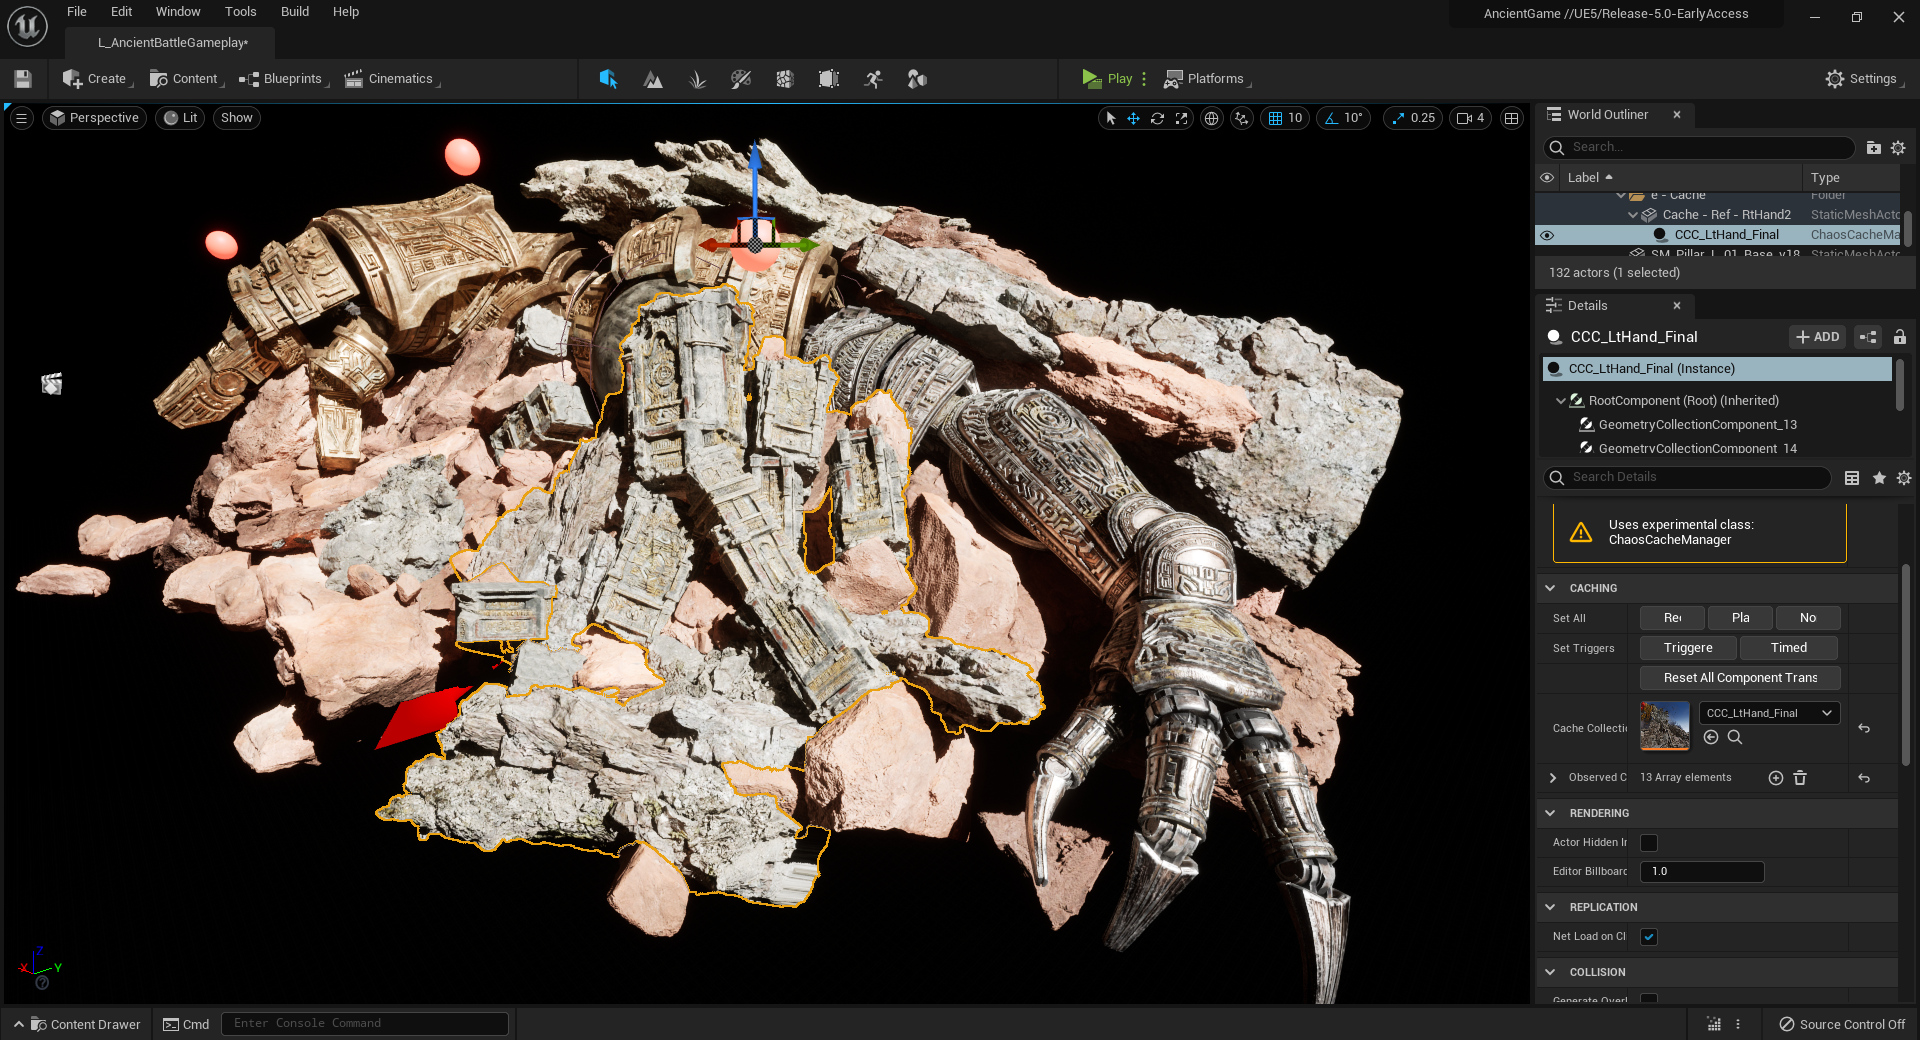
The original simulation setups for these assets have been stripped in the final build of the project. However, the geometry collections and cache managers for them are located in AncientBattle Content > Maps > Destruction. You can examine the collections in c_Destruction > 3_Lt_Hand for an example of the assets used for targeted fractures, and you can view the L_AncientBattle_Gameplay level to see all the cache managers used in the dark world.
Improvements to the flexibility of this workflow are ongoing. In the meantime, the implementation in the Valley of the Ancient provides a proof of concept for how we are improving the quality, accessibility, and flexibility of Chaos destruction in UE5.
Setting the Mood With Sky Atmosphere and Volumetric Niagara Effects
To complete the atmosphere in the Valley of the Ancient, we use the new Sky Atmosphere system.
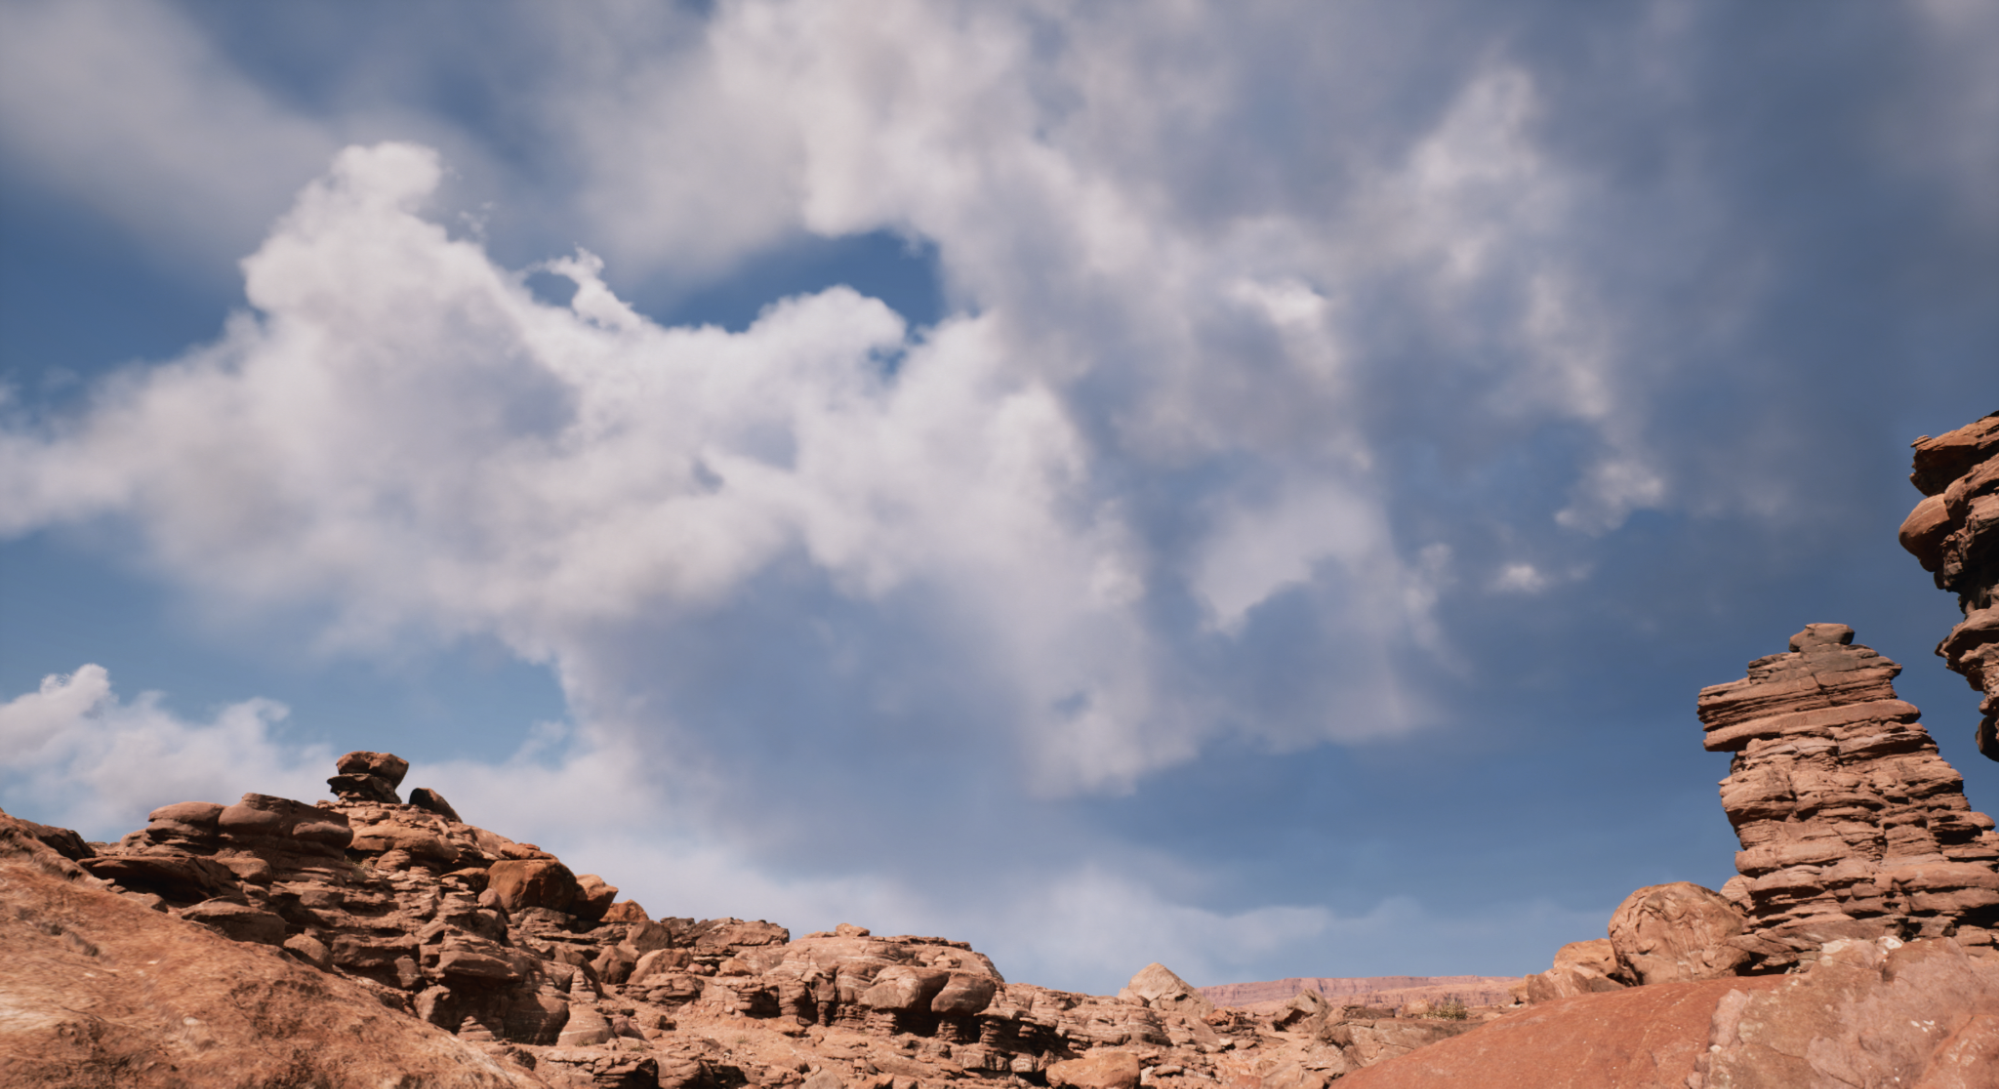
By placing a Sky Atmosphere actor in your scene, you can configure information about a simulated planet, including its ground radius in kilometers, physical parameters for its atmosphere, and art direction overrides. This system works in conjunction with a Directional Light set as the Atmosphere Sun Light, as well as a Sky Light. With all of these elements in place, the Sky Atmosphere system generates realistic atmosphere, volumetric clouds, and fog on a global scale. The environment lighting in this scene is completely dynamic thanks to the Sky Light's real time capture and convolution process.
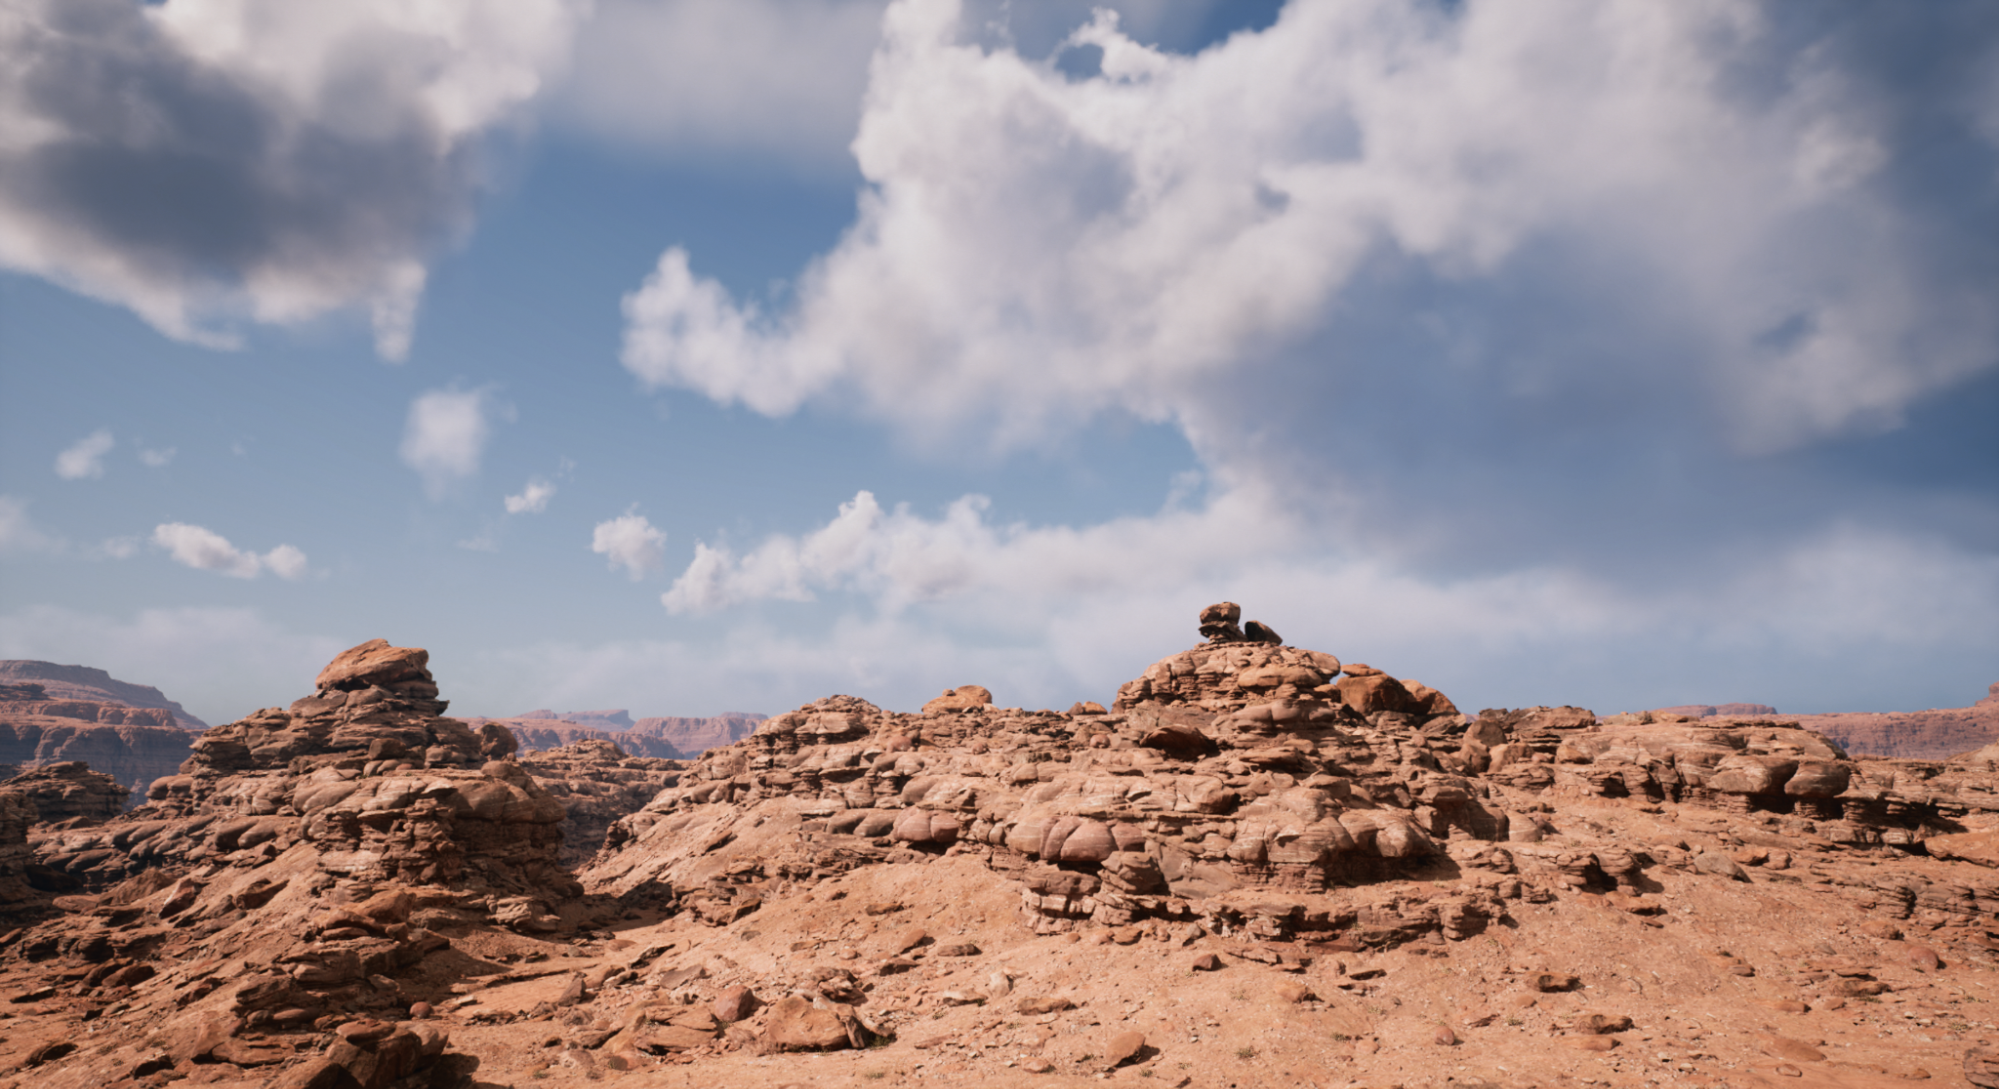
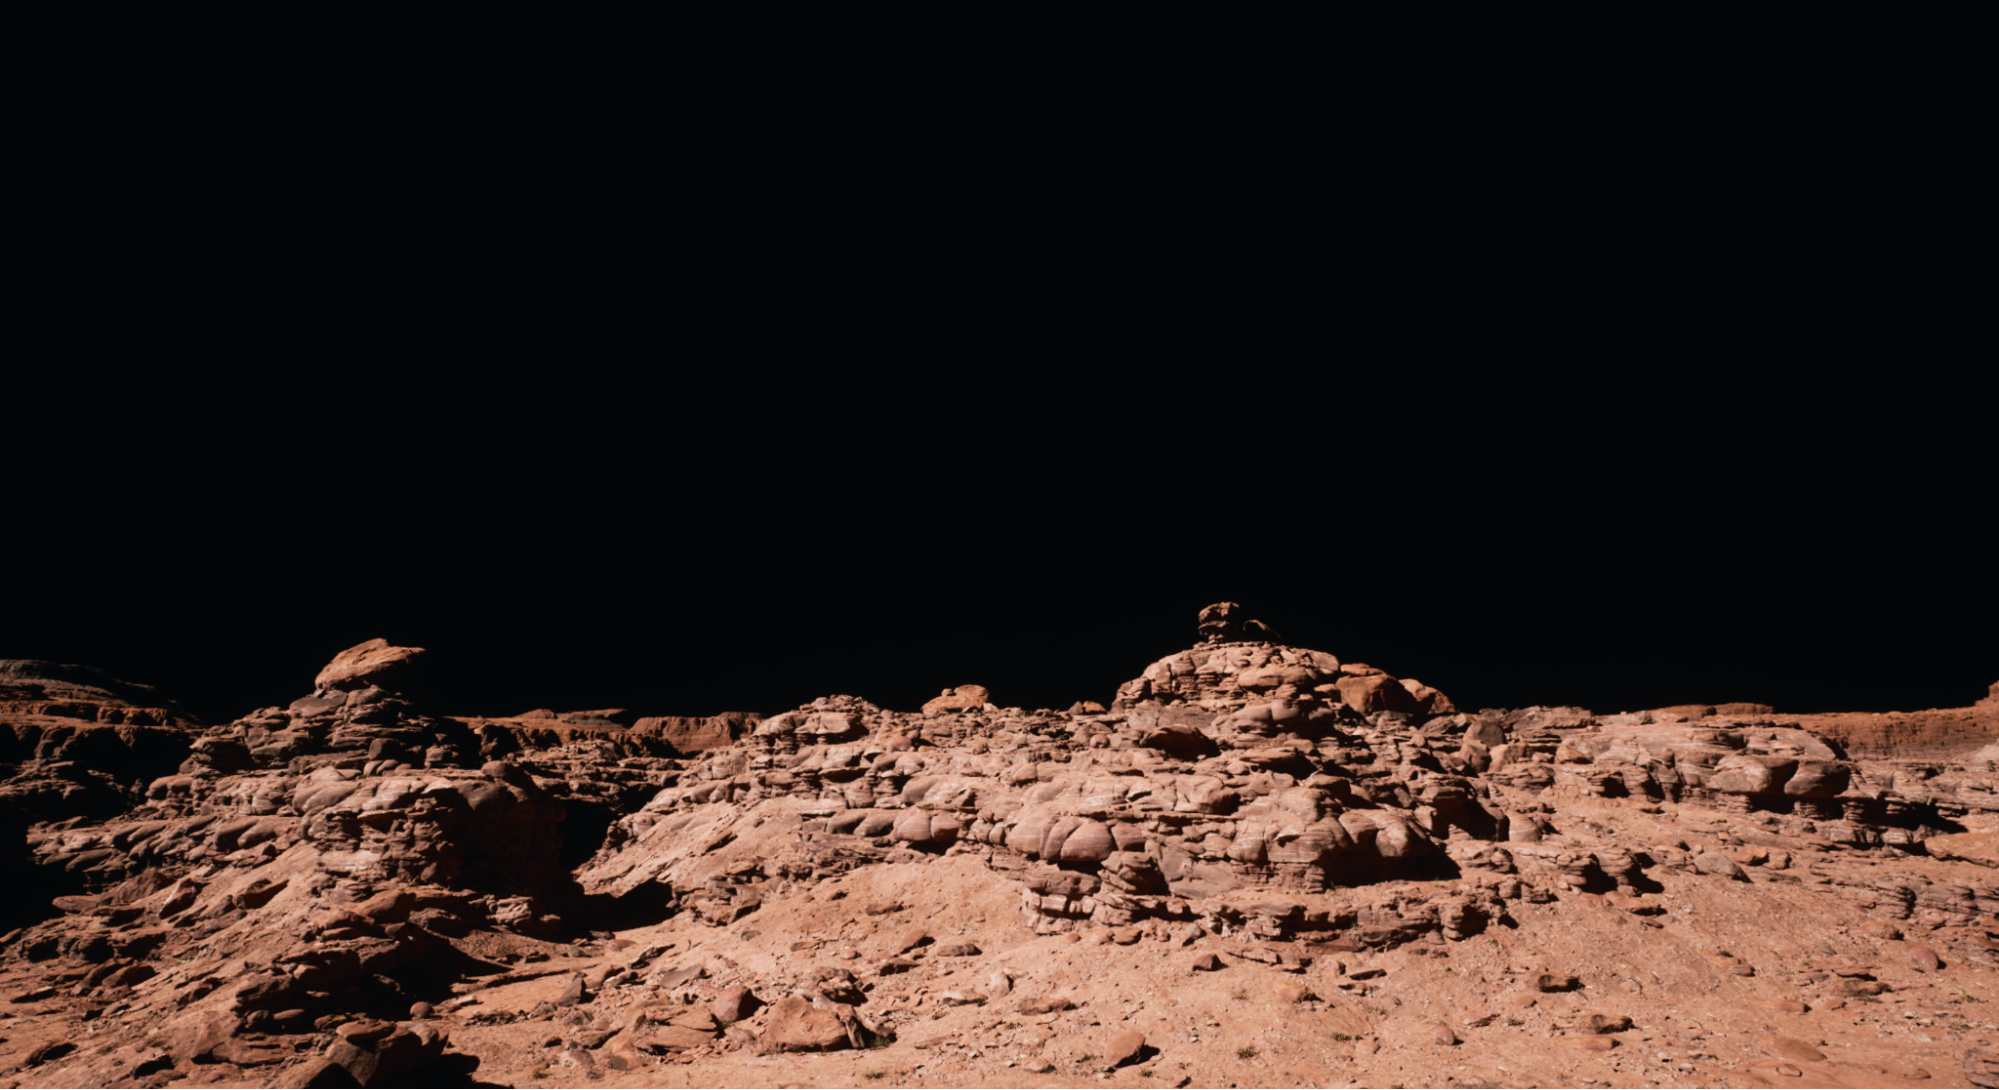
In the Valley of the Ancient, the light world uses a Sky Atmosphere actor, showcasing a more subtle atmosphere that is reflective of real-world Earth. It also features animated volumetric clouds, which are dynamically lit in real-time. Meanwhile, the dark world uses a more traditional skydome to achieve its more stylized, fantastical look.
| Light World Scene | Dark World Scene |
Click image for full size.
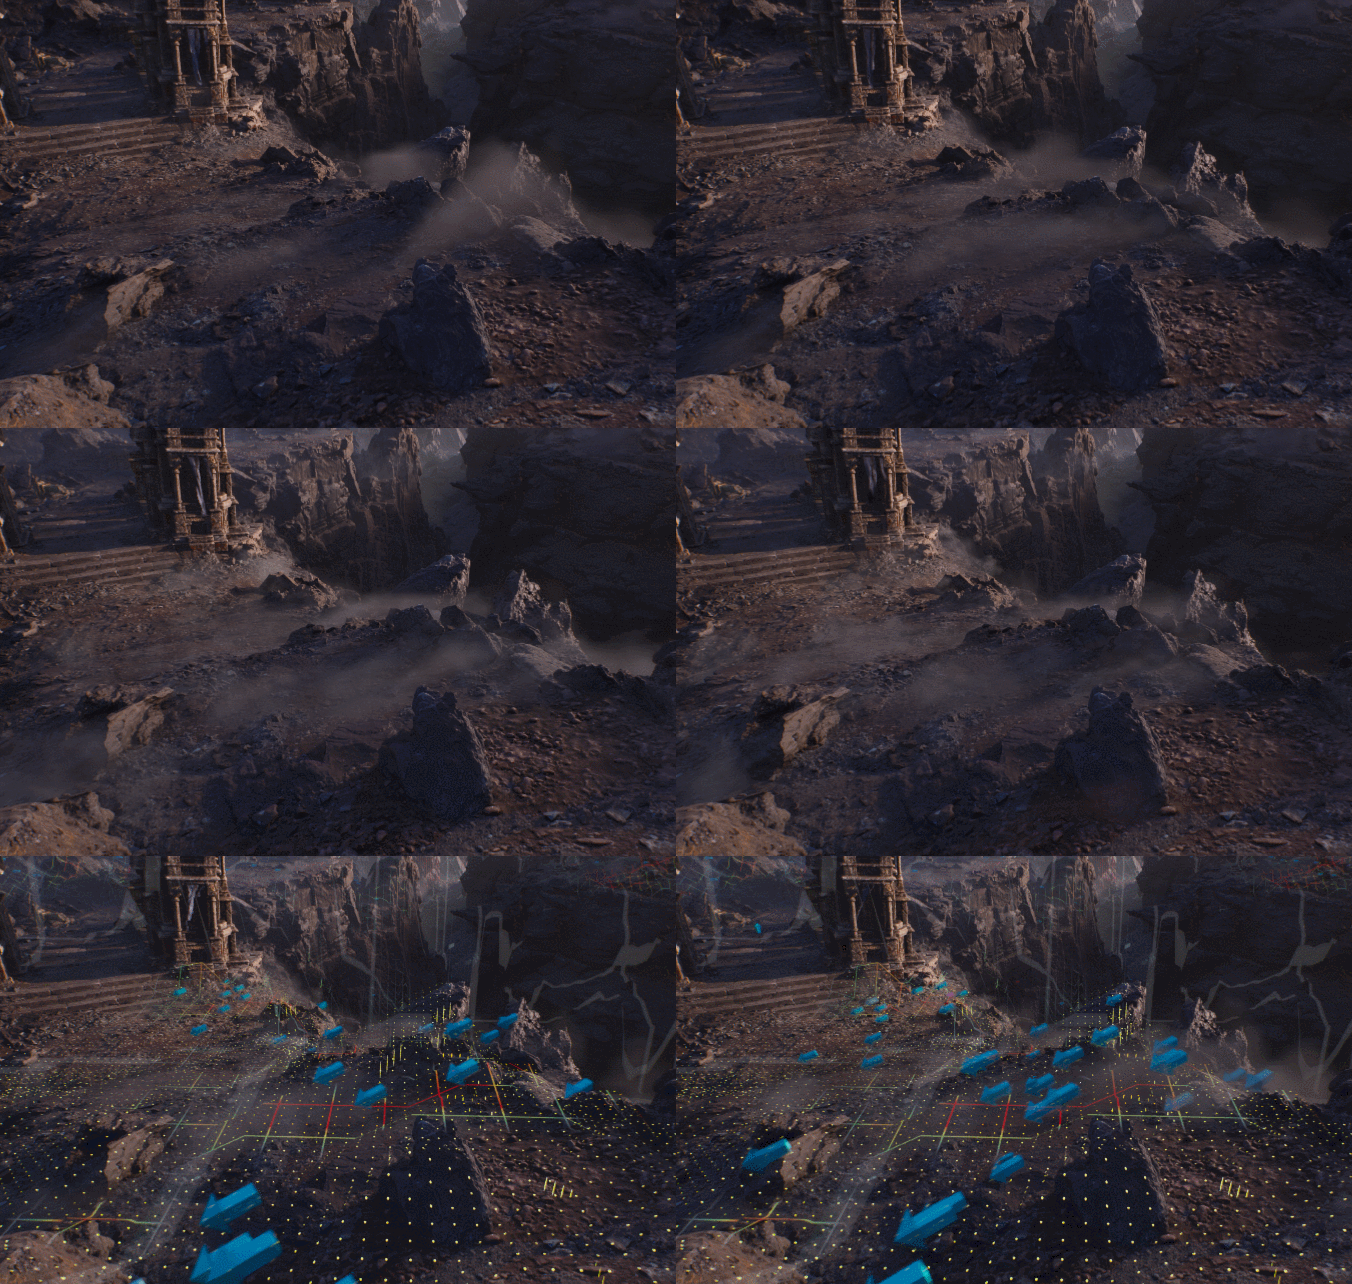
For the finishing touches, such as the mist and sand blowing across the rocky terrain, the team used Niagara particles in conjunction with volumetric paint data to direct them through the environment.
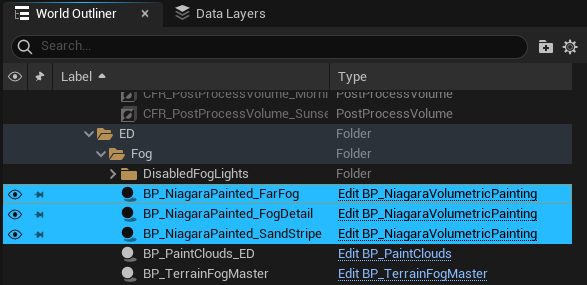
You can find the actors for these particle systems in the Dark World data layer: BP_NiagaraPainted_FarFog, BP_NiagaraPainted_FogDetail, and BP_NiagaraPainted_SandStripe.
Each of them uses two Niagara Data Interface textures: a VolumetricPaintingDensityMap, and a VolumetricPaintingVelocityMap.
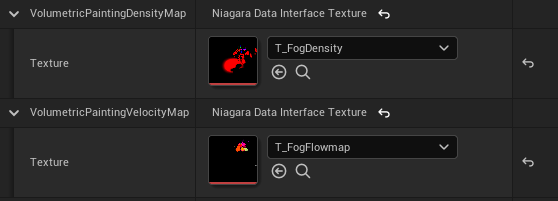
The density map uses RGB information coupled with an alpha channel to determine the height and density of particles relative to the terrain, while the velocity map determines the direction that these particles move in. The team used a custom-built volumetric painting tool to paint these layers in the environment and output these textures. In the image below, the grid overlaid on the environment represents the density map, while the arrows represent the flow map. BP_NiagaraPainted_FogDetail (fog flipbooks) is layered on top of BP_TerrainFogMaster (volumetric fog) with identical 3D density to add details.
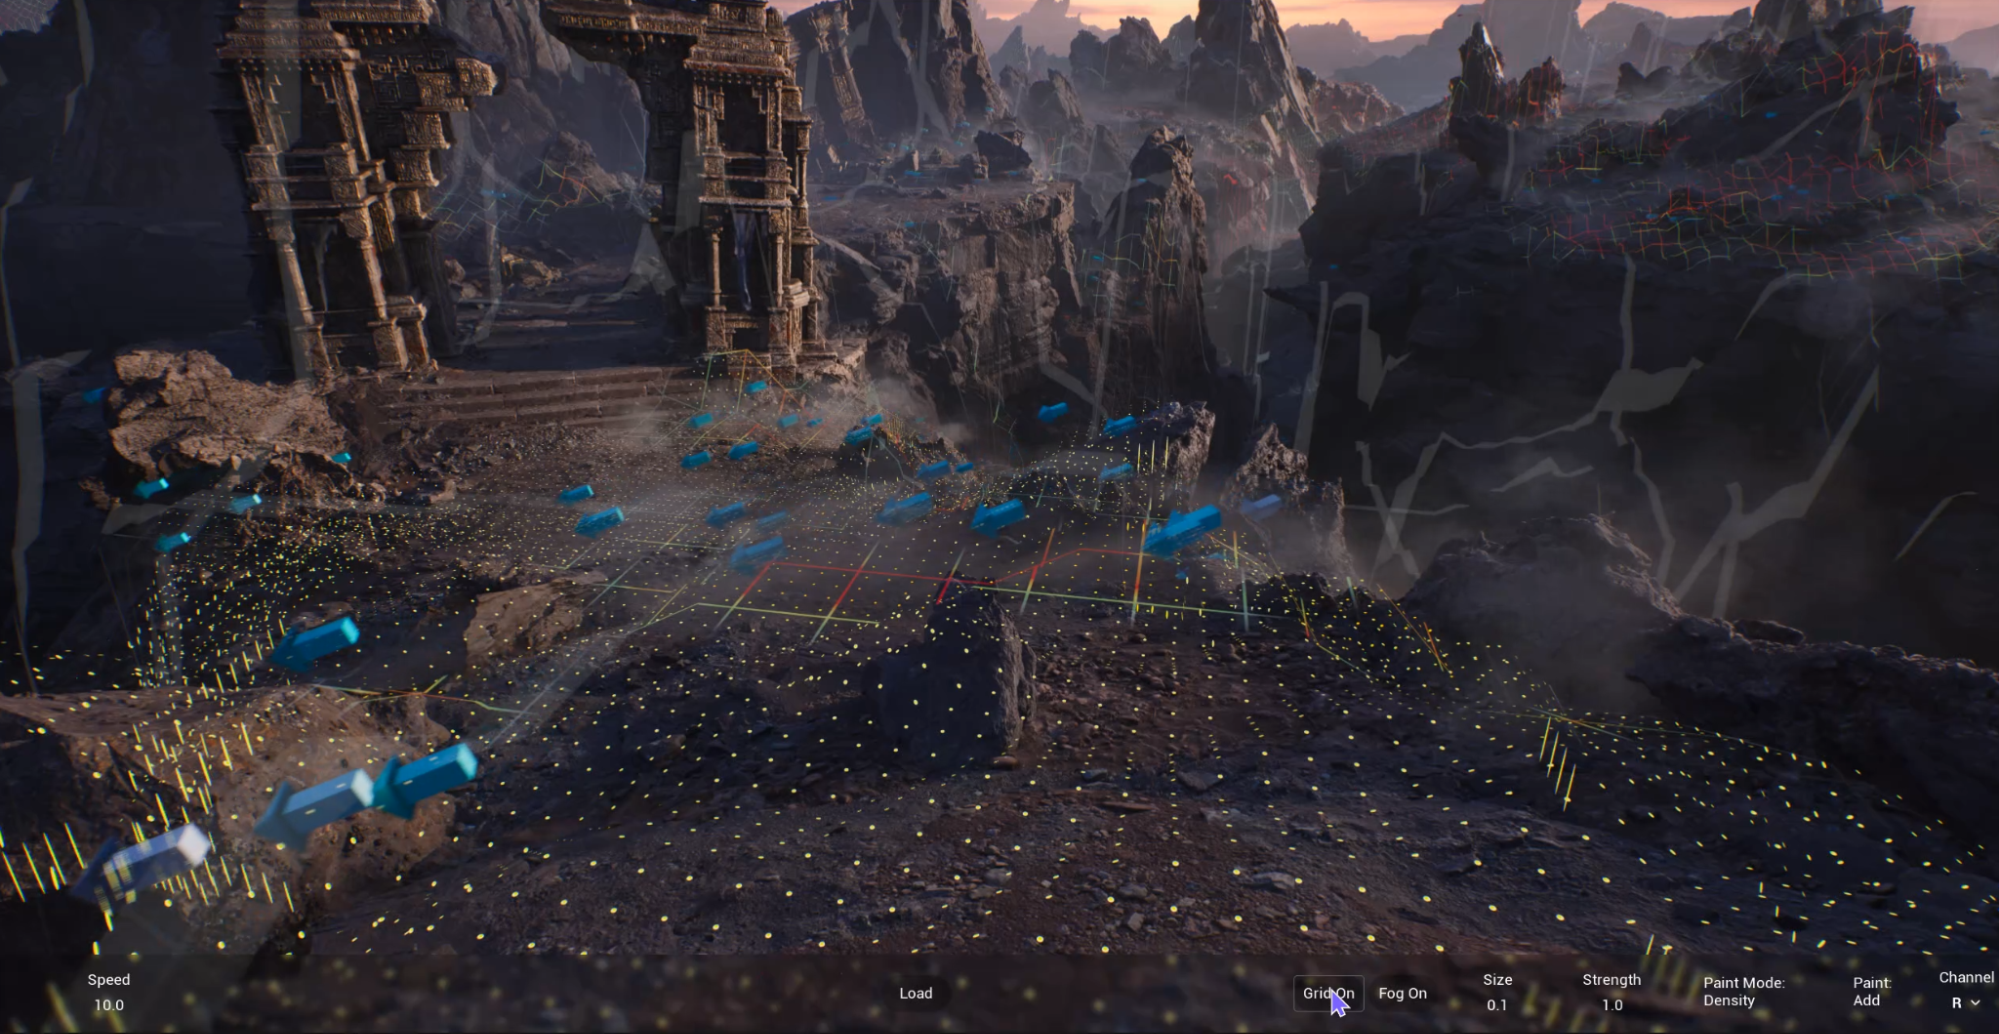
With this method, the Valley of the Ancient simulates over 100,000 GPU particles across the dark world's landscape using just three Niagara systems. All the Niagara systems are then fitted to the environment and Volumetric Fog, which uses the same volumetric painting data, to add bespoke detail. While the tools for volumetric painting are still in development, this offers a proof of concept for its performance and utility when combined with the power of Niagara.
Collaboratively Constructing a Large World
In the past, users would divide a level into sub-scenes and use either the level streaming system or the World Composition system to stream them in and out of a persistent level. This requires meticulous organization and makes it difficult for users to collaborate, as typically only one user can modify a scene at a time without encountering version control issues.
In Unreal Engine 5, we have re-invented the way you interact with level files to make this process cleaner and more intuitive. Not only can you edit massive worlds from just one level file, but you can do so in a collaborative environment with dozens of other developers with minimal conflicts. This section will detail the tools that make this possible, and how they benefited the team's collaboration when building the Valley of the Ancient.
One File Per Actor
The entire world in Valley of the Ancient uses UE5's new One File Per Actor (OFPA) system. When enabled, this system writes a separate file for each unique instance of an actor placed within a level rather than writing its data into a single map file.
As a user interacting with the level editor, nothing about your workflow is changed. To edit a level, you still open a single level file in the editor. However, since the underlying file system tracks each actor as a separate file, level designers and environment artists can edit different regions or layers of the same level and rarely, if ever, encounter a conflict when committing their changes to a version control system.
Valley of the Ancient has OFPA enabled globally. You can find this setting under World Settings in the Advanced section of the World parameters, where it is labeled Use External Actors.
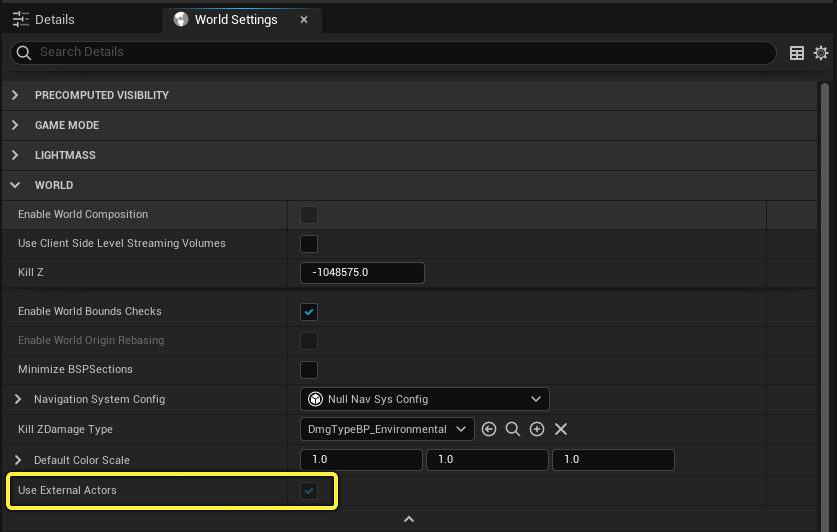
At your option, you can enable this for individual actors or globally for an entire project. Refer to the One File Per Actor documentation for more information.
Thanks to this system, the developers on Valley of the Ancient were able to commit their changes rapidly throughout a day of work and quickly see each other's changes in-editor, all without worrying about resolving versioning conflicts. Tweaks to gameplay scripting and environment art could occur alongside each other constantly, enabling a rapid pace of iteration and a highly collaborative environment art pipeline.
World Partition
Large worlds in games depend on dividing a map into many sections that can be loaded and unloaded as the player traverses the landscape, as it is not feasible to load an entire multi-kilometer map all at once. In past toolsets, this required developers to manually divide their maps into sub-levels and carefully manage when they streamed in and out. Viewing sections of the world in context with each other could often be difficult.
The new World Partition system greatly simplifies this process. Once World Partition is enabled for a level, it automatically divides objects into cells based on their grid position and updates the content of those cells as you adjust the world in the level editor, so you never need to manually assign objects to cells. During gameplay, World Partition automatically loads and unloads cells as players traverse through the game world, without the need for manually managing them or designating streaming volumes.
World Partition is enabled in the World Settings for the AncientWorld scene, under World Partition Setup.
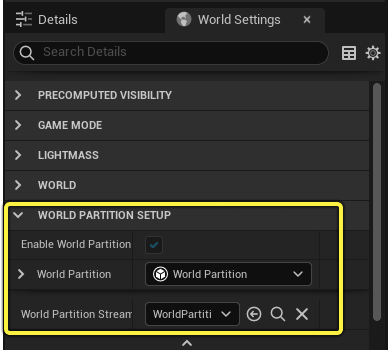
You can view the World Partition window by clicking Window > World Partition. Inside, you can click and drag editor cells to select them, and load or unload them for editing purposes. You can also use this window for quick navigation in the editor by moving the camera to a selected cell.
You can check the World Partition settings of individual actors in their Details, under the World Partition section. This can also be edited in class defaults inside the Blueprint editor.
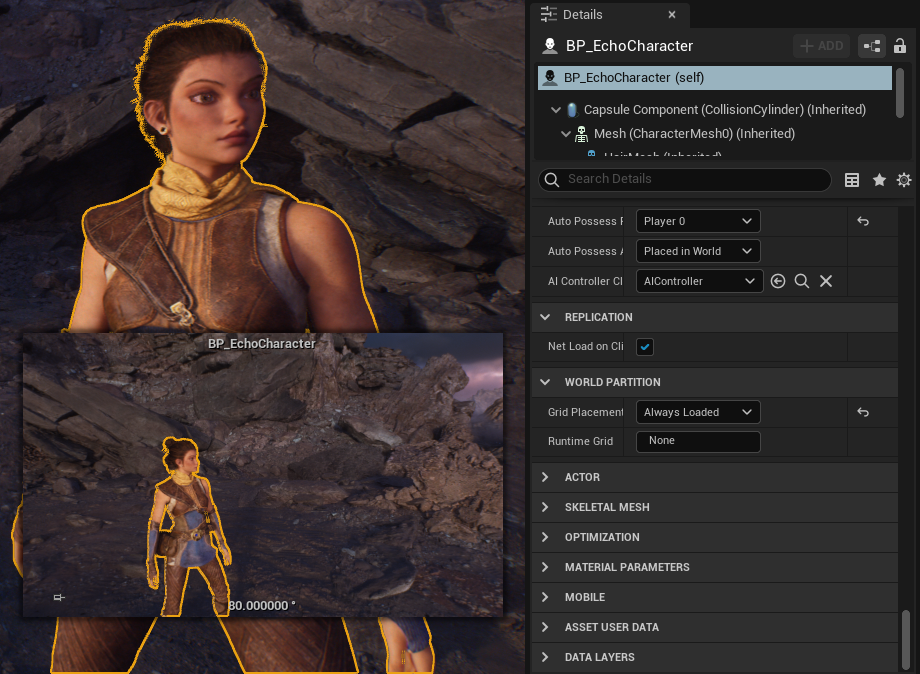
By default, most actors in the environment use their position within the World Partition grid to decide what cell they belong to. Echo is notably set to always be loaded, as she is the player character.
As you can see, the World Partition system greatly streamlines the process of building a large world. While it is still managing many files similar to sub-levels behind the scenes, artists and designers are free to focus on the environment and the user experience they wish to create, while the technical details are automated. For more information about how to configure World Partitions in your games, refer to the World Partition section.
Data Layers
Data Layers are a system for organizing the objects in the world into separate layers that can optionally be loaded and unloaded at-will. This system provides another alternative to sub-levels, designed to work in tandem with World Partition. It can provide another organizational tool for your projects, or it can drive gameplay features and give you an extra degree of control over your world.
You can open the Data Layers window by clicking Window > Data Layers. You can use this menu to create, organize, and load or unload Data Layers in the editor.
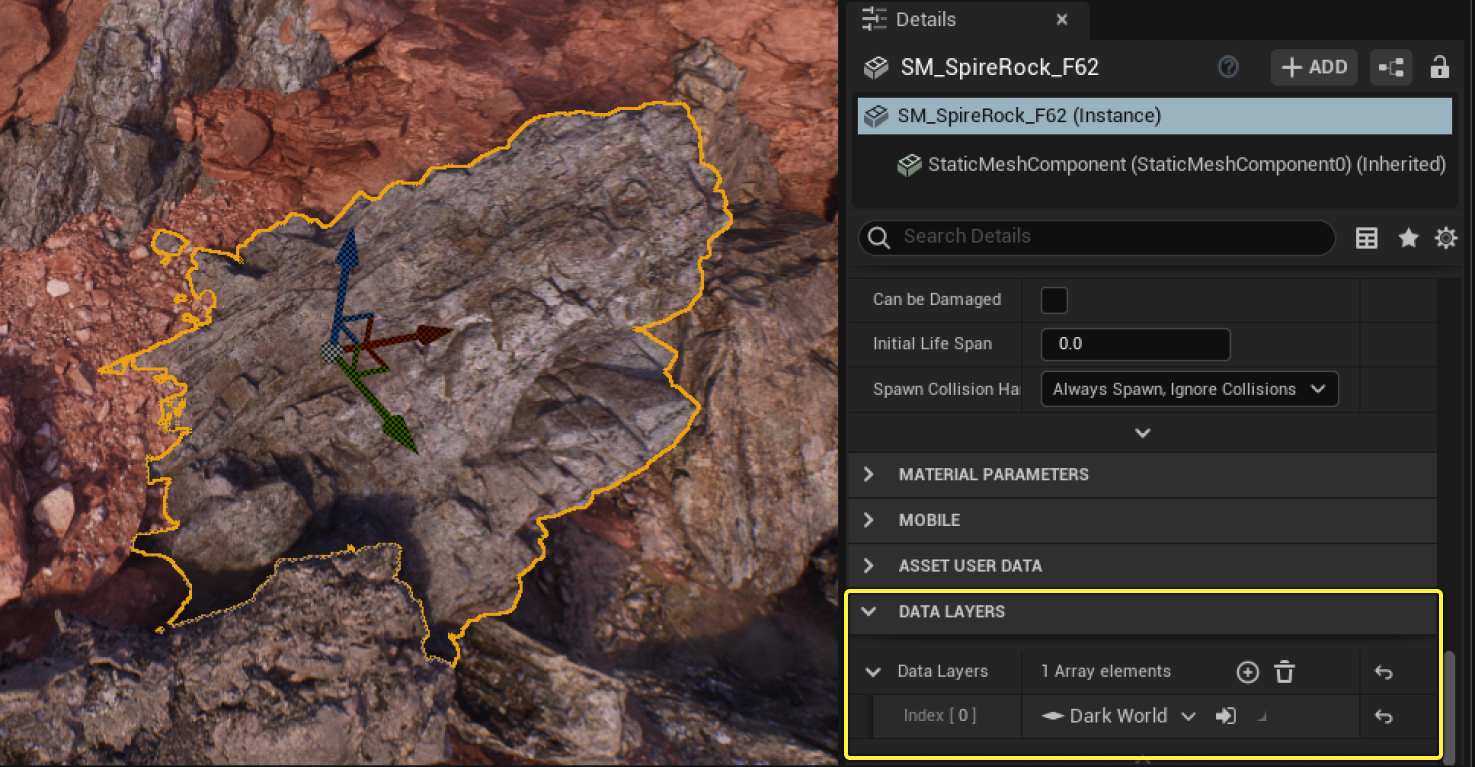
You can see the Data Layer information for an actor by scrolling to the Data Layers section of its Details. You can use the dropdowns here to change the actor's data layer, or click and drag a data layer from the Data Layers window into one of these entries.
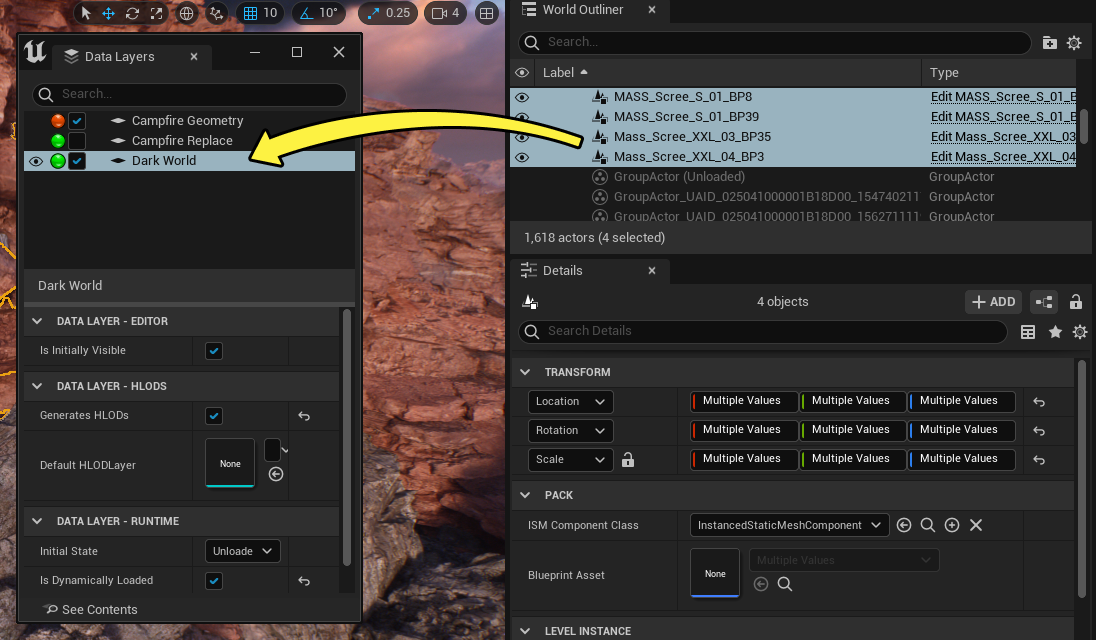
You can also click and drag actors from the World Outliner onto a Data Layer to assign multiple actors to a Data Layer at once.
Valley of the Ancient uses Data Layers to drive the transition between the light world and the dark world. When Echo activates the portal, it unloads several data layers representing the light world and loads another set representing the dark world.
| Light World | Dark World |
Click images for full size.
These are activated and deactivated using in-game events, triggered by the Dark World Rift object. Both are built in the same level file, overlapping the same space, making them truly different versions of the same world.
The Campfire Data Layer is used for both worlds, creating a common frame of reference for the player as Echo shifts from one world to the other. There is no need for a redundant version of this set piece, and the only thing that changes its appearance is the atmosphere and lighting used in the light and dark worlds.
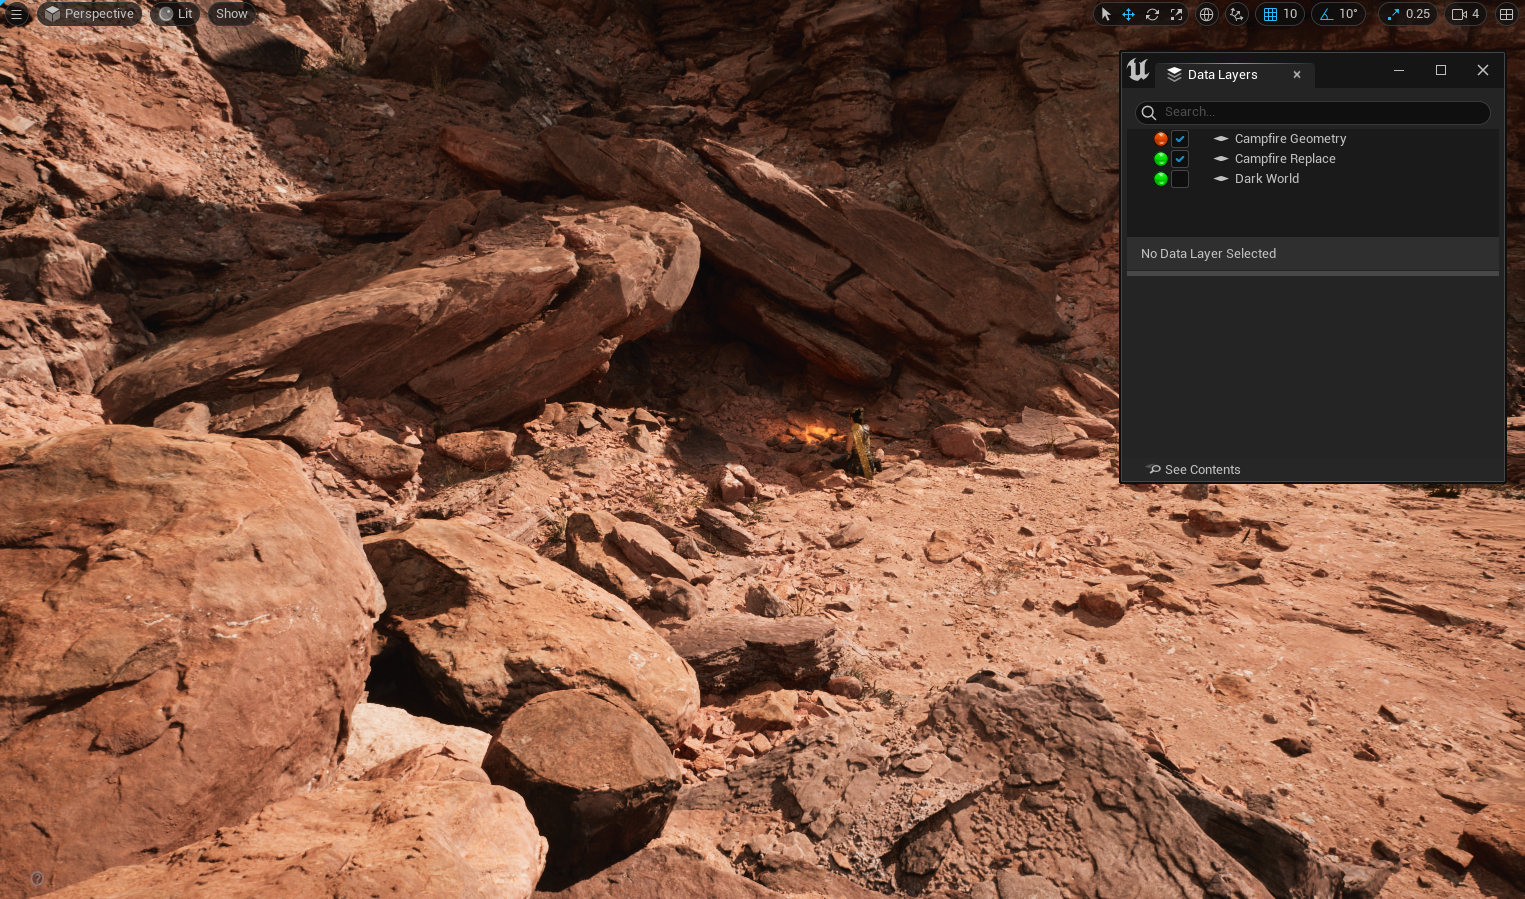
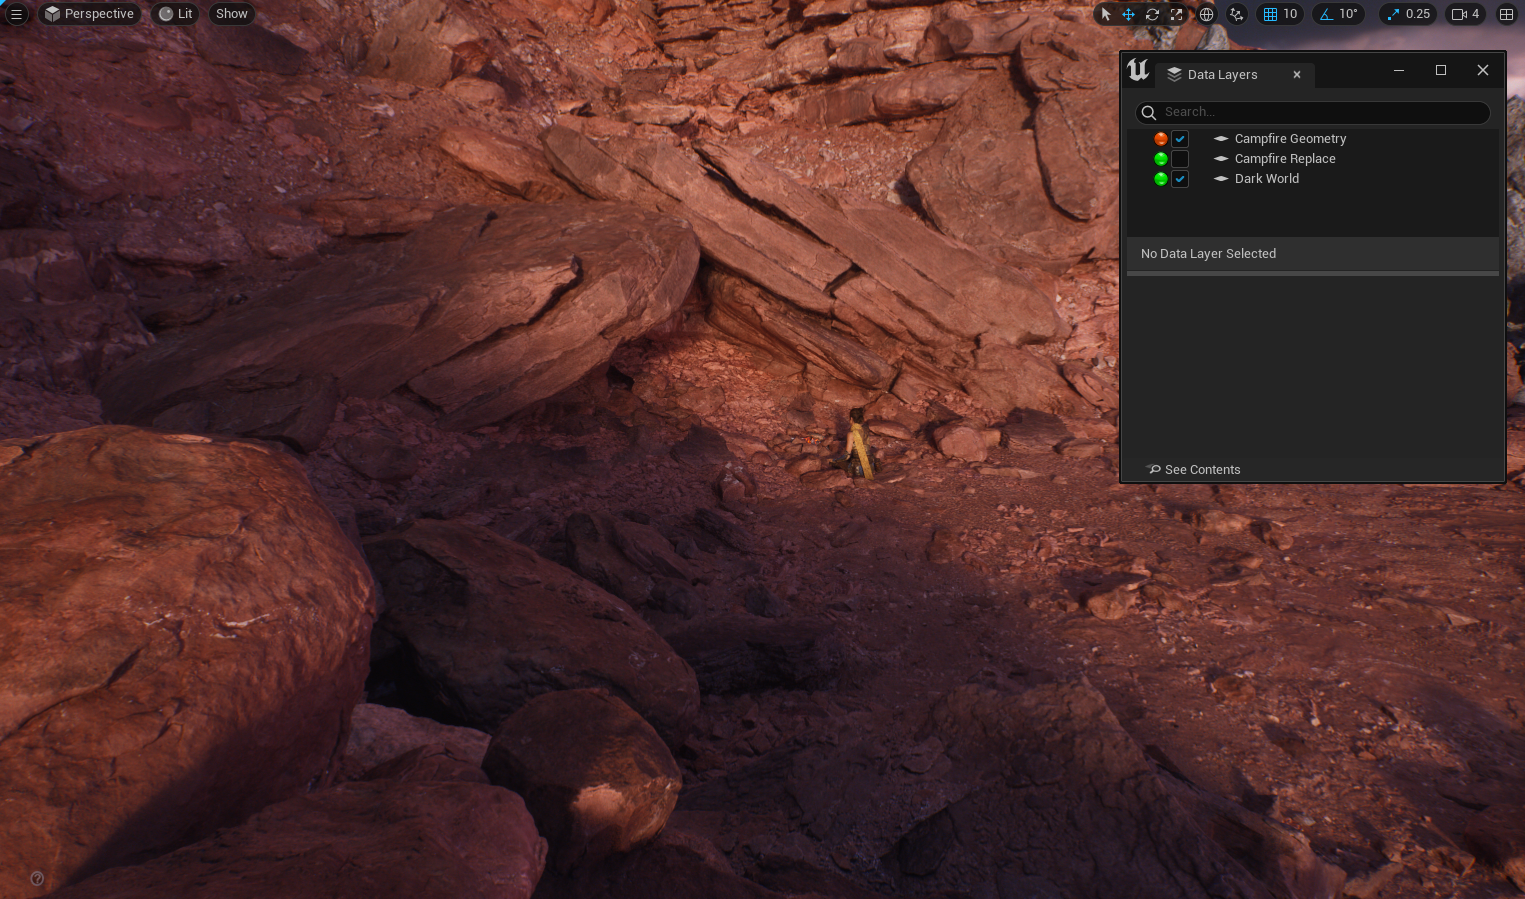
During development, this also provided a valuable tool for separating gameplay and set dressing elements, as environment artists could work in their own Data Layers without needing to interact with overlapping triggers or gameplay objects, and designers could focus on objects that were relevant to ingame events.
For more information, refer to the Data Layers page.
Flexible Real-Time Animation
UE5 also introduces several improvements to real-time animation with skeletal meshes, focused on characters and how they interact with the world. The Valley of the Ancient puts these to use in driving the interactions for both Echo as well as the massive Ancient One she confronts at the end of the demo.
Motion Warping
The new Motion Warping system provides a way for animations to adapt their root motion based on warp points in the environment. This makes it possible to use one animation flexibly in a variety of situations, greatly condensing the workload for handling complex environmental interactions.
As an example, in the Valley of the Ancient demo, Echo can vault over debris and obstacles in the dark world.
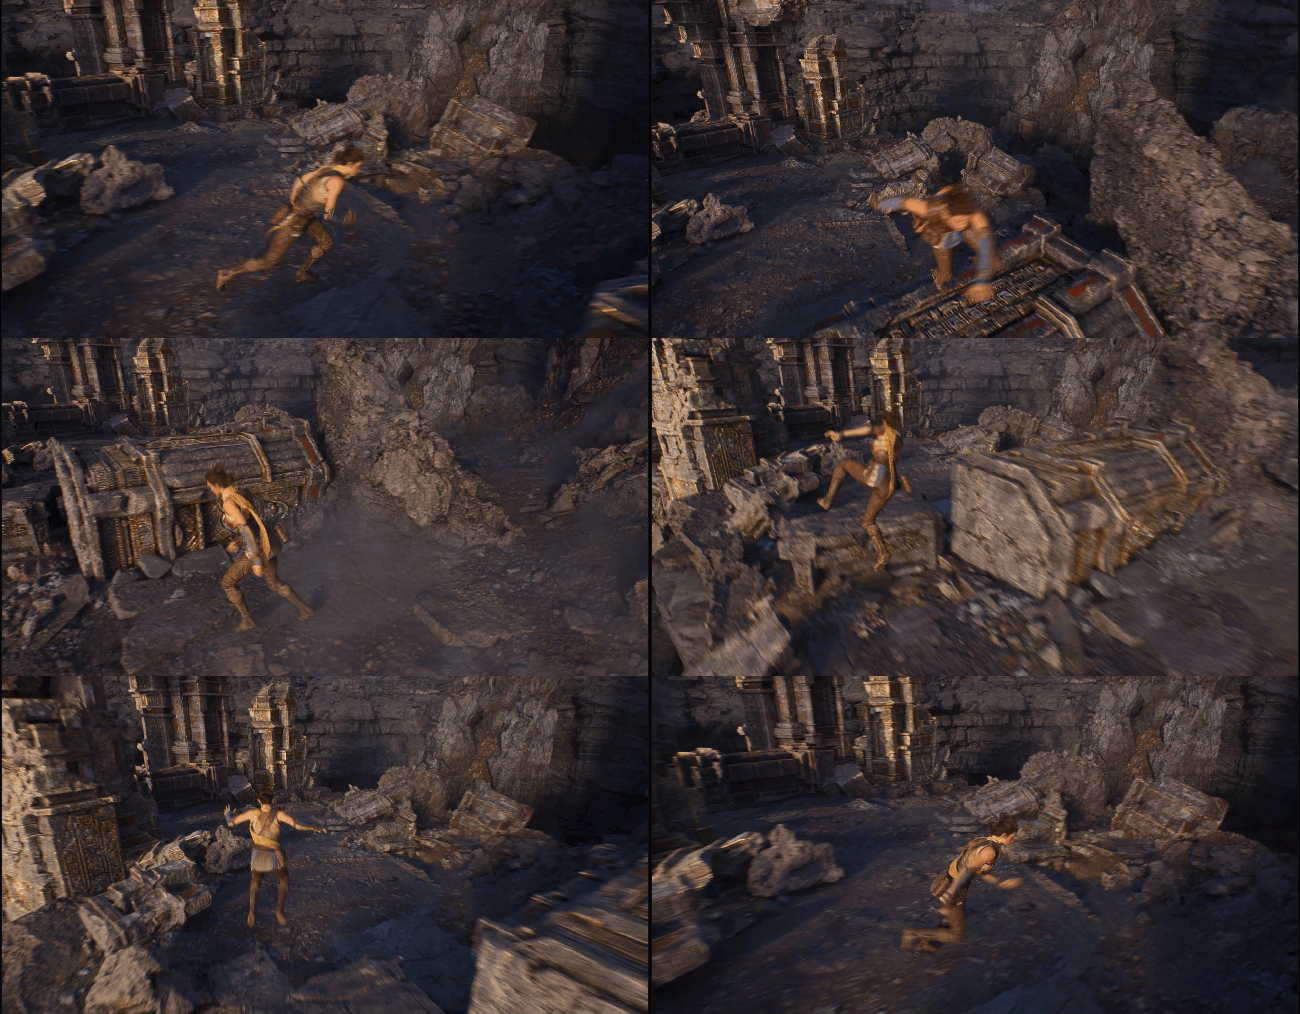
In previous workflows, making this kind of ingame action would require the team to either adopt highly restrictive conventions about the physical parameters of obstacles, create specific animations for specific obstacles, or break these actions up into component animations with complex rules about how and when to play them.
In this project, however, Echo's vault is handled entirely by the VaultOver_Montage asset.
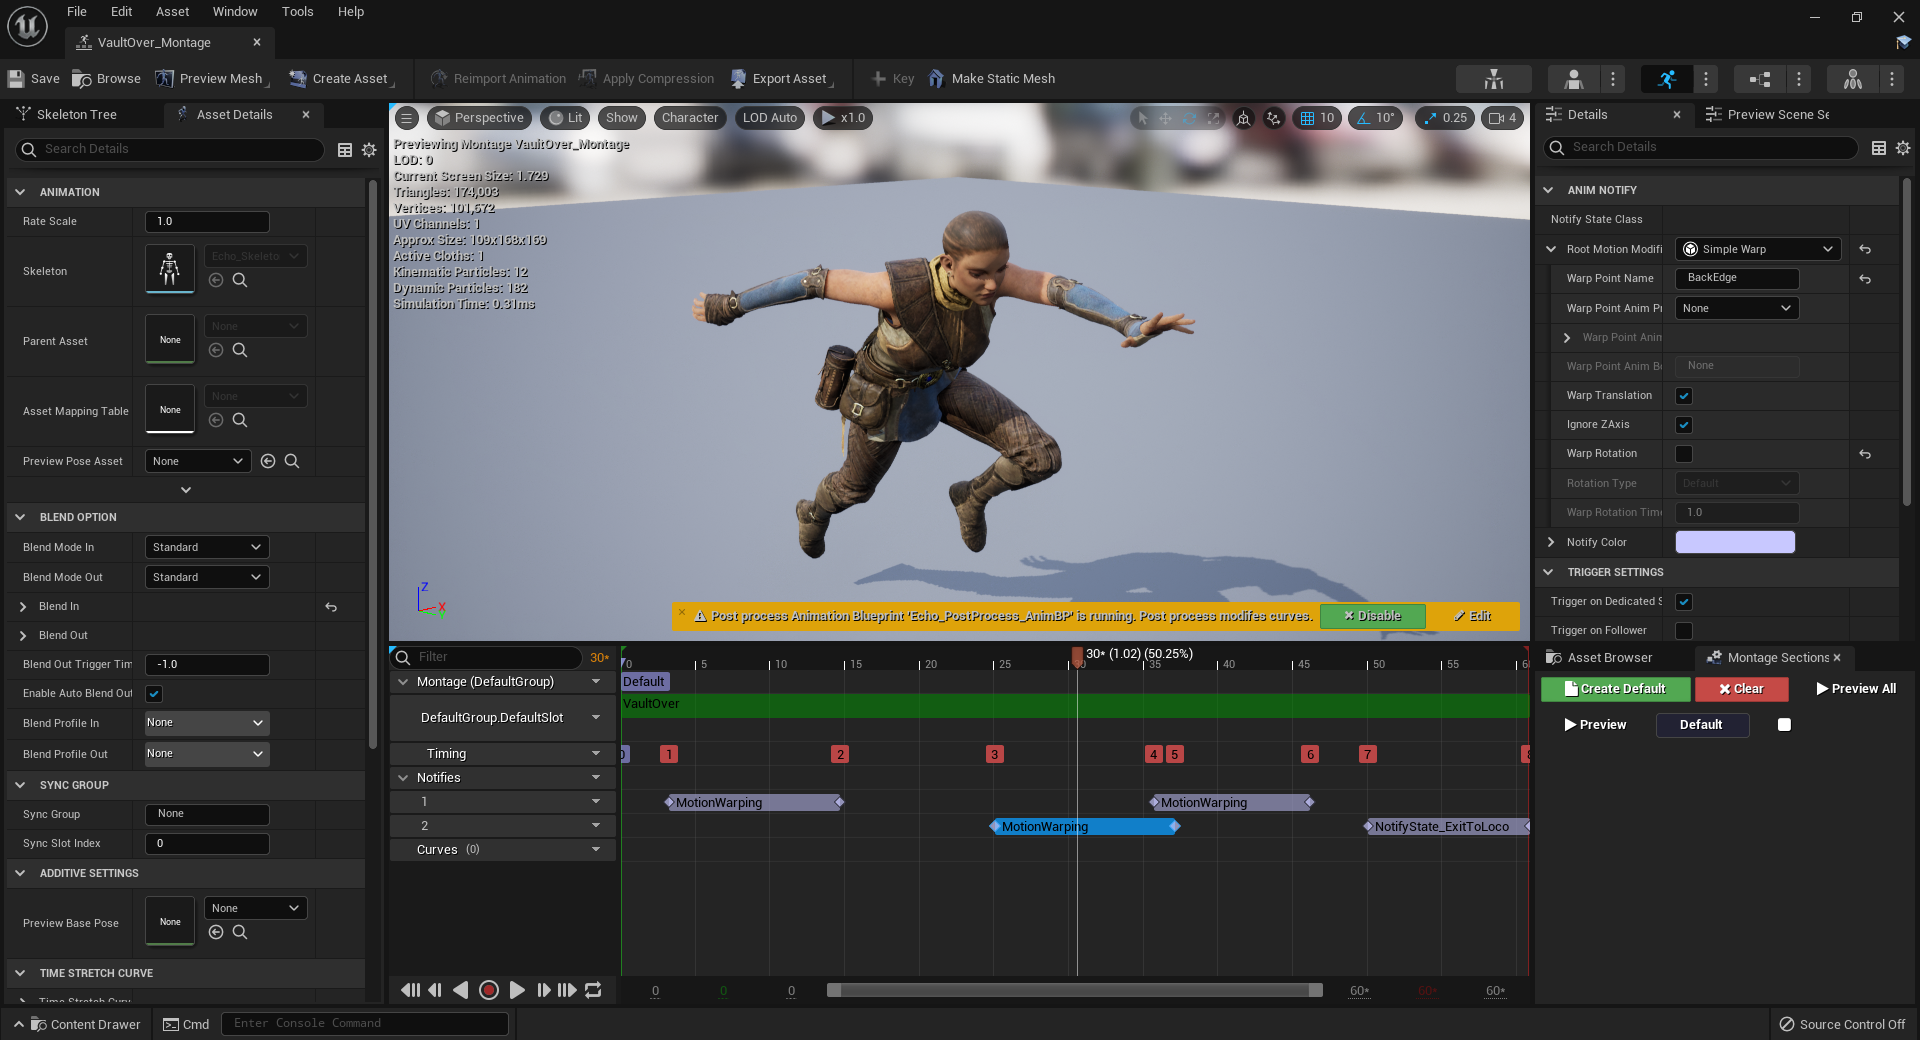
This asset uses new MotionWarping Notify States to mark segments of the animation where the character's root motion can be warped to fit the environment. Each one responds to a Sync Point placed in the environment. In this case, they are called FrontEdge, BackEdge, and BackFloor, and they correspond to different reference points on a vaultable object. FrontEdge represents the location where Echo's hand touches the object to pull herself up, BackEdge represents the point where she kicks off with a quick hop, and BackFloor represents the point where she lands on the other side of the object.
These points are set inside a GameplayAbility called GA_Vault, which triggers the vaulting behavior based on the VaultingTriggerVolume attached to BP_EchoCharacter. While there are built-in Blueprint nodes for setting individual motion warping sync points, this ability uses a custom node that computes all of the sync points at once based on data about the vaultable actor.
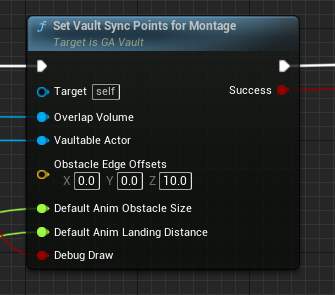
When these three points are provided to Echo's MotionWarping component, the VaultOver_Montage will automatically align her root motion to these points when it plays. This factors in the duration of the MotionWarping notify states, as well as their settings for how the motion warp for those segments should behave.
Thanks to this system, Echo can easily vault over a variety of objects in the environment with just one animation. Regardless of their height or depth, her animation will adjust itself to fit each of the destination points provided in a way that feels natural. This enables developers to gain an immense amount of flexibility out of a small library of animation assets.
For more information about how to implement Motion Warping, refer to the Motion Warping documentation.
Control Rig Improvements
Both Echo and the mighty Ancient One implement Unreal Engine's Control Rig, making it possible to animate both of them inside Unreal Editor. In UE5, we have expanded the tools available with Control Rig to include:
-
The Pose Library, which keeps a list of reusable poses that you can quickly assign to parts of your model as you build animations.
-
The Tween Tool, which can generate in-between keyframes and weight them according to information about surrounding keyframes.
-
The Snapper Tool, which can pin parts of your control rig to objects inside your game world.
These provide many quality-of-life improvements and shortcuts for composing a library of animations. In the Valley of the Ancient sample, the Ancient One's animations were authored entirely in the Unreal Editor using Control Rig and Sequencer by the Aaron Sims Creative team, who designed and built the model.
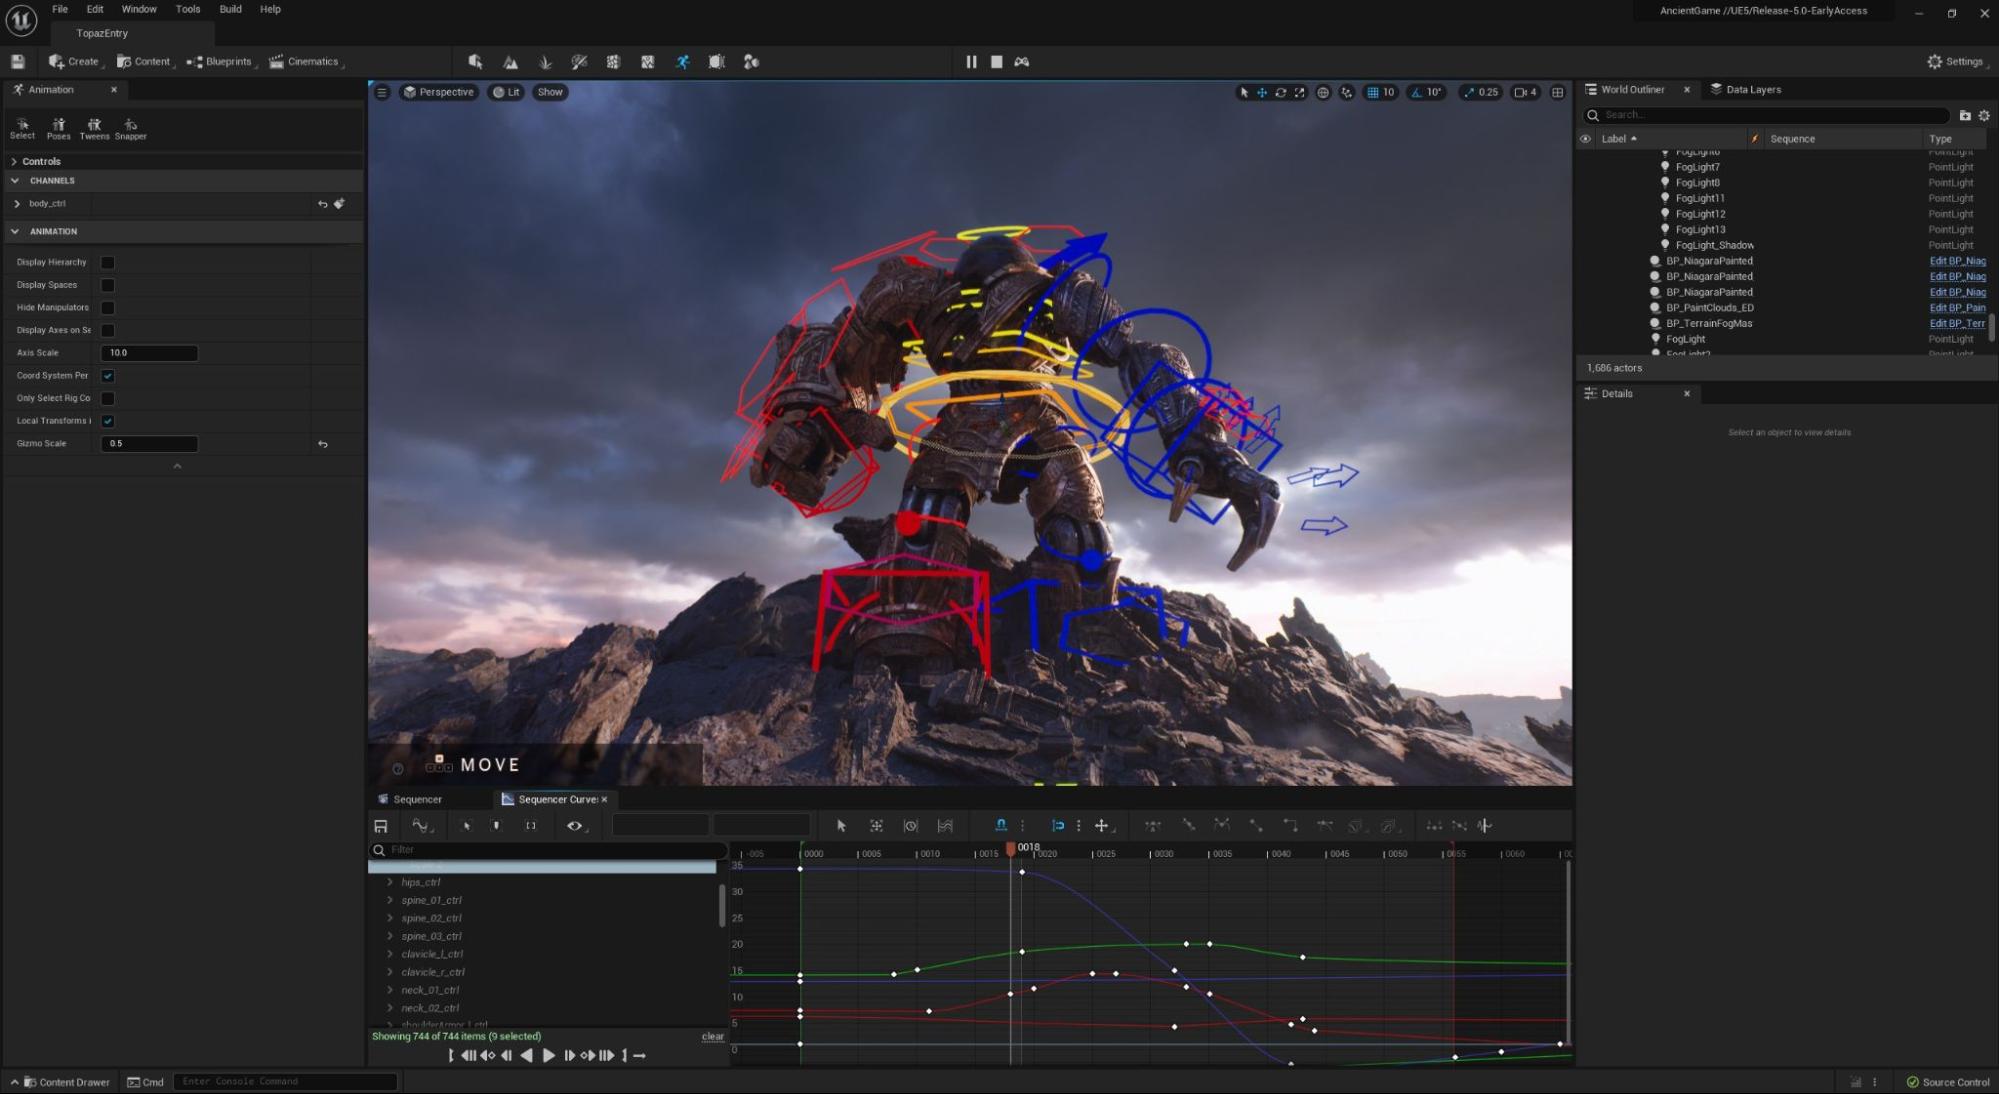
Both the Ancient One and Echo are set up with control rigs, which you can use to explore these new features. You can find Echo's rig in AncientContent > Characters > Echo > Rig, and the Ancient One's control rig in AncientBattle Content > Characters > AncientOne > Rig.

For a more thorough overview of Control Rig's improvements in UE5, refer to the Control Rig documentation.
Full-Body IK Solver
Both characters also implement the new Full-body IK (FBIK) Solver, which provides an extra layer to how they respond to the environment. FBIK is applied inside each character's Control Rig asset as a node in the Forwards Solve graph. This solver applies corrections to a model on a post-process layer after all the standard animations for the mesh are processed.
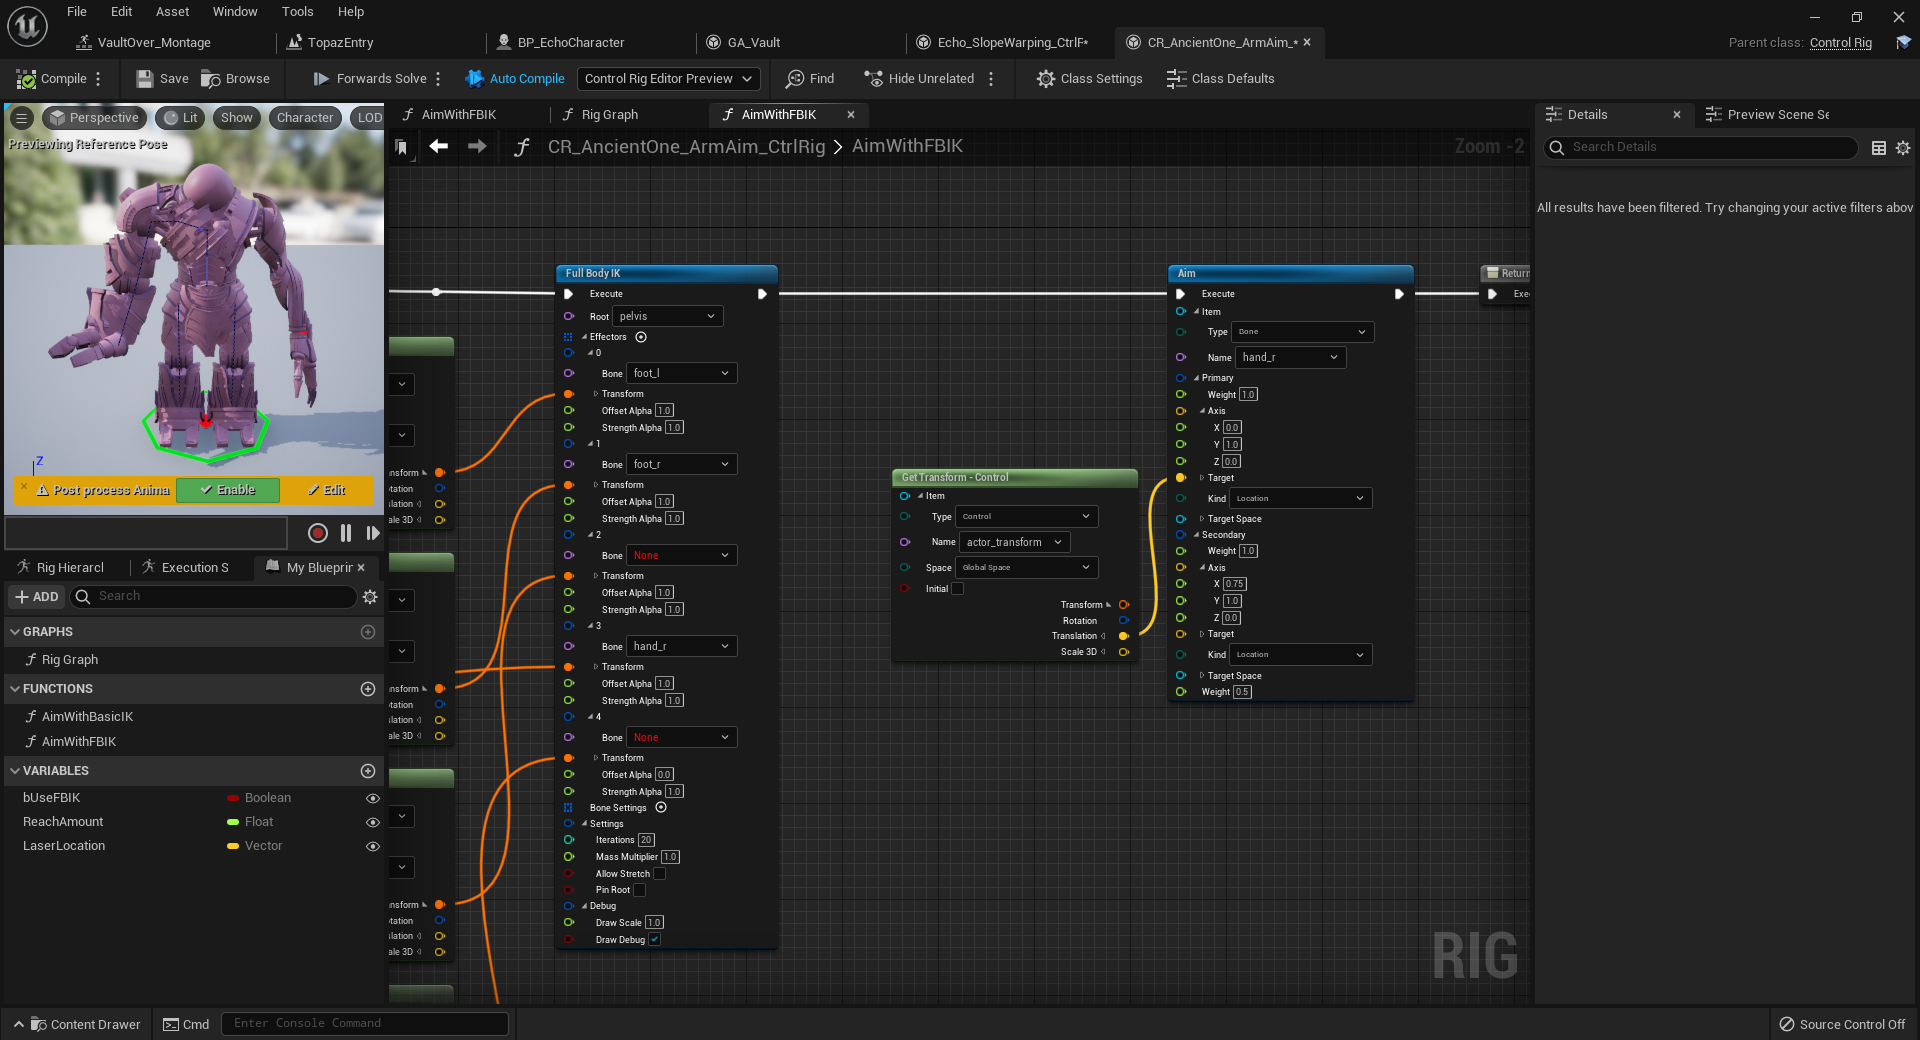
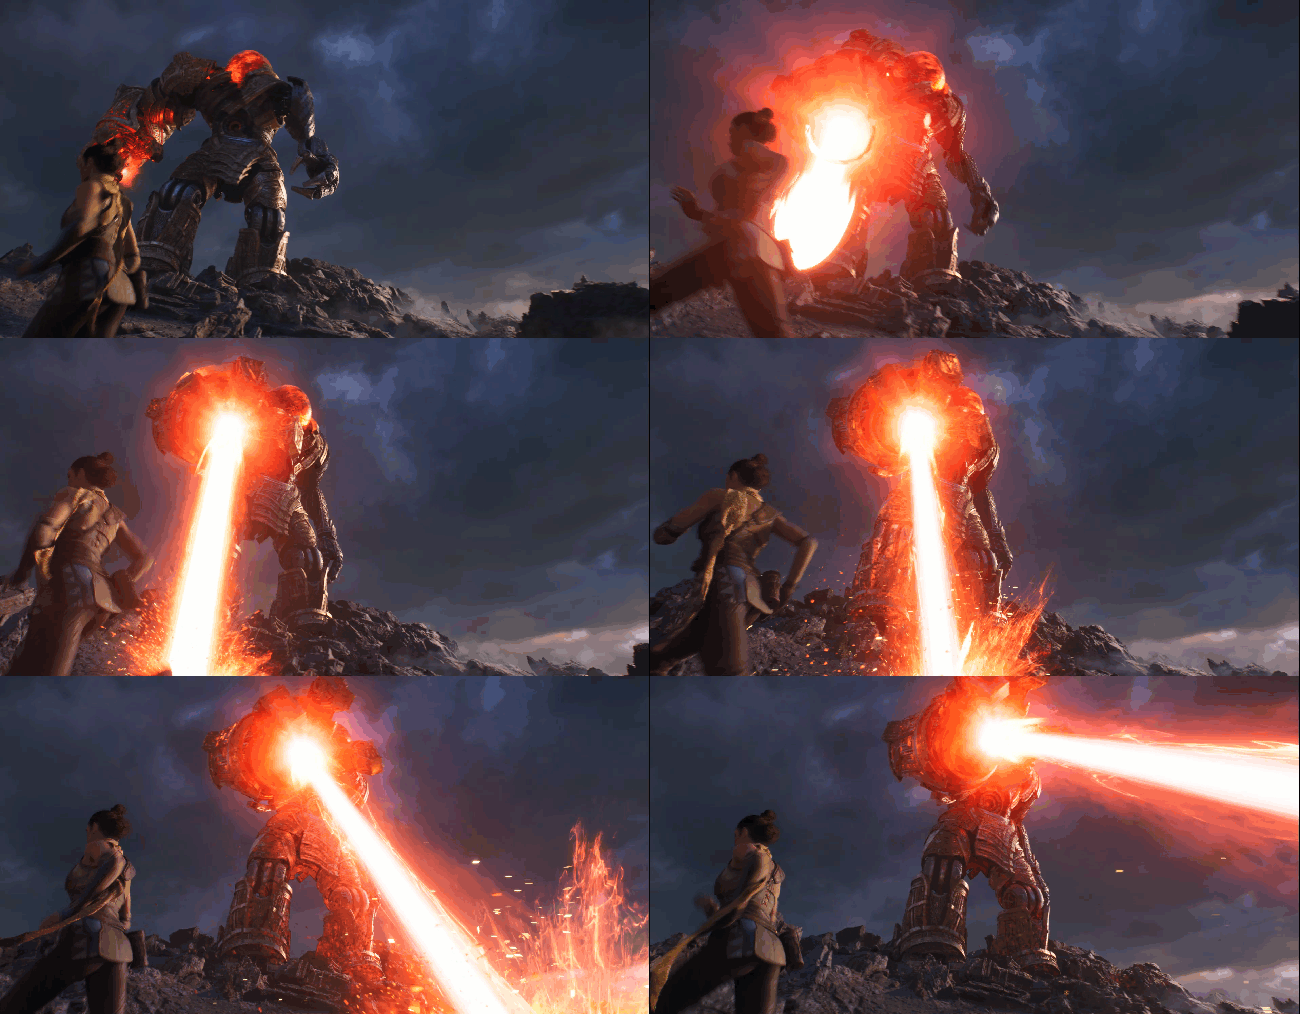
As an example of this in action, when the Ancient performs its energy beam attack, the placement of its arm is controlled by Blueprint logic as it tracks Echo's position, and the full-body IK solver handles the corrections for the rest of its body as it fires the beam.
As a more subtle example, Echo uses FBIK to adapt to the varying terrain within the game world, adjusting her feet to the angle of the ground and changing the position of her hips when moving on uneven surfaces. This creates more varied and natural movement, especially as she navigates up and down slopes or over obstacles.
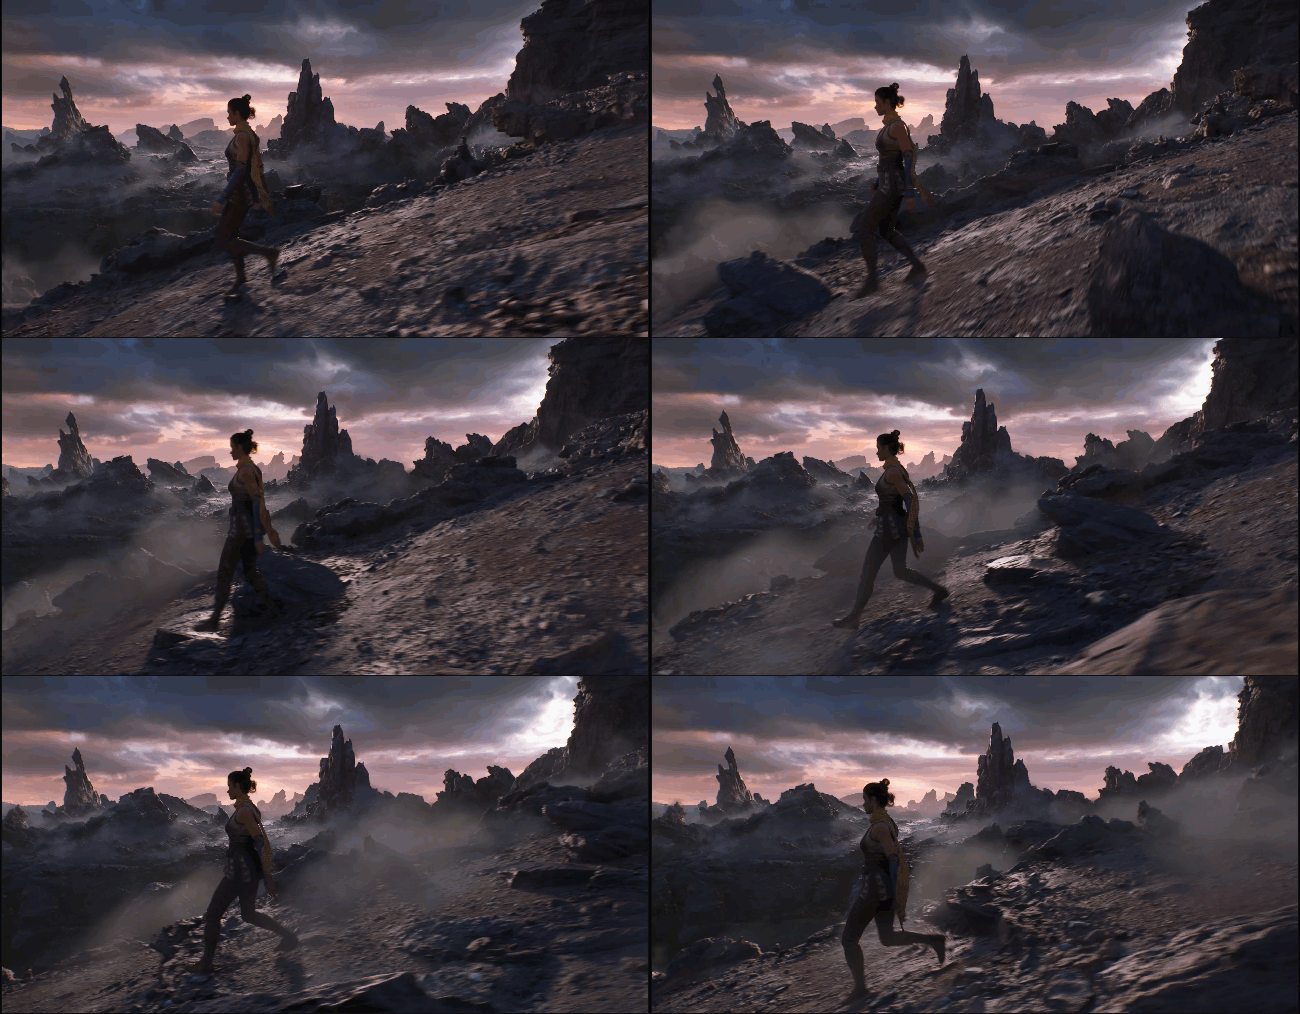
For more information about how to implement Full-Body IK, refer to the Full-Body IK documentation.
Building Modular Gameplay
UE5 also provides a framework for modularly building gameplay, and the Valley of the Ancient leverages these systems during the transition to the dark world. Not only does Echo's environment change, but new sets of input bindings and mechanics are introduced at runtime.
Extending Gameplay With Game Feature Plugins
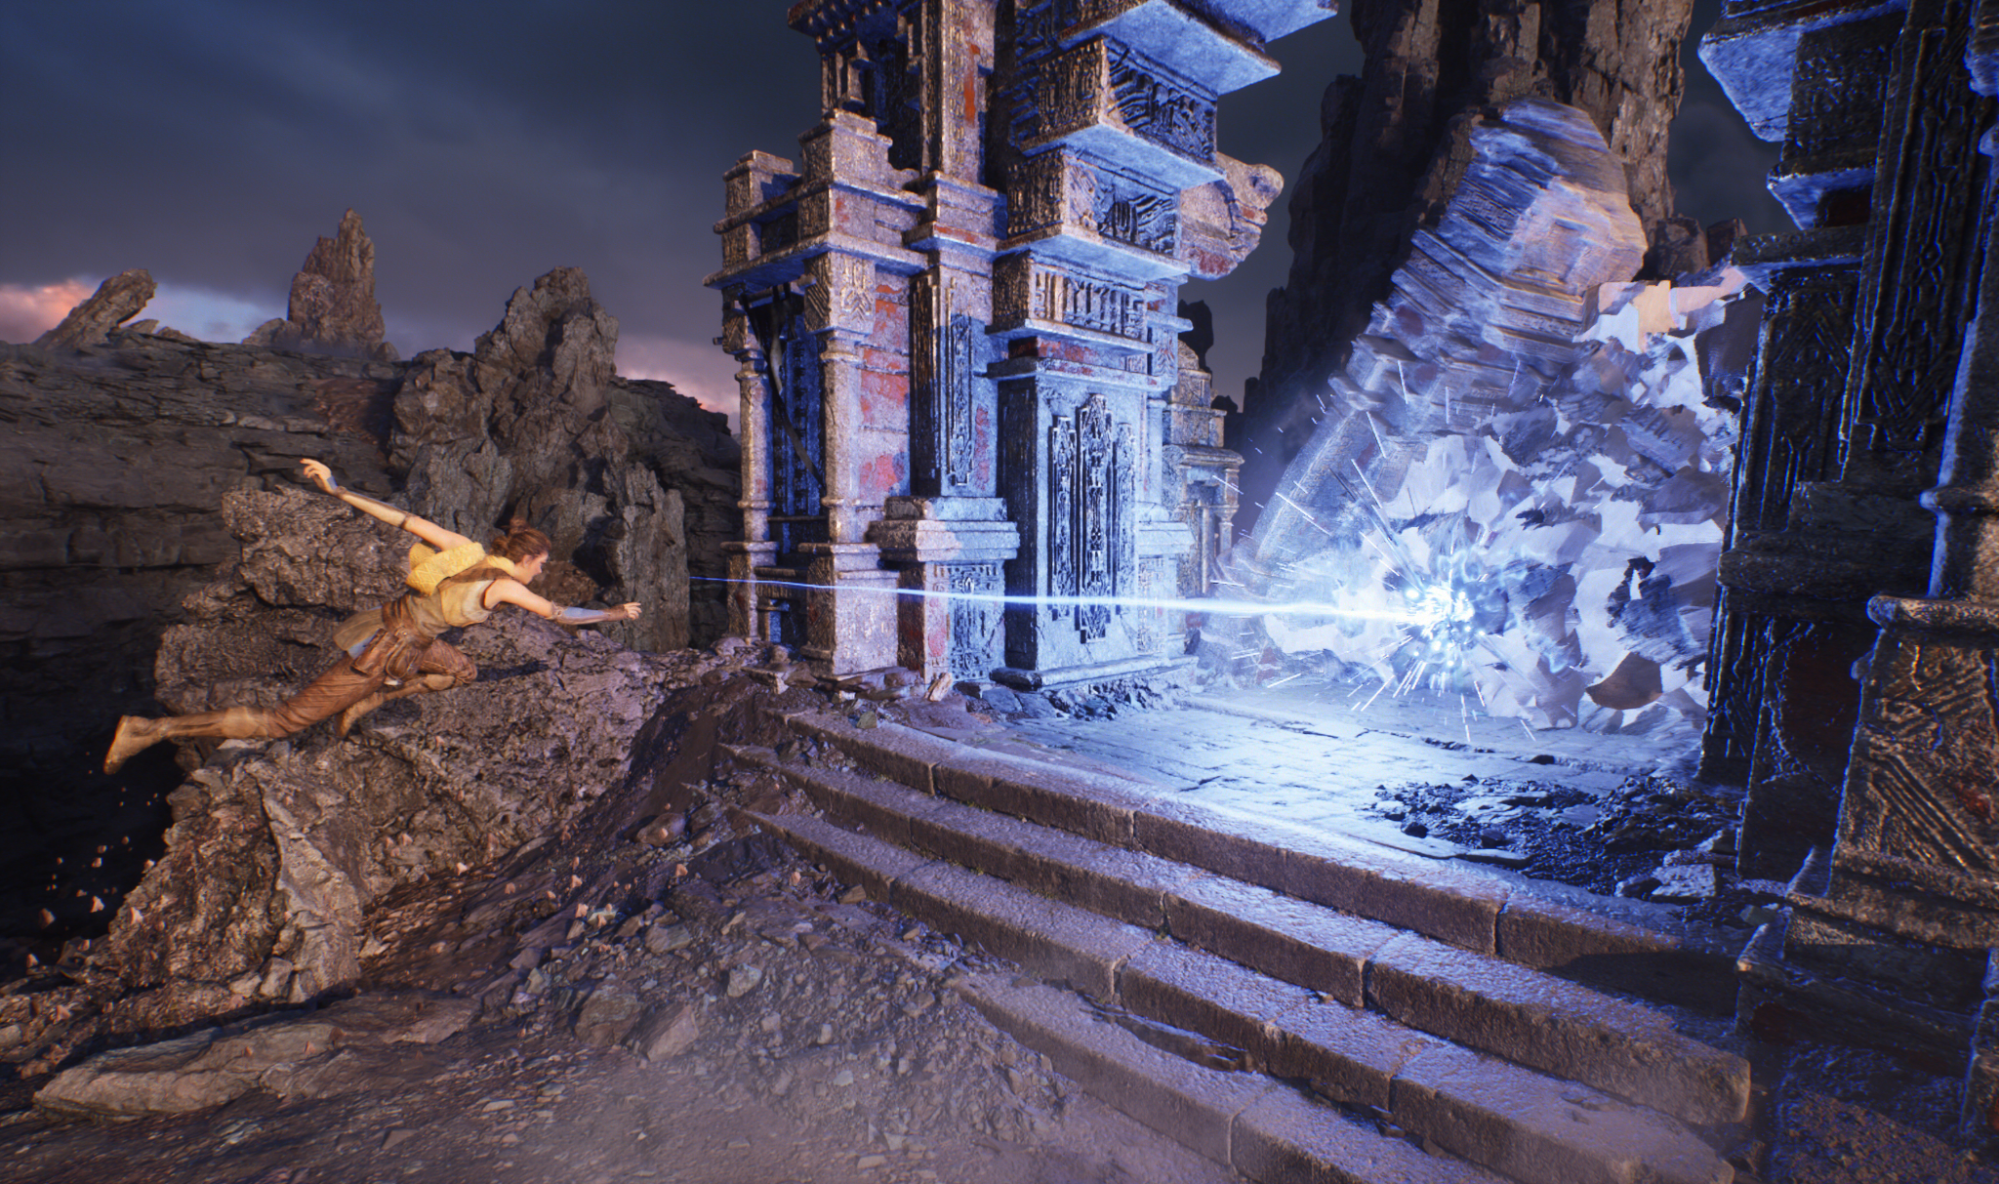
In the light world, Echo uses a remote-controlled mote of light to get a bird's eye view of her surroundings. In the dark world, she can throw a light dart to destroy obstacles and damage enemies. Each of these systems is a discrete Game Feature Plugin. Inspired by the Fortnite pipeline, this system makes it possible to develop features independently from one another and integrate them into the main game at-will. You can even load and unload them at runtime.
To create a new Game Feature, open the Plugins window and click Create Plugin. You can select a Game Feature for your base plugin type.
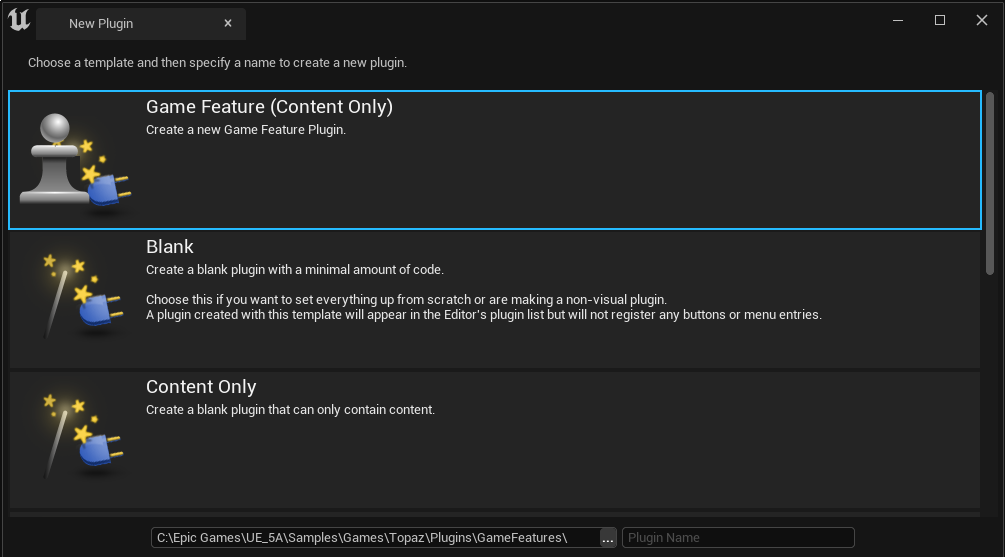
The plugin can then be found inside your project's Plugins directory.
When using standard plugins, the game can refer to classes and assets from those plugins, but the plugins do not have visibility into the base game's code or assets. With Game Features, that dependency flow is reversed. They depend on the base game, but the base game can not reference classes or functions from a game feature. This makes their implementation similar to mods, extending or modifying elements from the base game.
In Valley of the Ancient, the Light Dart and the Ancient One are both contained in the AncientBattle game feature. The basic systems that Echo needs to gain and use special abilities are already built into her base Actor, but the Light Dart provides a specific implementation of it. The Ancient One and other actors capable of responding to damage are also contained in this Game Feature, making the combat system fully encapsulated within this module. This feature's content is located in the AncientBattle Content folder.
To view this game feature's content in the Content Drawer, click the Settings button, then check Show Plugin Content and locate the AncientBattle Content folder.

All assets related to the Light Dart, including animations, visual effects, UI elements, and Blueprints are located inside this folder. At the top level of this folder there is a AncientBattle Game Feature Data asset.
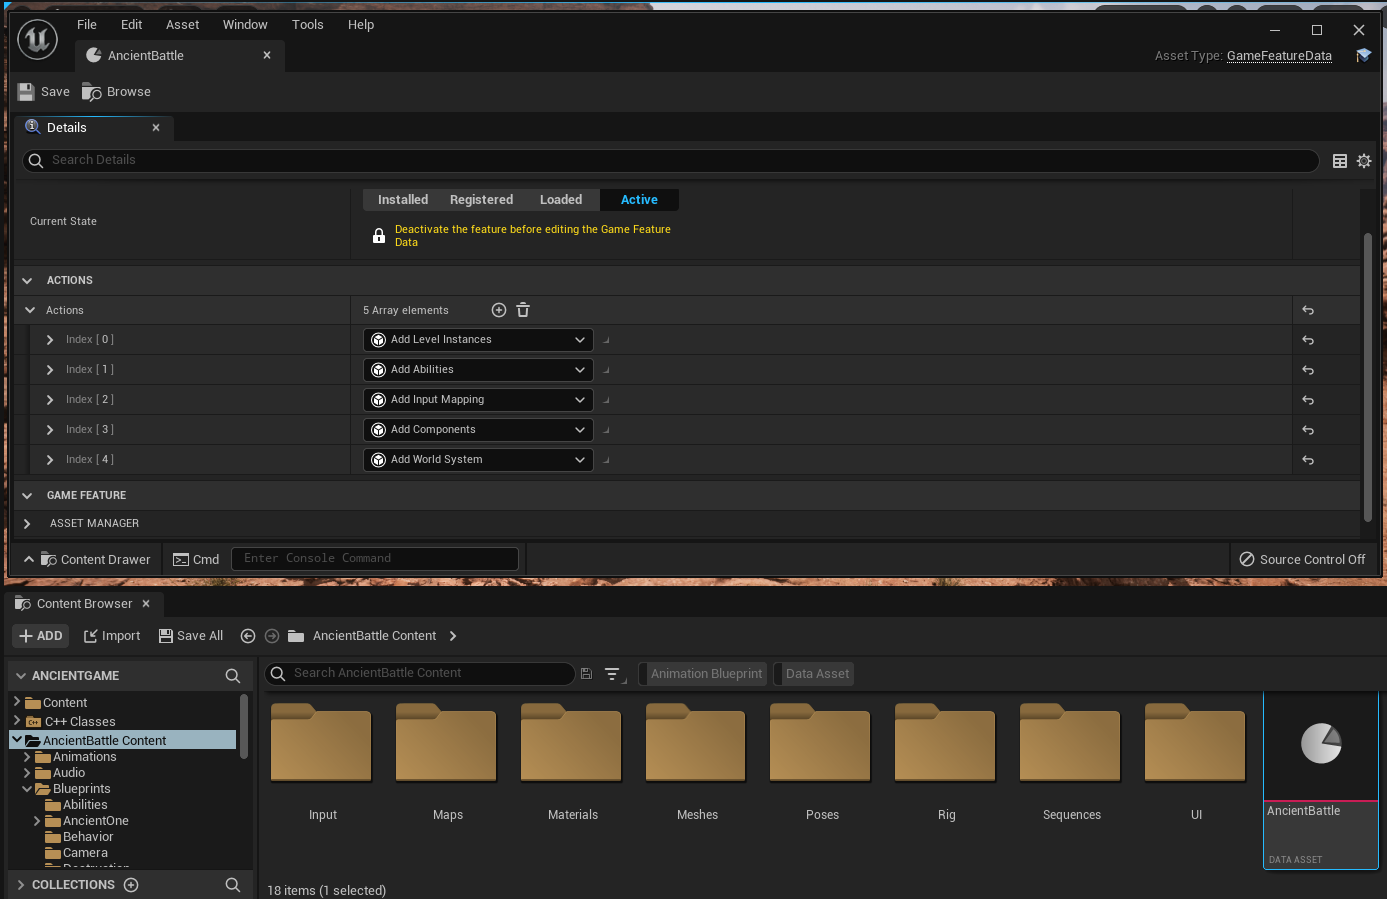
This asset contains instructions on how the plugin should behave when it is loaded and unloaded. The Light Dart plugin specifically has instructions to add the LightDart Gameplay Ability to Echo, set her up with input that will activate the ability, and attach needed components to her.
During gameplay, these features are toggled inside the BP_DarkWorldRift Blueprint when triggering the transition to the dark world.
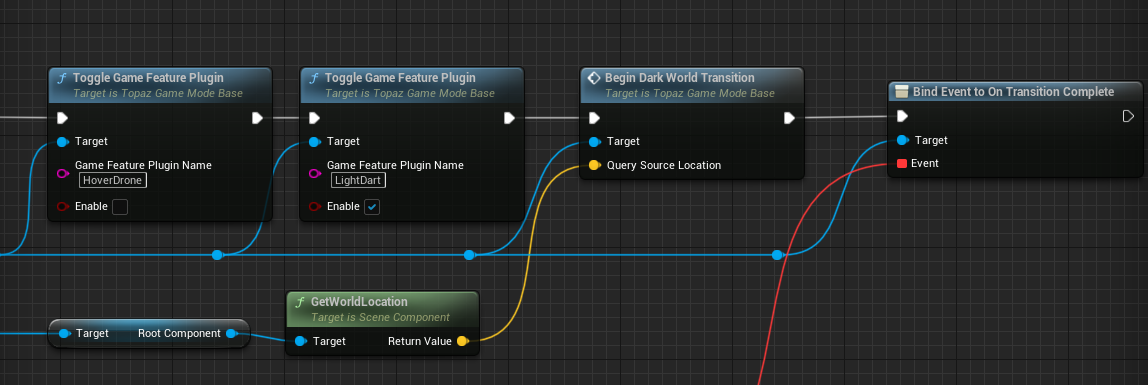
No additional references to the LightDart are necessary in the game's main codebase or assets. Once it is added to Echo, all of its components are ready to use thanks to the instructions in its Game Feature Data.
This system enables developers to easily control what sets of features are active at a given time. It is especially useful when dealing with mechanics that work within a limited timeframe or scope. Here we use it to toggle Echo's Light Dart when she transitions between worlds, but it is just as easily adaptable to limited events in online games, brief cinematic segments, or major mode changes during gameplay.
For more information about Game Feature plugins and how to implement them in your projects, refer to the Game Feature Plugins documentation.
Flexible Controls With the Enhanced Input System
UE5 features a new Enhanced Input System, which is used in Valley of the Ancient for Echo's controls. This system not only handles Echo's movement and abilities, but also provides methods for handling the context-sensitive elements of those inputs, including situational data for specific controls and adding or removing inputs based on player states.
Whereas the input system in UE4 processed raw inputs with events in an Actor's event graph, Enhanced Input models controls as Input Actions, which are represented by assets in the Content Drawer. Most of the Input Actions for Valley of the Ancient are located in Content > AncientGameContent > Input. The Input Actions specific to the dark world are contained in AncientBattle_Content > Input, and the Input Actions specific to the hover drone are contained in HoverDrone_Content > Input.

These include not only common controls, like IA_MoveForward and IA_MoveRight, but also highly situational ones, like IA_SitStand, which is used when Echo stands up from the campfire. You can open Input Actions to configure what type of value they return, including different types of axis values. You can also provide a list of Triggers, which add contextual requirements to activate the input, or Modifiers, which process the value of the input before passing it to gameplay.
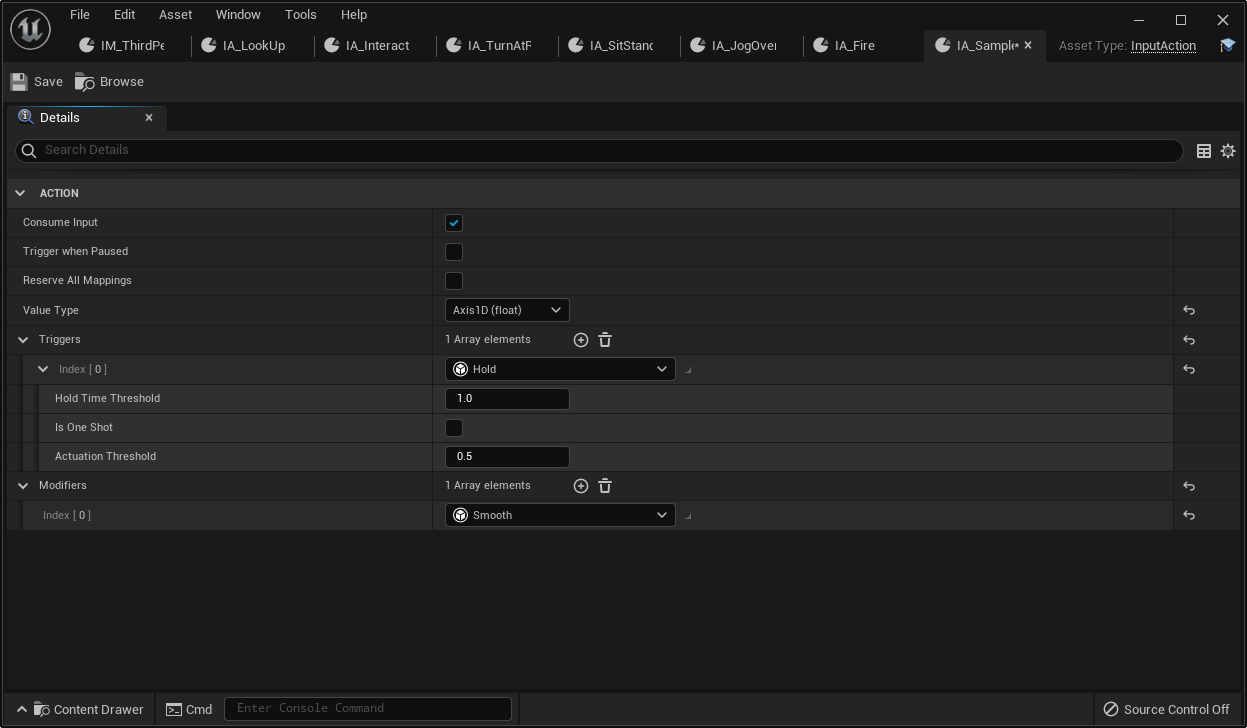
Triggers and Modifiers make it possible to handle dead zones, responsiveness curves, or contextual actions that are required to activate the input, all without manually filtering input data in gameplay code for your Actors. You can add more Triggers or Modifiers to your projects by defining them as either Blueprint or C++ classes.
Once an InputAction is defined in your Content Drawer, you can access it using an event in Blueprint. The InputActions for controlling Echo are handled in BP_EchoCharacter.
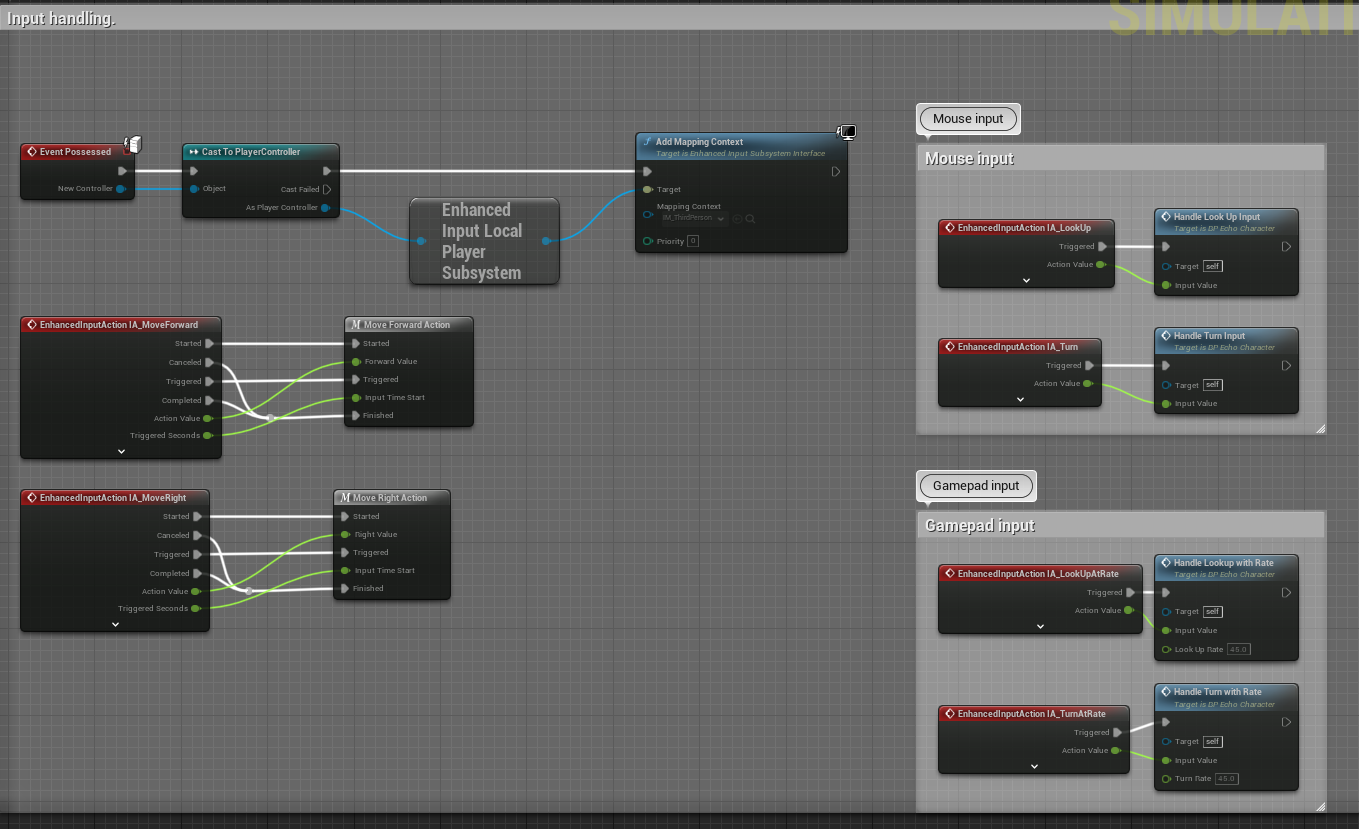
While these events function similarly to standard Input events, they provide more contextual information about the Input Action, including when an action starts, finishes, is in-progress, or gets forcibly canceled, as well as the time that the action is active. The value of the input event is defined by the Value Type listed in the InputAction asset. Any Modifiers listed for the InputAction will be applied before this value is output.
Input Mapping Contexts handle mapping InputActions to physical controls. You can find these assets alongside the InputActions. IM_ThirdPerson_Controls_InputMapping contains the majority of Echo's controls, while IM_LightDartInputMappings contains the added controls for the Light Dart ability and jogging.
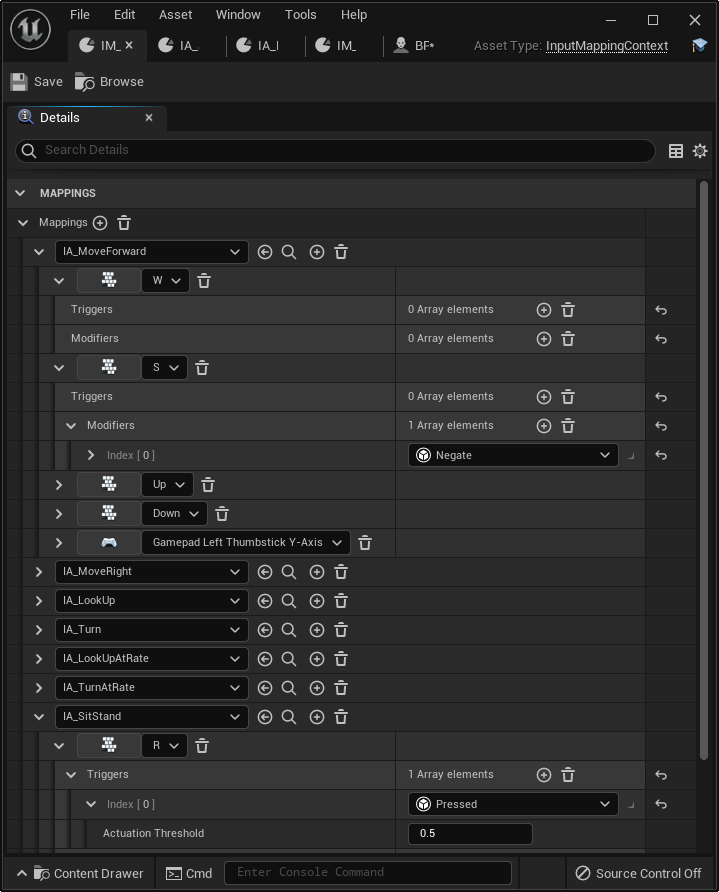
These are organized similarly to the action and axis mappings in the input system from UE4, but in addition to mapping InputActions to physical inputs, they also can apply Modifiers and Triggers to specific control implementations. For instance, Echo reads IA_MoveForward to determine forwards and backwards movement. While the W key has no Modifiers added to it, the S key uses a Negate modifier, which will cause it to read as negative input.
One of the advantages of Input Mapping Contexts is that they can be added and removed for individual players at runtime. For example, the AncientBattle Game Feature plugin adds IM_LightDartInputMappings when it is loaded.
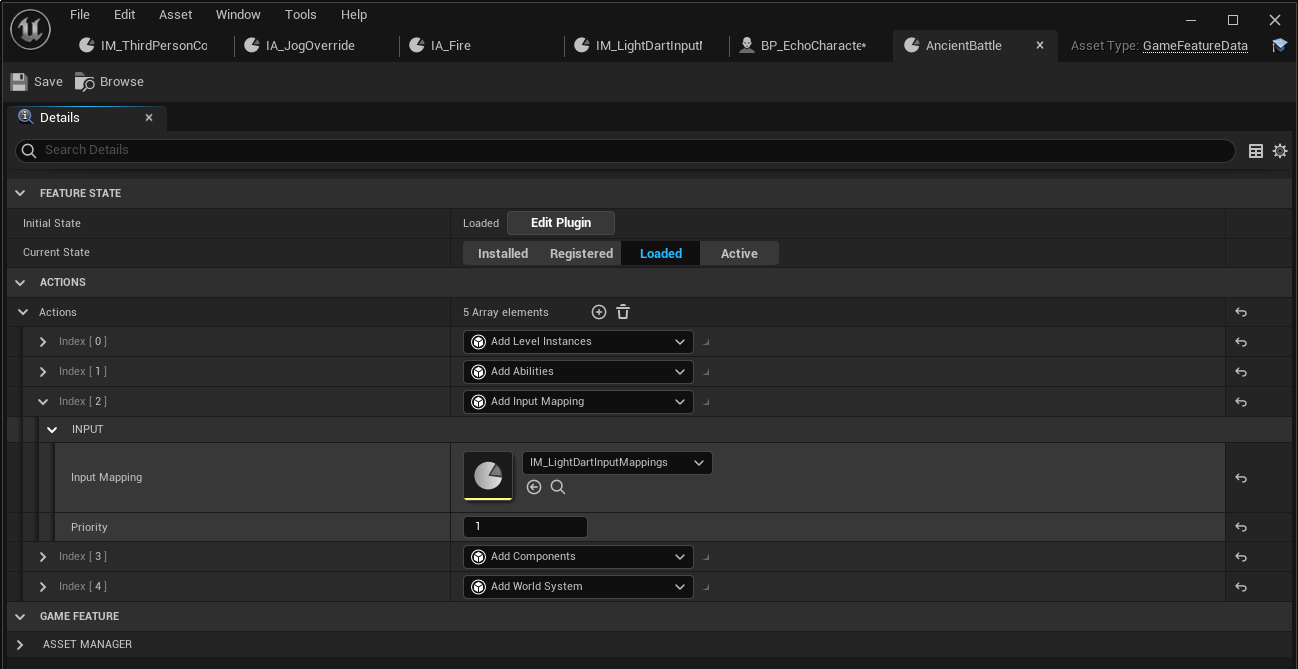
This Game Feature action was created specifically for this project in C++. You can see another example of input mappings being added and removed at runtime in the HoverDroneControlsComponent, a C++ class in the HoverDrone Gameplay Feature that extends the EnhancedInputComponent.
This example illustrates how the Enhanced Input system provides a highly extensible and flexible framework for managing a game's inputs. You can easily expand upon and adapt a game's inputs over the course of development without destructive changes to gameplay code, and this system has many tools for contextual or special case inputs. For more information, refer to the Enhanced Input System documentation.
Dynamic Interactive Audio
In addition to all of the tools that give you freedom in building visuals, game mechanics, and worlds, Unreal Engine 5 also provides more control over your game's audio with an all-new audio system. This section will show you how Valley of the Ancient uses these new tools to provide an extra sense of polish and dynamism for Echo's final encounter with the Ancient One.
MetaSounds
MetaSounds is the new high-performance audio system for Unreal Engine 5, providing a fully featured Dynamic Signal Processing (DSP) graph for audio designers. This system can synthesize procedural sound effects and music from the ground up, and features a Blueprint API that provides a way for designers to manipulate sounds based on gameplay events and in-game data. This provides sound designers with robust flexibility during development, supporting fast iteration, complex and dynamic sounds, and the ability to effortlessly adapt sound effects to game design changes.
For an example of the power and versatility of MetaSounds, you can find sfx_Golem_RobotBlast_Meta in the AncientBattle Content folder under Audio > MetaSounds.
This MetaSound uses a mixture of procedurally generated audio and .wav samples to create the sound effect for charging the Ancient One's beam. The first sections handle the bulk of synthesizing and modulating the main charge-up sound, which is completely procedural.
The Intro Wave and Shot Waves sections add an extra layer of texture to the sound with some supplemental .wav files. The Intro Wave section triggers when the beam initially starts to charge up. The Shot Waves section also has a sound that triggers when the beam begins charging, but also has components that trigger after the charge-up sound has fully played.
The middle sections of the graph handle mixing and filtering between each of these different sections into a final Stereo Mix, then feed into the Output node to play the final sound.
Triggers, parameters, and .wav files act as inputs, then the MetaSounds flow graph processes that information based on DSP nodes and mixes it into a final sound output. This system provides audio designers with a workflow for sound that is as powerful and flexible as the Material editor, capable of adapting to both typical sound parameters as well as in-game data, making it possible for them to work more closely and efficiently with a game development team within one sound design environment.
For example, during development of the battle sequence, a lot of iteration time was spent fine-tuning the amount of time the Ancient One spends charging up its beam. In other sound design workflows, this might entail re-authoring the sound based on changes to gameplay. Instead, the sfx_Golem_RobotBlast_meta MetaSound uses a Time input called ChargeDuration to determine how long the sound should play. Since the main charging sound is entirely procedural, it automatically adjusts its length based on the given input.
To see this in action, select ChargeDuration from the Inputs list, change it from its default value of 4.0 seconds, then try playing the sound.
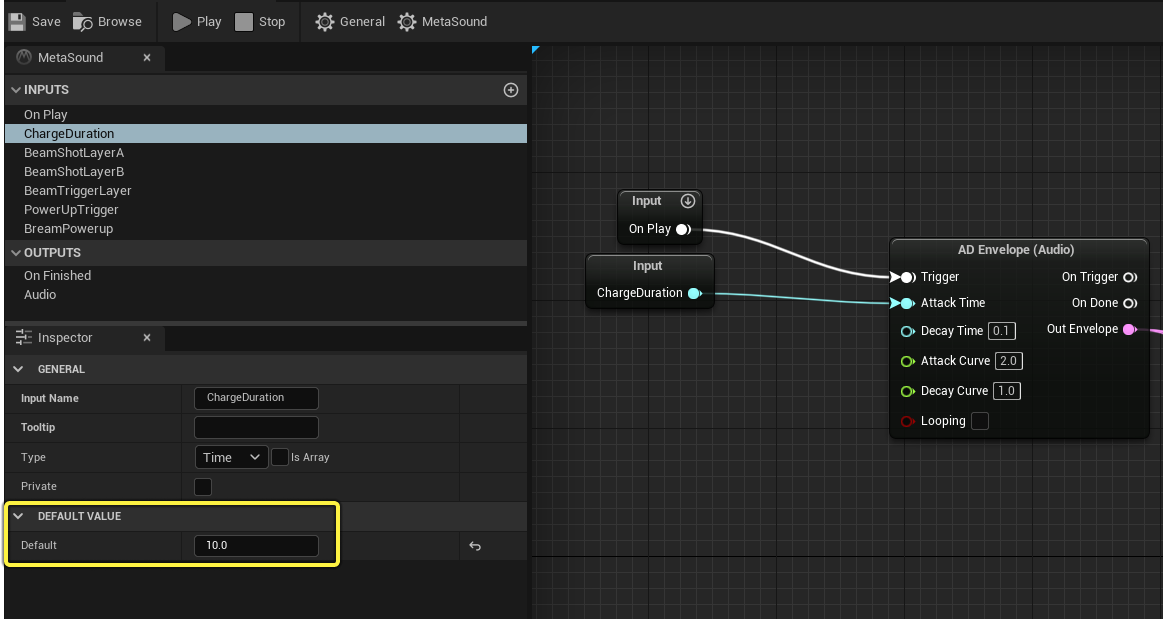
Thanks to this functionality, the game design team could change the Ancient One's charge duration as often as necessary without the need to re-author this sound.
There are many other Input parameters available to work with, including Triggers that you can activate from gameplay code using the Audio Parameter Interface. You can use these to create MetaSounds that procedurally handle starts, stops, and intermediate events. For instance, where an action like a gun firing would previously require multiple sounds for starting, stopping, and looping fire, this system can condense it all into just one MetaSound.
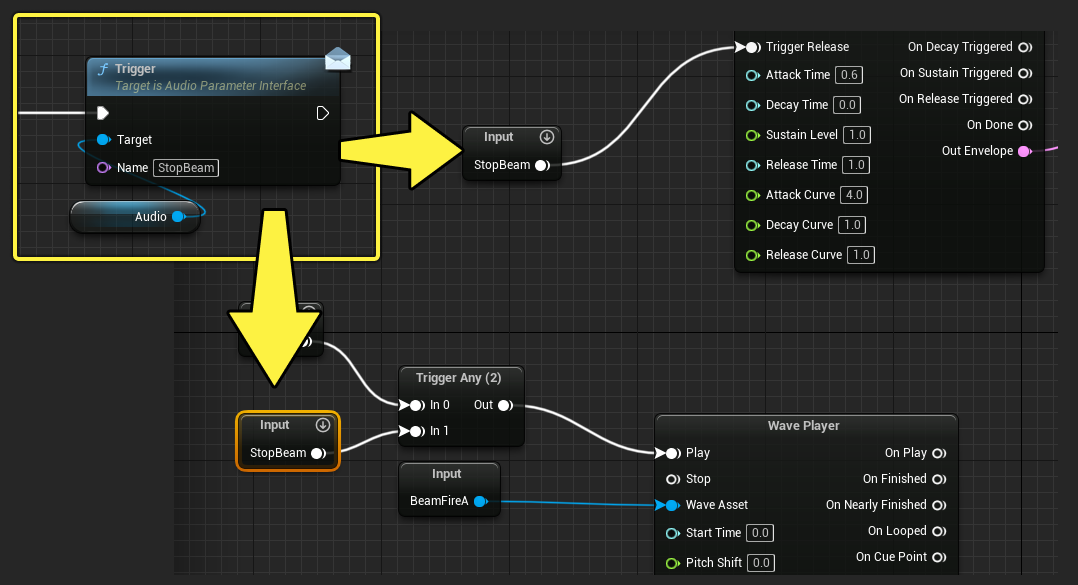
You can also manipulate other audio parameters using this API. This makes it possible for MetaSounds to fully encapsulate the sound playback logic for complex sound effects, all with sample-accurate timing.
MetaSounds' capacity for flexible design and infinite variation is complemented by significant performance improvements. The MetaSounds graph is rendered asynchronously, similarly to how individual sound effects are normally decoded, which provides an extra degree of flexibility in handling CPU resources. More importantly, since MetaSounds is a true audio rendering system, each MetaSound represents a single in-game voice, regardless of its complexity. This means that the playback you hear in the MetaSounds editor will always be accurate to its in-game sound, and in-game voice management is more predictable compared with earlier systems. This also condenses the workflow for evaluating audio performance, as in the future UE5 will be able to profile the performance of specific MetaSounds individually.
For more in-depth information on MetaSounds, refer to the MetaSounds documentation.
Quartz Audio Synchronization
Normally, discrepancies between the way the gameplay and audio threads are processed makes it difficult to synchronize events between them with accurate timing. Quartz provides a clock for scheduling sample-accurate audio playback from gameplay events. When you schedule a sound using Quartz, you can set up delegates based on specific timing relative to scheduled playback. The Quartz Clock will provide event delegates for that sound's playback so that gameplay can anticipate the intended timing and synchronize other gameplay events when appropriate. This makes it possible to create sample accurate dynamic music systems, as well as game systems with a high level of synchronicity with audio.
Valley of the Ancient uses Quartz in its dynamic music system, called the Underscore Subsystem, which schedules events based on musical beats and bars. Notably, the Ancient One chooses when to fire its laser based on the timing of the music cue during its showdown with Echo. Classes for this system are contained in Underscore C++ Classes.

Music for this system is contained in a special data asset called an UnderscoreCue, which contains the data for the music cue's time signature, different musical sections, transitions, and other information relating to musical states and events. The battle music for the Ancient One's battle is contained in the Arena_Battle_Cue asset, which is located in AncientContent > Audio > UnderscoreCues.
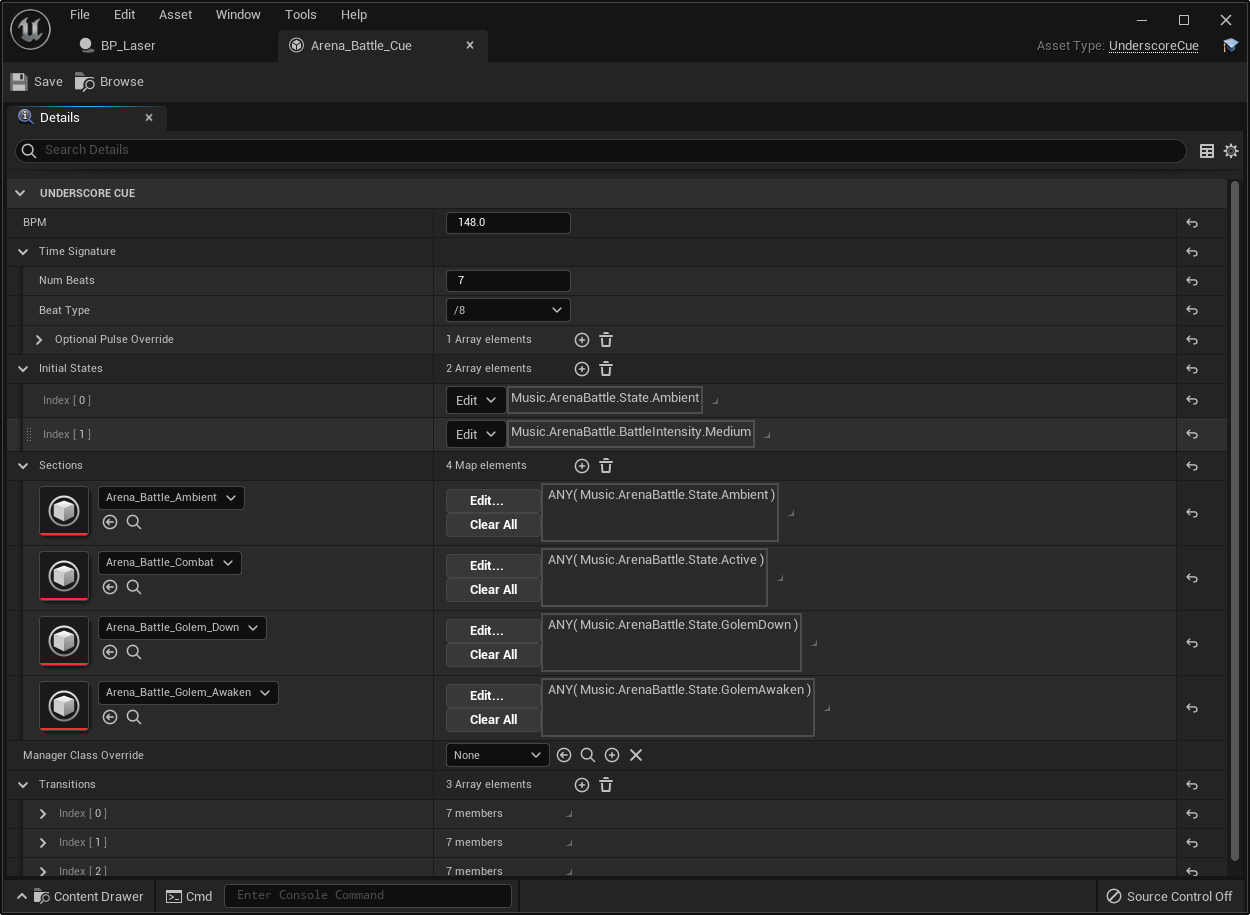
This contains the references to the clips that make up this music cue, as well as the music's BPM and Time Signature. This data is a description of the music, used by the music system to set up the Quartz Clock and manage timing transitions between each section. The introduction is set up to transition into the main body of the battle music, which is broken up into several different states. These states occur based on many different in-game events, and the music concludes with a beat-synchronous ending. Thanks to Quartz, all of this occurs with seamless, sample-accurate precision.
To see an example of how these sections relate to in-game events, you can find hooks for this system throughout BP_Laser and BP_AncientOne, which are in the AncientBattle Content directory. In addition to the logic for the laser itself, BP_Laser contains calls to bind events to the Underscore Subsystem, enabling the music to trigger the laser.
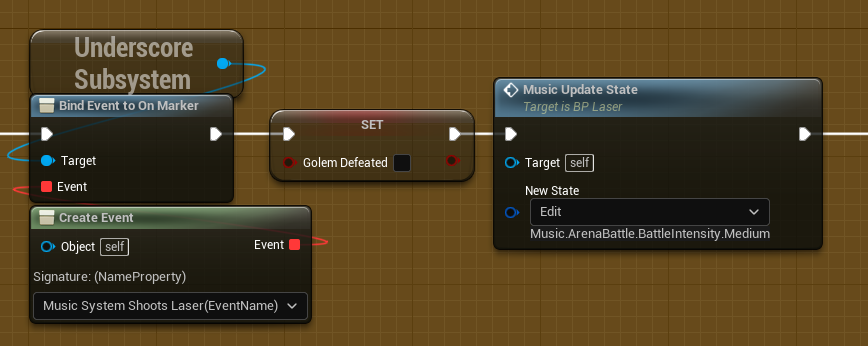
It also contains calls to the Underscore Subsystem to tell the music when to transition to other sections of the song, including when the beam finishes firing and when the Ancient One is defeated.
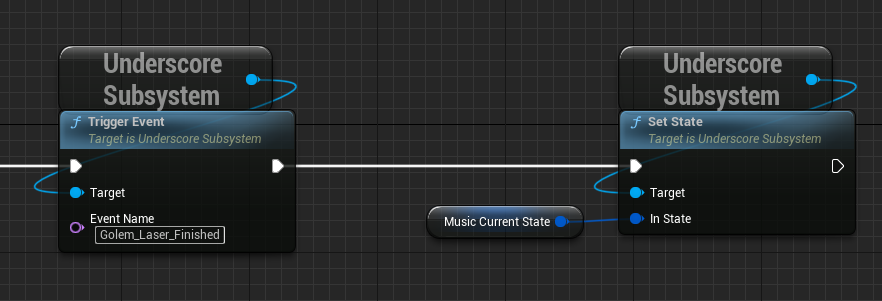
These are just a few examples of how the Underscore subsystem uses Quartz to facilitate dynamic music systems and precise interactions between gameplay and audio.
Final Notes
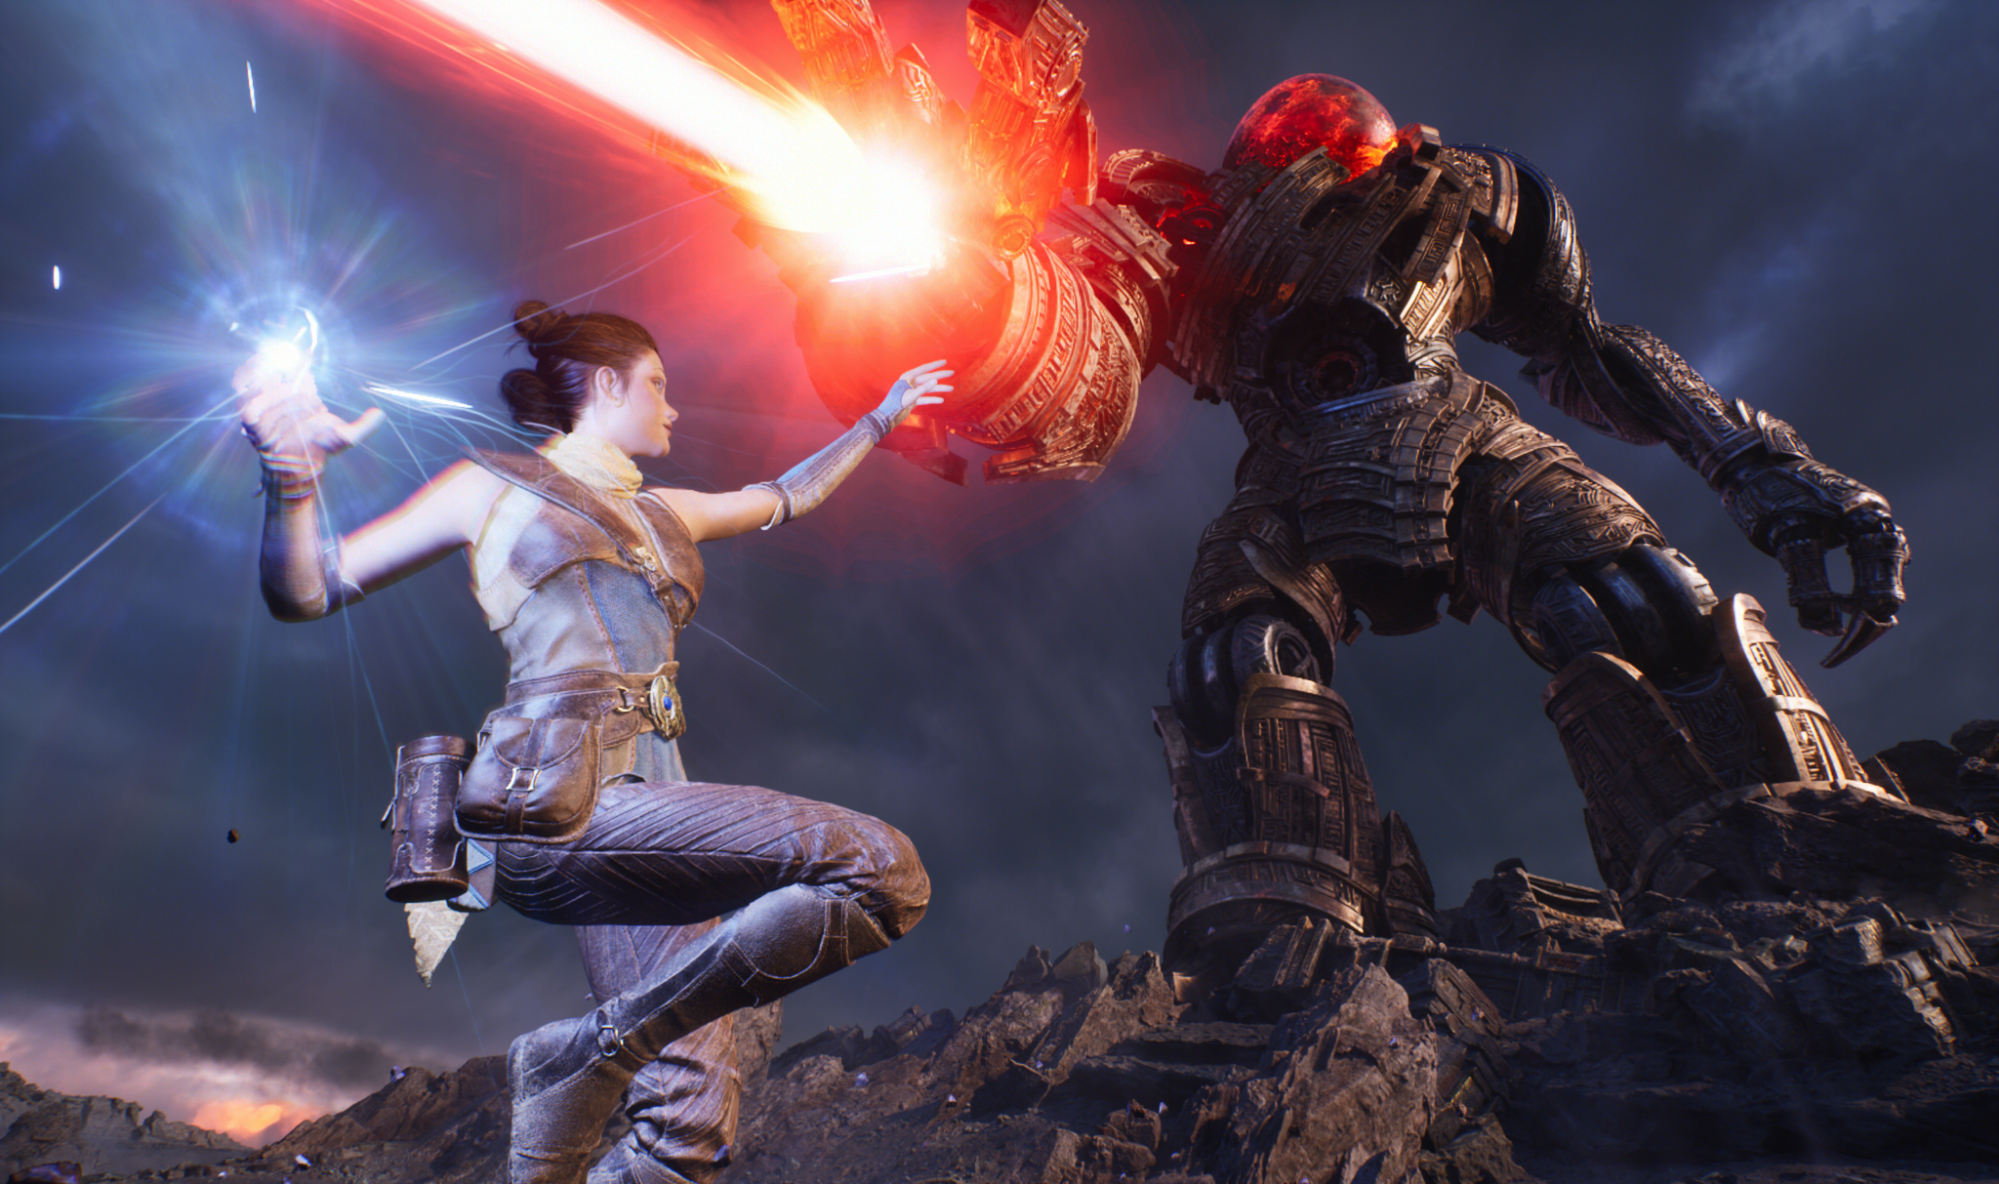
As you can see, Unreal Engine 5 features a range of incredible tools that make ambitious, high-fidelity projects more accessible to build than ever before. The Valley of the Ancient brings all of these tools together to provide both a sample of the production values you can achieve, as well as a case study in how the very same tools also streamline the development process for games. With UE5, developers will achieve better-quality visuals with fewer steps, larger worlds with less busywork, and more detailed interactions and environments with tools that empower creators.
