
This page describes how Datasmith imports scenes from Trimble SketchUp Pro into Unreal Editor. It follows the basic process outlined in the Datasmith Overview and About the Datasmith Import Process, but adds some special translation behavior that is specific to SketchUp. If you're planning to use Datasmith to import scenes from SketchUp into Unreal Editor, reading this page can help you understand how your scene is translated, and how you can work with the results in Unreal Editor.


SketchUp Workflows
Export Workflow
Datasmith uses an Export Plugin workflow for SketchUp. This means that to get your SketchUp content into Unreal using Datasmith, you need to:
-
Install a plugin for SketchUp. See the Installation Notes section below.
-
Export your SketchUp content to a
.udatasmithfile. See Exporting Datasmith Content from SketchUp Pro. -
Enable the Importers > Datasmith Importer Plugin for your Project, if it's not already installed.
-
Use the Datasmith importer available in the Toolbar of the Unreal Editor to import your
.udatasmithfile. See Importing Datasmith Content into Unreal Engine.
Batch Scene Export with Ruby
You can run a Ruby script in SketchUp to batch export .udatasmith files. This helps automate your pipeline.
Before you can do this, you need to install the Ruby Code Editor extension for SketchUp. For instructions on how to do that, see the SketchUp documentation on Managing Extensions. Once you install the Ruby Code Editor extension, you can access it from SketchUp's main menu: Window > Ruby Code Editor.
To export all SketchUp files from a given folder, run this code:
target_dir = 'C:\temp\udatasmithExports'
source_directory = 'E:\path\to\folder'
Dir.foreach(source_directory) do |filename|
ext = File.extname(filename)
if ext == '.skp' then
name = File.basename(filename, ext)
path = File.join source_directory, filename
Sketchup.active_model.close true
Sketchup.open_file path
puts "Exporting '#{filename}' as '#{name}' to '#{target_dir}'"
EpicGames::Datasmith.export name, target_dir
end
end
You can also export a single file from code. This is the equivalent of clicking the Export button on the Datasmith toolbar:
Sketchup.open_file 'E:\path\to\file\sketchup_file.skp'
EpicGames::Datasmith.export "hello", 'C:\temp'
# This creates a C:\temp\hello.udatasmith file.
Direct Link Workflow
To preview changes to your SketchUp scene in Unreal Engine in real time, you can set up a Datasmith Direct Link between the two. This way, you don't need to manually re-import the entire scene into Unreal Engine every time you want to make a change. For more information, see Using Datasmith at Runtime,
For Unreal Engine, Datasmith DirectLink is only supported on UE 4.27 and later versions, when using one of the following SketchUp versions:
- SketchUp 2020 (Windows and macOS)
- SketchUp 2021 (Windows and macOS)
Installation Notes
Before you can export SketchUp content, you must download and install the Datasmith Exporter for SketchUp plugin from the Datasmith Export Plugins page.
To see what versions of SketchUp the plugin supports, see .
The Datasmith exporter plugin currently only works with SketchUp Pro. It does not support SketchUp Free, or the discontinued SketchUp Make.
We encourage you to share the download link to the Datasmith Exporter plugins with any number of people, both inside and outside of your organization. Please note that you are not permitted to distribute the Datasmith Exporter plugins themselves.
Before you install the Datasmith Exporter for SketchUp plugin, make sure that:
-
SketchUp is not running.
-
You downloaded the installer for the exporter plugin that matches the Unreal Engine version you intend to use.
-
You uninstalled all previous versions of the Datasmith Exporter for SketchUp plugin.
After you downloaded the installer, double-click it to open, then follow the instructions on-screen.
If you need to uninstall the Datasmith Exporter for SketchUp plugin, you can do this like you would any other application:
-
Windows: Uninstall the plugin from the Control Panel.
-
macOS: Find the plugin in Finder and drag it to the trash icon on your Dock, or right-click and select Move to Trash.
Using the Datasmith Toolbar
Installing the Datasmith plugin adds a toolbar in SketchUp.

You can take the following actions from the Datasmith toolbar:
| Action | Button | Description |
|---|---|---|
| Synchronize with DirectLink |  |
Pushes the selected models to Unreal Engine or Twinmotion through the Direct Link connection. |
| Manage Connections |  |
Launches the Connection Status dialog. |
| Export to Datasmith File |  |
Launches the existing .udatasmith exporter to save a .udatasmith file to disk |
| Show Messages |  |
Launches the messages and logging window. Useful for reporting errors, missing textures, and other information. |
You can also use these commands from SketchUp's main menu by going to Extensions > Datasmith.
Converting Geometry into Static Meshes
Datasmith divides your SketchUp geometry into Static Mesh assets by combining all connected polygon faces that are in the same component or group, into a single Static Mesh. Knowing this strategy can help you influence the Static Meshes it creates.
If your Static Meshes in Unreal are very large, you may have trouble achieving good results when baking static or stationary lights for your scene. Large meshes require correspondingly large lightmap textures in order to make sure that each part of the model has an adequate amount of texture space to record its light and shadow. You can try increasing the lightmap resolution on the large Static Meshes, but this also increases your baking time and runtime memory requirements. Depending on the way your lightmap UVs are laid out, you may not be able to generate good results at all. If this happens, you can try splitting your large geometries across multiple components or layers in SketchUp to make the Static Meshes easier to deal with in Unreal.
Instancing
When Datasmith detects multiple copies of the same component in your SketchUp scene, it only creates one set of Static Mesh assets for that component, and places multiple instances of those Static Meshes into the scene. This is typically better for the runtime memory requirements and performance of your Project, as well as making it easier to manage the number of Static Mesh assets in your Content Browser.
Wherever possible, we recommend taking advantage of this by making any repeating elements in your scene (such as windows, doors, or chairs) into reusable components in SketchUp.
Billboards
Datasmith exports rotating billboards from your SketchUp scene as flat Static Meshes, and places instances of these flat Static Meshes into the Level.
The orientation of each Static Mesh in the Level is based on the viewpoint of the SketchUp camera at the time you export your scene. When the camera in the Unreal Engine is at the same location in the Level as the original camera in SketchUp, the flat Static Mesh appears the same way as the rotating billboard does in SketchUp. However, as you move the camera around in the Unreal Engine, the rotation of the Static Mesh does not update to match the camera's current viewpoint the way it does in SketchUp.
Triangle facing direction
SketchUp is very permissive about the facing direction of your geometry. You can create "single-sided" geometry — that is, geometry with no thickness — and see it from both sides; you can even apply different materials to the different faces of each plane.
The Unreal Engine uses a different approach: it assumes that all geometry is modeled with a thickness. Any triangles that face away from the camera represent the back side of a surface, and can be assumed to be hidden from view by the front side of that surface. In order to achieve the best possible performance at runtime, it always culls those back-facing triangles to avoid spending GPU cycles rendering triangles that aren't actually visible.
We recommend always modeling your 3D objects with a thickness, so that they work as expected in Unreal. However, if you do use single-sided geometry in SketchUp, Datasmith does its best to respect your intent in the way it assigns materials and facing directions to the triangles in your Static Meshes:
- If only one side of your surface in SketchUp has a material assigned, that surface is chosen for the facing direction of the triangle in Unreal.
- Otherwise, Datasmith chooses the front side of the surface in SketchUp as the facing direction in Unreal.
- If you have a material assigned to both sides, Datasmith imports only the material from the front side.
By default, this means that triangles in single-sided geometry won't appear in your Unreal scene when you look at them from the back side. In addition, the back-facing side does not cast shadows.
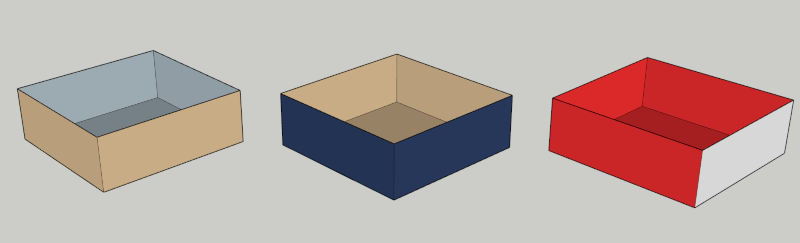

In the example above, the sides and bottom of each box face outward. On the left, each side has a single material assigned to its out-facing side. In the center, each has two materials assigned, one to each side. On the right, the red material are assigned to the whole group, and one individual side of the box has a different material assigned specifically to it. The colors on the outward facing sides all translate to Unreal, but the sides facing away are only visible when you look at the boxes from the other side.
The best way to deal with this is to fix it in SketchUp, by giving your objects a thickness. However, if you want to fix the problem in Unreal, there are other options. For a complete discussion, see About the Datasmith Import Process.
SketchUp Materials
For each material in your SketchUp scene, Datasmith creates a new Material Instance in your Unreal Engine Project, attempting to replicate your SketchUp Materials as closely as possible. Each of these Material Assets is an instance of a Parent Material that Datasmith also creates in your Project, in the Materials/Master folder. Datasmith creates the Material graph for each of these Parent Materials with the goal of producing equivalent results in the Unreal Engine's physically based renderer to the results you see when rendering in SketchUp.
Not every Instanced Material has its own Parent. Where possible, if two different Material Instances can share the same Material graph, Datasmith attempts to use a single Parent Material for both Material Instances.
The Material properties you see in Unreal depend on how the SketchUp Material was configured. You can add further Material properties by editing the Parent Material's PBR graph.
These properties will be overwritten if you reimport the scene again from SketchUp.
You can edit Parent Materials to add or override the properties outlined below.
Colors and Texture Images
By default, imported Materials keep the textures or colors that they have in SketchUp. You can override this to make your Material use either a solid color or a texture.
- Activate either the Color option or the Use Texture Image option. (If you don't see a Color option at all, de-activate the Use Texture Image option first.)
- To use a solid color, set the RGB color values to produce the color you want.
 Note that the A channel is not used: alpha blending is controlled by a separate Opacity option (see below).
 - If you choose to use a texture image, you'll see a Texture property, which you can set to refer to the Texture Asset you want to use. (If you want to use a texture that isn't already in your Unreal Project, drag and drop it into your Content Browser to import it into your Project.)
 You can also use the Texture Scale control if you need to change the way the texture is tiled across the surface. The R value controls horizontal scaling (the U axis in UV space), and the G value controls vertical scaling (the V axis in UV space). The B and A values are not used.
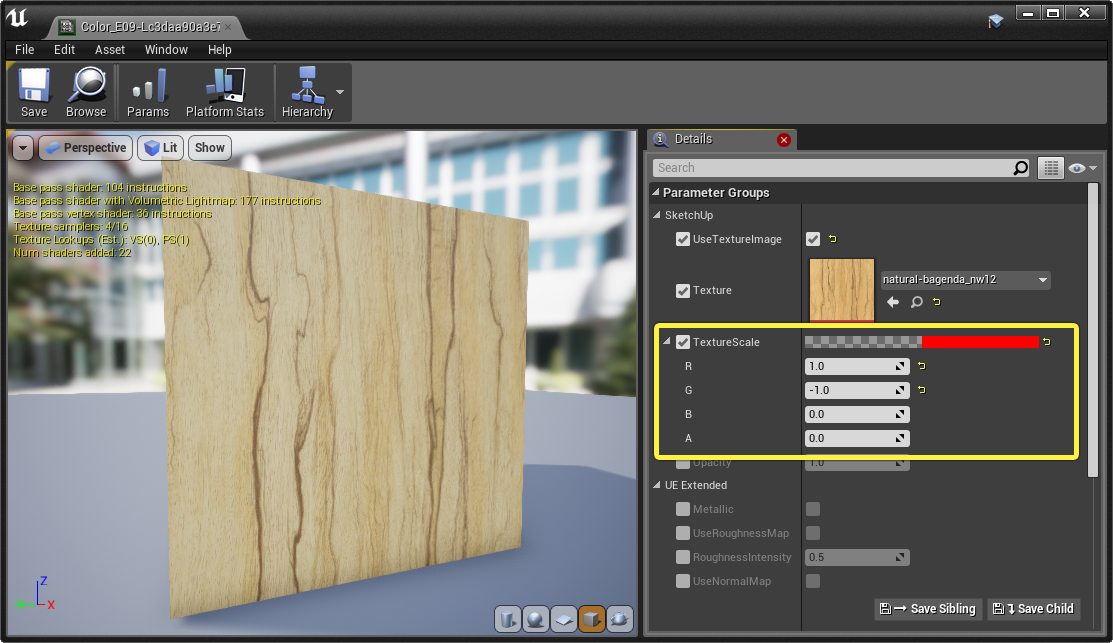
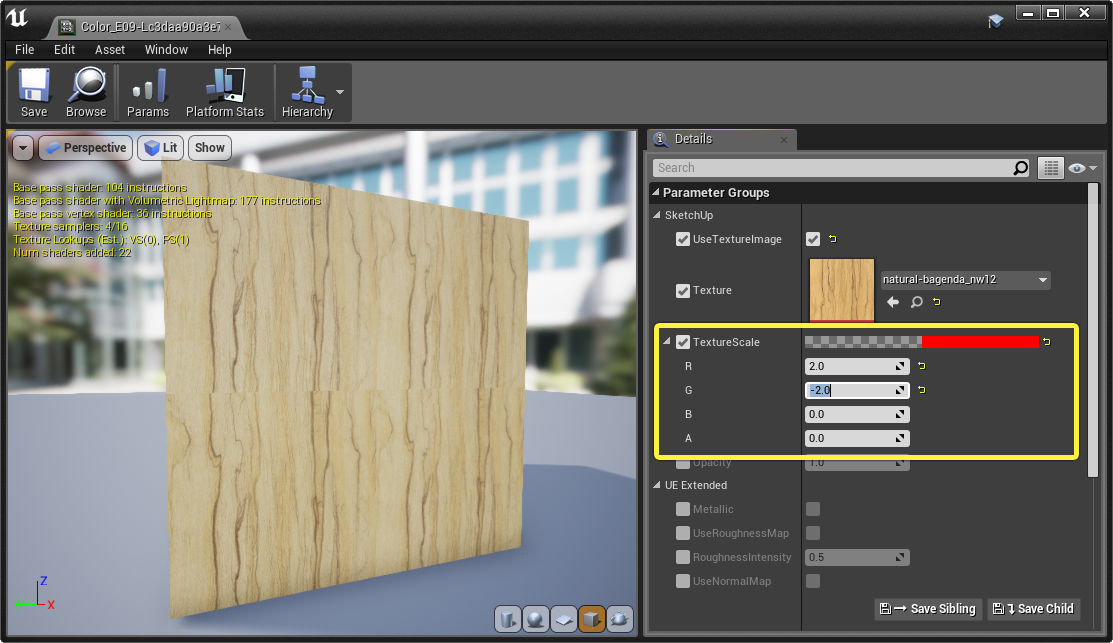

The effect of different texture scale settings.
Opacity and Blend Modes
Whether you use a solid color or a texture map for your Material's base color, you can use the Opacity control to determine how much of the background you can see through the Static Mesh.
By default, if your material in SketchUp has an opacity value below 100%, that value should come through correctly to your Material in Unreal.
If you want to give an Opacity setting to a previously non-transparent Material in Unreal, you have to change the Material's blending mode. In the General section, expand the Material Property Overrides group, check the Blend Mode option, and set its value to Translucent.
Click for full image.
UE Extended Properties
By default, all imported materials are set as non-metallic, with a balanced Roughness value of 0.5. However, you will likely find that tweaking these values for different Materials is an easy way to increase the realism of your scene's rendering in Unreal. You'll find these values under the UE Extended group pf properties:
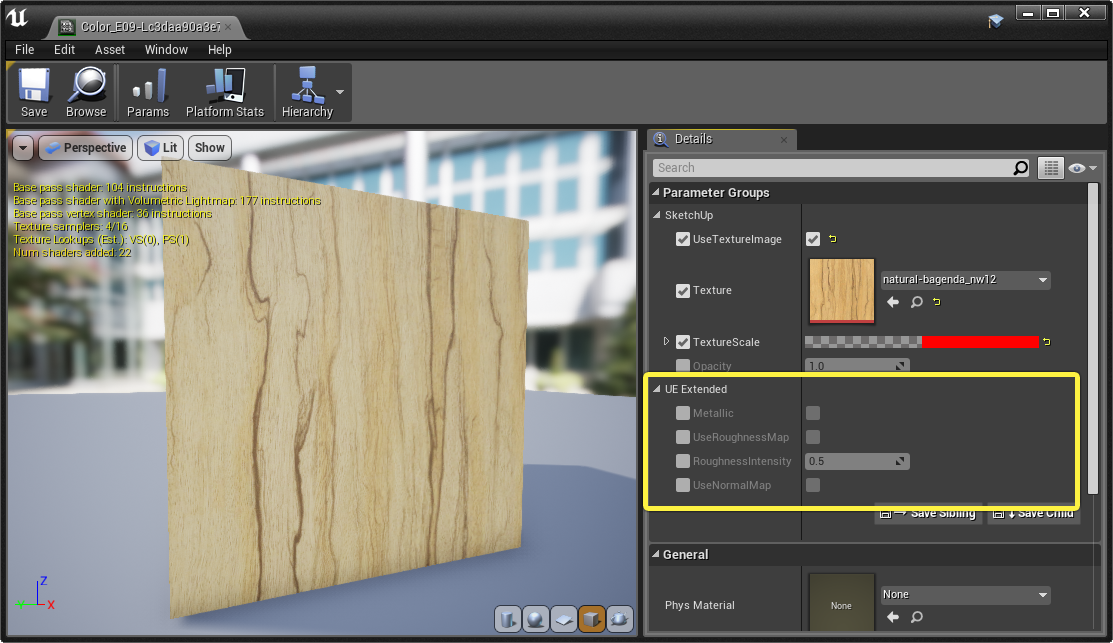
-
For any object that is made of metal, select the Metallic option. This makes a subtle difference in the way the base color or texture affects the incoming light that hits the surface.


-
If the surface of your object is particularly matte or glossy, check the Roughness option and raise or lower the value.

- If different parts of your object need to have different glossiness, you could instead opt to use a Roughness Map: a greyscale texture image in which you color the parts that you want to be matte in white, and the parts that you want to be glossy in black.
- For more about how the Roughness and Metallic values interact to create shiny surfaces, see also Creating Shiny Materials.
- In addition, you can set up Normal Maps for your imported Materials. These give the renderer hints about the small-scale surface details of your geometry:


You can generate Normal Maps and Roughness Maps in 2D image creation software like Adobe Photoshop. In some cases, as with the texture shown above, you may be able to base those Normal Maps and Roughness Maps on your Material's Base Color Textures.
Metadata
For each component you create in SketchUp, you can set Advanced Attributes such as price, size and status:

Entity Info on SketchUp Components or SketchUp Groups are exported as standard Datasmith metadata. Unreal Engine will store metadata on the Actor representing the root of the SketchUp Component or SketchUp Group.
The Datasmith metadata might be attached to the Actor that represents your component in the scene hierarchy, not to any of the individual Static Mesh Actors that represent the geometry of that component. If this is the case in your scene, you will need to adjust the Blueprint and Python examples shown in Accessing Metadata in Blueprint and Python .