
This page describes how Datasmith imports scenes from Maxon Cinema 4D into Unreal Editor. It follows the basic process outlined in the Datasmith Overview and About the Datasmith Import Process, but adds some special translation behavior that is specific to Cinema 4D. If you're planning to use Datasmith to import scenes from Cinema 4D into Unreal Editor, reading this page can help you understand how your scene is translated, and how you can work with the results in Unreal Editor.


Credit: The classroom scene used on this page is courtesy of Turbosquid user scripter.
Cinema 4D Workflow
Datasmith uses a Direct workflow for Cinema 4D. This means that to get your Cinema 4D content into Unreal using Datasmith, you need to do the following:
- In Cinema 4D, save your scene to a
.c4dfile. From the main menu in Cinema 4D, do one of the following:- If you are using a more recent version of Cinema 4D, select File > Save Project for Cineware option.
- If you are using an older version you might need to select File > Save Project for Melange instead.
-
In Unreal Engine, enable the Datasmith C4D Importer Plugin for your Project. To learn how to enable a plugin, see Working wih Plugins.
- In Unreal Engine, use the Datasmith import options to import the
.c4dfile into your project. For instructions, see Importing Datasmith Content into Unreal Engine.
In Cinema 4D versions prior to R22, you can configure Cinema 4D to automatically include the information Datasmith needs when you save a .c4d file.
-
From the main menu, select Edit > Preferences.
-
On the Files tab of the Preferences dialog, enable the following options:
- Save Polygons for Melange.
- Save Animations For Melange.
Enabling these options increases the size of the files you save. If file size is a concern, or you frequently work with Cinema 4D scenes that you don't need to import into Unreal Engine, you may prefer to use the File > Save Project for Melange option only when you need it.
Geometry
Datasmith creates a Static Mesh Asset for each visible geometric object in the Cinema 4D scene.
The object name that you see in the Cinema 4D Properties panel is the name Datasmith assigns to the corresponding Static Mesh Asset in Unreal Engine.
To influence the granularity of the Static Mesh Assets and Actors that Datasmith creates, you can merge objects in Cinema 4D before you export the scene.
For example you can do the following:
-
Use the Connect Objects command in Cinema 4D to merge two objects into a single object. See Connect Objects in the Cinema 4D documentation.
-
For more flexibility, use the Connect Object in Cinema 4D to combine objects that are closer than a given threshold value into a single mesh. In this case, the Datasmith importer produces a single Static Mesh Asset for the combined mesh, but the connected pieces remain separate objects in Cinema 4D. See Connect Object in the Cinema 4D documentation.
Object Visibility
If you have objects that you don't want to import into Unreal Engine at all, hide them in Cinema 4D before you save your .c4d file. The Datasmith importer does not import geometry of hidden objects into Static Mesh Assets, and does not include them in the Datasmith Scene hierarchy.
You can use the Objects panel in Cinema 4D to hide the objects individually. Alternatively, you can put the objects you want to omit into their own layer, then use the Layers panel to hide all objects in that layer.
Generators and Deformers
When you save your Cinema 4D scene for Melange, every generator in your scene is baked down to a single triangular mesh that represents the total procedurally generated geometry of the object. Similarly, every deformer is baked to a single triangular mesh based on the final state of the deformer. Datasmith imports each of these triangular meshes as a single Static Mesh Asset.
Instances, Cloners, and Arrays
If you use instances, cloners, or arrays in your Cinema 4D scene to place copies of a single object at multiple different locations in your scene, Datasmith respects your intention by creating a single Static Mesh Asset in your Content Browser from that object's geometry. It then places multiple instances of this Static Mesh Asset into the Datasmith Scene.
Normal Facing Directions
The Unreal Engine, like most real-time renderers, automatically culls triangles that face away from the camera in order to maximize performance. However, Cinema 4D can render geometry with or without this backface culling. Depending on how you set up Cinema 4D, you may not be used to taking the facing direction of your surfaces into account. If your scene contains single-sided geometry for which the surface normals of the faces point away from the typical viewing direction, that geometry may seem to disappear when viewed from certain angles in the Unreal Engine.
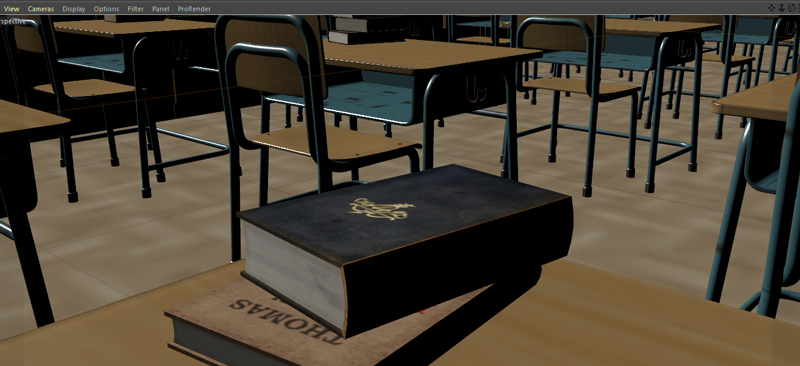
For example, the image below shows a book that was modeled with one of its surface normals facing inward. After the scene is imported into Unreal, the front cover at first appears to be missing. In this case, flipping the normal direction of the surface makes the sides appear as they should.

You can avoid this problem by verifying in Cinema 4D that your surfaces are facing in the direction you expect. There are a few ways you can do this. For example:
-
You can enable the Options > Backface Culling setting for your viewport. This hides all faces whose normals are pointing away from the camera, the same way they are hidden in Unreal Engine.
-
When you are in Polygons mode, selected faces show up with a yellow highlight when they are facing toward you, but a blue highlight when facng away from you.

-
You can configure your viewport to show vertex normals as white lines that extend from the center of each face. Choose Options > Configure and go to the Attributes panel. Make sure the Polygon Normals setting is enabled, and disable its Selected Only option to visualize the normals for all faces in the model that you have selected while you're in Polygons mode.

When you find faces with inversed normals in Cinema 4D, you can flip them around using the Reverse Normals command. See the Cinema 4D documentation.
For a complete discussion and more possible solutions, see Datasmith Import Process.
Lights
Datasmith converts most types of lights from Cinema 4D into equivalent light types in Unreal Engine. This translation preserves the most important emissive properties of the light, including its placement in the scene, color, photometric intensity, cone angles, IES profile, and more.
The following table describes how Datasmith maps Cinema 4D light types into Unreal Engine light types:
| Cinema 4D | Unreal Engine |
|---|---|
| Point light, IES light | Point Light |
| Spot light, Target light | Spot Lights |
| Area light, PBR light | DatasmithAreaLight Blueprint |
| Sun light, Infinite light | Directional Lights |
Cameras
For each camera in your Cinema 4D scene, Datasmith creates a CineCamera Actor in the Datasmith Scene. This camera is placed at the same position and rotation as its counterpart in Cinema 4D, and preserves some optional settings related to the camera's physical characteristics, including its focal length.
Scene Hierarchy
When Datasmith imports a Cinema 4D scene into Unreal Engine, it creates a hierarchy of Actors that closely matches the hierarchy of objects in Cinema 4D. Datasmith preserves object names and hierarchical relationships as closely as possible, but might not be able to create an exact match.
Possible differences include:
-
Object ordering: In Unreal Editor the Outliner orders Actors at each level of the hierarchy alphabetically. Actors might appear in a different order than their counterpart objects in Cinema 4D, but it does not affect their hierarchical relationships.
-
Object names: The names of the Actors Datasmith creates can only contain alphanumeric characters, hyphens, and underscores. If the name of a Cinema 4D object contains any other characters, Datasmith converts them to underscores automatically.
-
Baking procedural elements: During the import process, Datasmith bakes procedural features of the Cinema 4D scene, and replaces them with sets of static Actorsthat replicate their effects. This can affect the final hierarchy in Unreal Engine. See the next section for details.
How Datasmith Bakes Cinema 4D Procedural Features
Datasmith imports each procedural object in the Cinema 4D scene (for example, a generator, cloner, or array) into Unreal Engine as a single parent Actor with the same name as the original Cinema 4D object.
Under each parent Actor, Datasmith creates Static Mesh Actors that simulate the effect of the procedural geometry. These Static Mesh Actors have the same name as their parent Actors, but with a numeric suffix.
If you use procedural features extensively in Cinema 4D, it can produce complex scene hierachies when Datasmith imports your scenes into Unreal Engine. However, you do have access to each individual Actor as a separate instance in Unreal Engine.
Layers
When you import a Cinema 4D scene, Datasmith imports every named layer that has at least one object in it. It does not import empty layers, meaning layers in the Cinema 4D scene that have no objects in them. Datasmith assigns Level Actors it creates in Unreal Engine to the same Layer their counterpart objects are assigned to in the Cinema 4D scene.
To view imported layers, use the Layers panel (see Layers Panel)
Cinema 4D Materials
Datasmith creates a new Material Asset in the Unreal Engine Project for each Standard Material and Physical Material in your Cinema 4D scene.
The goal of these Material Assets is to respect the way you've set up the surfaces to look in Cinema 4D, while exposing properties that help you take advantage of Unreal's physically based renderer.
To modify a Material:
-
Double-click it in the Content Browser. Or, select an Actor in your Level that uses the Material you want to modify, and double-click the Material in the Details panel.
-
You'll open the Material Instance Editor shown below, where you can use the settings in the Details panel to modify the properties imported from Cinema 4D. You can also modify other built-in parameters exposed by the Unreal renderer.
For more information about how to use the Material Instance Editor, see Material Instance Editor UI.
Working with Material Channels
When you edit a Material imported from Cinema 4D, the top of the Details panel lists the different types of Cinema 4D channels that Datasmith handles during the import process. If you're used to working with materials in Cinema 4D, the effect of these channels and their settings should be familiar to you already.

When a channel is activated in the top 00 Global section, the Details panel also contains a section lower down where you can configure settings related specifically to that channel. These settings expose the most important properties that you can set for the corresponding channel in Cinema 4D.
For example, the channels activated in the image above make additional sections appear. You can see those sections in the image below: Color (1), Reflectance (2), Specular (3), and Normal (4).

The only exception to this rule is the Reflection Color channel. When the Use_ReflectionColor setting is activated, new Reflection Color and Reflection Color Strength settings are added to the 01_Color group.

The values you set in the Reflectance channel affect multiple Material output channels in the Unreal Engine, including the Roughness, Metallic, and Specular channels. Due to these complex relationships, Datasmith only translates one layer from the Cinema 4D Reflectance channel.
Controlling Texture UVs
At the bottom of the Details panel, you'll see settings that control the UV mapping for all channels in the Material. By changing these settings, you can change the way that the Material applies texture maps to the geometry of the Static Meshes it shades. The values you set here apply to all channels that use texture maps. These settings have similar effects to the offset and tiling settings for Texture Tags in Cinema 4d:

Each channel that offers a texture map in its settings also has its own optional UV wrapping controls. For example, the 04_Normal channel accepts a normal map texture, so it also offers a setting that activates a secondary set of UV controls that apply only to the normal map texture:

When you enable this option, a new set of UV mapping controls are added to the channel settings:

If you customize both the general UV settings in the UV group and the settings for a specific channel, the effects are added together.
Parent Materials
Each Material Asset that Datasmith creates is a Material Instance. The parent of this Material Instance is always the C4DMaster Material that is built in to the Datasmith Plugin. You can open up this parent Material to see how each of the properties exposed in the Material Instance are wired together in the Material graph. You can also modify the parent Material to expose other properties, or to change the way the existing properties are taken into account during the shading calculations. See Modifying a Datasmith Master Material.
Material Import Limitations
Datasmith's Material conversion process from Cinema 4D to Unreal Engine has a few limitations: it does not support procedural textures such as noise, node-based Materials (introduced in Cinema 4D R20), or third-party renderers.
In these cases, if you need the result in Unreal Engine to closely match what you see in Cinema 4D, the best approach is to bake your Materials out as bitmap textures, and to create new Materials that apply these baked bitmaps to your objects. See Bake Material in the Cinema 4D documentation.
Animations
If your Cinema 4D scene contains any elements whose 3D transforms are animated over time, including keyframe animations, MoGraph, or Dynamics, Datasmith automatically imports those animated transforms into a new Level Sequence Asset. You can use the Sequencer Tool to play back your animation in Unreal Editor, and use Blueprint to manage interactive playback at runtime.
For important details about how to work with the Level Sequences that Datasmith produces, see the Animations section of About the Import Process.
User Data
In Cinema 4D, you can add User Data to objects in a scene by choosing User Data > Manage User Data in the Attributes panel. For more information about adding User Data in Cinema 4D, see the Cinema 4D documentation.

Datasmith imports User Data from Cinema 4D objects, and stores it as Datasmith Metadata on the corresponding Level Actors. You can access this metadata in the Unreal Editor using Blueprint or Python, and in the Engine at runtime using Blueprint. For more information, see Accessing Metadata in Blueprint and Python.
A few important notes apply to the data conversion:
-
In Cinema 4D, you can organize User Data into hierarchical groups, but Datasmith Metadata in Unreal Engine is always a flat list of keys and values. If your User Data contains any groups, Datasmith does the following:
- flattens the hierarchy.
- Puts all metadata keys from all groups into a single flat list.
- Discards the group names.
-
Regardless of the data type you set for your User Data in Cinema 4D, the value stored in the Datasmith Metadata is always a string. Wherever possible, Datasmith converts the original data value into a string that you can parse to extract the relevant information. However, some Cinema 4D data types are not supported, such as gradients, links to other scene objects, priority values, splines, and so on.
-
Metadata key names can only contain alphanumeric characters, hyphens, and underscores. If the name of your User Data in Cinema 4D contains any other characters, Datasmith converts them to underscores automatically.