Transition Setup
To control which states can blend to another, you can create transitions, which are links between states that define the structure of your State Machine.
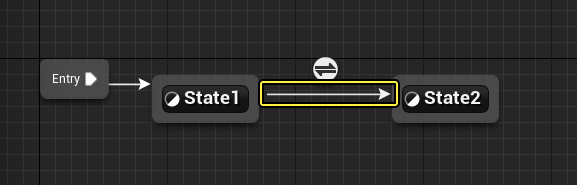
To create a transition, drag from a state border to another state. In this example the Idle state is connected bi-directionally to the Run state, which is a common setup for basic locomotion State Machines. Transitions are single-direction, so if two states are intended to transition back and forth, you need to create a transition for each direction.
You can also rebind existing transition logic by selecting a transition node and dragging it to a different state. You can rebind multiple transition nodes at once by dragging the transition arrow to a new binding.
Transition Rules
While transitions control the structure of inter-state blending, transition rules control when a state can transition. In other words, it is not enough to simply define a transition, you must also define how and when the transition happens.
Transition rules are automatically created when you create a transition. Like states, you can see and access them from either the My Blueprint panel, or by double clicking the transition icon in the State Machine graph.

Within transition rules, you can create any variety of blueprint logic for checking and comparing, all with the purpose of outputting a boolean (true or false) value. A true value is used to determine whether the state can transition to the next state.
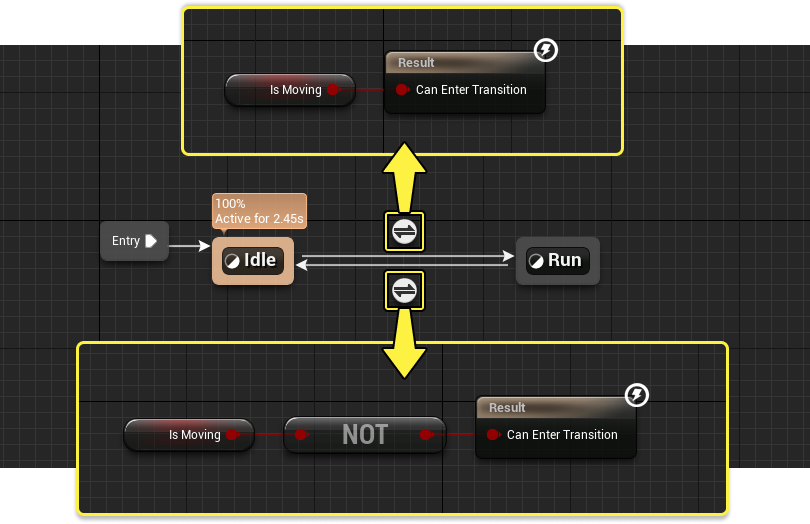
For example, when transitioning from idle to run, and then back to idle, the logic might look like this. In this example, a bool variable is being used to provide the transition rule. When returning to the default state, the inverse of the bool is used.
Transition rules are typically informed by the movement component and other character variables. To learn more about how to get common properties for a controllable character, refer to the How to Get Animation Variables page.
Once your variables are correctly set up with the intended logic, meeting the conditions of those variables during gameplay causes the transition to occur.
Transition Functions
Within the transition rule graph, you can use the following specialized transition-only functions to augment your logic:
| Name | Image | Description |
|---|---|---|
| Current State Time |  |
Gets the current elapsed time (in seconds) of any currently active state within this State Machine. This output provides information similar to the activity indicator in State Machines. 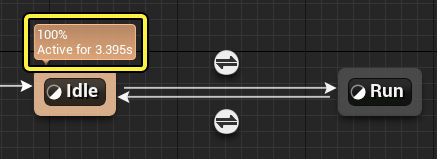 |
| Get Current State Name |  |
Gets the name of the currently active state within this State Machine. |
| Get Relevant Anim Time | 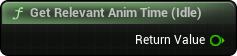 |
Gets the current elapsed time (in seconds) of the most relevant animation within the state this transition is going to. Because states can potentially have multiple animations with equal relevance, you can disable those animations from being checked and used in relevant-related functions. To do this, open the state graph, select the animation nodes you want to exclude (sequence players, blend spaces, aim offsets, or similar), and enable Ignore for Relevancy Test from the Details panel. 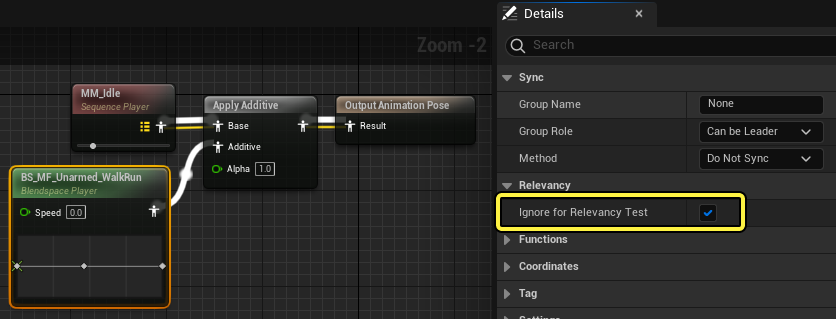 |
| Current Time |  |
Gets the current elapsed time (in seconds) of an animation from the preceding state. This function is useful if you want to reference a specific animation directly, rather than by relevance. |
| Get Relevant Anim Time Remaining |  |
Gets the current time remaining (in seconds) of the most relevant animation within the state this transition is going to. |
| Time Remaining |  |
Gets the current time remaining (in seconds) of an animation within the state this transition is going to. This function is useful if you want to reference a specific animation directly, rather than by relevance. |
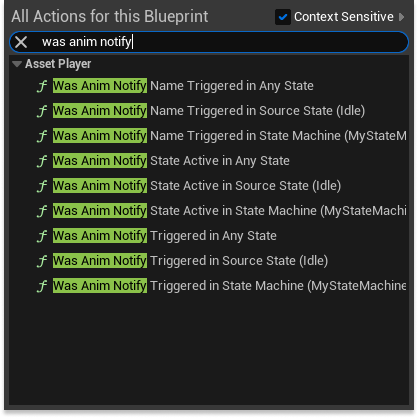
Animation Notify Functions
There are also several Animation Notify functions that you can use within the transition graph. You can add these functions by right-clicking in the transition graph and locating Was Anim Notify… functions.
| Name | Description |
|---|---|
| Was Anim Notify Name Triggered… | Returns true if a Skeleton Notify, specified by name, was triggered in the previous tick. |
| Was Anim Notify State Active… | Returns true if a Notify State, specified by class, was active in the previous tick. |
| Was Anim Notify Triggered… | Returns true if a Notify, specified by class, was active in the previous tick. |
The main differentiators between the notify function checks are if they are searching:
- In any state, which searches for the notify in all active State Machines.
- In the source state, which searches for the notify in the previously active state (the state being transitioned from).
- In the State Machine, which searches for the notify in a specific State Machine.
Transition Interrupt
While transitioning, if another state becomes active, then the transition will "interrupt" and transition to that new state instead. When this interruption occurs, you can link certain Animation Notifies to the interruption. This makes those notifies execute when the interruption occurs.
To set up transition interruption notify behavior, select the transition and locate the Transition Interrupt properties in the Details panel.
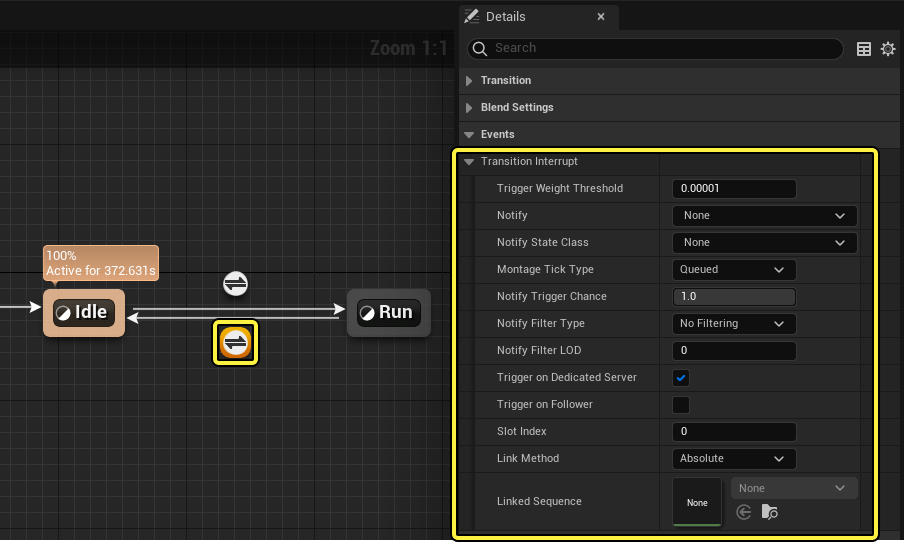
You can specify either a Notify or Notify State Class to link to the interruption. If a Notify State is used, then the interruption executes both the start and end notify events in sequence on subsequent frames.
The other properties can be referenced in the Montage Notify page.
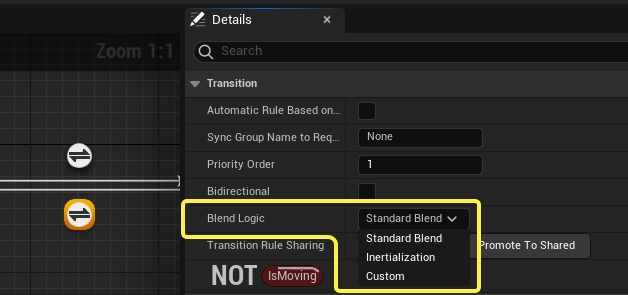
Transition Blend Types
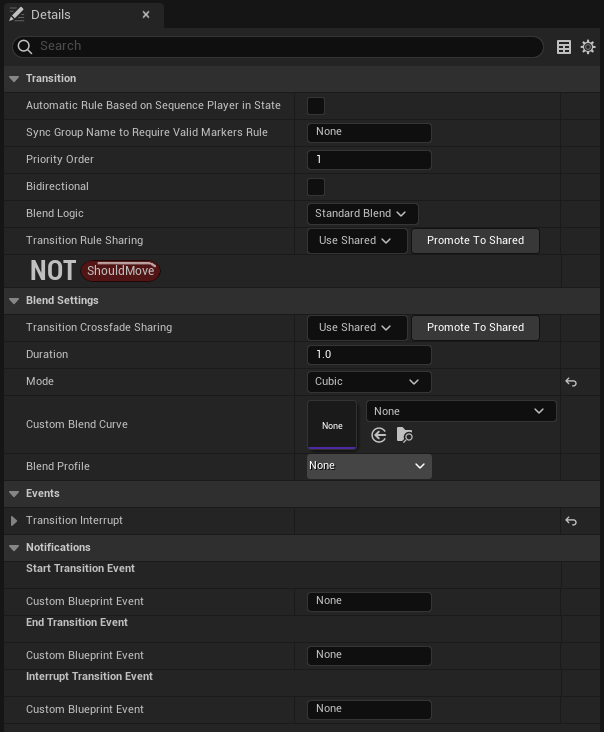
There are three main types of state transition blending you can use when deciding how you want states to transition: Standard Blend, Inertialization, or Custom. You can choose any of these types by selecting the transition and locating the Blend Logic property in the Details panel.
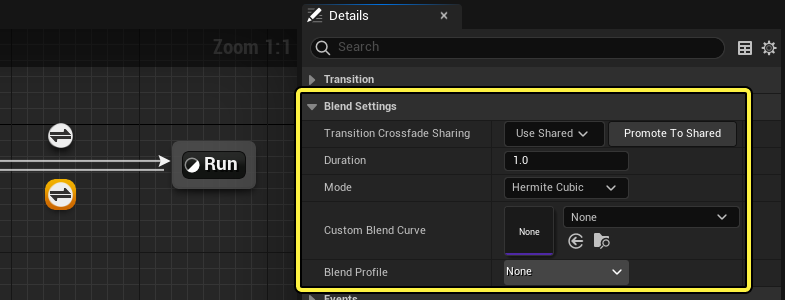
Standard Blend
Standard Blend is the default transition option and contains settings for duration, curve, and other basic controls. You can locate and adjust these settings by selecting the transition and locating the Blend Settings category in the Details panel.
| Name | Description |
|---|---|
| Transition Crossfade Sharing | You can use this dropdown menu to share Blend Settings properties between different transitions. To create a new shared setting, click Promote to Shared, type in the name of the setting, and press Enter. You can now access this setting on other transitions. The settings are completely shared, so editing settings for one transition affects all others. |
| Duration | The length of time, in seconds, that the transition takes. |
| Mode | The curve type to use when blending with this transition. Holding Ctrl + Alt on each of the options will display a preview of the curve shape. |
| Custom Blend Curve | If Mode is set to Custom, then this is where you specify a custom created Curve Asset to use as the curve shape, when blending with this transition. |
| Blend Profile | You can optionally specify a Blend Profile here, if you want certain bones to blend faster than others during this transition. |
Inertialization
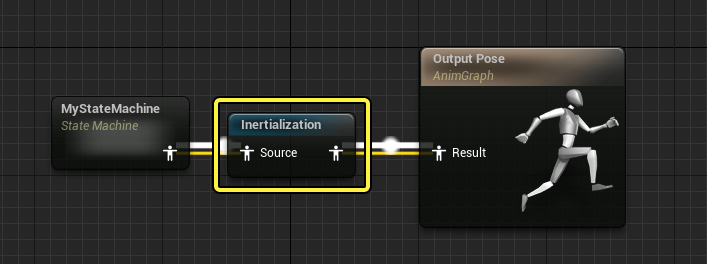
Rather than simply blending from one state to another, Inertialization can be used where the animation velocity and acceleration occurring at the time of the switch to the new animation are used to carry forward the motion. Refer to the Inertialization document for more information.
If you are using inertialization as a blend type, you must also ensure that the Inertialization node is used in the Anim Graph. It must be placed after your State Machine evaluates.
Inertialization does not produce good results on all transitions, depending on the animations used in the states bordering them. Some general rules to keep in mind when using interialization blending are:
- Keeping your blend duration short, less than 0.4 seconds is best.
- When the poses are extremely different, do not use inertialization.
Custom
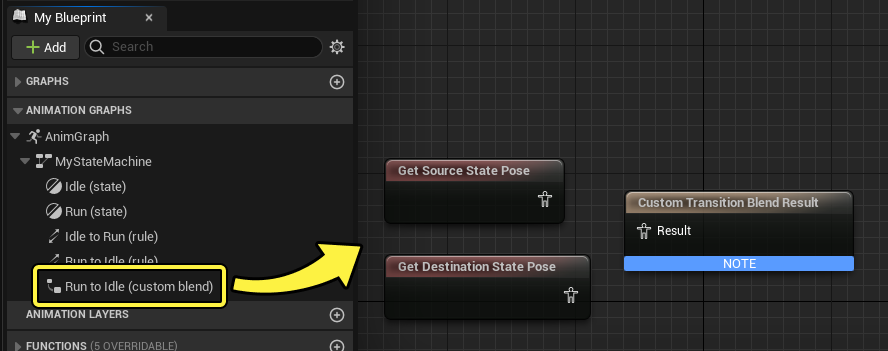
Custom blends are blends you can graph and customize in their own Anim Graph layer, with its duration and curve shape determined by the standard blend settings.
When Blend Logic is set to Custom, you can either click Edit Blend Graph next to the dropdown menu, or double click the custom blend graph in My Blueprint to open the graph.
Within a custom blend graph, you can use the following special functions to read transition time and state weight information to inform your graph:
| Name | Image | Description |
|---|---|---|
| State Weight |  |
Gets the blend weight of the preceding state. This number gradually decreases from 1 to 0 over the transition duration. |
| Get Transition Time Elapsed |  |
Gets the elapsed time in seconds of a specified transition. |
| Get Transition Time Elapsed (ratio) |  |
Gets the elapsed time as a ratio of the crossfade duration for a specified transition. In other words, this number gradually increases from 0 to 1 over the transition duration. |
| Get Transition Crossfade Duration |  |
Gets the crossfade duration of a specified transition. This is the number used in the Blend Settings > Duration property. |
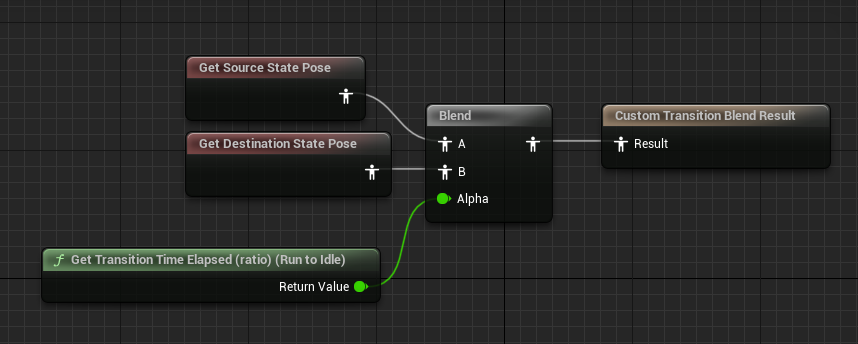
With custom blends, you can create a wide variety of blending logic. As a simple example, you can replicate a standard blend by using a normal Blend node with the Get Transition Time Elapsed (ratio) function.
Transition Properties
Transitions contain the following properties:
| Name | Description |
|---|---|
| Priority Order | The priority order of this transition. If multiple transitions are true at the same time, the one with the smallest priority is chosen. |
| Bidirectional | This setting is unsupported and currently does not function. |
| Blend Logic | What transition blend type to use. |
| Transition Rule Sharing | You can use this dropdown menu to share the Transition graph between different transitions. To create a new shared setting, click Promote to Shared, type in the name of the setting, and press Enter. You can now access this setting on other transitions. Graphs are completely shared, so editing the graph for one transition affects all others. |
| Automatic Rule Based on Sequence Player in State | When enabled, the transition node will try to start the transition automatically based on the most relevant asset player node's remaining time and the AutomaticRuleTriggerTime property's value, ignoring internal time. This property can be useful to blend between state transitions more dynamically, by beginning blends sooner, during the first animation's playback. |
| AutomaticRuleTriggerTime | Here you can set when to begin the automatic transition rule, when the Automatic Rule Based on Sequence Player in State property is also enabled. The value set for this property, in seconds, is relative to the time remaining on the relevant asset player. Values less the 0.0 will use the blend out's cross fade duration to automatically transition the animation out (AnimiationLength - CrossFadeDuration). Values greater than or equal to 0.0 will use this value, in seconds, to manually set the time when the transition out is triggered (AnimationLength - AutomaticRuleTriggerTime). |
| Sync Group Name to Require Valid Markers Rule | If you specify a Sync Group name here, then this transition is only used if the current state contains animations with valid Sync Markers. Normal transition rules still apply. |
| Transition Crossfade Sharing | You can use this dropdown menu to share Blend Settings properties between different transitions. To create a new shared setting, click Promote to Shared, type in the name of the setting, and press Enter. You can now access this setting on other transitions. The settings are completely shared, so editing settings for one transition will affect all others. |
| Duration | The length of time, in seconds, that the transition takes. |
| Mode | The curve type to use when blending with this transition. Holding Ctrl + Alt on each of the options will display a preview of the curve shape. |
| Custom Blend Curve | If Mode is set to Custom, then this is where you specify a custom created Curve Asset to use as the curve shape, when blending with this transition. |
| Blend Profile | You can optionally specify a Blend Profile here, if you want certain bones to blend faster than others during this transition. |
| Transition Interrupt | Contains settings for transition interrupts. |
| Start Transition Event (Custom Blueprint Event) | Creates a Skeleton Notify with the name used in the Custom Blueprint Event field. This notify executes when this transition starts. As with normal Skeleton Notifies, you can access the event by creating it in the Animation Blueprint's Event Graph. |
| End Transition Event (Custom Blueprint Event) | Creates a Skeleton Notify with the name used in the Custom Blueprint Event field. This notify executes when the transition ends. |
| Interrupt Transition Event (Custom Blueprint Event) | Creates a Skeleton Notify with the name used in the Custom Blueprint Event field. This notify will execute when the transition interrupts. |