
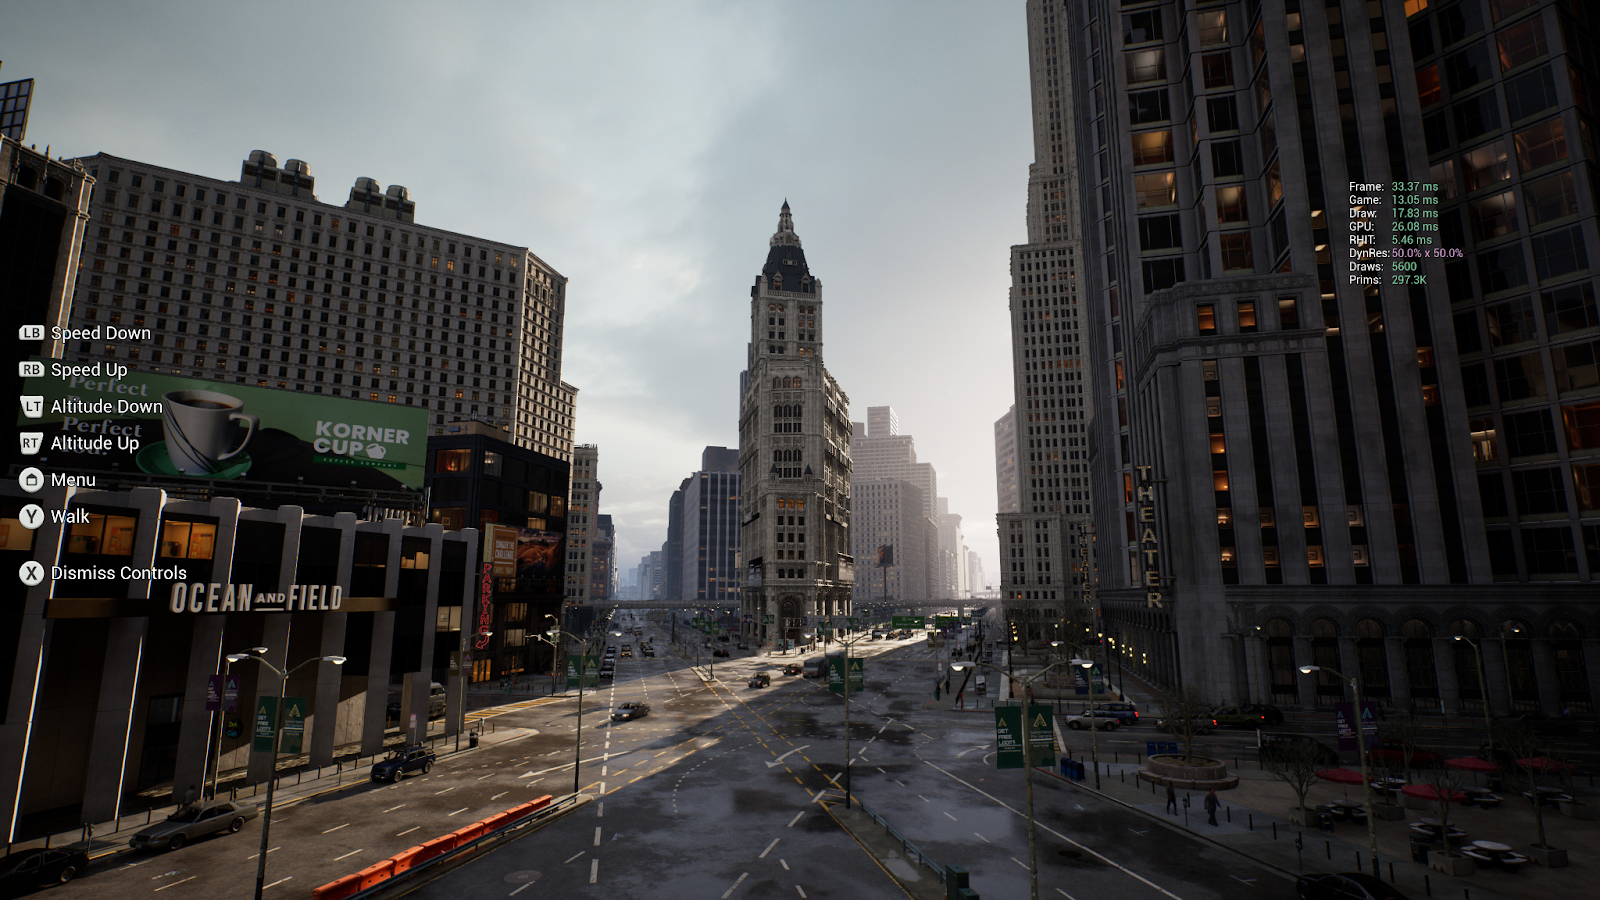
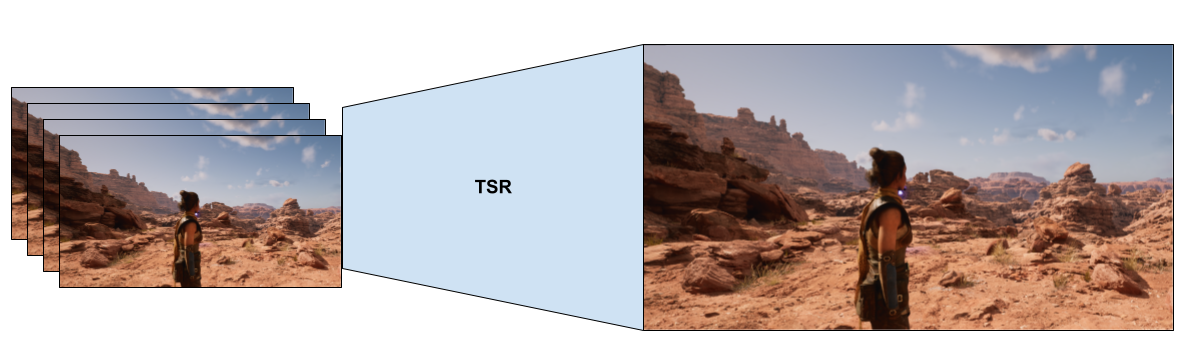
Temporal Super Resolution (TSR) is a platform-agnostic Temporal Upscaler that enables Unreal Engine to render beautiful 4K images. Images come at a fraction of the cost by amortizing some of the costly rendering calculating across many frames. TSR does this by rendering a lower internal resolution than what Temporal Anti-Aliasing Upsampling (TAAU) in Unreal Engine 4 could do.
TSR provides a native high-quality upsampling technique to meet the demand of next-generation games. It realizes the possibilities needed with the fidelity and details required by Nanite geometry while rendering frames at much lower resolutions to accommodate enough performance for Lumen.
The comparison below demonstrates the quality and performance differences between frames rendered at native 4K and those rendered at 1080p upscaled to 4K. With TSR, it's possible to achieve image quality near 4K resolution while also reducing GPU frame time by half.

These images are both 4K images. If you want to compare their fully uncompressed resolution, right-click on each and save them to your computer.
Temporal Super Resolution has the following properties:
- Rendered frames approach the quality of native 4K with input resolutions as low as 1080p.
- Less "ghosting" artifacts against high-frequency backgrounds than was visible with Unreal Engine 4's default anti-aliasing method, Temporal Anti-Aliasing.
- Reduced flickering on geometry with high complexity, such as those rendered with Nanite.
- Supports Dynamic Resolution scaling on console platforms.
- Runs on any hardware that supports D3D11, D3D12, Vulkan, Metal, PlayStation 5, and Xbox Series S | X with shaders specifically optimized for PlayStation 5 and Xbox Series S | X GPU architectures.
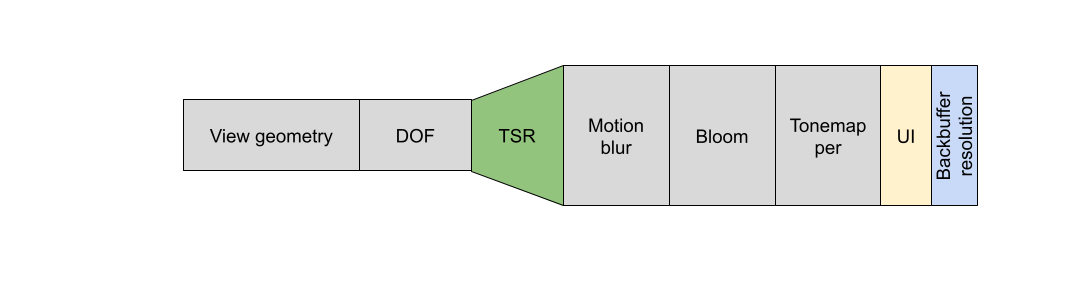
In the rendering chain, Temporal Super Resolution happens after depth of field and everything that follows is upscaled, such as motion blur, bloom, and so on.
Supported Platforms
TSR is available on desktop renderers across all desktop hardware that supports Shader Model 5 or higher. These include support for the following platforms:
- Windows D3D11 SM5, D3D12 SM5 and SM6, D3D12 SM6, and Vulkan SM5 and SM6
- Linux Vulkan SM5 and SM6
- Mac Metal SM5 and SM6
- PlayStation 5 and Xbox Series S | X
TSR's upscaling quality and behavior is strictly identical across all supported platforms. However, TSR has been specifically optimized for AMD RDNA GPUs used in PlayStation 5 and Xbox Series S | X consoles, taking advantage of 16-bit types and packed instructions.
TSR Scalability
TSR includes a lot of customization options for its upscaling settings so you can tailor it to individual platform's based on your project's needs. The following sections cover some of the ways you can go about checking TSR in your project and then scaling it appropriately.
Understanding the Caveats of Temporal Accumulation of Details
In general, all temporal upscalers make compromises as an essential part of their function, and TSR is no exception. However, advertising only TSR's increases to frame rate by rendering at lower resolutions doesn't fully describe the behavior and limitations of the tech. One such limitation of any temporal upscaling technology is that the accumulation of lower resolution frames over time to converge an image requires that some details — like how thick any piece of geometry could be in the first frame — can only be known after enough details are accumulated.
Take for example the comparison below where TSR is enabled and disabled where you can see how much detail is retained in the scene at near and far distances when frames are accumulated over time.
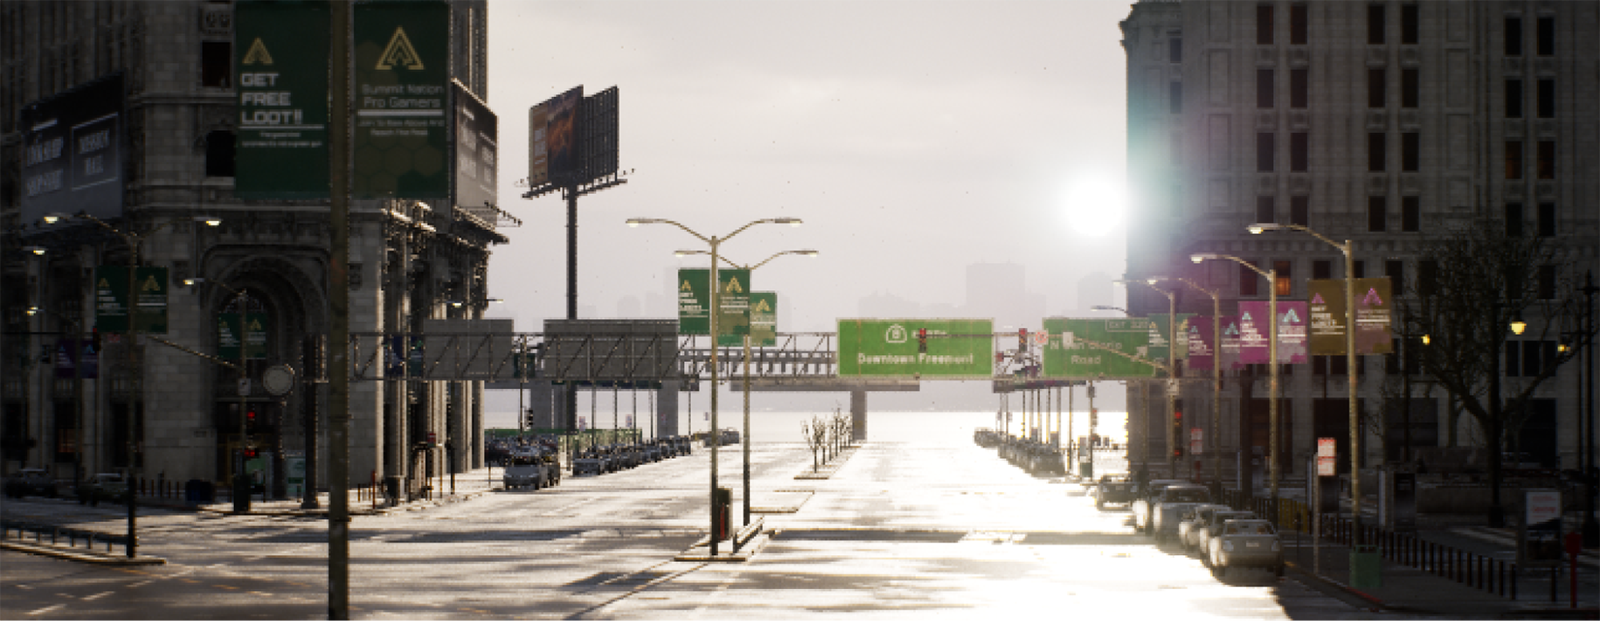
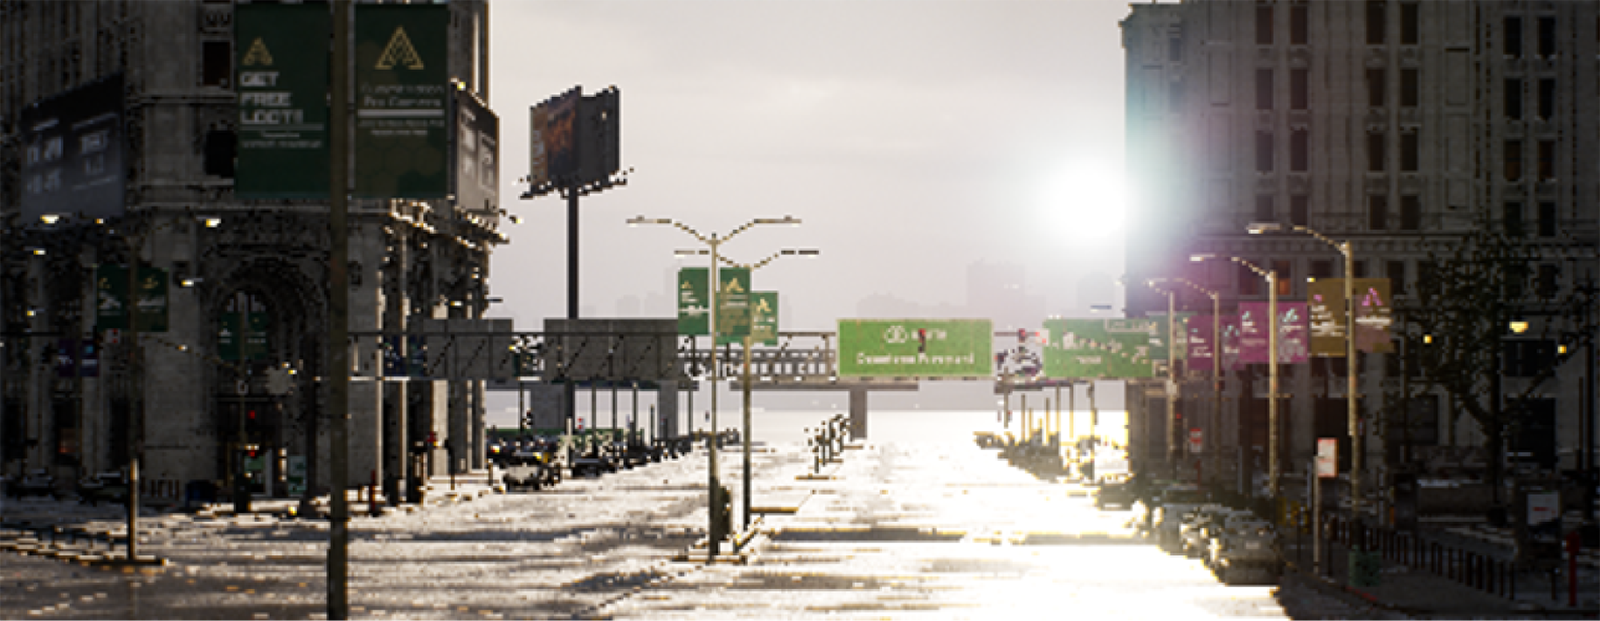
These examples used a screen percentage of 61 and their secondary upscale (r.Test.SecondaryUpscaleOverride) is set to 4 for the TSR enabled screenshot.
The rendering resolution of the frame is controlled by Screen Percentage. This controls how much information is available each frame, with the rest of the information needed to converge depending on the remaining parts of the frame to be rendered. TSR is dependent on both the resolution of the frame being rendered and the frame rate. Both of which contribute to how fast details can accumulate. A major implication of this behavior is that TSR can be affected by more than just the GPU limiting frame rate, like when the frame is bound by the CPU, or when VSync on non-variable refresh rate monitors is used.
While working in the editor, you can use the TSR frame rate statistics to help identify what may affect TSR's accumulation to the overall image. You can set the checkbox next to TSR in the Viewport Options menu under Stat > Engine.
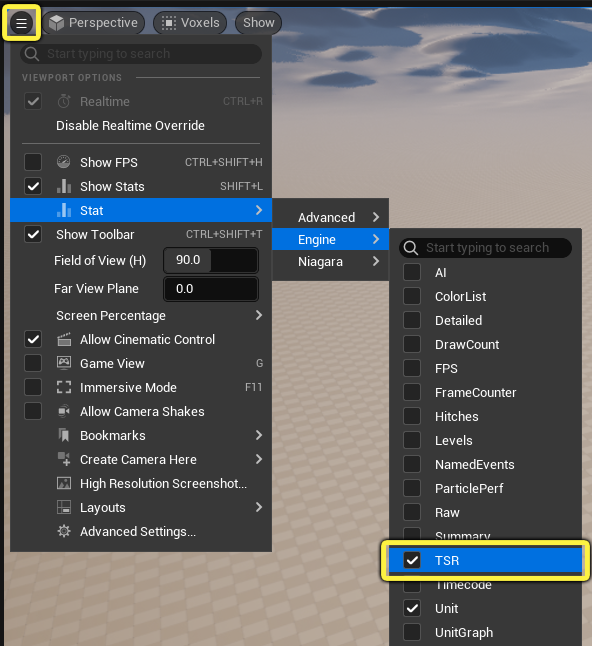
Alternatively, you can toggle the TSR stats on and off using the console command stat tsr.
Like other stat commands, such as stat unit that displays frame information, TSR stats displays similar information except that it adds two additional stats for TSR feed and TSR 1spp.
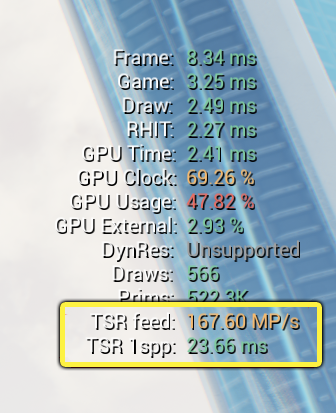
TSR feed displays the number of megapixels per second being fed into TSR, which is an important macroscopic metric to understand how much data TSR has to converge to the overall image. This is the Rendering Resolution Width * Rendering Resolution Height * FrameRate = Display Resolution Width * Display Resolution Height * ScreenPercentage^2 * FrameRate. This metric has the benefit of indicating macroscopic image quality in motion regardless of the display resolution.
The table below illustrates how TSR feed scales:
| Display Resolution | Screen Percentage | Framerate | TSR Feed in MP/s |
|---|---|---|---|
| 4k (3840x2160) | 50% | 60hz | 38402160(50/100)^2*60 = 124.4 MP/s |
| 4k (3840x2160) | 58% | 60hz | 167.4 MP/s |
| 4k (3840x2160) | 66% | 60hz | 216.7 MP/s |
| 4k (3840x2160) | 50% | 30hz | 62.2 MP/s |
| 4k (3840x2160) | 72% = 50% x sqrt(2) | 30hz | 124.4 MP/s |
| 1080p (1920x1080) | 100% | 60hz | 124.4 MP/s |
| 1080p (1920x1080) | 72% = sqrt(0.5) | 60hz | 62.2 MP/s |
| 1080p (1920x1080) | 50% | 60hz | 31.1 MP/s |
TSR 1spp is TSR's convergence rate — the time needed for TSR to have enough data to reach one sample per pixel. It is especially important in motion where there can be disocclusion that needs to accumulate details quickly. The formula to achieve this is TSR1spp = 1000 / (ScreenPercentage^2 * FrameRate).
The table below illustrates TSR 1spp's convergence:
| Screen Percentage | Framerate | TSR Convergence Rate |
|---|---|---|
| 50% | 60hz | 1000 / ((50/100)^2 * 60) = 66.6 ms |
| 58% | 60hz | 49.5 ms |
| 66% | 60hz | 38.2 ms |
| 100% | 60hz | 16.6 ms |
| 50% | 30hz | 133.3 ms |
An example scenario of how this data could be used is if the screen percentage were set to 50. This means you need (50 / 100)^-2 = 4 frames to have at least one sample per pixel. If each frame takes 16.6 milliseconds (ms) to render, it means a disocclusion area on screen takes four times that long to have enough data, or 66.4 ms.
Upscaling GPU Cost
The primary goal of TSR is upscaling. The majority of its GPU work scales based on the resolution it is provided. This is due to some of the GPU cost of TSR needing to be done at a higher display resolution than the rendering resolution.
You can use the TSR frame rate statistics to help identify what may affect TSR's accumulation to the overall image while working in the editor. You can do this by checking the box next to GPU in the Viewport Options menu under Stat > Advanced.
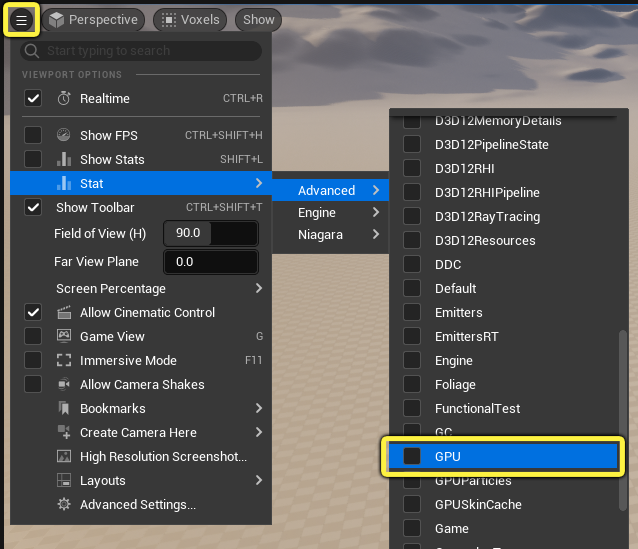
With the GPU stats displayed, you can override the Screen Percentage, in the Viewport Options menu, to see the difference in performance when rendering at 100 versus 50 percent screen percentage. This can give you an idea of how the upscaled display resolution will impact performance in your project. The examples below show this comparison using the Valley of the Ancient sample project.
| ~0.79ms at r.ScreenPercentage=100 | ~0.43ms at r.ScreenPercentage=50 |
Click image for full size.
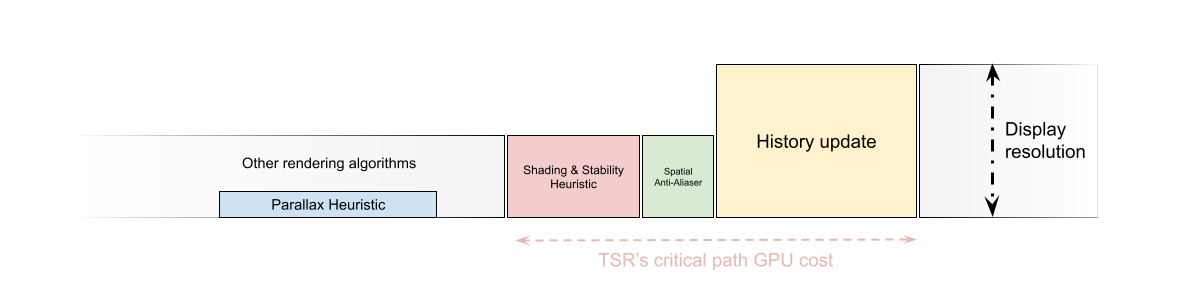
The parallax heuristic of TSR depends on the depth and velocity buffer rather than the scene color and translucency of the frame. This is because the depth and velocity buffers often finish on the GPU much earlier than the scene color and translucency buffers do. This allows for the entire TSR parallax heuristic to compute asynchronously on the GPU, filling in the gaps where the GPU is underused by other rendering algorithms with r.TSR.AsyncComputer=1.
For example, in Fortnite Chapter 4 on PlayStation 5 and Xbox Series X, the TSR async compute is offsetting approximately 0.5ms of TSR's total GPU cost. When testing performance over the course of an entire Battle Royale performance replay. About 0.1 ms is saved, bringing down the effective TSR cost to 1.5 ms, and critical path GPU cost to finish rendering the frame to 1.1 ms.
Anti-Aliasing Scalability Group
TSR's GPU cost scales with the screen resolution being rendered with Screen Percentage. TSR works on any SM5 and later capable GPU, but TSR needs to have a GPU runtime cost that makes sense for older less powerful GPUs. This is one way that TSR differentiates itself from other third-party temporal upscaling solutions — it offers user-facing scalability controls to control upscaling, anti-aliasing quality, and runtime GPU costs independently of the screen rendering resolution. The Engine Scalability Settings provides a baseline for these scalability options.
The graph below shows how the screen's rendering resolution and anti-aliasing quality determines the type of upscaling TSR does. Lower screen percentages require extreme upscaling but are more cost effective in the end. Whereas, any screen percentage above 100% with a High scalability level or greater is super-sampled and the GPU goes up from there.

Extreme upscaling with any screen percentage lower than 50% should only be considered when targeting a display resolution of greater than 4K, or exceptional occasions with dynamic resolution on console platforms.
TSR is controlled with the Anti-Aliasing (TSR) scalability group found in the Scalability Groups rollout that is located under the Settings > Engine Scalability Settings.
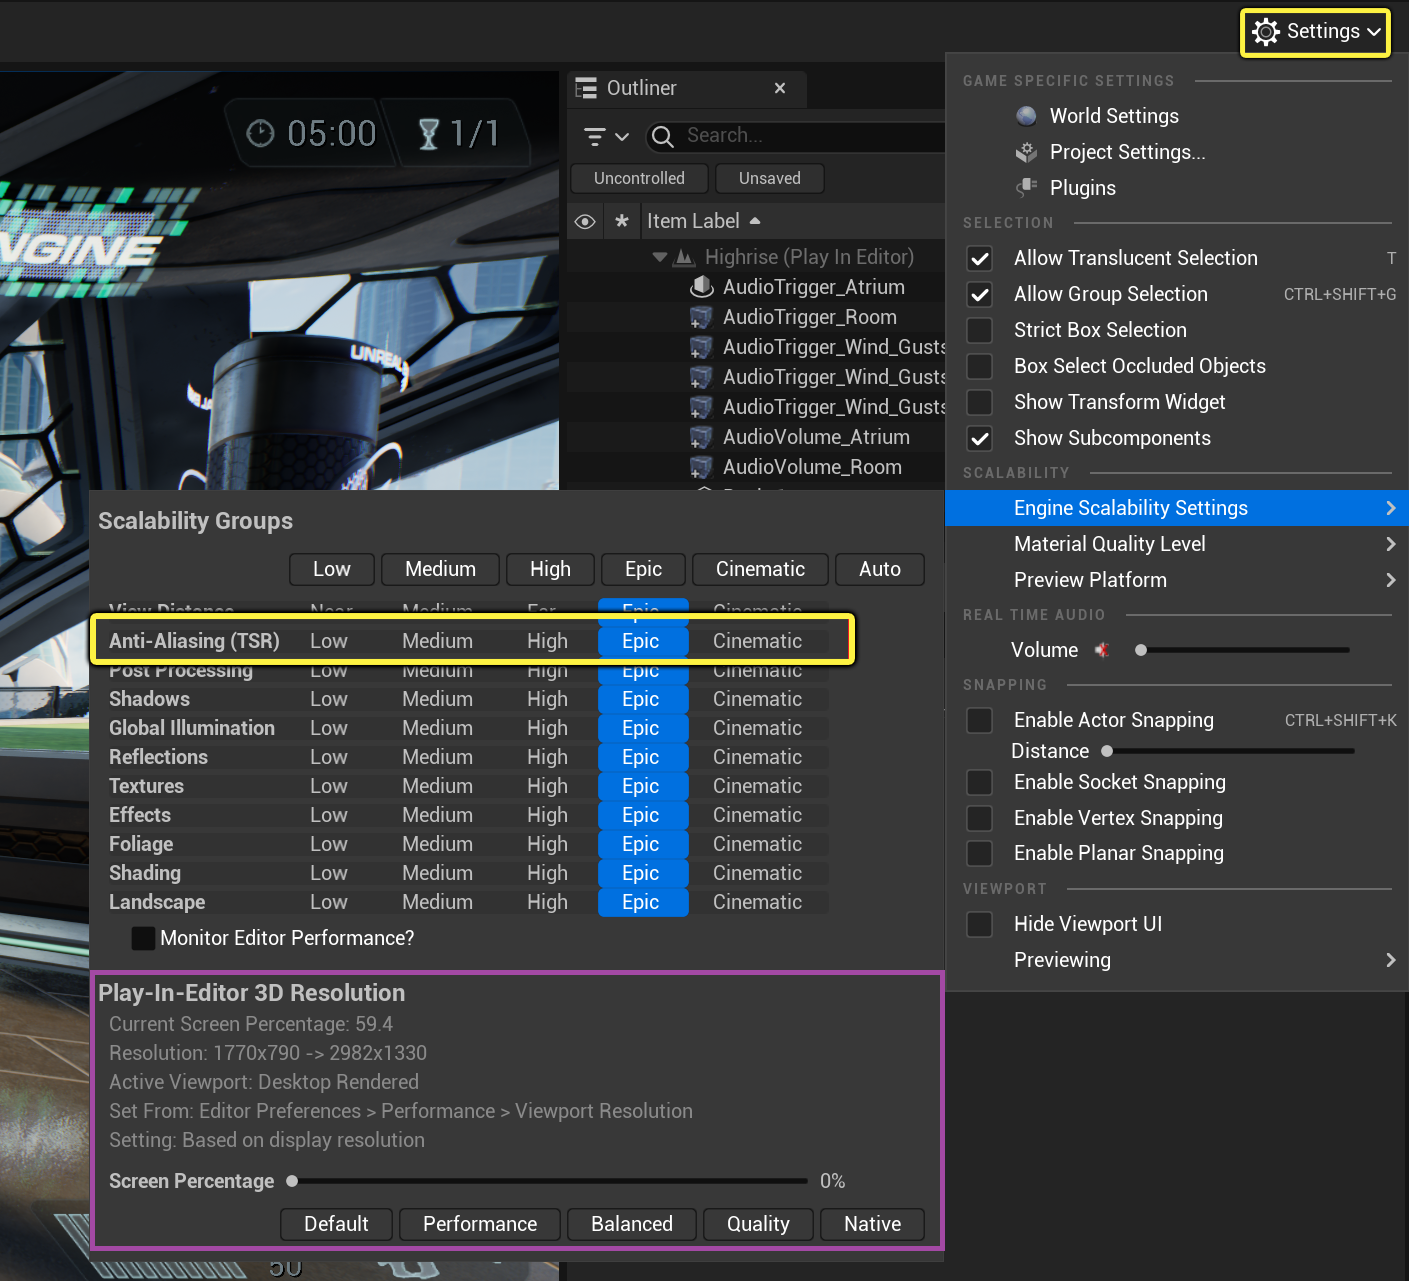
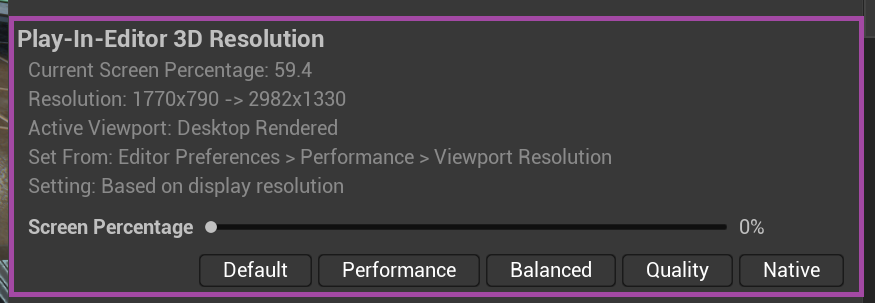
While using Play-In-Editor (PIE), the Engine Scalability Settings displays information under the Play-In-Editor 3D Resolution about screen resolution, screen percentage, active viewport being used, and more. While in PIE, you can adjust the screen percentage using the slider or any of the buttons below to automatically adjust based on performance, balance, quality, and native resolution.
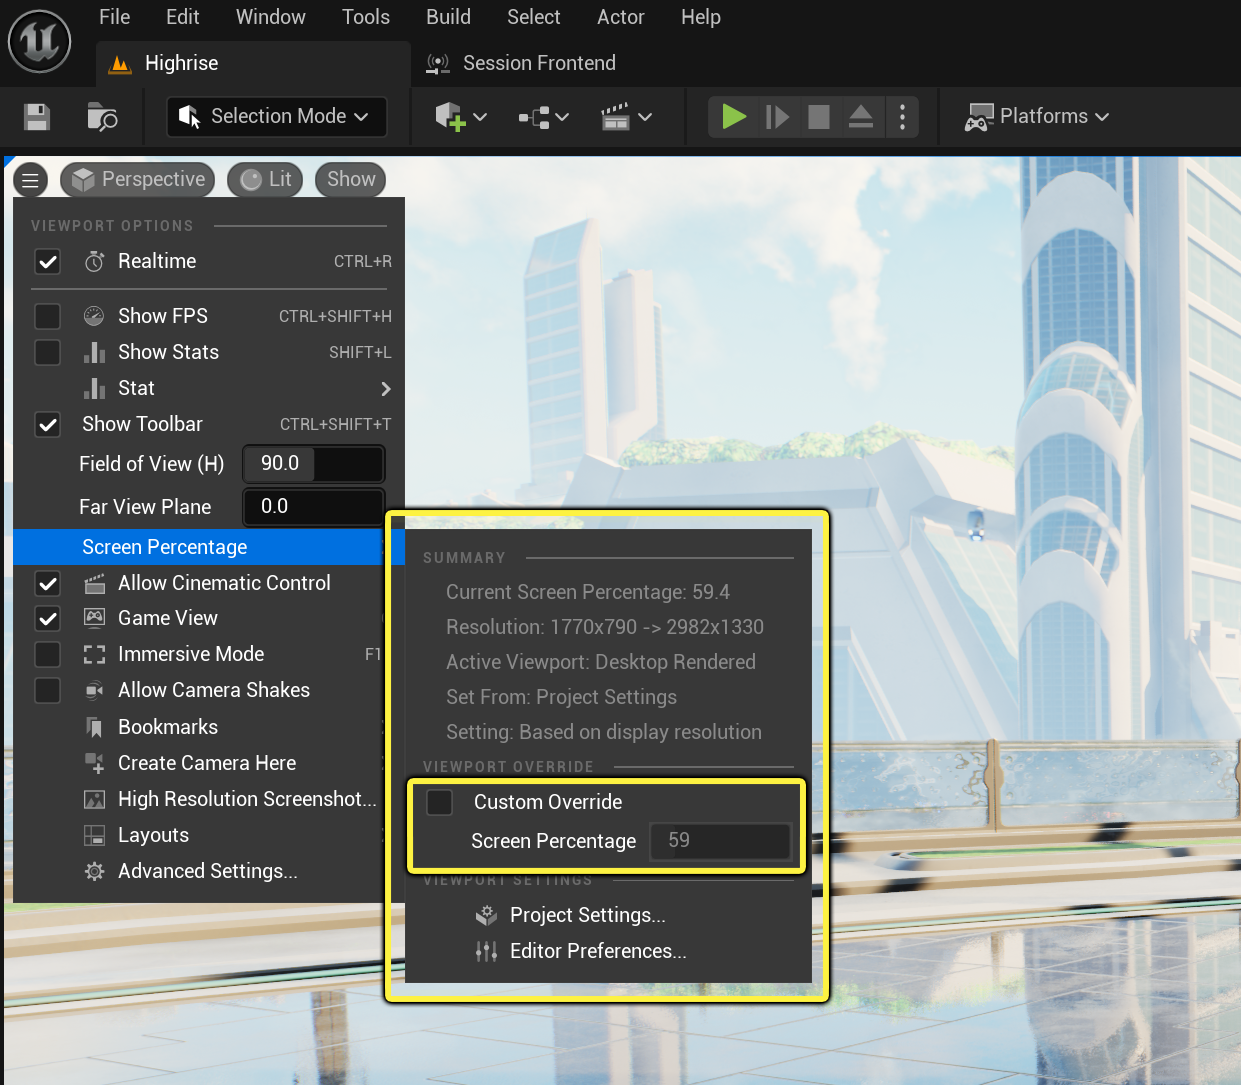
Editor viewports have their own rendering resolution controlled with the Screen Percentage setting found in the Viewport Options menu. Enable the checkbox for Custom Override to set your own screen percentage.
Alternatively, you can use the console to set the anti-aliasing scalability group with sg.AntiAliasingQuality, where 0 = Low, 1 = Medium, 2 = High, 3 = Epic, and 4 = Cinematic qualities.
The configuration file BaseScalability.ini in the [Unreal Engine Root]/Engine/Config folder contains listings of all scalability group settings. You can look at the AntiAliasingQuality sections to see how TSR is scaled depending on the anti-aliasing quality group being used. Each group contains a list of console variables and values.
Your project contains its own configuration file named DefaultScalability.ini in [Your Project Root]/Config folder. You can modify these console variables to fit the needs of your own project.
This is an example of the High anti-aliasing quality values in the BaseScalability.ini file:
[AntiAliasingQuality@3]
r.FXAA.Quality=4
r.TemporalAA.Quality=2
r.TSR.History.R11G11B10=1
r.TSR.History.ScreenPercentage=200
r.TSR.History.UpdateQuality=3
r.TSR.ShadingRejection.Flickering=1
r.TSR.RejectionAntiAliasingQuality=2
r.TSR.Resurrection=1
You can use a GPU debugger, such as Unreal Engine's GPU Profiler, DumpGPU, or a third-party debugger to inspect TSR's anti-aliasing grouping. The selected AntiAlaisingQuality group includes the rendering and display resolutions on the draw event found under Scene > PostProcessing > TemporalSuperResolution.
| GPU Profiler | DumpGPU Viewer |
Click image for full size.
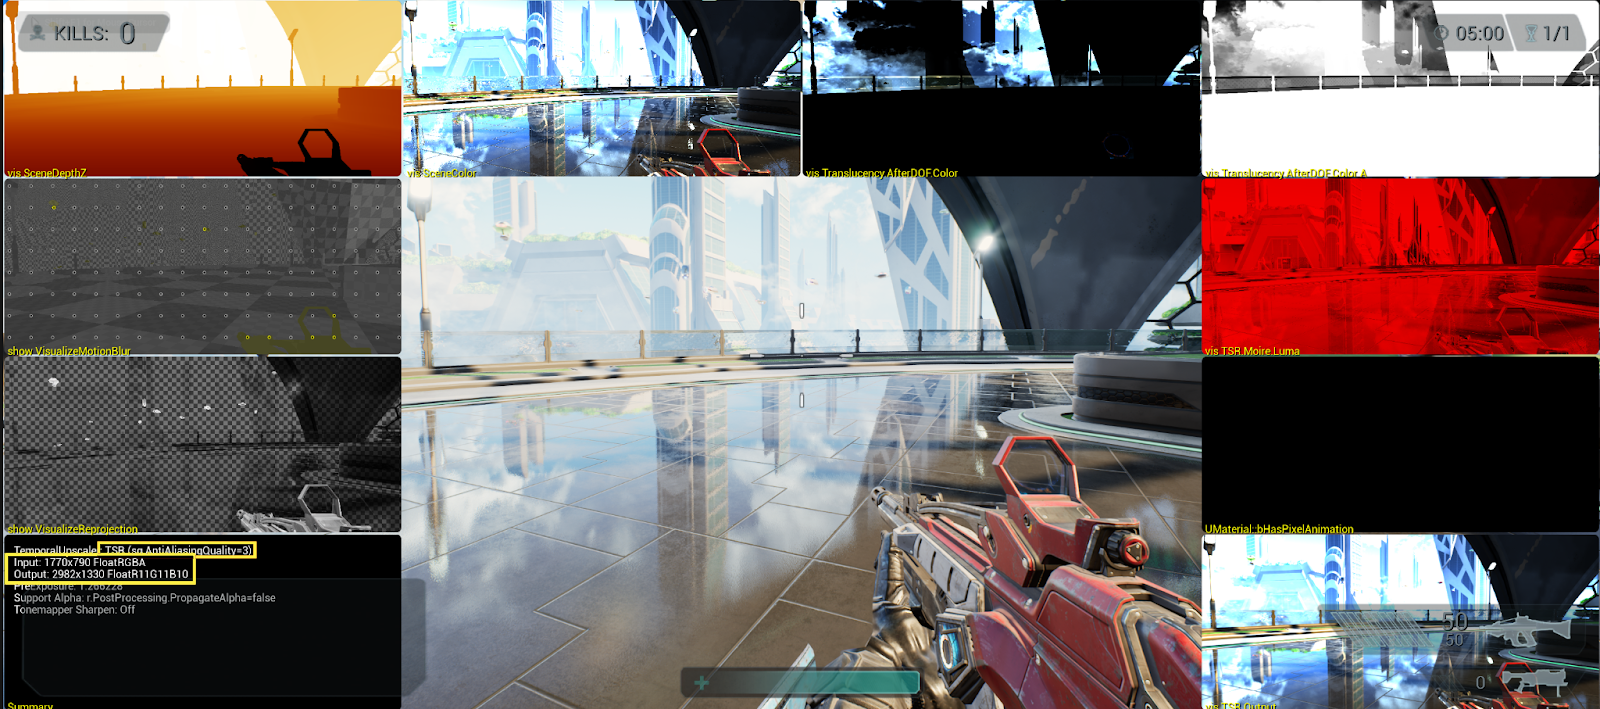
When using the VisualizeTemporalUpscaler show flag, under the viewport's Show > Visualize menu, the bottom-left visualization displays the input and output and the AntiAliasingQuality group currently being used:
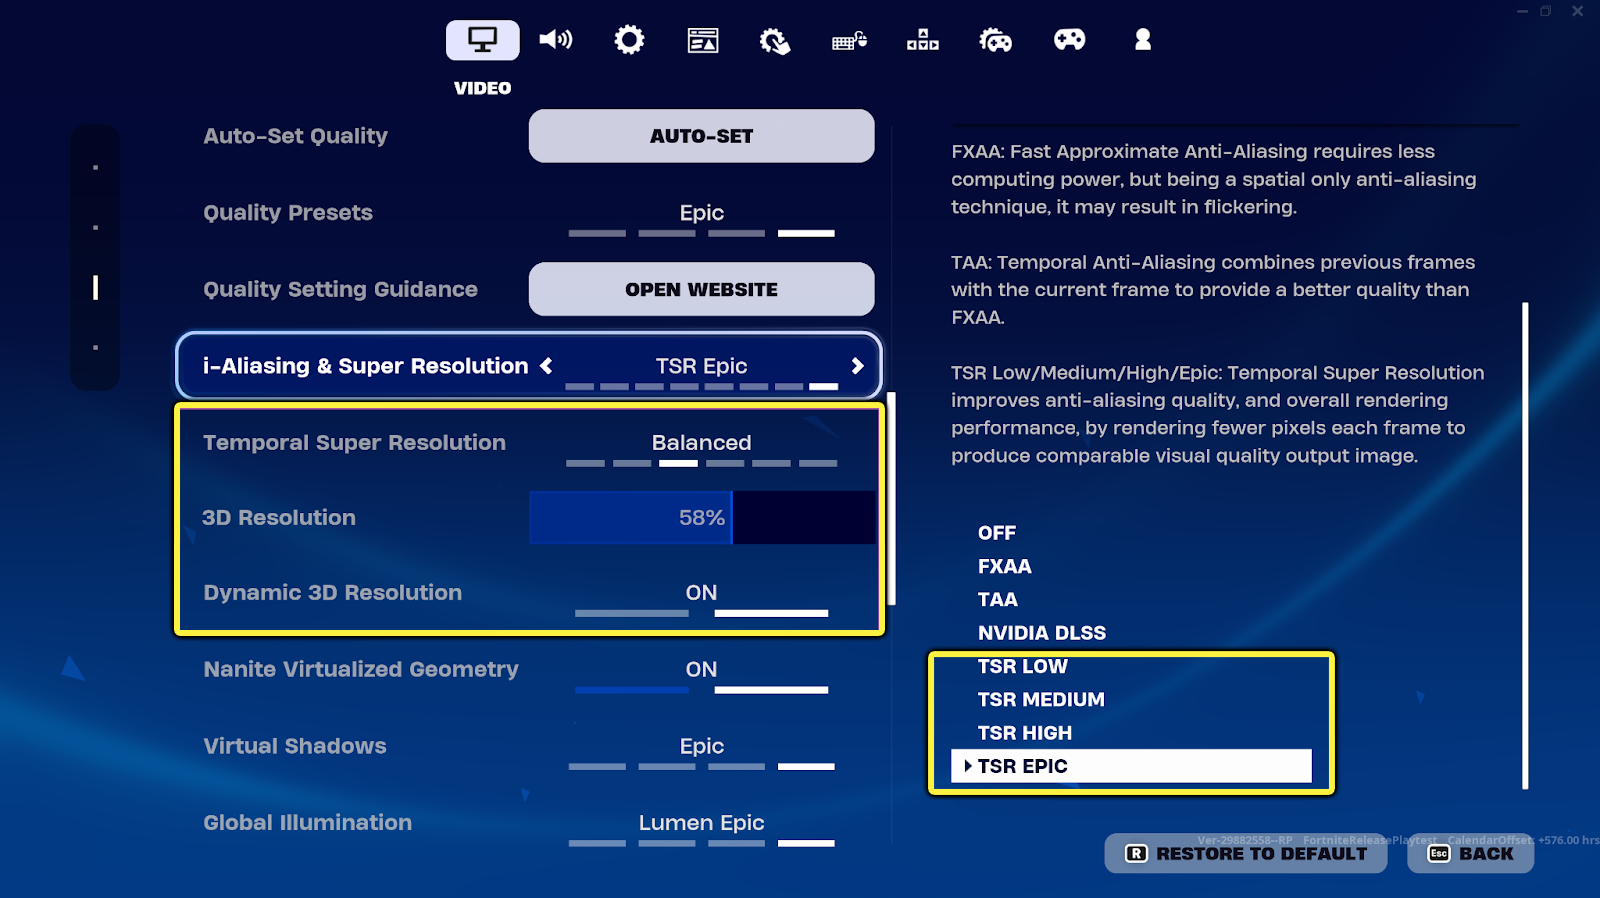
You can optionally add your own anti-aliasing scalability groups and expose them as separate settings. One way to differentiate TSR's settings from other anti-aliasing options is to add a parenthesis indicating the method being used.

With your own projects, you may want to differentiate this further. In Fortnite for example, multiple anti-aliasing methods are supported. The TSR settings there have their own selections depending on Low, Medium, High, and Epic quality settings. There are also some additional parameters exposed to the user interface.
Hidden GPU Costs of Temporal Upscaling
TSR, along with any other temporal upscaler, happens in the middle of the post processing render chain. This means that passes, such as motion blur and tonemapper, run after TSR is no longer scaling with the primary screen percentage. In the absence of a secondary screen percentage with a spatial upscaler (r.SecondaryScreenPercentage.GameViewport), the output resolution of TSR runs at the display resolution rather than the rendering resolution set by screen percentage.
Because of this and TSR being enabled by default, there is a lot of effort focused on reducing the hidden temporal upscaling costs of passes that happen after TSR.
Optimizing Motion Blur with TSR
Optimizations for motion blur are combined for three times the motion blur GPU performance cost on PlayStation 5 and Xbox Series X. These are platforms that always display a 2160p backbuffer, even on lower resolution televisions. So, with that in mind, you can expect the following:
- Increased TSR costs when using
stat gpu:- TSR cost may increase slightly in
stat gpuwhen toggling motion blur on and off for comparison. - TSR takes over its Velocity Flatten pass that normally runs at input resolution when motion blur is enabled. You can control this using the console command
r.MotionBlur.AllowExternalVelocityFlatten, which is enabled by default. - TSR outputs half-resolution scene color to reduce bottlenecks in memory bandwidth that occurs in large directional motion blur kernels. You can control this using
r.MotionBlur.HalfResInput, which is enabled by default.
- TSR cost may increase slightly in
- Half-resolution on directional blur:
- Directional blur automatically runs at half-resolution on very large movements when happening at display resolution. Enabling this feature reduces the VALU cost of motion blur.
- Half resolution is enabled using the console command
r.MotionBlur.HalfResGather 1.
- Motion Blur Half and Quarter Resolutions:
- TSR and motion blur can output half or quarter resolution. This is important for Gaussian depth of field, Convolution Bloom, Lens Flare, Eye Adaptation (Auto Exposure), and Local Exposure that all run after the Motion Blur pass.
The Post Process Quality scalability group scales some of the mentioned motion blur values. You can see how these are set in the BaseScalability.ini configuration file located in [Your Engine Root]/Engine/Config folder.
Tools for Debugging Temporal Super Resolution
TSR's primary advantage is that it is purely an image processing technique. This means any inputs and outputs are visible images, making it clear to see with the built-in visualizer, DumpGPU Viewer, or more commonly known platform GPU debugging tools, such as RenderDoc and PIX.
Visualize Temporal Upscaler Inputs and Outputs
There are times where you'll need to diagnose artifacts that affect temporal upscaling. For this, you can use the Temporal Upscaler show flag. The visualizer shows the raw input and output buffers as a starting point for diagnosing these artifacts.
You can enable this show flag in the viewport under Show > Visualize and selecting Temporal Upscaler I/O (TSR, TAAU, or third party plugins).
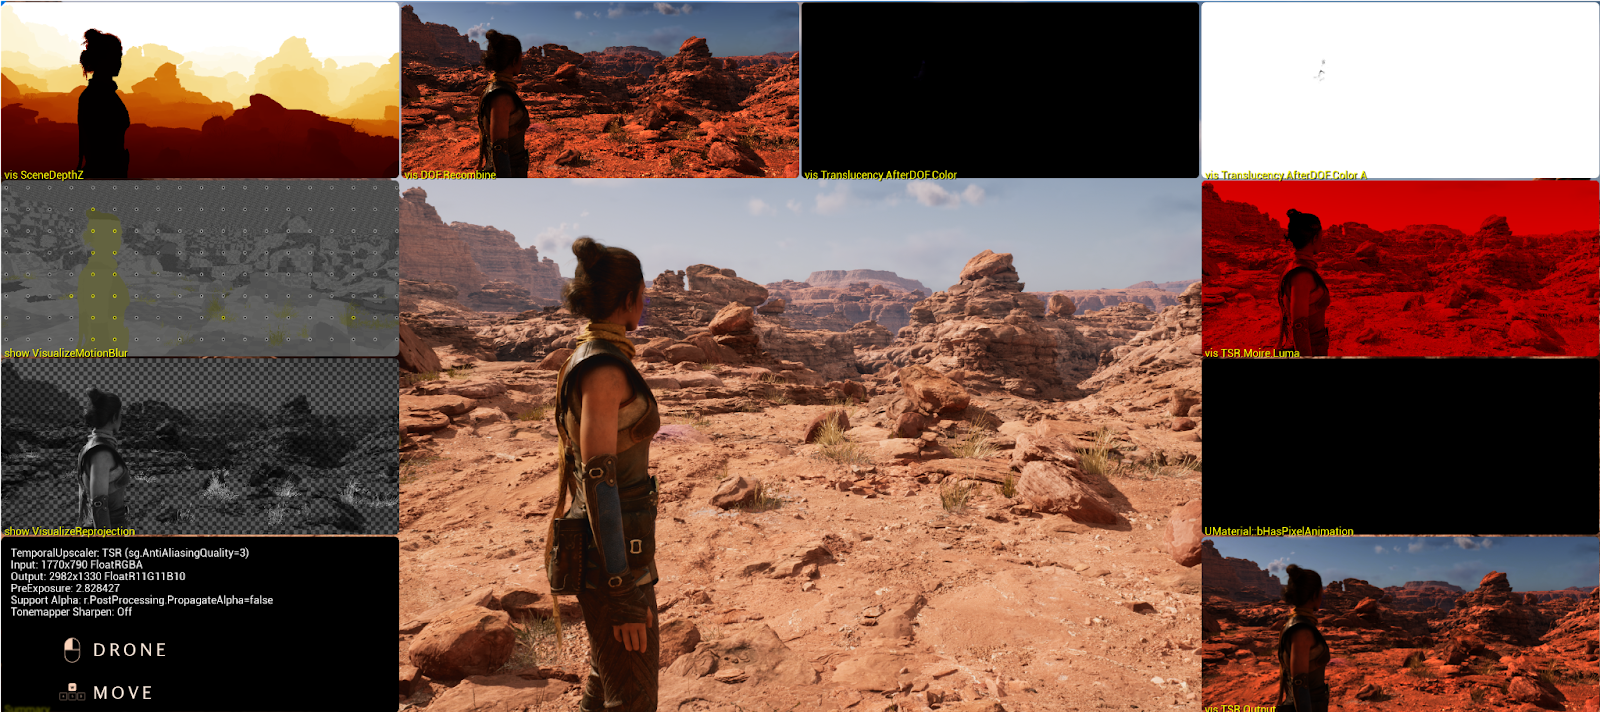
The Temporal Upscaler visualization mode with Anti-Aliasing (TSR) group quality set to High
For more information, see Temporal Upscaler.
Visualize TSR
The Temporal Super Resolution visualization displays an overview of TSR that is most helpful in diagnosing particular problems. This visualization mode is also a good starting point to gain a better understanding of the inner workings of TSR and the work it does to stabilize the image.
You can access this show flag from the viewport Show > Visualize menu by selecting Temporal Super Resolution.
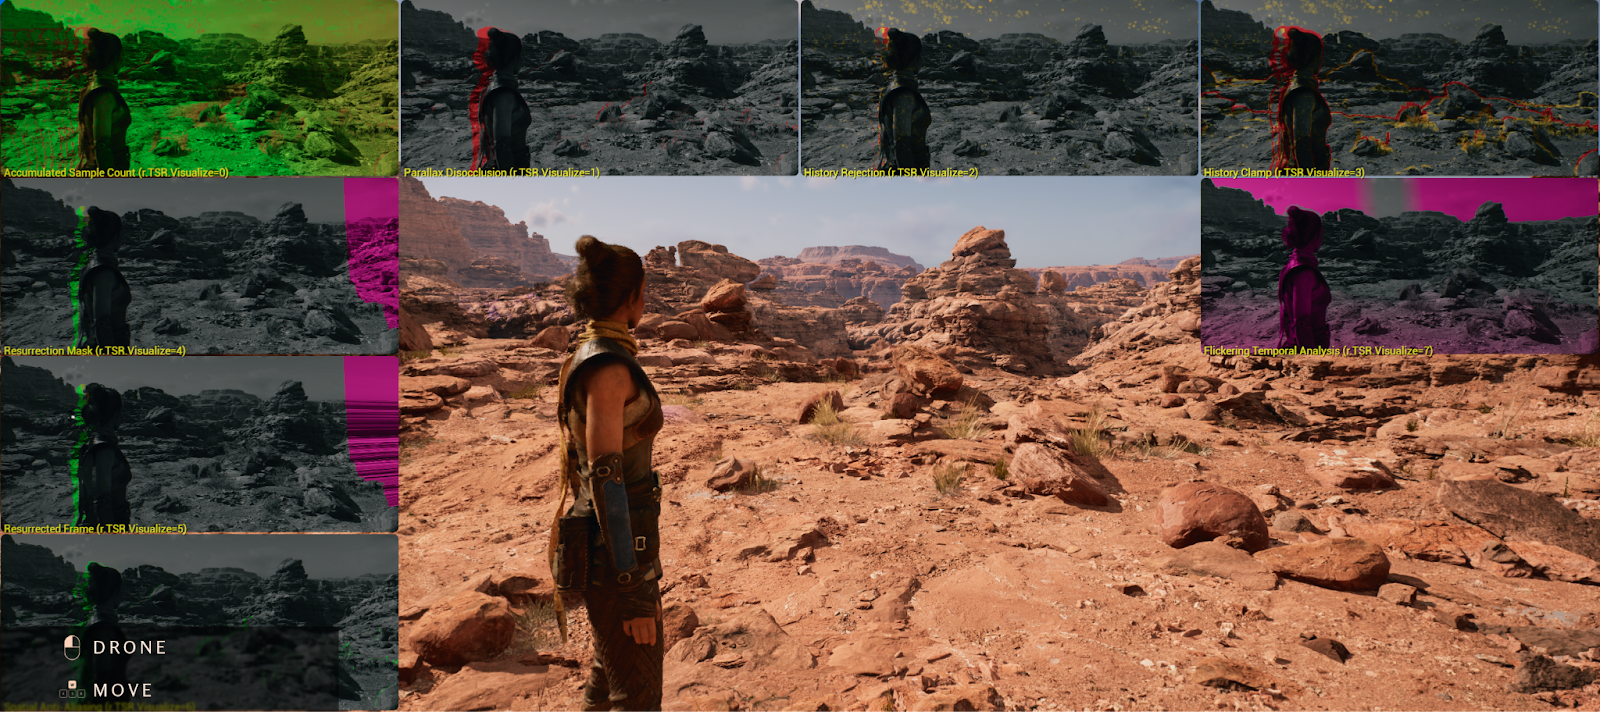
The TSR visualization mode with Anti-Aliasing (TSR) group quality set to High
The colors in the visualizations are as follows:
- Pink means something is disabled.
- Yellow / Red means something is detrimental for image quality.
- Green means something is in the interest of image quality.
The Temporal Super Resolution show flag provides an overview of different visualization options. You can use the console command r.TSR.Visualize to select one of these views by entering one of the following values:
- -2 displays an overview grid VisualizeTSR visualization regardless of how the show flag is set in the viewport's Show menu.
- -1 displays the overview grid of VisualizeTSR based on how the show flag is set in the viewport's Show menu.
- 0 shows the number of accumulated samples in history.
- 1 shows parallax disocclusion based on depth and velocity buffers.
- 2 shows the mask where the history is rejected.
- 3 shows the mask where the history is clamped.
- 4 shows the mask where the history is resurrected.
- 5 shows the mask where the history is resurrected in the resurrected frame.
- 6 shows the mask where spatial anti-aliasing is being computed.
- 7 shows the mask where the flickering temporal analysis heuristic is taking effect.
DumpGPU Viewer
DumpGPU is a built-in platform-agnostic intermediary GPU resources viewer. DumpGPU is well-suited to diagnose TSR artifacts over many frames because TSR is mostly image processing. With some minimal setup, you can use DumpGPU directly in the console (`) to inspect TSR's intermediary render targets. To do this, you can use the following commands:
| Console Command | Description | Value to Use |
|---|---|---|
r.DumpGPU.Root |
Constrains the GPU dump to solely GPU passes. | “TemporalSuperResolution” |
r.DumpGPU.FrameCount |
Dumps multiple successive frames, which is useful for diagnosing issues with TSR because it accumulates results over several frames. | 30 |
r.DumpGPU.Stream |
Asynchronously stream resources from the GPU to disk to speed up the dumping process. | 1 |
r.DumpGPU.FixedTickRate |
Fixes the engine tick rate at a desired frame rate if the dumping process ends up slowing down the frame rate. This is similar to how t.MaxFPS works. |
30 |
r.DumpGPU.Delay |
Delays the dumping process by a few seconds to have time to reproduce the artifact with gameplay logic. | 3 |
r.DumpGPU.CameraCut |
This issues a camera cut on the first dumped frame. This is optional for diagnosing issues with DumpGPU. | 1 |
Optionally, you can copy these commands into your project's ConsoleVariables.ini file:
r.DumpGPU.Root="*TemporalSuperResolution*"
r.DumpGPU.FrameCount=30
r.DumpGPU.Stream=1
; Fixes the engine tick rate at a desired frame rate if the dumping process ends up slowing down the frame rate, like t.MaxFPS
r.DumpGPU.FixedTickRate=30
r.DumpGPU.Delay=3
r.DumpGPU.CameraCut=1
With TSR's intermediary render targets to inspect, you can step through frames forwards and backwards to see how an artifact evolves over the captured frames.
You can speed up the dump GPU streaming to fit the renderer's internal render targets to your rendering resolution by entering r.ResetRenderTargetsExtent into the console. This is useful to do when changing the rendering resolution with screen percentage. Also, note that when Dynamic Resolution is enabled, the rendering resolution can be locked with r.DynamicRes.TestScreenPercentage, but the internal render targets size is still controlled by r.DynamicRes.MaxScreenPercentage.
If you're submitting bug reports or requesting assistance with TSR issues to Epic, a compressed 7-zip (*.7z) file is best suited to compress the dump directory for uploading the files.
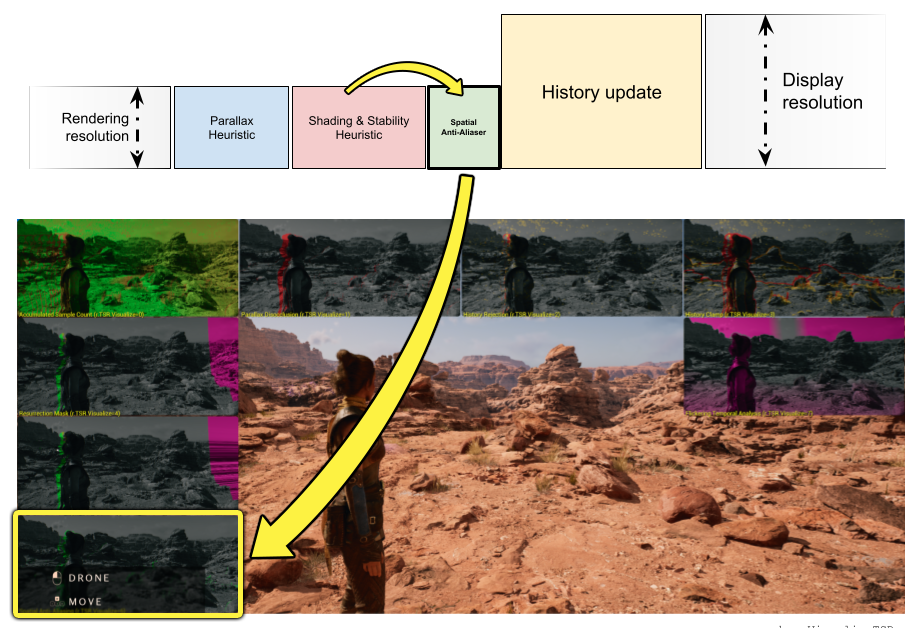
The Components of TSR
TSR is composed of many different algorithms that are designed to solve specific problems in order to get the best image quality possible on current generation consoles.
TSR uses the following algorithms:
- The History works to accumulate, store and reuse details between frames.
- The Parallax Heuristics reproject history using motion vectors while maintaining image quality on disocclusion.
- The Shading Rejection detects color changes and translucency. It also finds a balance with the amount of detail that Nanite includes in a frame.
- The Flickering Temporal Analysis stabilizes the frame reducing artifacts, such as moire patterns on some geometry.
- The History Resurrection recalls stored data from past frames when they show up again in the current frame.
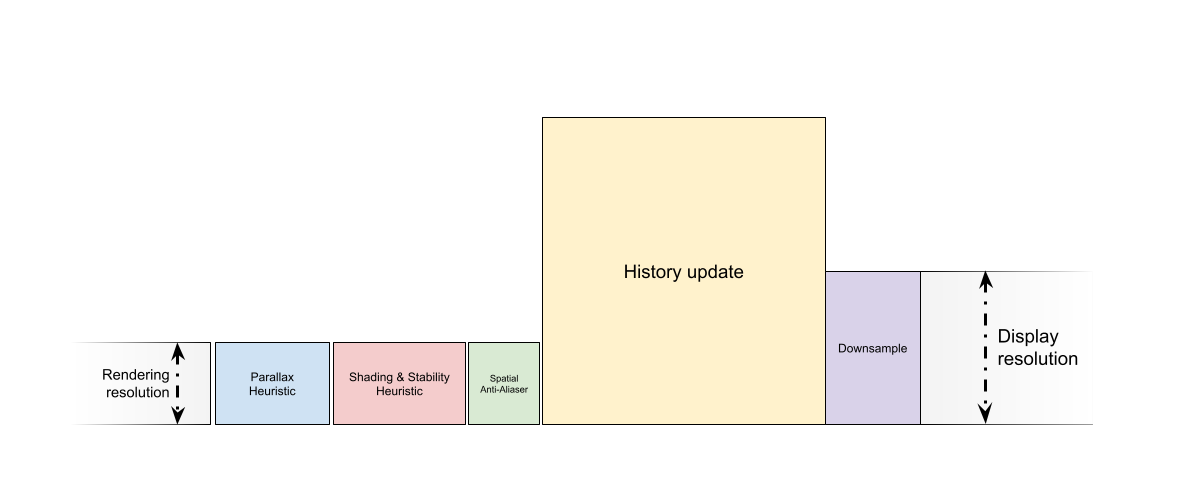
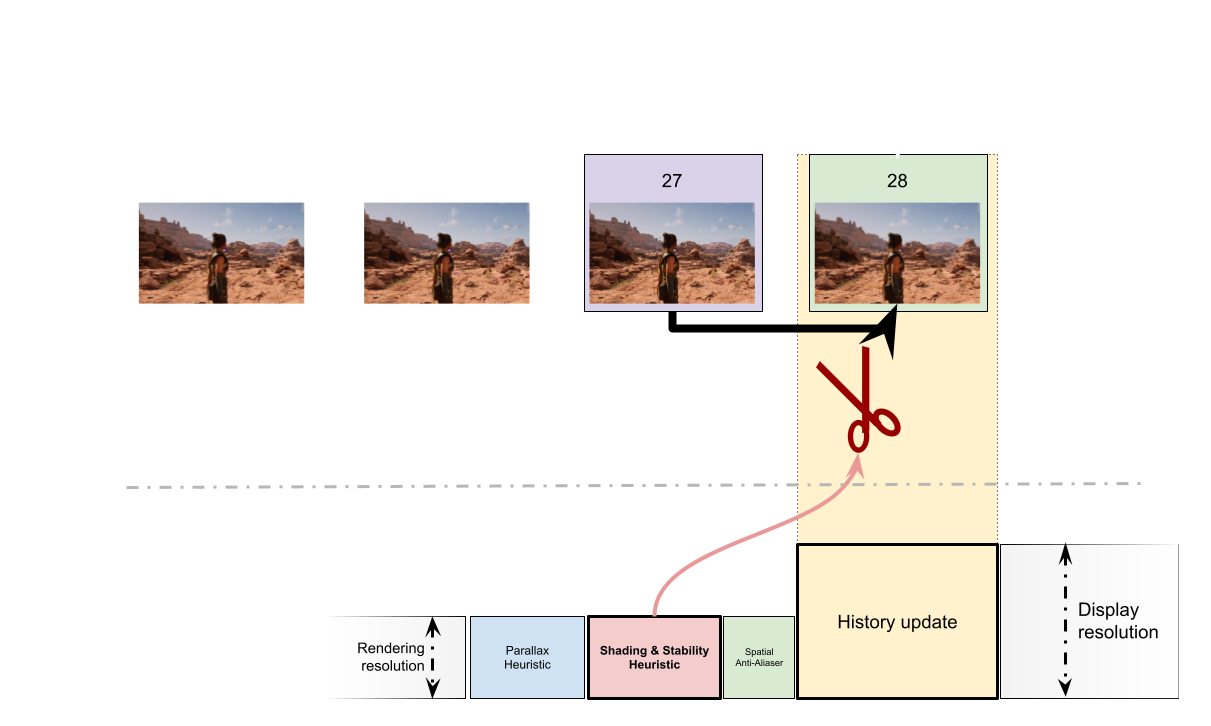
The chart below can give you an idea of how these algorithms all feed into TSR's frame output.
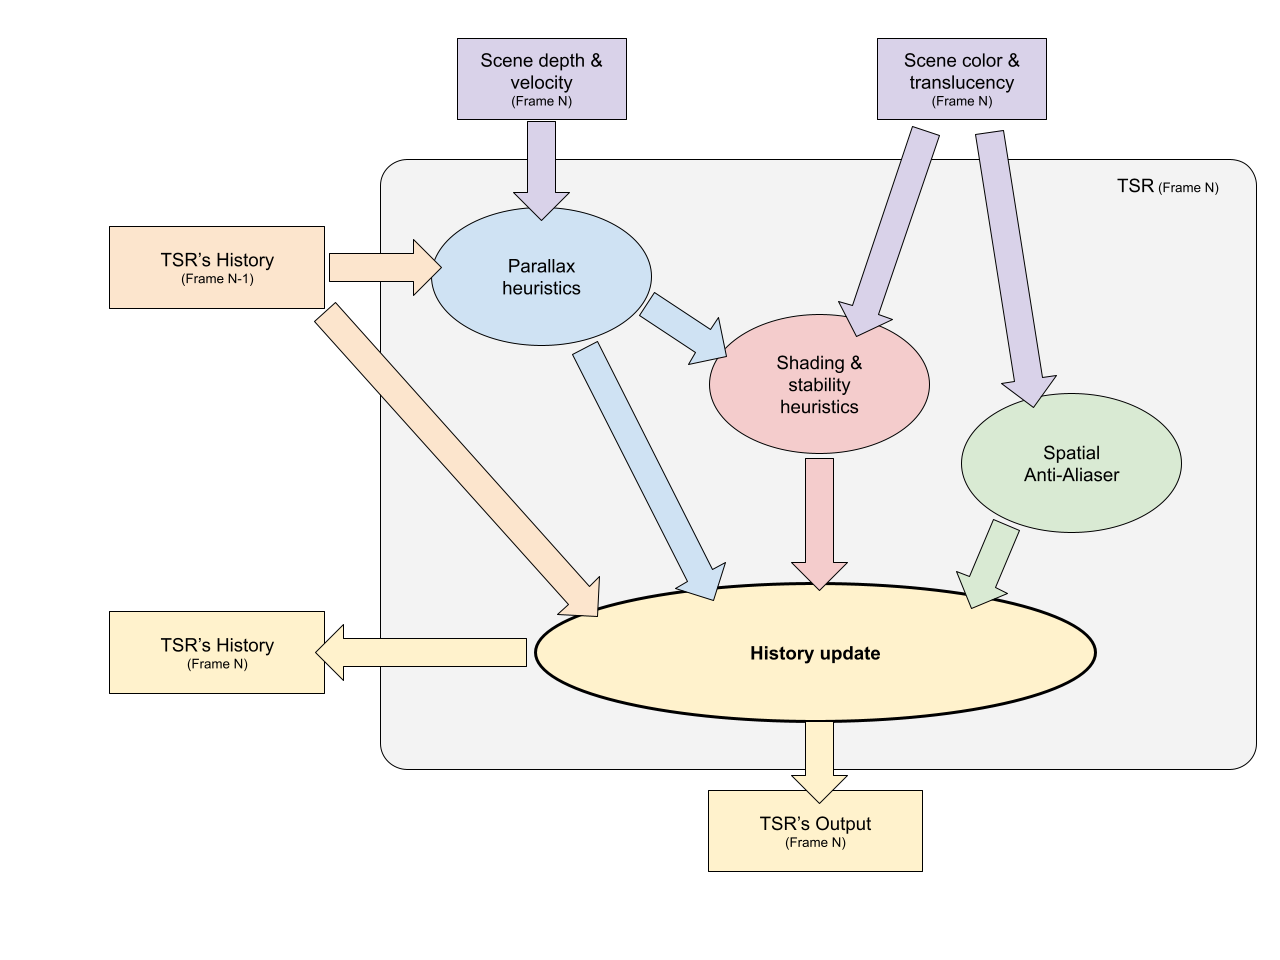
The sections that follow will look at these individual algorithms listed above and how they work with the Temporal Upscaler and Temporal Super Resolution visualization modes.
TSR History
This is mandatory on all TSR anti-aliasing scalability, but is customizable with r.TSR.History.* console commands.
TSR accumulates details over time. The aggregated integration of these rendered details over time is done in the history at display resolution. TSR also includes some additional data hidden in the history that is specific to TSR's internal algorithm.
Details collected in frames rendered over time are accumulated to make up the TSR history.
When using the TSR visualization mode, the amount of detail being accumulated in the history is shown in the top-left corner with the Accumulated Sample Count input. The more green the image is, the more details it has accumulated. Areas in red don't have enough pixels being accumulated, whereas the areas in green have reached their highest number of samples per-history. The number of samples per-history can be adjusted to suit your needs with r.TSR.History.SampleCount.
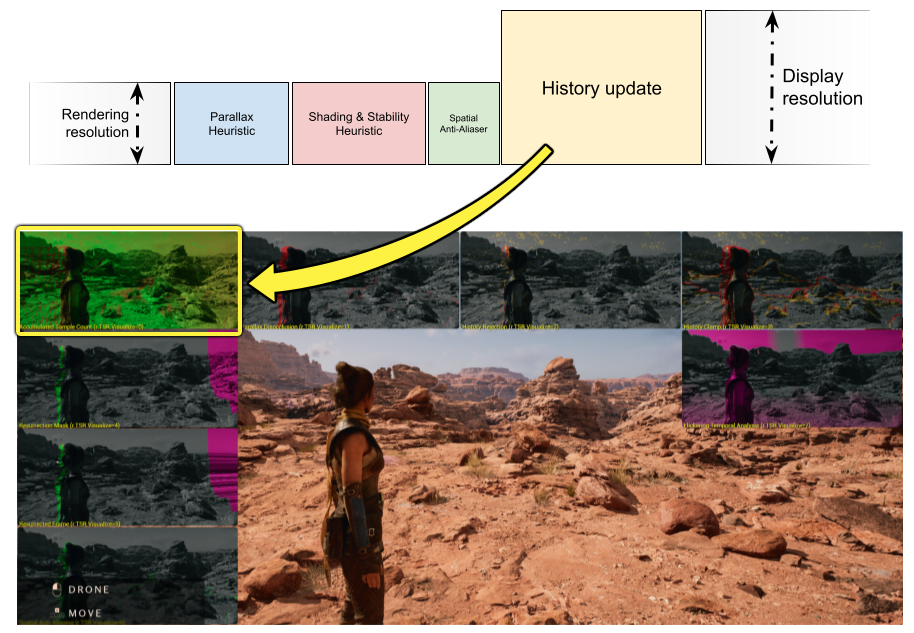
To view the Accumulated Sample Count input full screen. Use the console command `r.TSR.Visualize 0”. For more information on the TSR visualization options, see the Visualize TSR section of this page.
The History Update is the most expensive pass in TSR's total GPU cost because the history is rendered at display resolution.
TSR's History Update includes selectable permutations with the console command r.TSR.UpdateHistory: 0 for low, 1 for medium, 2 for high, and 3 for epic quality. These quality levels are driven by the Anti-Aliasing (TSR) scalability group quality setting. For more details about what each quality level offers, look at DIM_UPDATE_QUALITY in the TSRUpdateHistory.usf file located in [Unreal Engine Root]/Engine/Shaders/Private. You inspect and customize to your project's needs from here.
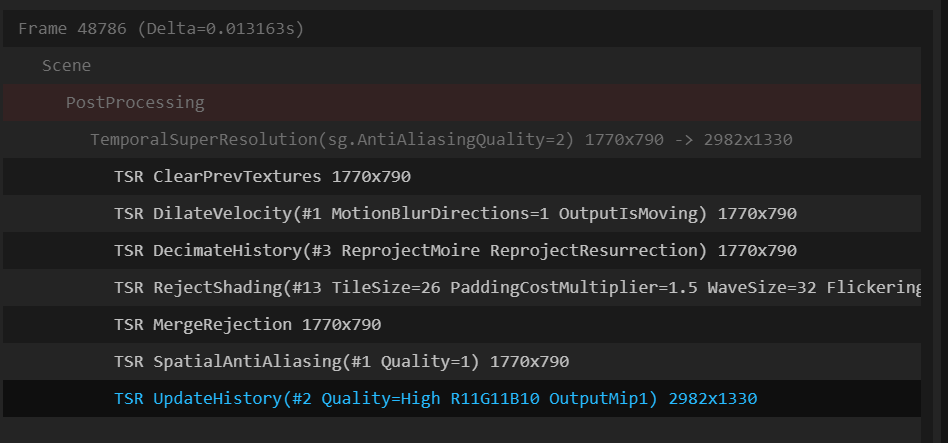
Example showing TSR UpdateHistory with Anti-Aliasing scalability quality set to “High” as viewed in the GPUDump viewer.
To fight history reprojection blur when r.TSR.History.ScreenPercentage=100, you'll want to accelerate detail accumulation again with r.TSR.Velocity.WeightClampingSampleCount. For example, games of a competitive nature, such as Fortnite, can benefit by sacrificing some image stability during movement in favor of sharpness by lowering r.TSR.Velocity.WeightClampingSampleCount from 4.0 (default) to 2.0 in the project's DefaultEngine.ini configuration file.
TSR Nyquist-Shannon History
This is enabled by default on Epic and Cinematic TSR anti-aliasing scalability levels. It's controllable with the console variable r.TSR.History.ScreenPercentage.
TSR reprojects the previous frame's history that has the geometric and texture detail already aggregated into an ready-to-use image — the same as any other temporal upscaler in the market — which works well in theory.
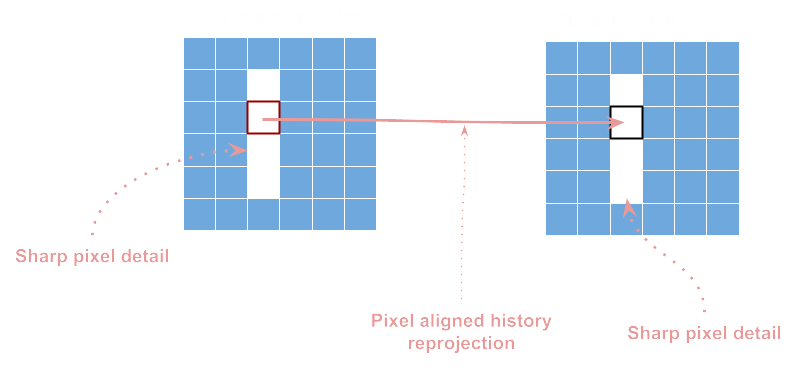
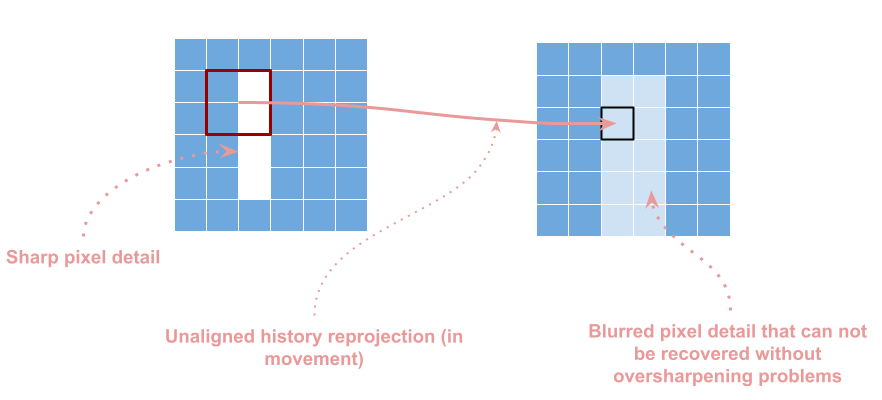
When this is applied in practice with movement, the pixels between the current and previous frames are unlikely to be aligned. Instead, TSR and other temporal upscalers have to interpolate the previous frame's pixels, which introduces blur. TSR attempts to mitigate over blurring of pixels by doing some sharpening in this kernel, but it can't solve the problem of transforming details that are 1 pixel thick that move only half a pixel in the frame. This limitation causes detail to be lost even more with the blur, making it impossible to recover these details after the fact.
As a result of the history reprojection, temporal upscalers can look like they have a resolution of 540p when displaying at 1080p while movement is happening in the frame. This only adds to the negative reputation they have with blur on things that move in the frame. To counteract this, The Epic and Cinematic anti-aliasing scalability groups set TSR's history screen percentage (r.TSR.History.ScreenPercentage) to 200 in order to store TSR history at twice the display resolution.
This approach has the advantage of eliminating blur that happens during history reprojection, where reprojection relies on the Nyquist-Shannon sampling theorem through a Mitchell-Netravali downsample kernel.
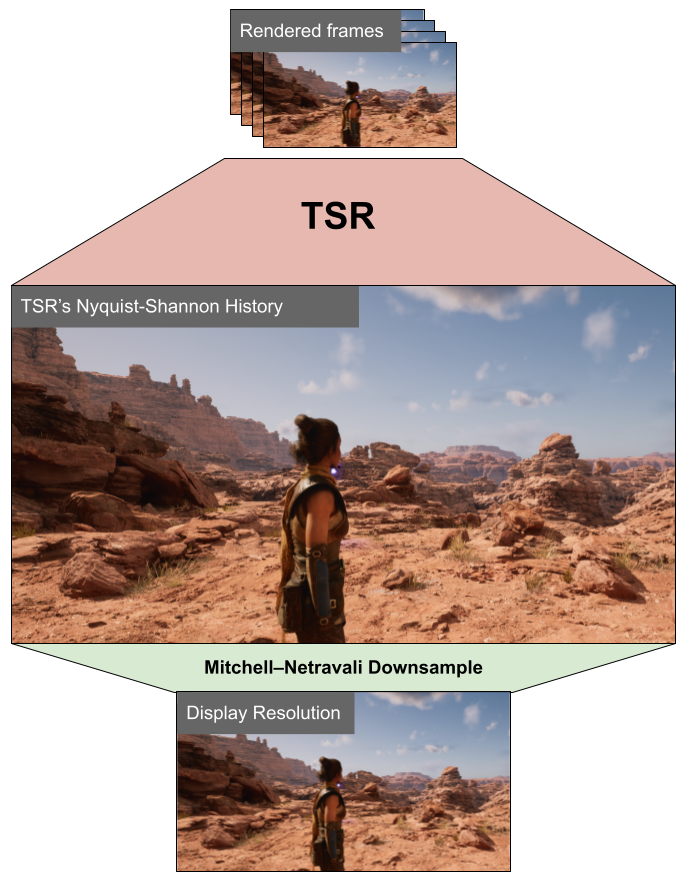
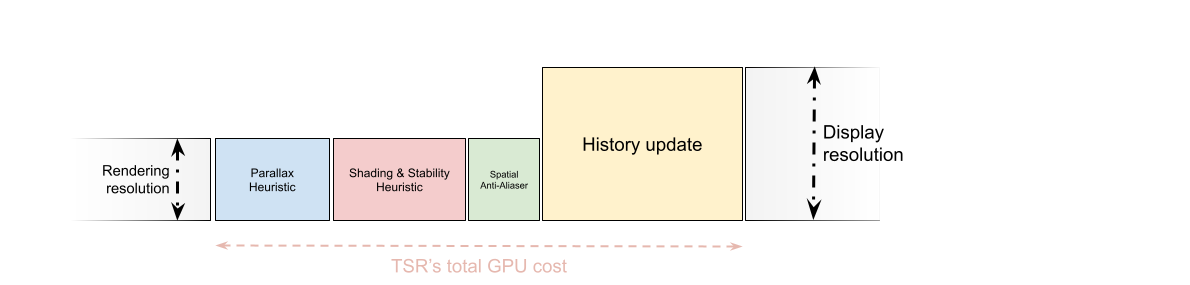
Blurring during history reprojection is something that temporal upscalers are known to suffer from. To counteract this, the higher default history screen percentage means that the history update's GPU cost is 4x more expensive, substantially adding to TSR's GPU cost. While this approach may appear counterintuitive because of the incurred cost, the idea here is to provide twice as much information along the resolution axis than that of the monitor's display resolution. When the super sampled history update is downsampled, it retains much more detail than it otherwise would have if it wasn't using a higher screen percentage for the history.
Graph showing the history screen percentage at 200% and its effect on TSR's total GPU cost.
If you're concerned about the project's frame budget being too costly, you can use a High (or lower) engine scalability group since the Epic anti-aliasing scalability carries a higher GPU cost.
The Nyquist-Shannon history setup has been used in Epic's own demos going back as far as the “Troll” demo from Goodbye Kansas and Deep Forest Films in 2019 using Unreal Engine 4.22 with Temporal Anti-Aliasing (TAA). It has been a proven method for our projects that use temporal upscalers.
Parallax Disocclusion
This is mandatory on all TSR anti-aliasing scalability groups.
TSR has a Parallax Disocclusion heuristic that helps reduce artifacts that happen from areas of the frame becoming visible from behind areas of the frame closer to the camera. Take for example the camera panning in the scene below and the building in the far distance become visible from behind the building that is closer. This type of disocclusion can cause artifacts to appear as the building in the distance needs to accumulate detail from the frames to stabilize the image.
TSR with Epic scalability (r.AntiAliasingMethod=4, sg.AntiAliasingQuality=3) and Screen Percentage at 50%
This heuristic is solely based on the current frame's depth and velocity buffer that is viewable Temporal Upscaler visualization mode. A parallax disocclusion mask is generated from this buffer and can be viewed in the Temporal Super Resolution visualization mode.
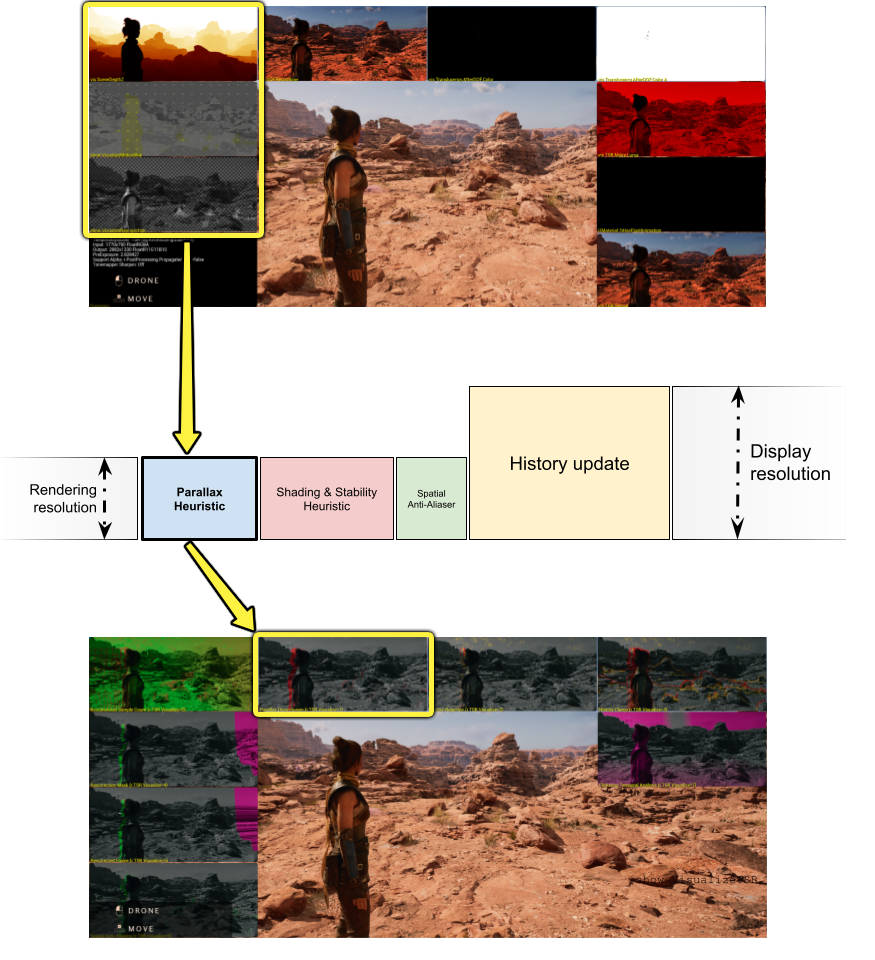
Temporal Upscaler visualization mode's depth and velocity input that is used in the TSR's visualization mode to generate a disocclusion mask.
You may discover there are times where some object's motion vectors are being calculated and drawn by each code path handling geometry in the scene, and that this can cause issues that affect these objects. When discovered, the first component to check for motion vectors drawn by geometry that are not working correctly is TSR's parallax heuristics and its generated disocclusion mask.
Use the following TSR visualization to investigate these types of issues. You can toggle them on from the viewport's Show > Visualize menu.
- Motion Blur (
Show VisualizeMotionBlur) shows motion vectors as arrows on the screen when the camera is moving.- Look to see if the arrows are in the correct direction as the object. *Look to see that the object(s) in question are yellow. This indicates they are drawing motion vectors.
- Previous Frame's Reprojection (
Show VisualizeReprojection) shows the difference between the current frame and the reprojected previous frame.- Motion vectors on objects not reprojecting correctly show up in color, and their details won't line up correctly.
- Temporal Upscaler I/O (
Show VisualizeTemporalUpscaler) shows an overview of the inputs and outputs of TSR. - Temporal Super Resolution Parallax Disocclusion (
Show VisualizeTSR) shows the disocclusion vignette that should be behind objects drawing velocities.
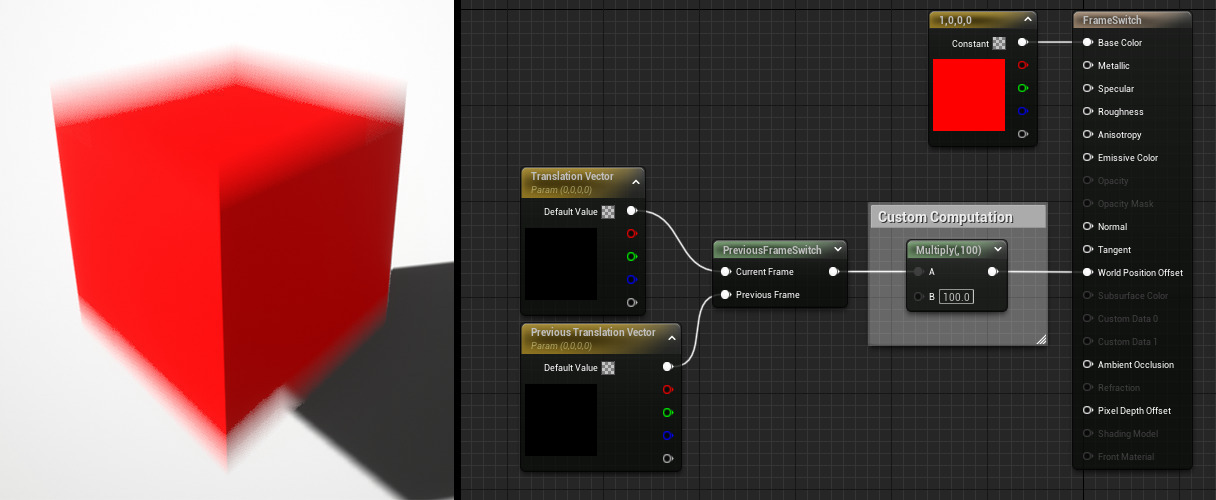
Animation World Position Offset
Materials with parameters that are animated present a problem for TSR and other temporal accumulations of the renderer, such as a material using World Position Offset (WPO) with vertex animation. For these types of materials, the WPO needs to evaluate the current and previous frame in order to retrieve proper motion vectors. Because the previous frame evaluation of WPO logic only has the current frame's value, the previous frame result ends up being incorrect. For materials that draw velocity, it's important that they specify the value of what the previous frame was.
The Previous Frame Switch material node solves this problem by providing a way to generate correction motion vectors that work with TSR and motion blur. This node correctly adds motion blur on vertex animation and allows for TSR to reproject the object correctly in the process. While materials that are only a function of time already work without modification, they cannot account for other variables, such as material parameters that can affect the animation at runtime. The Previous Frame Switch node solves these types of problems by tracking how these parameters change in the material.
Some additional things to consider:
- The project setting Output velocities due to vertex deformation allows for materials using WPO to use double-evaluation for current and previous frames. This outputs velocities during the velocity pass even when the actor has not moved. This setting is enabled by default.
- If the project setting Velocity Pass is set to Write after base pass, there can be a performance cost incurred due to additional draw calls. Performance cost can be higher if many objects are using WPO, such as a forest of trees.
For more information on setup and using this expression, see the “Previous Frame Switch” section of Utility Material Expressions.
Shading Rejection
This is mandatory on all TSR anti-aliasing scalability groups, but is customizable with r.TSR.ShadingRejection.* console variables.
TSR's Shading Rejection heuristic is the process of deciding how much the current frame matches what was in the previous frame and whether it should be reused or rejected altogether.
The inputs of the shading rejection are viewable in the Temporal Upscaler visualization mode and are Scene Color and AfterDOF Translucency Color and Color A. The output, or how much of a frame must be rejected, is shown in the Temporal Super Resolution visualization mode with History Rejection and History Clamp.

The history update running at display resolution (or even higher resolution with the Nyquist-Shannon histories) becomes simplistic in principle, solely doing integration of details over time. It is also conveniently fast.
 (w:800)
TSR and Translucency
This is mandatory on all TSR anti-aliasing scalability groups.
Translucency is a particular issue for TSR to handle because there can be any number of arbitrary layers blended on top of one another. By default, translucent materials never draw velocities, or at most they draw one. This leads to their edges looking less sharp than they should otherwise be because TSR doesn't know exactly how they move.
Translucency Pass
Translucent materials render in different translucency passes, such as before depth of field, after depth of field (default), and after motion blur. A common problem with any surface using translucency comes when there are multiple translucent objects overlapping one another. This leads to translucency sorting problems where the depth buffer isn't able to determine which translucent object should appear in front of the other.
In the material settings, you can specify where the translucency pass should happen. Under the Translucency category, use the Translucency pass dropdown to select where this translucent material should happen. By default, a translucent material is set to render After DOF.
TSR must handle translucency differently than opaque geometry due to their blended nature, and that they never draw velocities. TSR's shading rejection heuristic takes advantage of translucencies happening after depth of field, because they are drawn separately from the rest of the scene geometry.
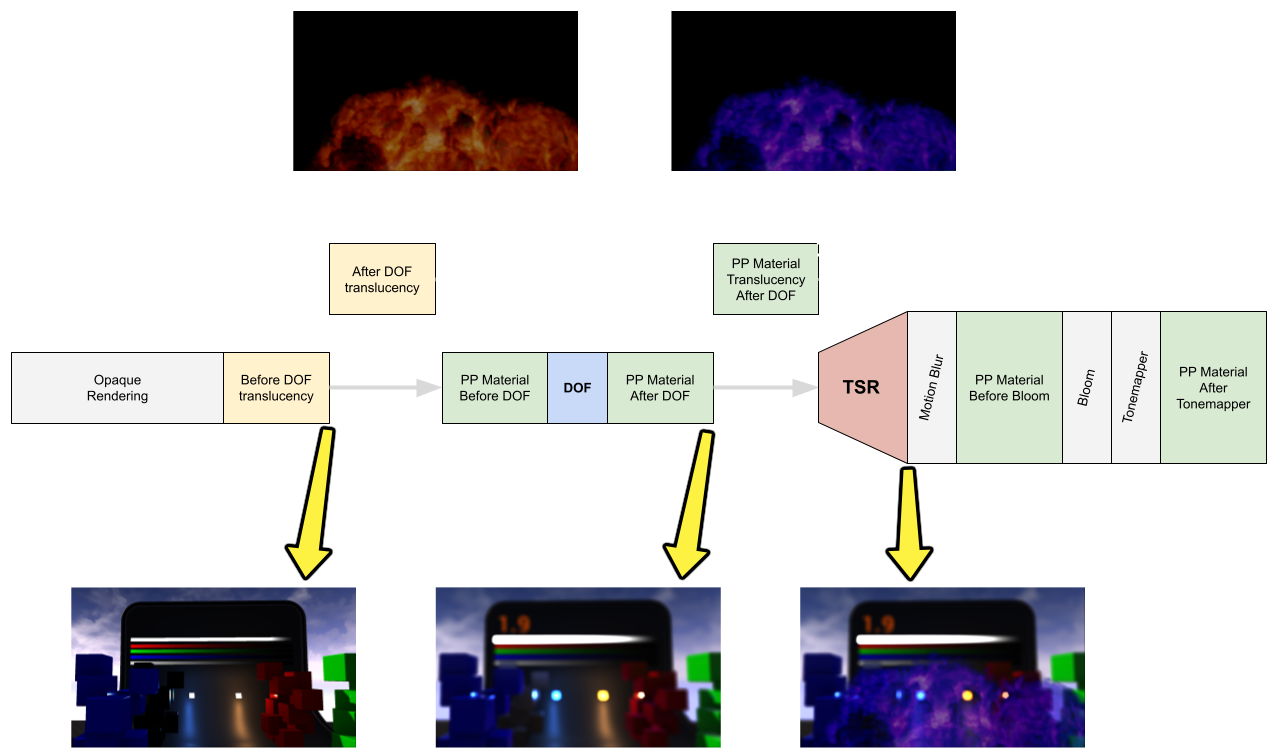
The chart below shows where each of these translucency passes happens in the rendering pipeline.
If you open the output from a DumpGPU, translucency passes are found under Scene > Translucency.
| DumpGPU Output Example 1 | DumpGPU Output Example 2 |
Click image for full size.
Where the DumpGPU command can take a while to dump all of your frame information to disk, the Temporal Upscaler visualization mode provides the AfterDOF view, which is a convenient way to sanity check that translucencies are drawn in the correct location.
| DumpGPU Output Example 1 | DumpGPU Output Example 2 |
Click image for full size.
TSR's shading rejection heuristic is built with a handwritten network of convolutions to take rejection decisions — with a majority of these convolutions dedicated to image stability — in order to sustain the amount of detail that Nanite affords. However, ghosting can happen with later convolutions that have incorrect motion vectors, in-turn creating ghosting artifacts. Because translucency doesn't often have motion vectors, the shading rejection of translucent materials that happen after depth of field, and that is drawn in a separate pass, adds a dedicated blur convolution. This convolution sacrifices a bit of image stability on objects with translucency in order to subject them to less ghosting.
The chart below shows where in the TSR history these convolutions happen to stabilize the image with all the detail that Nanite provides.
Translucency sometimes requires manual adjustment to get the desired effect. For instance, it's not uncommon to need to manually adjust a material's translucency pass on a per-shot basis. The Auto Before DOF (r.Translucency.AutoBeforeDOF) functionality automatically draws translucency effects behind the focus distance in the before depth of field pass to save from having to do this on a per-shot basis, or similar style setup. This functionality is enabled by default.
| With BeforeDOF | Without BeforeDOF |
We strongly recommend that you only adjust the Translucency Pass in a material if you are sure of your intent. Changing this setting can have an effect on the look of your translucent materials as well as incur some unforeseen performance cost. We recommend using the default AfterDOF.
Should you need to adjust the values, the console variable takes a float value between 0 and 1 where:
- 0.0 sets to 1x the focal distance
- 0.5 sets to 2x the focal distance
- 1.0 sets to 100x the focal distance
Outputting Translucency Velocities in Materials
TSR's lack of optical flow means that moving translucent objects can appear to have sharper edges, which sometimes look unsightly, even if it's not entirely a ghosting issue. Materials using translucency have the option to output their velocity to write motion vectors to the depth buffer in the velocity pass. This is a useful starting point for TSR to determine how sharp translucent details are moving in the scene for object's that enable this setting.
You can enable a material to output motion vectors by checking the box for Output Depth and Velocity in the Details panel under the Translucency category.
The example scene below shows how outputting the depth and velocity of a translucent material for the sun sprite sharpens the detail of the eyes and the mouth compared to not having the depth and velocity.
| Output Depth and Velocity: Disabled | Output Depth and Velocity: Enabled |
You can use the Temporal Upscaler visualization mode to inspect this setting with the vis SceneDepthZ, show VisualizeMotionBlur, and show VisualizeReprojection views.
| vis SceneDepthZ | show VisualizeMotionBlur | show VisualizeReprojection |
In the Temporal Upscaler visualization mode, you can see how the translucent material in these three inputs receive information from the enable Output Depth and Velocity setting to achieve the final result.
Translucency is blended into the scene color with some opacity, but the depth and velocity buffer cannot be blended like colors can. The depth and velocity buffer can only be completely overwritten, or not. The Opacity Mask Clip Value material setting is used to compare the renderer's material opacity.
You can set the Opacity Mask Clip Value in the Details panel under the Material > Advanced category.
The default opacity mask clip value (0.333) is not always a good fit for visual effects (VFX) that use translucent materials. Overwriting depth and velocity can be detrimental for instances where reprojecting opaque geometry behind objects that are transparent. In these cases, using a higher opacity mask clip value to only draw velocity for the most opaque area of the VFX where the reprojection error of the opaque geometry behind a transparent object will be much less noticeable.
In the examples below, the Opacity Mask Clip Value can make a difference in how sharp or smooth details are when the Output Depth and Velocity setting is enabled or disabled.
| Output Depth and Velocity: Disabled | Output Depth and Velocity: Enabled |
TSR with Post Process Materials
Identical behavior between TSR and other anti-aliasing techniques.
The flexibility offered by post process materials includes its own conditional limitations because TSR happens in the middle of the post-processing chain. Materials are inserted at different locations in the scene color and on the after depth of field translucency.
Materials can be inserted into scene color in different locations with a post process material. You can use the Blendable Location material setting to specify where the post process material location to modify the scene color should reside.
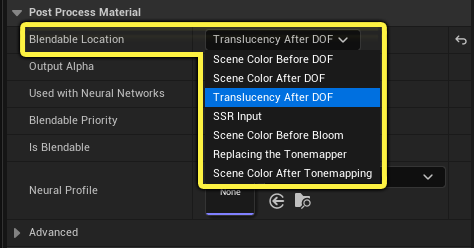
| Blendable Location | Description |
|---|---|
| Scene Color Before DOF | This places the post process material location to modify scene color between translucency distortion and depth of field. It always runs at render resolution with inputs and output always in linear color space. |
| Scene Color After DOF | This places the post process material location between depth of field and after depth of field translucency. It always runs at rendering resolution with its inputs and output always in linear color space |
| Translucency After DOF | This places the post process material location after depth of field translucency before composition into the scene color. It always runs at rendering resolution with its inputs and output always in linear color space. |
| SSR Input | This post process material composes a backplate into screen space reflections (SSR) between TSR/TAA and the next frame's SSR. It runs at display resolution with TSR or TAAU rendering resolution with inputs and output always in linear color space. |
| Scene Color Before Bloom | This post process material location modifies the scene color before bloom. It runs at display resolution with TSR or TAAU rendering resolution with inputs and output always in linear color space. |
| Replacing the Tonemapper | This post process material replaces the tonemapper to modify scene color. It runs at display resolution with TSR or TAAU rendering resolution with inputs always in linear color space. |
| Scene COlor After Tonemapping | This post process material location modifies the scene color after the tonemapper. It runs at display resolution with TSR or TAAU rendering resolution with Inputs and output in different color spaces based on rendering settings. For example, sRGB/Rec709, HDR, or Linear Color. |
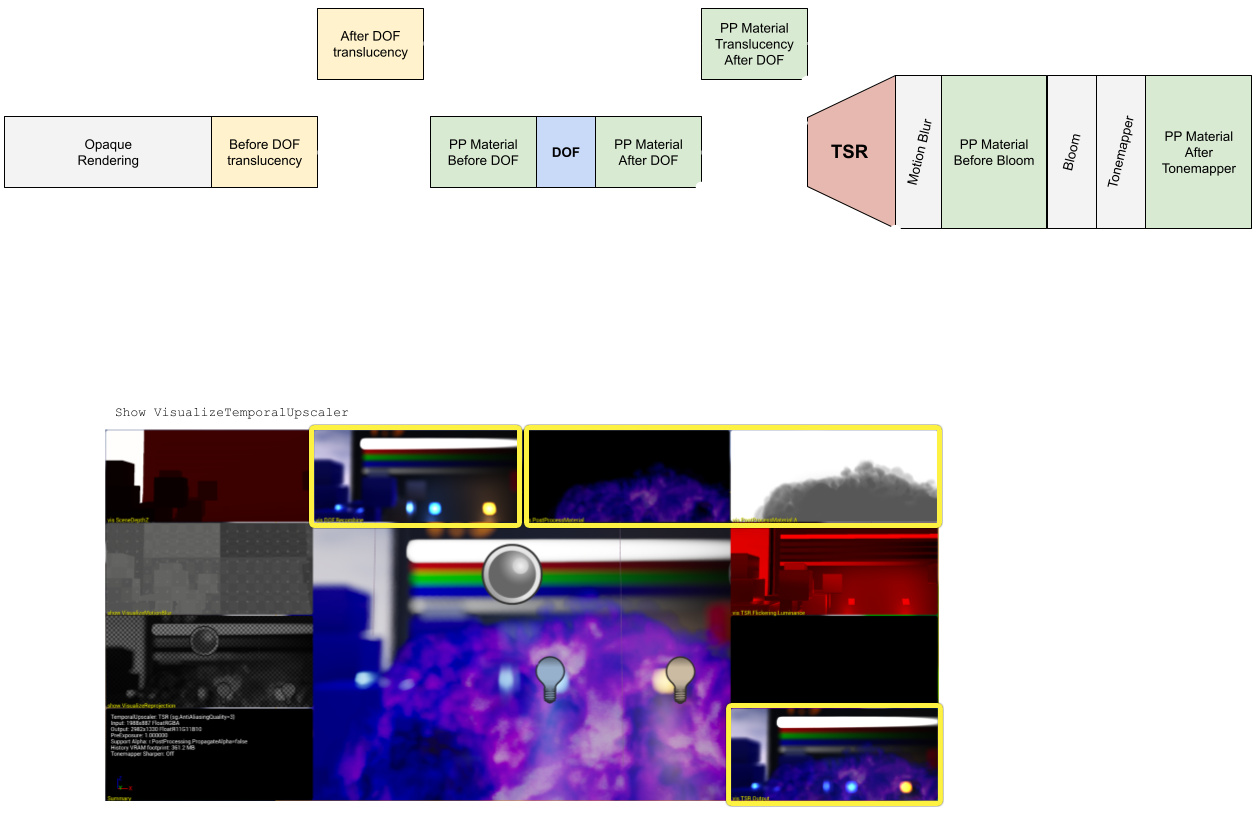
The chart below can help outline which of the locations is being executed, when it's being executed, and at what resolution it's being executed. The chart below uses Scene Color Before DOF, Scene Color After DOF, and Translucency After DOF as examples.
The Temporal Upscaler visualization mode is a useful way to get a better understanding of these views and where they fall in the pipeline. Specifically, the vis SceneColor, vis Translucency.AfterDOF.Color, vis Translucency.AfterDOF.Color A, and vis TSR.Output.
You can use the command DumpGPU to output a log dump of the GPU. When opening the log in the DumpGPU Viewer, you can search your materials name to verify what the inputs and output of your post process material looks like. If you want a more constrained and faster dump log, you can constrain the log to only dump the post processing portion with r.DumpGPU.Root *PostProcessing*.
Click image for full size.
Spatial Anti-Aliaser
This is enabled by default on Medium, High, Epic, and Cinematic TSR anti-aliasing scalability groups. You can control its quality with the console command r.TSR.RejectionAntiAliasingQuality.
There are times when TSR can only end up with a single frame's worth of data to work with, like when there's a camera cut, or when a new new object appears or changes on screen. For this reason, TSR has a built-in spatial anti-aliaser algorithm to automatically provide better anti-aliasing for areas of the image that need it most.
In the examples below, you can see how this can be useful to increase quality for areas of the image that need it most, like around the rock edges near the middle of the frame.
 |
 |
| With the Spatial Anti-Aliaser | Without the Spatial Anti-Aliaser |
You can test this yourself in your own project using the following commands:
r.Test.CameraCut 1
r.Test.SecondaryUpscaleOverride 8
Once set, you can use the console command r.TSR.RejectionAntiAliasingQuality to test the quality of the spatial anti-aliaser. Set the value to 0 or 1 to toggle it off and on.
The Temporal Super Resolution visualization mode includes a Spatial Anti-Aliasing view in the bottom-left corner. You can view it full screen by entering the console command r.TSR.Visualize 6.
The algorithm in charge of the aliasing detection in the neighborhood is a Fast Approximate Anti-Aliasing (FXAA) style algorithm doing a horizontal or vertical search across the frame. This algorithm can improve the quality of what is currently in the frame but it cannot create information it doesn't have. The sole purpose of this algorithm is to cheaply hide the areas of the frame where not enough details have accumulated during the short amount of time that details continue accumulated based on the history convergence rate.
You can learn more about this in the Understanding the Caveats of Temporal Accumulation of Details section of this page.
TSR Flickering Temporal Analysis
This is enabled by default on High, Epic, and Cinematic TSR anti-aliasing scalability groups. You can control its quality with the console command r.TSR.ShadingRejection.Flickering.
An important factor in delivering good image quality is maintaining stability over time. The amount of detail that Nanite produces can be a challenge for temporal integration.
The information in this section looks at the common issues that can happen while trying to maintain image stability with TSR when there are large amounts of detail within the frame to process. These sections look at how to analyze flickering that can happen with TSR, why it's happening, and some things you can try in your own projects to mitigate these issues.
Moire Patterns
Moire patterns are an artifact that often happens with repetitive details, such as lines that overlap or that are small enough on screen (usually in the far distance) that it creates an undesirable pattern. In games, this could often be solved by using textures to add detail to geometry rather than adding that detail directly to the mesh because the texture would use mipmaps for lower resolutions at farther distances mitigating any undesirable artifacts.
The amount of detail created with Nanite can create completely unstable images, especially when objects are seen at grazing angles. Take for example the City Sample project that was created for Epic's Matrix Awakens GDC demo. There were a lot of challenges because of the amount of detail and the opportunity for grazing camera views with disocclusion in such an environment.
The capture on the left demonstrates the type of moire pattern artifacts that can happen with lots of geometric detail that takes up very few pixels on screen. When TSR uses its flickering shading rejection, these types of artifacts can be mitigated, if not nearly resolved. The first image is a worst-case scenario for this type of artifact.
You can compare the two captures in the table below by looking at how much grazing angles can cause artifacts when TSR's flickering shading rejection is disabled versus how much it's reduced when enabled and the flickering period has been increased slightly. The flickering shading rejection being disabled in the first capture is a worst-case scenario for this type of artifact.
 |
 |
| Without Shading Rejection (r.TSR.ShadingRejection.Flickering 0) | With Shading Rejection and increased flickering period. (r.TSR.ShadingRejection.Flickering 1) |
Each of these captures were at 60 Hz using the Epic anti-aliasing scalability group. The capture on the right also increases the default flickering shading rejection period from 2 (default) to 3 with the console command r.TSR.ShadingRejection.Flickering.Period.
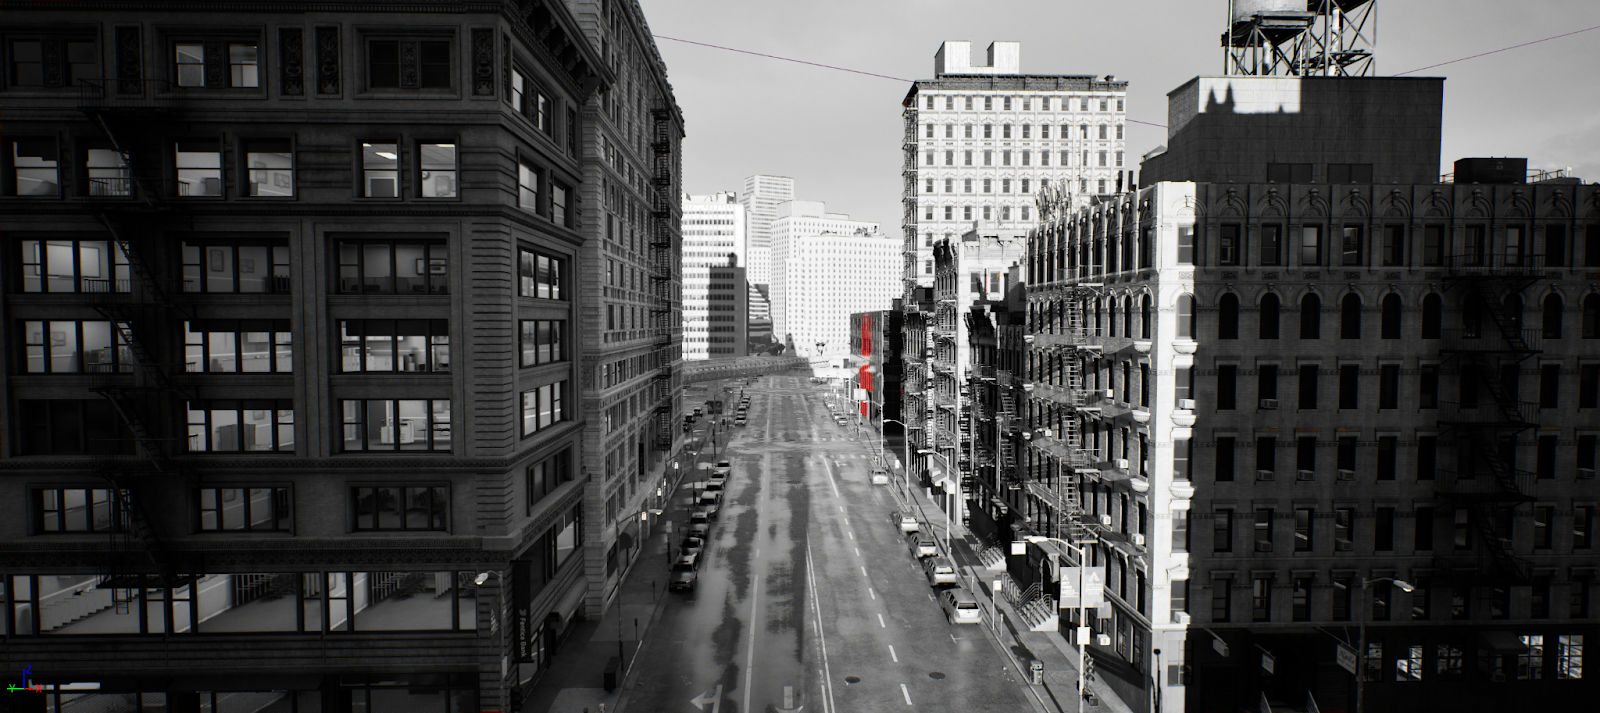
The core issue that happens with these types of artifacts is that details are lost. This can happen even when anti-aliasing is disabled, like the screenshot below.
A scene from City Sample with anti-aliasing disabled that results in lost details on building faces in the distance.
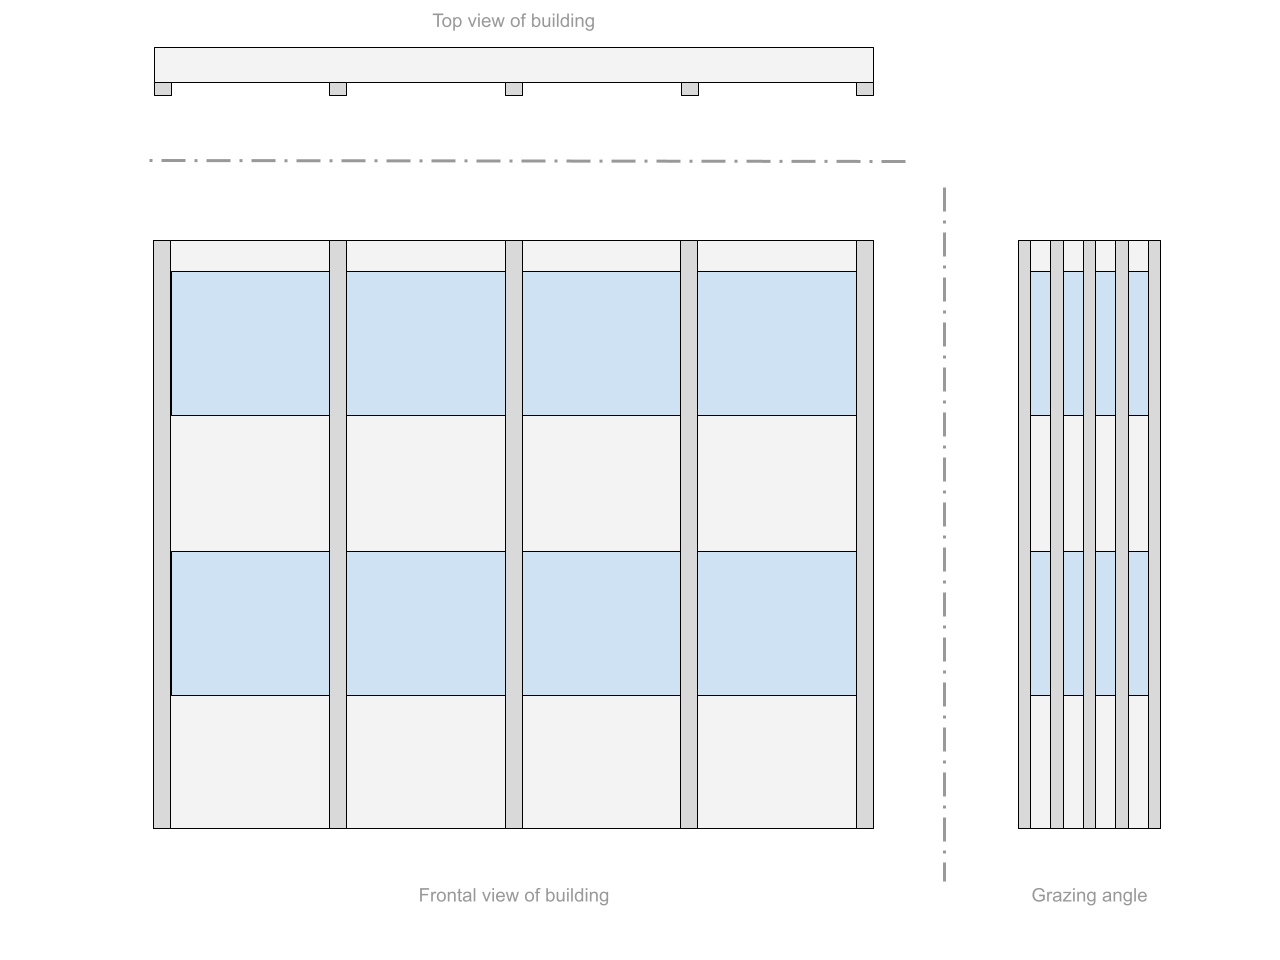
The reason for this lost detail is because of the amount of detail that Nanite maintains for any given frame. This is especially true in this scene for geometry around the windows because the structure of the building's columns cause detail to be lost for geometry that takes up fewer pixels and is farther away from the camera..
The drawing below is a simplified representation of the building's geometry from top, front, and grazing angle view points. From the top view, you can see the columns that fall between each window. The front view shows how far these windows are spaced between the columns, and how the columns run vertically from the ground to the top of the building. The grazing angle shows how compressed these vertical columns appear when viewed at a distance.
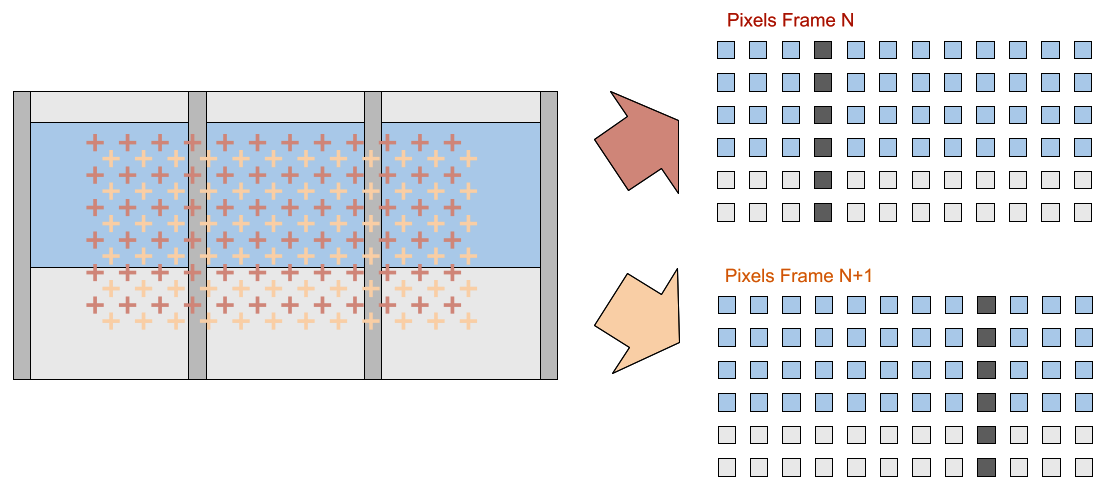
Like much of the detail of this building, the pixels that make up an image are structured in a grid, and this grid changes every frame as details are integrated over time.
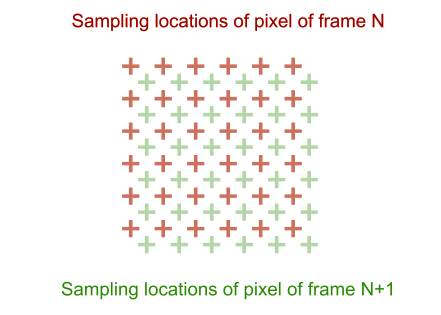 |
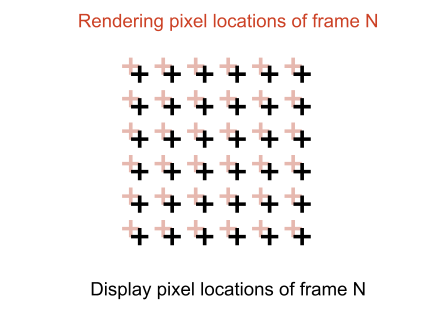 |
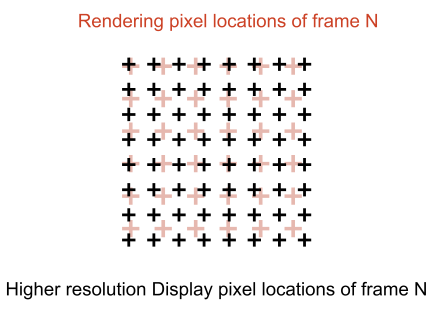 |
| Red are the sampling locations of pixels of frame N. Green are the locations of frame N+1. | Red is the rendered pixel locations of frame N. Black is the displayed pixel locations of frame N. | Red is the pixel locations of frame N. Black is the higher resolution display pixel locations of frame N. |
As a result, the frame may find some details of the buildings to be smaller than a pixel every few frames. TSR is designed with this in mind, not all frames will have sub-pixel Nanite details, which means that it's possible to recognize what parts of the images should be stable from one frame to the next. In this case, the parts of the building for the columns shouldn't be moving between frames and should be stabilized.
The drawing below demonstrates how the pixels can align between the first frame (red) and the next frame (tan), and the geometry that is recognized as stable is carried over to the next frame.
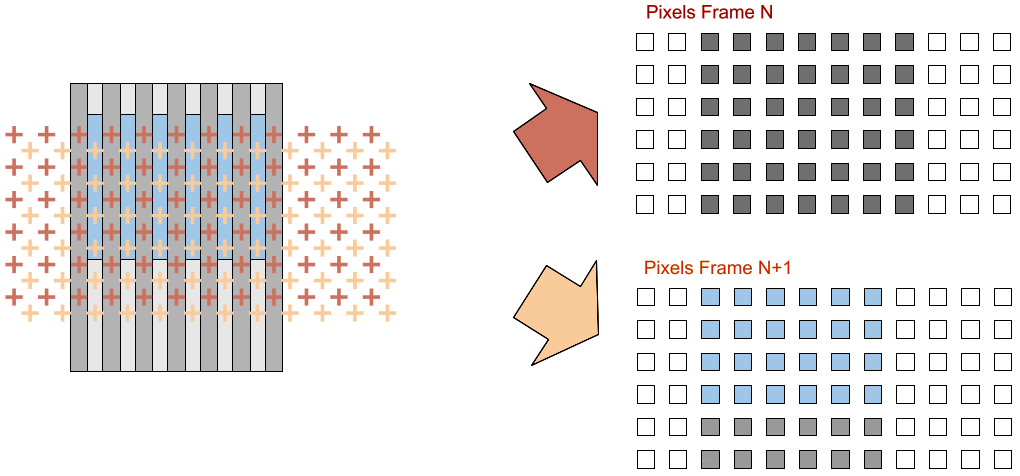
At grazing angles, some of the smaller structure details become more visibly dominant compared to other parts. The alignment of the structure's detail can end up aligned with the pixel that is currently being rendered, meaning only the windows and wall are found instead of the columns between each of these windows.
The drawing below shows how frame N's (red) pixels and frame N+1's (tan) pixels can cause this sort of misalignment with each frame seeing something different because of their grid placement.
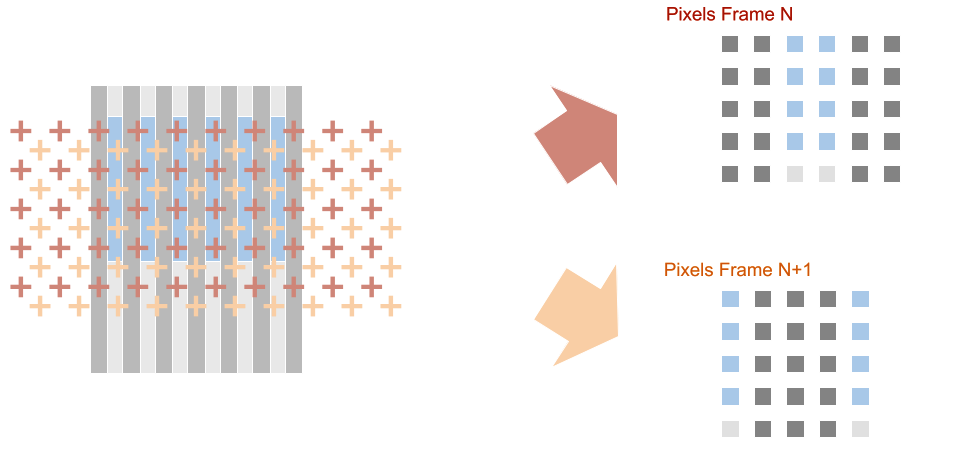
This is what leads to Moire patterns emerging in the frame, and it's a particularly hard problem to solve with TSR since there's no way for TSR to know if the pixel contains the same geometry or if it's a shading change that's taken place. Add to this the problem of not only depending on geometry to know what's changed, but also what the rendering resolution of the frame is.
For instance, reducing the rendering resolution and increasing the space between the sampling locations of all the pixels being rendered ends up having a greater diversity in geometry detail of the building. This can be the windows, walls, and columns of the building, which is more information for TSR to recognise that this is the same geometry of the building and not a shading change.
In the drawing below, there is better differentiation between pixels from frame N (red) to frame N+1 (tan) for vertically aligned geometry with these pixels to help maintain image stability.
This particular aliasing issue on the building is an example of general sampling problems that can happen with scene geometry and the pixels being rendered each frame. TSR decides whether the pixels being rendered belong to particular geometry in the scene over time and whether it needs to sample the rendered pixel.
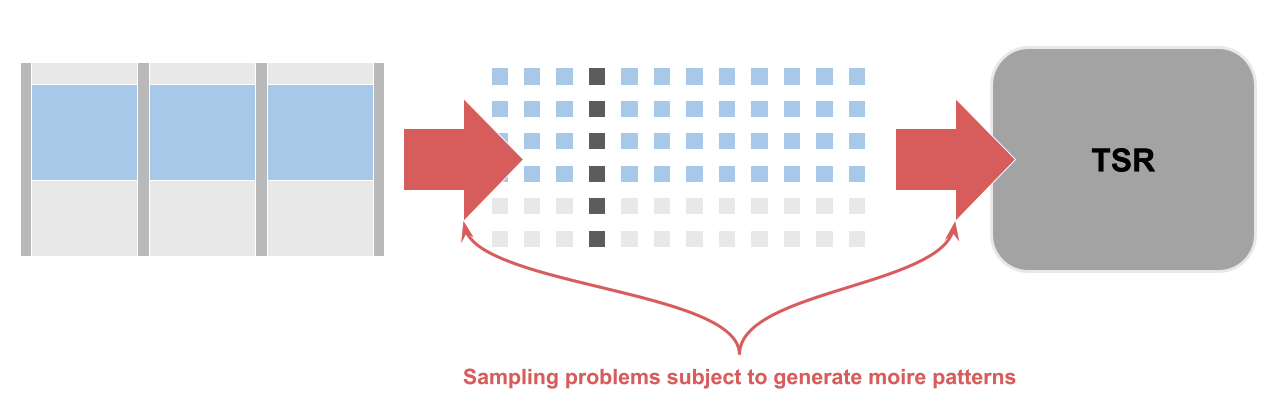
Image stability is a multi-faceted problem, and TSR is in charge of deciding what needs to be stabilized in the frame. There are factors that can cause Moire patterns to emerge, so it's better to let TSR control what should be stabilized. There can even be instability in parts of the screen that doesn't have a Moire pattern between the rendered pixel grid and geometry. This example is a worst-case scenario and what makes TSR the technical solution in charge of detecting shading changes and keeping temporal stability tightly coupled.
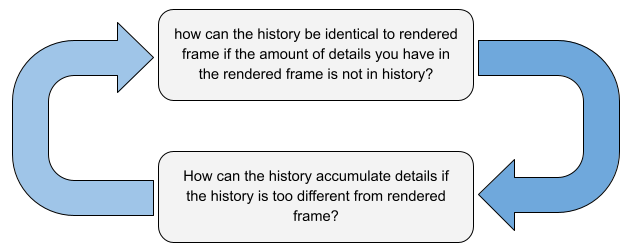
Temporal History's Causality Dilemma
Moire patterns aren't the only sampling problem that causes instability with TSR. There is also the issue of having an extreme amount of Nanite details sampled by the rendered pixel grid. Ultimately, this creates a loop of how can the history be identical to the rendered frame if the amount of details in the rendered frame are not in the history, all the way to how can the history accumulate such detail if the history is too different from the rendered frame?
Trying to solve this shading rejection problem leads to an unreasonably amount of ghosting under similar circumstances, like when visual effects are moving on screen, or when lighting changes happen in the environment. TSR solves this problem over time with additional effort to stabilize the image and break this cycle.
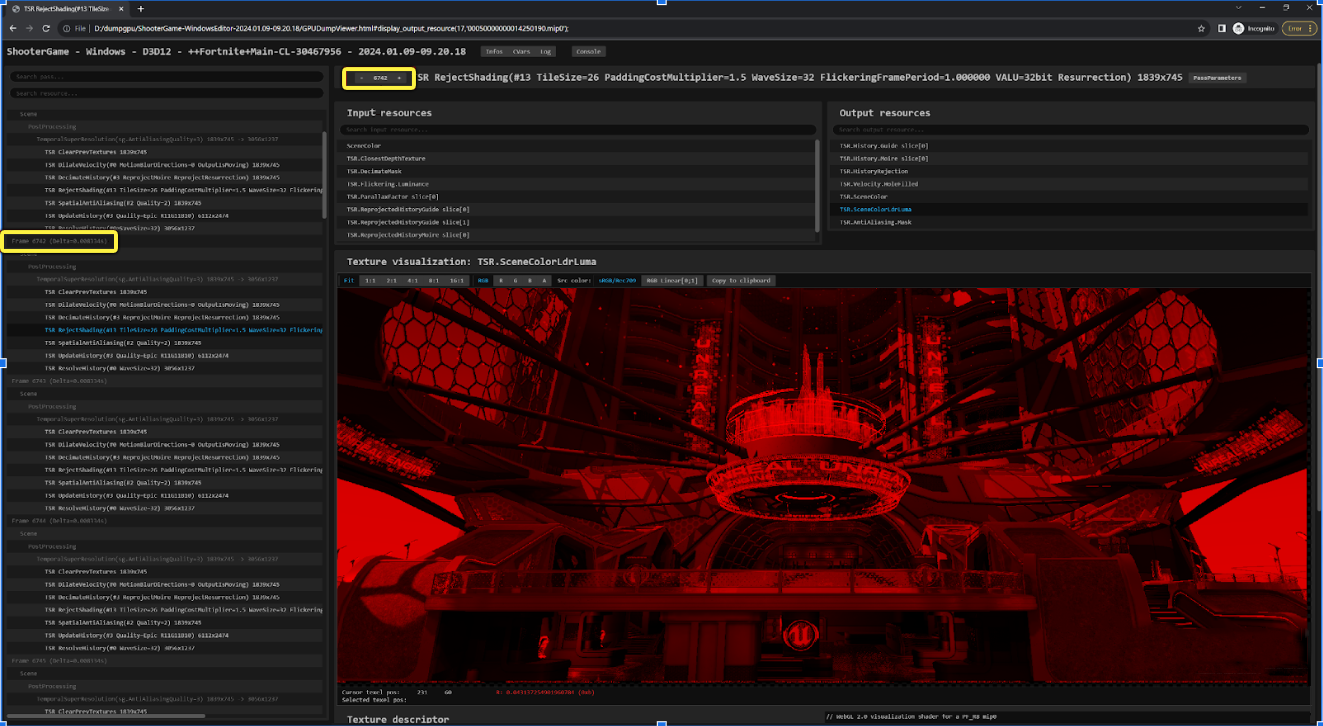
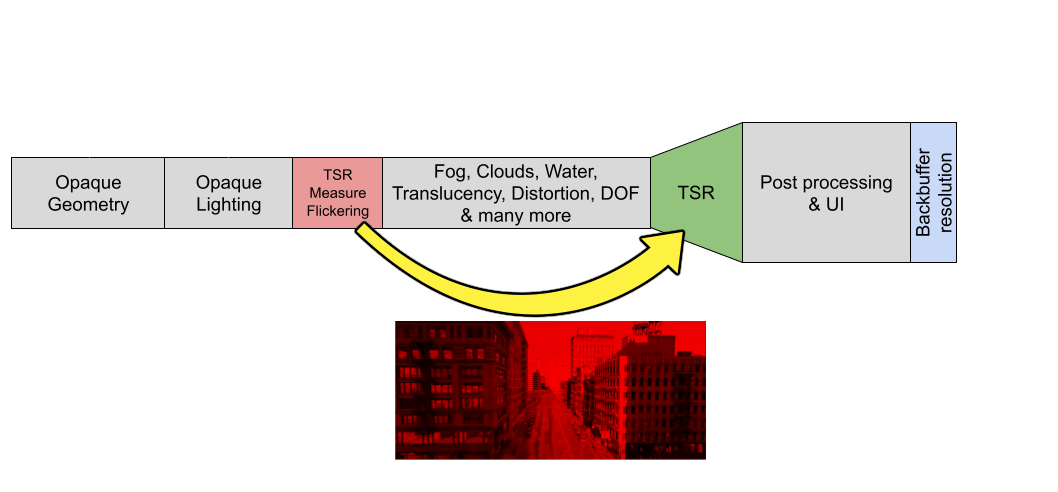
Flickering Luminance Measurement
Both the Moire pattern and temporal history causality dilemma comes from the amount of detail that Nanite is capable of handling on screen. In order to mitigate any sort of rendering algorithm that could interfere with TSR's anti-ghosting mechanism, TSR inserts an additional pass after opaque lighting just to take a snapshot of the opaque geometry in the frame. This pass is called the TSR.Flickering.Luminance and its input can be seen in the Temporal Upscaler visualization mode.
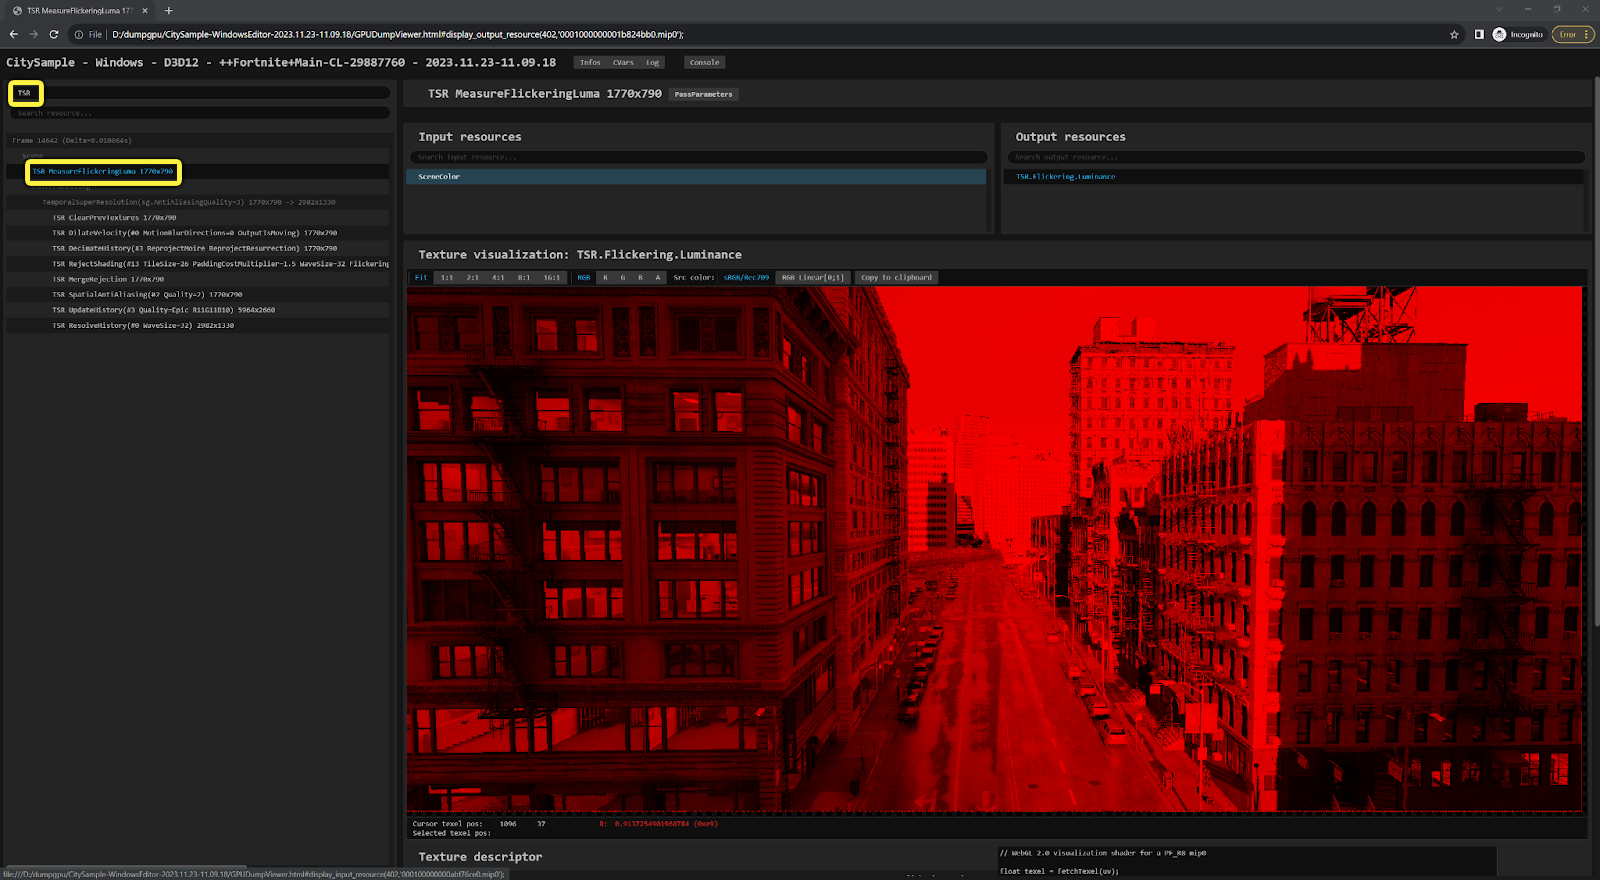
Alternatively, you can also find it in the DumpGPU viewer. Search for “TSR” and select TSR MeasureFlickeringLuma to inspect its output.
The TSR MeasureFlickeringLuma pass primarily converts the scene color into low dynamic range (LDR) luminance. While this could be done in the last lighting pass, it's not due to the large amount of code paths Unreal Engine supports in the renderer. Instead it is kept as a standalone pass.
As you prepare to ship your game, you can use this as a way to see what code paths are being used and optimize by disabling any that aren't being used. For example, you can disable baked static lighting if you're only using dynamic lighting.
This snapshot is helpful for TSR to know whether any other effects within the scene color should or shouldn't be considered flickering, such as fog, clouds, single layer water, pre-distortion translucency, and distortion. This is achieved by comparing the scene color with the TSR flickering luma snapshot.
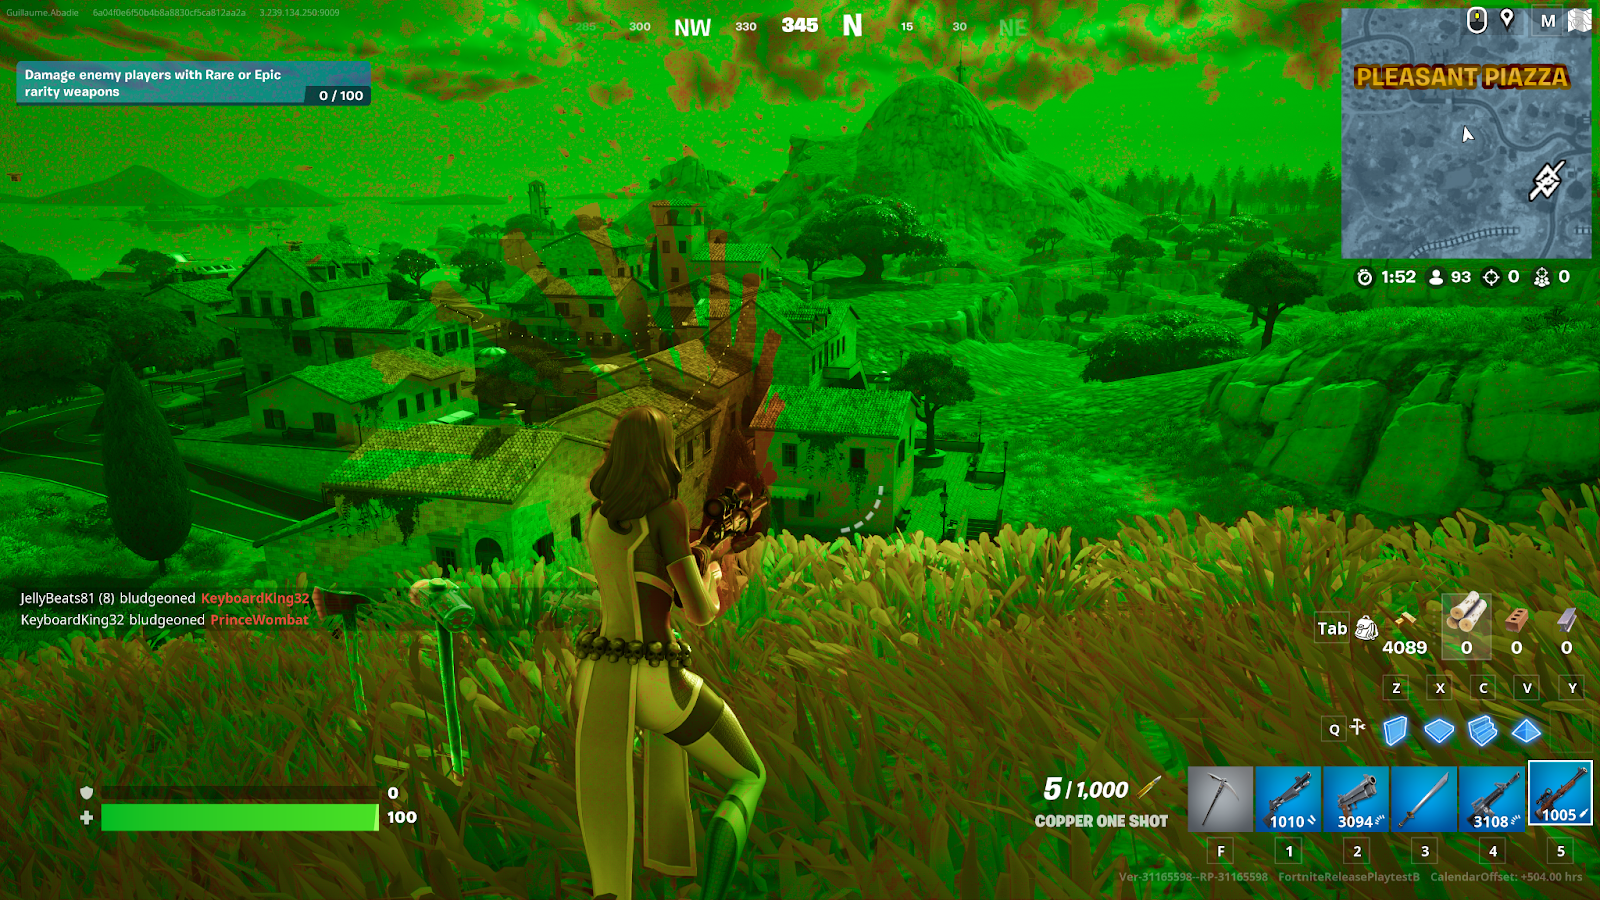
Looking at the building near the center-right of the frame, you can see the moire pattern changing between frames in the flickering luminance visualization.
Flicking Temporal Analysis
Because TSR knows how much opaque lit geometry is flickering from one frame to the next, it's possible to track over time when the time between flickers becomes smaller than what is specified by r.TSR.ShadingRejection.Flickering.Period. This console variable measures the flicker period in frames, and attempts to stabilize the image by relaxing the shading rejection heuristic.
You can use the Temporal Super Resolution visualization mode to see first-hand how much the shading heuristic relaxes the flickering.
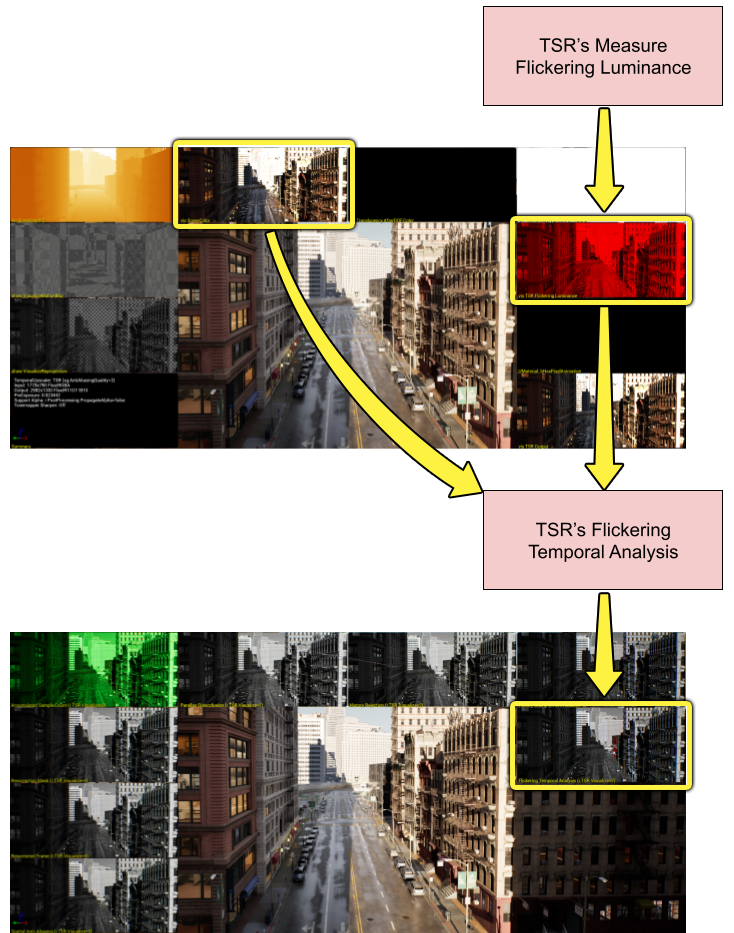
All of this input allows for the anti-flickering heuristic to quickly focus in on the parts of the image that exhibit flickering, like the flickering of the columns and windows of the building near the center of the frame. The output highlights in red the problematic areas that exhibit flickering.
CitySample, 5.4, r.TSR.ShadingRejection.Flickering.Period=3, r.TSR.Visualize=7
For performance reasons, the temporal analysis of flickering is only monitoring the luminance of pixels. This keeps its cost to a third of what it could be when compared to monitoring each color channel. This means that the heuristic might still let some flickering through that doesn't cause much flicker on luminance but does with chromatic elements of the frame.
Effects of Frame Rate
Flickering can happen regardless of frame rate, such as visual effects that are based on time and are independent of the frame rate. This can mean that a visual effect that looks smooth at 60 Hz might appear to “flicker” at lower lower frame rates, like around 24 Hz. Because of this, it's important that visuals authored by an artist need to remain unaffected by frame rate since TSR scales to meet GPU performance and not specifically frame rate. This can have unintended consequences of altering visuals when a device or platform is running at lower than expected frame rates.
For this reason, you can use the console command r.TSR.ShadingRejection.Flickering.Period to automatically reduce flickering when the frame rate drops lower than the specified frame rate with r.TSR.ShadingRejection.Flickering.FrameRateCap (default is 60 Hz). This means that geometric details that might be stable at 60 Hz might become less stable at a lower frame rate. You can see an example of this in the captures below.
 |
 |
| 60 Hz Refresh Rate | 30 Hz Refresh Rate |
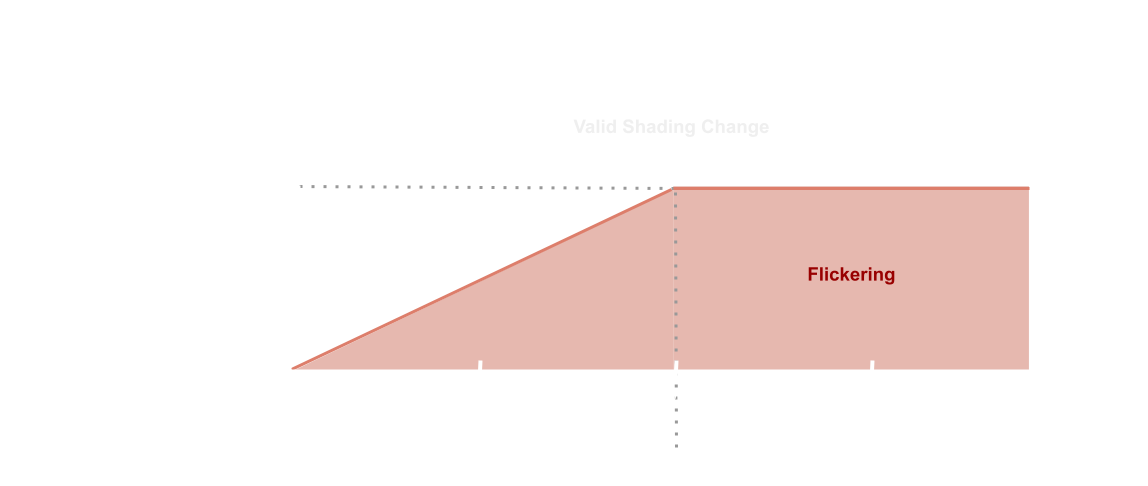
The graph below shows the period of frames below which is considered flickering is set to two frames with the frame rate cap set to 60 Hz. Anything below 60 Hz is more likely to exhibit flickering as the frame rate drops. Anything at or above 60 Hz is considered stable.
The captures below have a frame rate of 30 Hz and use the same settings as the previous captures. Except this time, the flickering frame rate cap (r.TSR.ShadingRejection.Flickering.FrameRateCap has been set to 60 Hz instead of 30 Hz, which stabilizes the image.
|
 |
| 60 Hz Refresh Rate | 30 Hz Refresh Rate |
Following these steps to fine-tune anti-flickering for your project:
- Set
r.TSR.ShadingRejection.Flickering.FrameRateCapto your project's target frame rate, such as 30 or 60 Hz. - Lock in your editor's refresh rate, or FPS, with
t.MaxFPSto this same frame rate value, such as 30 or 60. - Customize the flickering period with
r.TSR.ShadingRejection.Flickering.Periodto your desired look.
Once you've locked in these settings in the editor, you can copy them to your DefaultEngine.ini file in [Your Project's Root]/Config folder for consistent behavior across your editor and targeted platforms.
While this anti-flickering behavior is enabled by default, you can opt out of it by setting r.TSR.ShadingRejection.Flickering.AdjustToFrameRate to 0. We strongly advise against this in the interest of visual effects, though.
Anti-Aliasing with Movement and Changing Resolution
Moire patterns that happen between pixel grids and Nanite geometry are going to move based on the rendering resolution, as previously mentioned in the Moire Patterns section of this page. Moire patterns also depend on where the object lies in the frame relative to the camera.
For example, in the scene below, notice how the flickering location of the building changes when the screen percentage is changed from 60% to 90%. It is also worth noting that nothing else in this scene has moved.
 |
 |
| Screen Percentage: 60 | Screen Percentage: 90 |
Understanding that screen percentage and where the pixel grid lies within the scene in relation to geometry is an important caveat because it's a limitation of the existing anti-flickering heuristic. There isn't an effective solution that is performant enough to overcome this issue on existing hardware. So, as Moire patterns move — whether it's due to camera movement or a change to the rendering resolution — TSR will detect flickering in any new areas over the course of a few frames before being certain it is indeed flickering that it should attempt to stabilize.
Notice how in the capture below as the camera pulls back, the Moire pattern on the building takes a few frames before being targeted by TSR's anti-flickering heuristic to stabilize the image. Also, note how the Moire pattern changes locations on the building, like the two examples above.
(r.AntiAliasingMethod=4, sg.AntiAliasingQuality=3, r.TSR.ShadingRejection.Flickering=1, r.TSR.ShadingRejection.Flickering.FrameRateCap=30, r.TSR.ShadingRejection.Flickering.Period=3)
TSR's flickering temporal analysis gets disabled on a per-pixel basis for objects that move, and for any pixels that have big enough parallax changes. This mitigates issues with other content that doesn't have motion vectors, such as reflections, parallax occlusion mapping, and parallaxed building interiors.
You can use the Temporal Super Resolution visualization mode to look at the TSR Flickering Analysis input to see the parts of the screen that are disabled while moving. Pixels that are disabled are colored pink in the frame. You can view this input in full screen using the console command r.TSR.Visualize 7.
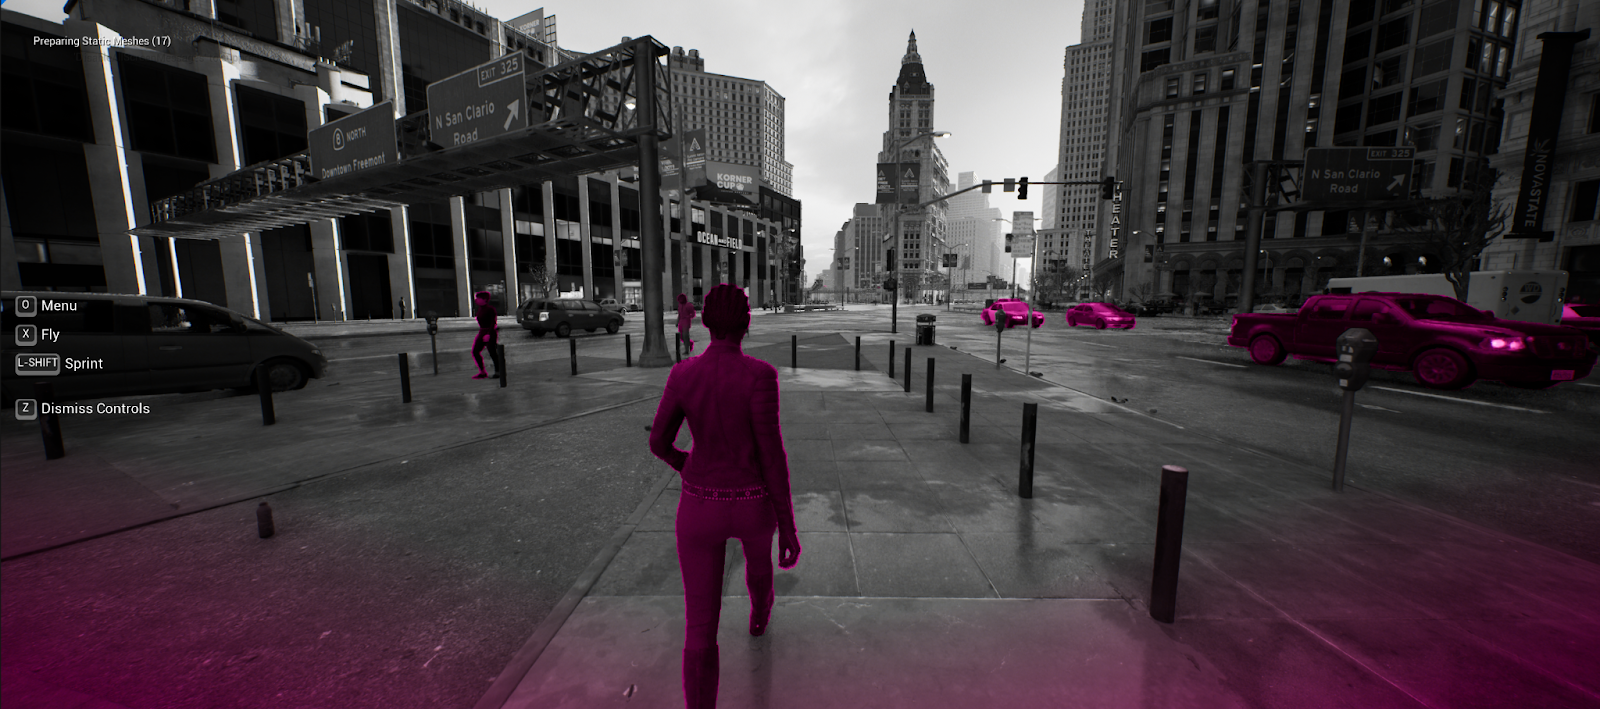
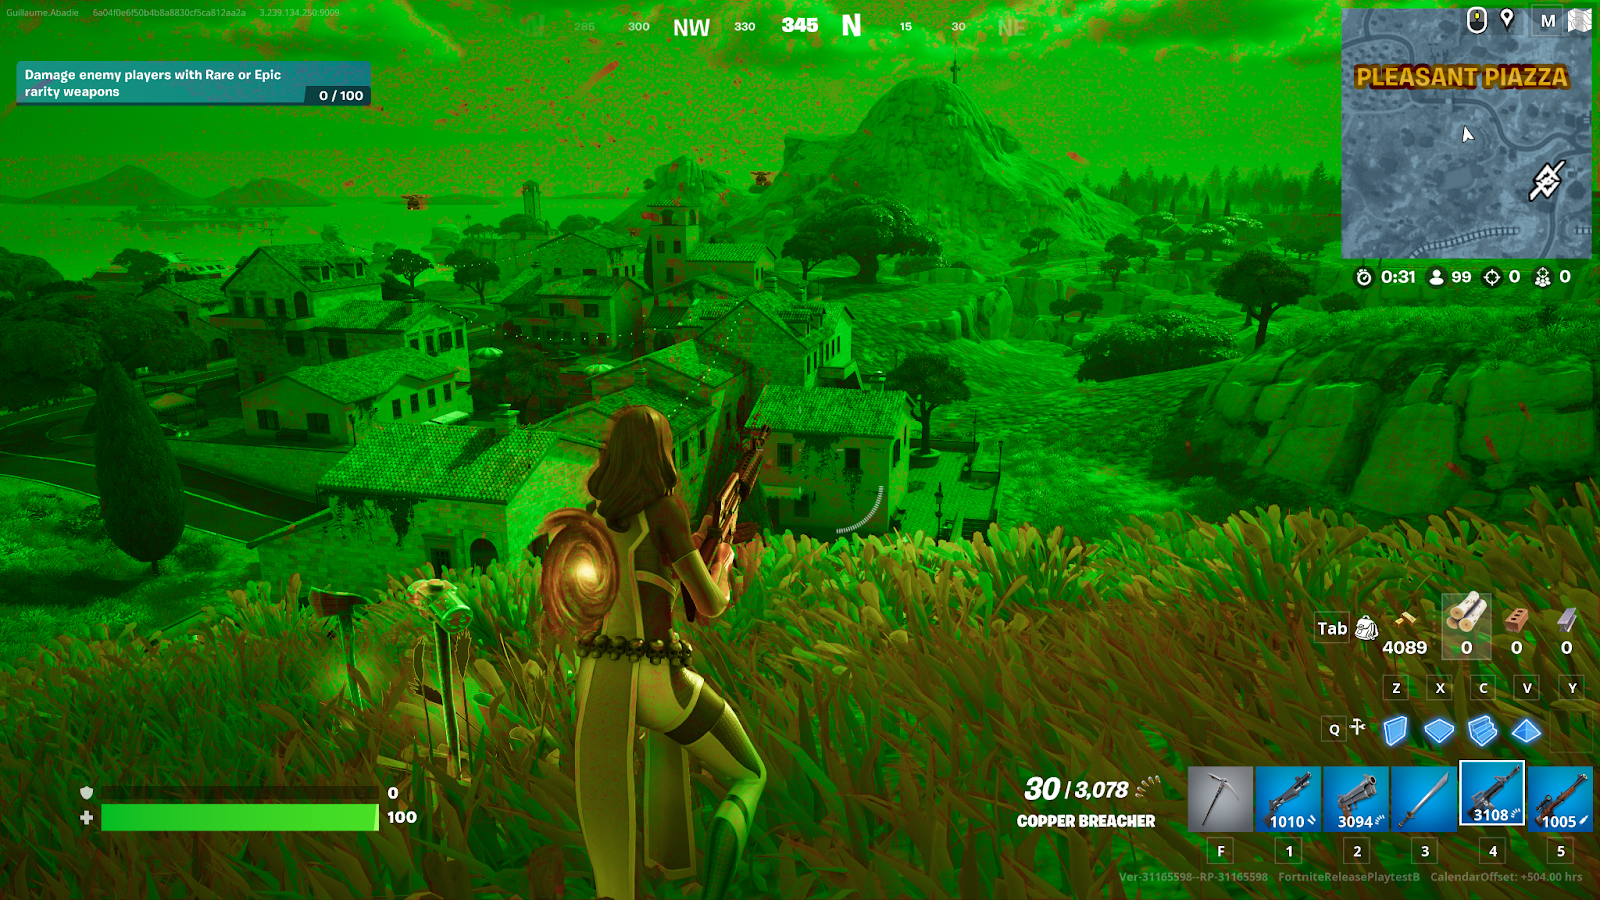
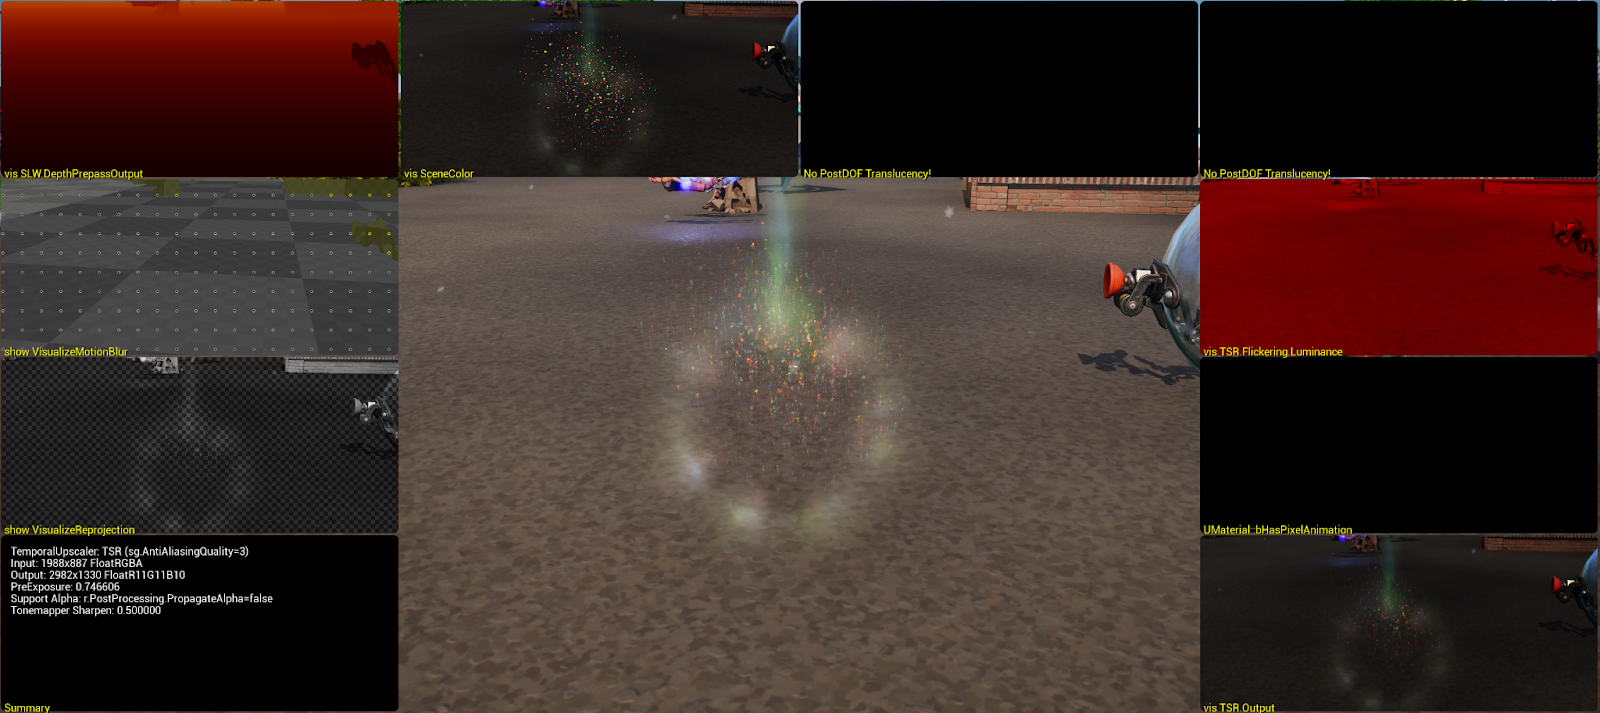
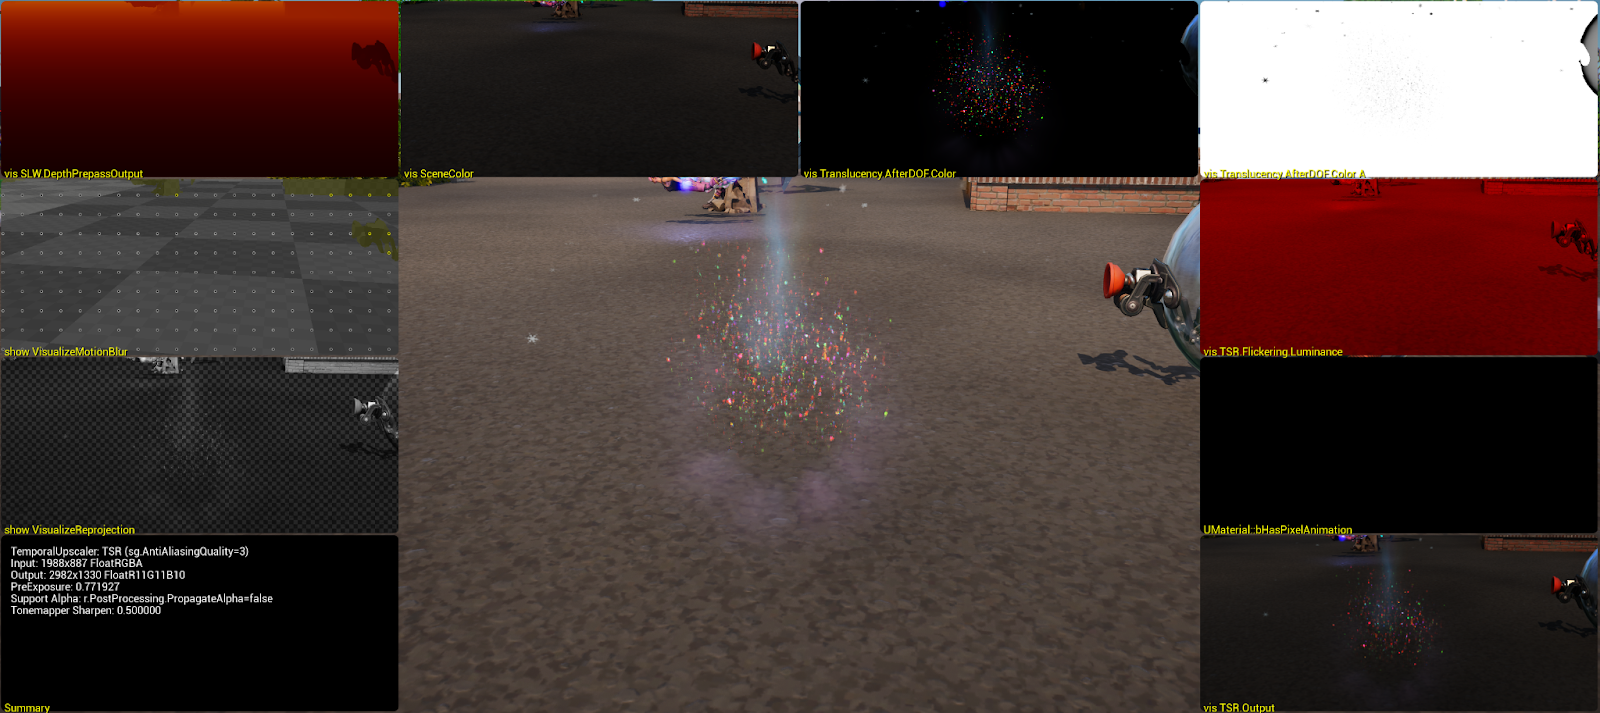
Materials with Pixel Animation
Opaque materials that perform some pixel shader animation, such as texture panning can be problematic if they pass the flickering period threshold because they can cause ghosting with TSR. This is because the moving pixel animation lacks any motion vectors and the flickering temporal analysis sees the opaque pixels are changing color often.
Take for example the character below that has an opaque material that animates continuously. The Temporal Upscaler visualization mode's TSR Flickering Luminance input doesn't reflect the changing material in its flickering temporal analysis.
Because these pixels change often over time, they are detected as “flickering,” causing TSR to attempt to stabilize the image, thus introducing unwanted ghosting. This can also be seen if you look at the Temporal Super Resolution visualization mode's Flickering Temporal Analysis input.
You can counteract ghosting caused by TSR's flickering temporal analysis by marking the offending opaque material as one that has pixel animation that isn't represented with motion vectors. Enable the material's Has Pixel Animation setting in the Details panel of the material. This same setting can also be overridden on a material instance under the Material Property Overrides.
| Has Pixel Animation Material Property | Has Pixel Animation Material Instance Property Override |
This setting encodes any primitive using the material in the velocity buffer that TSR uses as input. In the Temporal Upscaler, the material will display its mask in the UMaterial bHasPixelAnimation input. This mask is used as part of the Temporal Super Resolution visualization mode's Flickering Temporal Analysis input to ignore these pixels.
History Resurrection
This is enabled by default on Medium, High, Epic, and Cinematic TSR anti-aliasing scalability groups. You can control its quality with the r.TSR.Resurrection.* console variables.
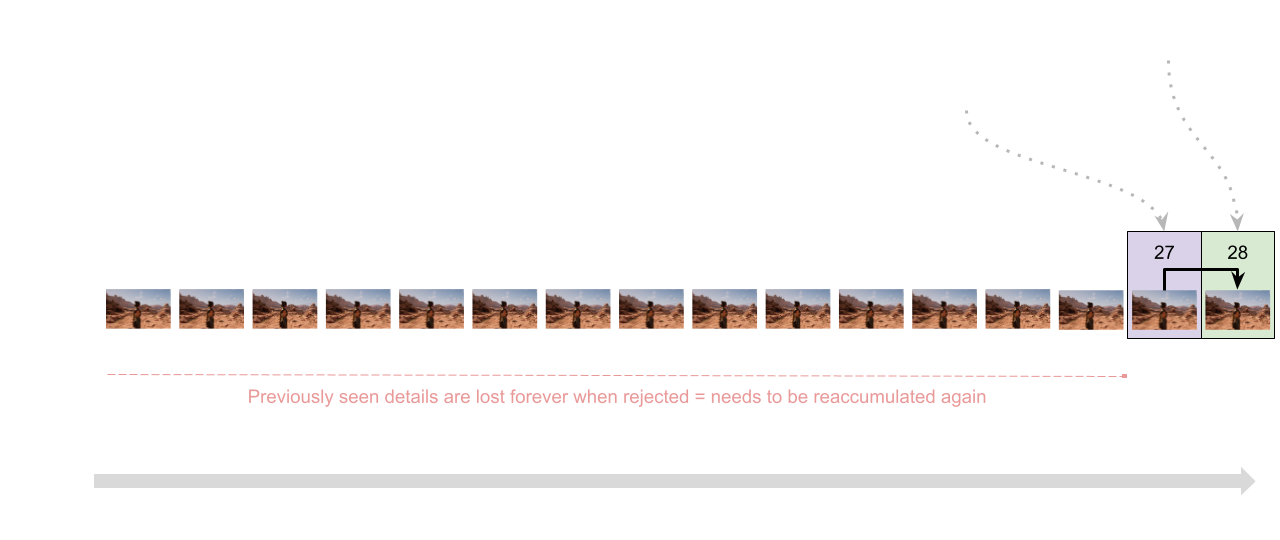
TSR's history resurrection is the process of deciding whether to use the immediate previous frame or an earlier “resurrected” frame from the history that better matches details in the current frame. This process is an effort to stabilize the image to limit, or even prevent, noise and ghosting artifacts from happening. These ghosting artifacts happen because of previously accumulated details being discarded for various reasons, such as occlusion, changes with shading, and objects going outside of the frame. When these details show up again, TSR has to reaccumulate their details, in turn causing ghosting artifacts.
TSR's resurrected frame histories provide access to a limited number of frames from the history for comparison with the current frame. When the history resurrection is disabled, only the previous frame is available for comparison for details to be reprojected with the current frame. Any new or missing detail must be accumulated, which is the primary cause of ghosting artifacts.
When TSR resurrection is enabled, a history of older persistent frames is kept in memory in a Texture2DArray. This array is identical to the one used to store previous frame history. The oldest persistent frame available in the history is compared and used instead of the immediate previous frame if it is a better match for the current frame. The cost of resurrection history update is inexpensive because these frames are stored in a Texture2DArray and the global shader either reprojects the previous frame or the resurrected frame taken from the array. The cost comes mostly from additional cache memory bandwidth on the edges of the resurrection mask, but the number of texture fetches is strictly identical because of the Texture2DArray history.
When there are multiple frames that are a possible better match than the previous frame, they are compared to the current frame and reprojected if that ends up being true. Older persistent frames are removed and replaced by newer ones depending on their frame count and interval from the current frame.
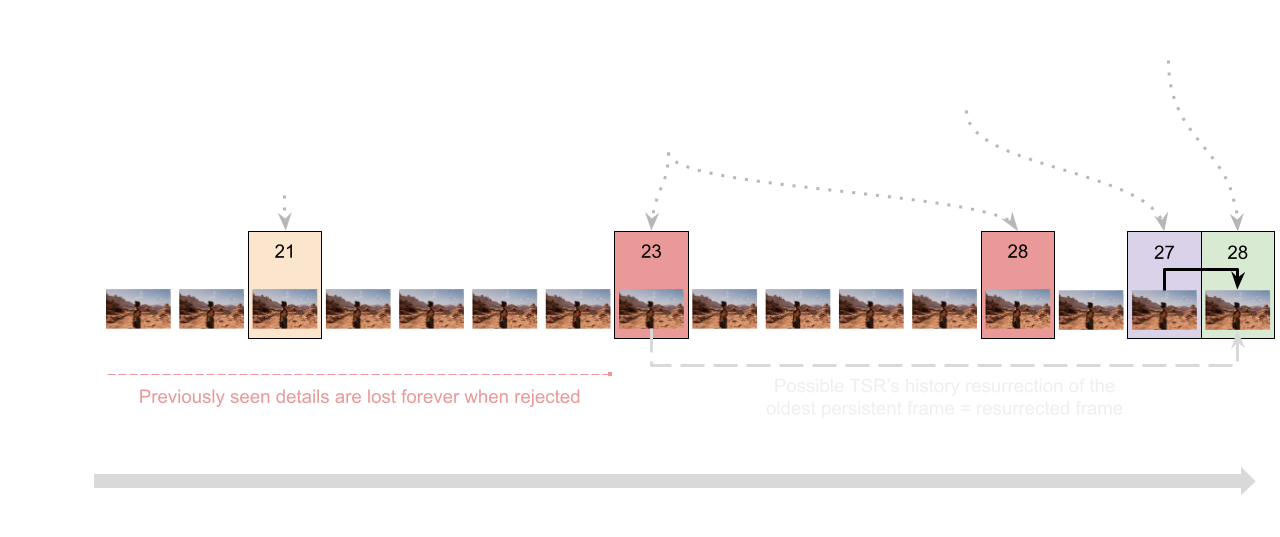
You can compare the results of history resurrection when it's toggled off and on. When the resurrection history isn't available to be compared and reprojected, the previous frame is used, and often details have to be reaccumulated causing ghosting in the process. This is especially clear to see in the frames below where the animation is swapping out weapons.
 |
 |
| TSR Resurrection Disabled | TSR Resurrection Enabled |
Use the console command r.TSR.Visualize 0 to view the Accumulated Samples input at full size in the viewport.
The Temporal Super Resolution visualization mode's Resurrection Mask and Resurrected Frame input shows areas of the frame that are colored for the resurrection mask (green) of the current and previous frames, and pixels where resurrection is impossible (pink) because they are outside the bounds of the resurrected frame.

You may want to configure the number of persistent frames history to suit your own project's needs, and you can do so with the following console variables:
r.TSR.Resurrection.PersistentFrameCount: Sets the number of persistent frames to record for future history resurrection. This increases the memory footprint of the entire TSR history. This must be an even number greater than or equal to 2.r.TSR.Resurrection.PersistentFrameInterval: Sets how often (in number of frames) persistent frames should be recorded in history for future history resurrection. This has no implication on the memory footprint of the TSR history. This must be an odd number greater than or equal to 1. User.TSR.Visualize 5to tune this to your content.
Reprojection Field
TSR's reprojection field dilates the repojrection vector by half spatially for anti-aliased rendering pixels from the depth buffer instead of by a full rendered pixel in the dilate velocity pass. This allows for the rendering resolution to be hidden whenever the velocity buffer ends up extruding some object to the edges, like when rotating. However, this comes at the cost of spatial anti-aliasing in the DilateVelocity pass, as well as having extra dependent texture fetches at the begining of the History Update pass.
The reprojection field embeds a Jacobian 2x2 matrix for each pixel to have a more procise reprojection of the history for the displayed pixels in the rendered pixels. For instance, this allows TSR to maintain sharp geometry edges on movement.
By default, the reprojection field is enabled by default on high, epic, and cinematic TSR anti-aliasing scalability groups. You can control it with r.TSR.ReprojectionField.
Troubleshooting Ghosting Issues with TSR
The following are some ways you can go about troubleshooting ghosting issues in your project:
-
Identify if TSR is the cause of ghosting or if it's caused by something else.
Use the Temporal Upscaler visualization mode to look at whether ghosting is visible in any of the input views. If so, use the
DumpGPUcommand and viewer to identify which system is introducing the ghosting in TSR.If you're not sure if the ghosting is caused by TSR, try switching to another anti-aliasing method, or disable anti-aliasing altogether, to see if the ghosting is still happening.
-
Are bad motion vectors causing artifacts or ghosting?
TSR relies on motion vectors for the reprojection of opaque geometry. Verifying the object reprojection alignment is important to prevent ghosting. Often, when motion vectors are to blame for ghosting. This can be determined by looking to see if the issue is with specific objects in the scene and that it's not the entire scene causing the issue.
Sometimes, detecting motion vector issues can be caused by subtle translucency effects (like clouds) that overwrite velocity in the material settings. You can check this by using the console command
r.Translucency.Velocity 0to disable velocity for translucent materials to quickly check if this is the case.You can check if world position offset (WPO) is based on any animated material parameters, and if that's the case, check that the Previous Frame Switch node is fed the previous frame's value. You can learn about this setup in a material by seeing Utility Material Expressions.
Motion vector computation lacks automatic velocity vectors for per-instance transform motion.
-
Is ghosting caused by TSR's Flickering Temporal Analysis?
Before investigating the flickering temporal analysis, you should be entirely sure that motion vectors are correct. Otherwise, you could be misled that the flickering temporal analysis is the cause of ghosting.
Use the Temporal Super Resolution visualization mode and look for red areas of the frame where ghosting is occurring. If it's an opaque material with shader animation, like texture panning, make sure the material setting Has Pixel Animation is set. For more information about this, see the Materials with Pixel Animation section of this page.
-
Is the object causing ghosting artifacts translucent?
Use the Temporal Upscaler visualization mode and verify the object is in the Translucency.AfterDOF.Color input view. TSR's shading rejection is less forgiving with After DOF translucency, which is the default for all materials. This is because they don't draw velocity by default and are impossible to reproject correctly. For more information about this, see the TSR and Translucency section of this page.
 |
 |
| Translucent Material set to happen After Depth of Field | Translucent Material set to happen Before Depth of Field |
Temporal Super Resolution Frequently Asked Questions
For some commonly asked questions and answers on the topics discussed in this page, see the Temporal Super Resolution Frequently Asked Questions.
Console Variables
| Console Variable Name | Description |
|---|---|
r.TSR.16BitVALU |
Whether to use 16-bit VALU on platforms that have bSupportRealTypes=RuntimeDependent. |
r.TSR.16BitVALU.AMD |
Overrides whether to use 16-bit VALU on AMD desktop GPUs. |
r.TSR.16BitVALU.Intel |
Overrides whether to use 16-bit VALU on Intel desktop GPUs. |
r.TSR.16BitVALU.Nvidia |
Overrides whether to use 16-bit VALU on NVIDIA desktop GPUs. |
r.TSR.AplhaChannel |
Controls whether TSR should process the scene color's alpha channel or not.
|
r.TSR.AsyncCompute |
Controls how TSR runs on async compute. Some TSR passes can overlap with previous passes:
|
r.TSR.Debug.ArraySize |
Size of the array for TSR.Debug.* Render Dependency Graph (RDG) textures. |
r.TSR.ForceSeparateTranslucency |
Overrides r.SeparateTranslucency whenever TSR is enabled. This is enabled by default. |
r.TSR.History.R11G11B10 |
Select the bit depth of the history when set to "1". It saves memory bandwidth that is of particular interest in TSR's UpdateHistory's runtime performance by saving memory both at the previous frame's history reprojection and its write-out of the output and new history. This optimization is unsupported when r.PostProcessing.PropagateAlpha=1 is used. Also, note that increasing r.TSR.History.ScreenPercentage to 200 adds two additional implicit encoding bits in the history compared to the TSR Output's bit depth because of a downscaling pass from TSR history resolution to TSR output resolution. |
r.TSR.History.SampleCount |
The maximum number of samples for each output pixel in the TSR history. Higher values means more stability on highlights on static images but it may introduce additional ghosting on some styles of VFX, such as fireflies. You can have a minimum of 8 samples and a maximum of 32 due to the encoding of TSR.History.Metadata. The default sample count is 16. |
r.TSR.History.ScreenPercentage |
The resolution multiplier of the history of TSR based on the output resolution. Increasing the resolution adds runtime cost to TSR but allows it to maintain a better sharpness and stability with the details stored in history throughout the reprojection. By default, the value is set to 200 because a particular property relying on the NyQuist-Shannon sampling theorem is used that establishes a sufficient condition for the sample rate of the accumulated details in the history. As a result, only values between 100 and 200 are supported. This value is controlled with the Anti-Aliasing scalability group. Epic and Cinematic quality levels use 200, while all others use 100. |
r.TSR.History.UpdateQuality |
Selects shader permutation of the quality of the update of the history in the TSRHistoryUpdate pass. This is currently driven by the sg.AntiAliasingQuality scalability group. For details about what each group offers, see DIM_UPDATE_QUALITY in TSRUpdateHistory.usf to make any customizations. |
r.TSR.RejectionAntiAliasingQuality |
Controls the quality of TSR's built-in spatial anti-aliasing technology when the history needs to be rejected. While this is not critical when the rendering resolution is not much lower than the display resolution, this technique is essential to hiding lower rendering resolution because of two reasons: the screen space size of aliasing is inverse proportional to the rendering resolution, and rendering at a lower resolution means needing more frames to reach at least 1 rendered pixel per display. By default, this option is enabled for all Anti-Aliasing scalability groups except the Low scalability group. |
r.TSR.Resurrection |
Allows for TSR to resurrect previously discarded details from many frames ago. TSR looks at the immediate previous frame or one from the history that is a good match for the current frame to reproject its details to stabilize the image. To learn how TSR's resurrection works, see the History Rejection section of this page. |
r.TSR.Resurrection.PersistentFrameCount |
Configures the number of persistent frames to record to the history for future history resurrection. Increasing the number of frames stored in history resurrection will increase the entire TSR history. This must be an even number greater than or equal to 2. (Default is 2). To learn how TSR's resurrection works, see the History Rejection section of this page. |
r.TSR.Resurrection.PersistentFrameInterval |
Configures (in number of frames) how often persistent frames should be recorded in history for future history resurrection. This has no implication on the memory footprint of the TSR history. This must be an odd number greater or equal to 1. Use the TSR visualization and r.TSR.Visualize 5 to tune this parameter to your content. (Default is 31). To learn how TSR's resurrection works, see the History Rejection section of this page. |
r.TSR.ShadingRejection.ExposureOffset |
The shading rejection needs to have a representative idea of how bright a linear color pixel ends up displayed to the user. And shading rejection detects when a color has changed to become visible in the backbuffer by comparing to what is in This variable adjusts the exposure of the linear color space solely in TSR's rejection heuristic. High values lift the shadow's LDR intensity, meaning that The best way to verify this is to look at Temporal Upscaler visualization mode's TSR.Flickering.Luminance input, or in the DumpGPU viewer with TGB Linear [0;1] source color space against the Tonemapper's output in sRGB source color space. |
r.TSR.ShadingRejection.Flickering |
Instability in TSR's output comes from instability of the shading rejection the majority of the time. This can happen for different reasons, such as:
When enabled, this heuristic monitors the luminance of the frame right before any translucency drawing stored in TSR.Moire.Luma resource evolves over successive frames. If flickering is constantly detected regularly happening above the threshold defined by Another caveat of determining what is considered a flickering pixel versus an animated pixel is that flickering happens regardless of frame rate, whereas visual effects that are/should be based on time and are therefore independent of the frame rate. This can mean that a visual effect that looks smooth at 60 frames per second might appear to "flicker" at lower frame rates, like 24 fps. To avoid ghosting with artist-authored visual effects, the console variable By default, this console variable is enabled in the Anti-Aliasing scalability group for High, Epic, and Cinematic levels. |
r.TSR.ShadingRejection.Flickering.AdjustToFrameRate |
Whether the flickering period settings (r.TSR.ShadingRejection.Flickering.Period) should adjust to the frame rate when lower than this frame rate cap. see r.TSR.ShadingRejection.Flickering for more details. |
r.TSR.ShadingRejection.Flickering.FrameRateCap |
Framerate cap in hertz at which there is automatic adjustment of r.TSR.ShadingRejection.Flickering.Period when the rendering frame rate is lower. See the r.TSR.ShadingRejection.Flickering entry for more details. By default, this is set to 60hz. |
r.TSR.ShadingRejection.Flickering.MaxParallaxVelocity |
Some materials that use Parallax Occlusion Mapping, such as City Sample with its buildings' windows interiors can often not accurately render a motion vector of this faked interior geometry. This can cause the heuristic to believe it is flickering, when it's not. This variable defines the parallax velocity in 1080p pixel at the frame rate defined by r.TSR.ShadingRejection.Flickering.FrameRateCap at which point the heuristic should disable to not cause ghosting. |
r.TSR.ShadingRejection.Flickering.Period |
Period in frames in which luma oscillations at equal or greater frequency is considered flickering and should ghost to stabilize the image. See the r.TSR.ShadingRejection.Flickering entry for more details. By default, this is set to 3. |
r.TSR.ShadingRejection.SampleCount |
Maximum number of samples in each output pixel of the history after total shading rejection. Lower values means higher clarity of the image after shading rejection of the history but at the trade off of higher instability of the pixel on subsequent frames accumulating new details, which can be visually distracting. By default, this is set to 2.0. |
r.TSR.ShadingRejection.TileOverscan |
The shading rejection runs a network of convolutions on the GPU. It does this without a roundtrip to the main video memory. However, chaining many convolutions in tiles means that some convolutions on the edge around become corrupted and need to overlap the tile a little to hide it. Higher values means it'll be less prone to tiling artifacts but at a performance loss. |
r.TSR.Velocity.WeightClampingPixelSpeed |
Defines the output pixel velocity at which the high frequencies of the history gets their contributing weight clamped. It's basically to lerp the effect of r.TSR.Velocity.WeightClampingSampleCount when the pixel velocity gets smaller than r.TSR.Velocity.WeightClampingPixelSpeed. |
r.TSR.Velocity.WeightClampingSampleCount |
The number of samples to count to in the history pixel to clamp history when the output velocity is reached by r.TSR.Velocity.WeightClampingPixelSpeed. Higher values means higher stability on movement but at the expense of additional blur due to successive convolution of each history reprojection. You can visualize the number of samples in TSR history with the console command r.TSR.History.Metadata. Note that this clamps the sample count in pixel history, not the output pixel. Therefore, lower values, by design, are less noticeable with higher TSR screen percentage (r.TSR.History.ScreenPercentage). This is done so that increasing it unilaterally and automatically gives more temporal stability while maintaining sharpness of detail reprojection at the expense of extra runtime costs regardless of this setting. For instance, a story-driven game might prefer to keep this setting at 4.0 for a "cinematic" look whereas a competitive game like Fortnite would prefer to lower that to something like 2.0. (Default is 4.0f.) |
r.TSR.Visualize |
Use this variable with one of the following values to view different visualization inputs that make up the Temporal Super Resolution visualization mode's inputs.
|
r.TSR.WaveOps |
Whether to use wave ops in the shading rejection heuristics to speed up convolutions. The shading rejection heuristic optimization can be hard for the shader compiler, causing them to become corrupt or show quality loss. This optimization is currently disabled on SPIR-V platforms (mainly Vulkan and Metal) due to adding to compilation time in the SPIR-V backend with DXC, which can take longer to start the editor. |
r.TSR.WaveSize |
Overrides the WaveSize to use.
|