
In Unreal Engine, you can generate Skeletal Mesh LOD (Level of Detail) model variants to optimize gameplay. In the following document you can read about using the LOD generation tool and the Skeletal Mesh Reduction Tool features to tweak the LOD generation to retain details and more precisely optimize Skeletal Meshes.
Prerequisites
- Your project contains a Skeletal Mesh.
- Your project has the Skeletal Mesh Reduction Plugin enabled.
First open in the Project Settings window by clicking Edit > Project Settings in the Menu Bar. In the Project Settings window, navigate to the Skeletal Mesh Reduction Simplification category and ensure the Skeletal Mesh Reduction Plugin property is set to SkeletalMeshReduction.

Creating LODs
With your Skeletal Mesh, you can use the LOD Generation tool to create LOD variants of the model for use in your project.
In some cases, LODs for a Skeletal Mesh are created in an external DCC (digital content creation) software. The Skeletal Mesh Reduction Tool can be used in cases where externally created LODs are present, but any regenerated LOD will overwrite any existing LOD, even LODs imported from an external source.
Generate LODs
First, open the Skeletal Mesh you wish to generate LODs for. In the Asset Details panel of the Skeletal Mesh Editor, navigate to the LOD Settings section.
With the Number of LODs property you can define how many LODs you wish to generate.
Generating 4 LODs, would result in a total of 4 LODs for the Character. LOD 0 being the highest quality Mesh imported into Unreal Engine. Beginning with LOD 1, each increasing LOD is a step down in quality for the Skeletal Mesh, with LOD 3 being the lowest quality mesh.
Click Apply Changes to generate the new LODs for your Skeletal Mesh.

You will be prompted to select a location to save a LODSettings file, this can be saved in the same location as your Skeletal Mesh and any related files.
The generated LODs will now be visible in the LOD menu option within the Viewport.


Skeletal Mesh LODs
Depending on the complexity of your Skeletal Mesh and the power of your hardware, the LOD generation process may take some time to complete.
LODs can be individually modified and regenerated at any time by selecting Regenerate LOD from within an Individual LODs Reduction Settings, or the entire set can be modified and regenerated with Apply Changes from the base LOD's (LOD 0) LOD Settings.
LODs that have been generated using Unreal Engine, will have a note next to their property section in the Asset Details panel, indicating that it has been [generated].

Skeletal Mesh Reduction Tool
When generating LODs in Unreal Engine, there may be some cases where the Mesh reduction can eliminate key or important details of the Mesh. Using the Skeletal Mesh Reduction Tool, you can more precisely define how LODs are generated, and control the reduction effect.
Bones to Prioritize
Within an individual LOD's set of properties in the Asset Details panel, you can use the Bones to Prioritize property to preserve the associated skinned geometry quality.


First, in the Asset Details panel locate the LOD Picker section and enable the Custom property. This will allow you to see each LOD's set of properties in the Asset Details panel.

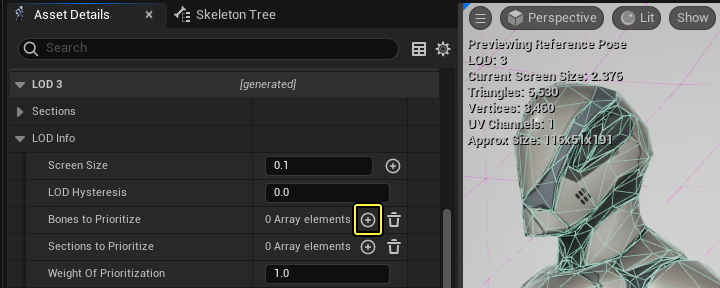
Next, in an Individual LODs properties, Navigate to LOD Info > Bones to Prioritize and click (+) to add a new element to the array.
To preserve a structure in the Skeletal Mesh, select each bone within the structure from the drop down menu. Defining an individual bone in each array element.

Once you have defined all the bones of a structure you wish to preserve, set a high value for the Weight Of Prioritization property under LOD Info, for example 5,000, and then select Regenerate LOD.

Here is an example of a mesh with defined bones to prioritize when generating a LOD.


Lock Mesh Edges
Another method of controlling the LOD generation process to reduce any visual errors using the Lock Mesh Edges feature. Lock Mesh Edges will lock mesh Vertices in place which will attempt to maintain the structure of the simplified mesh at mesh edges at the cost of more triangles. This property can be helpful when vertices are disconnected from the mesh, causing visual errors along the mesh edges.
To enable the Lock Mesh Edges property, expand a LOD's properties in the Asset Details panel. Under the Reduction Settings, enable Lock Mesh Edges and then select Regenerate LOD.

Termination Criterion
With the Termination Criterion properties you can control the amount and the method used to calculate what mesh geometry is retained at each individual LOD level during the LOD generation process. When generating or regenerating LOD meshes for your project's Skeletal Meshes you can choose to specify the number, or percentage, of triangles or vertices thresholds that must be met when optimizing a set of LODs or an individual LOD level.
Generally speaking, the memory cost of a Skeletal Mesh is related to the number of vertices in the mesh geometry, while certain rendering costs are more closely tied to the number of triangles.
Select the highest quality LOD (LOD 0) of your Skeletal Mesh and then expand its Reduction Settings.

In the Termination Criterion property you can select what method by which to optimize the Mesh during the LOD generation process. From the drop down you can select your desired optimization method.
Depending on the optimization method chosen, additional properties will be accessible that you can use to fine tune the LOD generation method to fit your project's needs. For a full list of the Termination Criterion properties, with accompanying descriptions, please see the Skeletal Mesh Reduction Tool section of the Properties Reference.
After these properties are defined, select Apply Changes to generate or regenerate the Skeletal Mesh's set of LODs or Regenerate LOD if modifying the Termination Criterion for an individual LOD level.
Volumetric Correction
Volumetric Correction controls space occupied by the optimized Skeletal Mesh when compared to its source. When disabled (with a value of zero), the simplification process will flatten and deflate rounded surfaces. You can slightly increase (with values greater than 1) or decrease (with values less than 1) the volume of the Skeletal Mesh LOD by adjusting the Volumetric Correction property.
Typically the default setting (a value of 1.0) will give the best results.
You can apply volumetric correction to an entire set of LODs with the Volumetric Correction property that can be accessed in the LOD 0 Reduction Settings, and then selecting Apply Changes.

Volumetric Correction can be applied to each individual LOD's Reduction Settings and selecting Regenerate LOD.
Reducing Bones
When working with Skeletal Mesh LODs there may be situations where you want to reduce the amount of Bones in a Skeletal Mesh's Skeleton Asset alongside the reduction in the Mesh. Unlike the LOD generation workflow, this process requires the manual definition of the bones you wish to remove.
Within the desired LOD's LOD Info properties, navigate to the Bones to Remove property. Using the (+), add an array element and select a bone you wish to remove in the drop down menu.

Add a new array element and define a bone for each individual bone you wish to remove at the selected LOD level.

After defining each bone you wish to remove, select Regenerate LOD.
When a Skeletal Mesh's LOD has had bones removed from its skeleton, the Bones will still be visible in the Skeleton Tree of the LOD, however they will be indicated with a dot icon rather than the usual bone icon.

Properties Reference
Here you can reference properties relevant to Skeletal Mesh LODs while working in the Skeletal Mesh Editor's Asset Details panel.

LOD Picker
In the LOD Picker property section you can choose which LOD's properties will be accessible in the Asset Deteails panel.
| Property | Description |
|---|---|
| LOD | From the drop down you can toggle which LODs properties are visible in the Asset Details panel. By default only one LODs properties are visible at a time. |
| Custom | When toggled you can use the Advanced property drop down menu to toggle which LODs properties will be visible, enabling multiple LOD property sets to be visible at once. |
| Advanced | Toggle each individual LOD's property set to be visible in the Asset Details panel. |
LOD Info
For each LOD variant associated with a Skeletal Mesh, a set of the following properties will be accessible, after switching to the individual LOD in the Viewport, or by selecting the LODs you wish to view in the LOD Picker property section.
| Property | Description |
|---|---|
| LOD Hysteresis | This value is used to avoid 'flickering' when crossing a LOD threshold. Only taken into account when transitioning from a complex to a simple LOD. Higher values will increase the hysteresis, or lag, of the perceived model, which can smooth transitions between radically different LODs. |
| Bones to Prioritize | While the Skeletal Mesh Reduction tool is effective at reducing the triangle count of Skeletal Meshes, there can be instances where the reduction is too aggressive. To provide more control over what is optimized and what is not, the Bones to Prioritize array makes sure that any geometry skinned to the bones in the list will not be optimized. Listed here is an array of Bones which should be prioritized to retain quality. Use the Weight of Prioritization property below to control the value at which these are prioritized. |
| Sections to Prioritize | Similar to the Bones to Prioritize property above, this property is an array of Sections, or Material Slots, which should be prioritized to retain quality. Use the Weight of Prioritization property below to control the value at which these are prioritized. |
| Weight of Prioritization | Listed here is the value that determines how much consideration to give the Bones to Prioritize and Sections to Prioritize properties. The weight is an additional vertex simplification penalty where 0 means nothing. Higher values increase the weight of prioritization for listed Bones and Sections, while lower values reduce the weight of prioritization. |
| Source Import Filename | Listed is the source file directory, for the base mesh FBX file, and any separated associated custom LOD source files. |
| Skin Cashe Usage | This drop down menu will set the LODs behavior in using the skin cache feature. Options are as follows:
If the Support Ray Tracing property is enabled on the mesh, it implies Enabled by default. |
| Morph Target Position Error Tolerance | The property value is displayed in microns. Larger values result in better compression and lower memory footprint, but also lower quality. |
| Bake Bose | Select a single frame of animation to bake into a pose. This is useful when automatic LOD generation is removing bones for lower detail LODs but you want to retain a finer detail that has been removed. For more information, refer to the Pose Asset page. |
| Bake Pose Override | Overrides the Bake Pose property. The source Bake Pose can be disabled if some LOD settings are in use. For more information, refer to the Pose Asset page. |
| Bones to Remove | An array of Bones to be removed from the skeleton for this LOD level. |
Skeletal Mesh Reduction Tool
Here you can reference a list and description of the Skeletal Mesh Reduction Tool properties you can use to tailor the LOD generation process for your Skeletal Mesh.
| Property | Description |
|---|---|
| Termination Criterion | The Termination Criterion option in the Skeletal Mesh Reduction tool gives you the ability to change the way the simplifier reduces the Skeletal Mesh asset in LOD generation. For example, you can specify the number (or percentage) of vertices, instead of triangles, to provide more control to better fit memory or performance targets. The available options for reduction technique are as follows:
Depending on which Termination Criterion is selected the following options will dynamically change to the relevant properties. |
| Percent of Triangles | This property is a target percentage value of triangles to generate a simplification of the source mesh for a new LOD. |
| Percent of Vertices | This property is a target percentage value of vertices to generate a simplification of the source mesh for a new LOD. |
| Max Triangles Count | The maximum number of triangles to retain when using the percentage criterion. A maximum value to limit the automatic generation. |
| Max Vertices Count | The maximum number of vertices to retain when using the percentage criterion. A maximum value to limit the automatic generation. |
| Max Triangles Count | The maximum triangles to retain when using the Max Triangle criterion. |
| Max Vertex Count | The maximum vertices to retain when using the Max Vertices criterion. |
| Remap Morph Targets | Remaps the existing morph targets from the base LOD to the reduced LOD selected. |
| Max Bone Influence | The maximum number of bones that are assigned to each vertex. |
| Enforce Bone Boundaries | If enabled, Unreal will penalize edge collapses between vertices that have different major bones attached. This helps articulated segments like tongues, but can lead to undesirable results under extreme simplification. |
| Merge Coincident Vertices Bones | If enabled, the same location, for example UV boundaries, always has the same bone weights. This can fix bone merge errors when the characters are animated. |
| Volumetric Correction | A slider to determine the Volumetric Correction implemented at this LOD level. The default value of 1 attempts to preserve volume. Smaller values will lose volume by flattening curved surfaces, and larger values will accentuate curved surfaces. |
| Lock Mesh Edges | If enabled, cuts in the mesh's surface are preserved by locking vertices in one place. This increases the quality of the simplified mesh at edges, at the cost of more triangles. |
| Lock Vertex Color Boundaries | If enabled, edges that connect two vertex colors are locked. This increases the quality of the simplified mesh at edges at the cost of more triangles. |
| Regenerate | If pressed, Unreal will regenerate the current LOD with the applied Reduction Tool properties above. |
Console Commands
Here is a reference to helpful console commands you can use while working with Skeletal Mesh LODs.
| Command | Description |
|---|---|
| FORCESKELLOD LOD=X | Forces a Skeletal Mesh to render at the assigned LOD level, where X is any available LOD number for the Skeletal Mesh. |
| a.VizualizeLODs | To draw LODs during runtime. |