
This document refers to a sample game project called Shooter Game. You can find this project by doing the following:
- Click the Learn tab in the Epic Launcher and scroll down to the Games section.
- Click the image for Shooter Game to see a description of the project. Click the yellow button named Free.
- After a short time loading, the button will change to Create Project. Click this button and the launcher will prompt you to choose a project name and location.
- Click Create and the project will download to your designated folder.
The First Person Shooter sample is an example of a PC multiplayer first-person shooter. It includes basic implementations of weapons and gametypes along with a simple front end menu system.
A complete list of the featured concepts:
- Instant hit weapon (ShooterWeapon_Instant)
- Projectile based weapon (ShooterWeapon_Projectile + ShooterProjectile)
- Non-Team game mode (ShooterGame_FreeForAll)
- Team-based game mode (ShooterGame_TeamDeathMatch)
- Pickups (ShooterPickup)
- Main menu (ShooterHUD_Menu)
Weapon Fire System
The base firing functionality for the weapons - such as ammo management, reloading, and replication - is implemented
in the AShooterWeapon class.
The weapon is switched to its firing state on the local client and server (via RPC calls). DetermineWeaponState()
is called in StartFire()/StopFire() which performs some logic to decide which state the weapon should be in and then
calls SetWeaponState() to place the weapon into the appropriate state. Once in firing state, the local client will
repeatedly call HandleFiring() which, in turn, calls FireWeapon(). Then it updates ammo and calls ServerHandleFiring()
to do the same on the server. The server version is also responsible for notifying remote clients about each fired round via the
BurstCounter variable.
Actions performed on the remote clients are purely cosmetic. Weapon fire is replicated using the BurstCounter
property so that the remote clients can play animations and spawn effects - perform all of the visual aspects of the
weapon firing.
Instant-Hit Weapon Fire
Instant-hit detection is used for fast firing weapons, such as rifles or laser guns. The basic concept is that when the player fires the weapon, a line check is performed in the direction the weapon is aimed at that instant to see if anything would be hit.
This method allows high precision and works with Actors that do not exist on server side (e.g., cosmetic or torn off). The local client performs the calculations and informs the server of what was hit. Then, the server verifies the hit and replicates it if necessary.
In FireWeapon(), the local client does a trace from the camera location to find the first blocking hit under the crosshair
and passes it to ProcessInstantHit(). From there, one of three things happens:
- The hit is sent to the server for verification (
ServerNotifyHit()-->ProcessInstantHit_Confirmed()). - If the hit Actor does not exist on server, the hit is processed locally (
ProcessInstantHit_Confirmed()). - If nothing was hit, the server is notified (
ServerNotifyMiss()).
Confirmed hits apply damage to the hit Actors, spawn trail and impact effects, and notify remote clients by setting data
about the hit in the HitNotify variable. Misses just spawn trails and set HitNotify for remote clients, which look
for HitNotify changes and perform the same trace as the local client, spawning trails and impacts as needed.
The instant-hit implementation also features weapon spread. For trace/verification consistency, local client picks a random
seed each time FireWeapon() is executed and passes it in every RPC and HitNotify pack.
Projectile Weapon Fire
Projectile fire is used to simulate weapons that fire rounds which are slower moving, explode on impact, affected by gravity, etc. These are cases where the outcome of the weapon fire cannot be determined at the exact instant the weapon is fired, such as launching a grenade. For this type of weapon, an actual physical object, or projectile, is spawned and sent moving in the direction the weapon is aimed. A hit is determined by the projectile colliding with another object in the world.
For projectile fire, the local client does a trace from camera to check what Actor is under the crosshair
in FireWeapon(), similar to the instant-hit implementation. If the player is aiming at something, it adjusts the fire direction
to hit that spot and calls ServerFireProjectile() on the server to spawn a projectile Actor in the direction the weapon was aimed.
When the movement component of the projectile detects a hit on the server, it explodes dealing damage, spawning effects, and tears off from replication to notify the client about that event. Then, the projectile turns off collision, movement, and visibility and destroys itself after one second to give client time for replication update.
On clients, explosion effects are replicated via OnRep_Exploded().
Player Inventory
The player's inventory is an array of AShooterWeapon references stored in the Inventory property of the player's
Pawn (AShooterCharacter). The currently equipped weapon is replicated from the server, and additionally, AShooterCharacter
stores its current weapon locally in CurrentWeapon property, which allows the previous weapon to be un-equipped
when a new weapon is equipped.
When the player equips a weapon, the appropriate weapon mesh - first-person for local, third-person for others - is attached to the Pawn and an animation is played on the weapon. The weapon is switched to the equipping state for the duration of the animation.
Player Camera
In first-person mode, the Pawn's mesh is hard-attached to the camera so that the arms always appear relative to the player's view. The downside of this approach is that it means the legs are not visible in the player's view, since the entire mesh rotates to match the camera yaw and pitch.
The basic flow of the camera update is:
AShooterCamera::UpdateCamera()is executed each tick.APlayerCamera::UpdateCamera()is called to update the camera rotation based on the player's input.AShooterCharacter::OnCameraUpdate()is called to perform the calculations necessary to rotate the first person mesh to match the camera.
When the player dies, it switches to a death camera that has a fixed location and rotation set in the AShooterPlayerController::PawnDied()
handler. This function calls AShooterPlayerController::FindDeathCameraSpot(), which cycles through several different
locations and uses the first one not obstructed by the level's geometry.
Online Multiplayer
Online multiplayer matches are divided into 3 stages:
- Warm up
- Match play
- Game over
When the first player joins the game, the warm up stage begins. This is a short period, marked by a
countdown timer, that gives other players a chance to join. During this period, the players are in spectator mode allowing them
to fly around the map. When the countdown timer expires, StartMatch() is called to restart all of the players and spawn their
Pawns.
Matches are timed, with the game time being calculated server side in the AShooterGameMode::DefaultTimer() function,
which is executed using a looping timer with a rate equal to the current time dilation that equates to once every game second.
This is stored in the RemainingTime property of the game replication info class (AShooterGRI), which is then replicated
to clients. When the time remaining reaches zero, FinishMatch() is called to end the game session. This notifies all players
the match has ended and disables movement and health.
Menu System
The menu system is created using the Slate UI framework. It consists of menus, menu widgets, and menu items.
Each menu has a single menu widget (SSHooterMenuWidget) that is responsible for layout, internal event handling, and animations
for all of the menu items. Menu items (SSHooterMenuItem) are compound objects that can perform actions and contain any number
of other menu items. These can be as simple as a label or button or "tabs" that contain complete submenus made up of other menu items.
This menu can be operated using a keyboard or controller, but there is only limited mouse support at this time.
Each menu is constructed via the Construct() function, which adds all of the necessary menu items, including sub-items,
and attaches delegates to them where necessary. This is done using the helper methods - AddMenuItem(), AddMenuItemSP(), etc. -
defined in the MenuHelper namespace in the SShooterMenuWidget.h file.
Navigation to previous menus is done using an array of shared pointers to menus and is stored in the MenuHistory variable of
the menu widget. MenuHistory acts like stack to hold previously entered menus and makes it easy to go back. By using this method,
no direct relationship is created between menus and the same menu can be reused in different places if necessary.
Animations are performed using interpolation curves defined in SShooterMenuWidget::SetupAnimations(). Each curve has start time,
duration, and interpolation method. Animations can be played forward and in reverse and their attributes can be animated at a specific time
using GetLerp(), which returns a value from 0.0f to 1.0f. There are several different interpolation methods available, defined in
ECurveEaseFunction::Type in SlateAnimation.h.
Main Menu
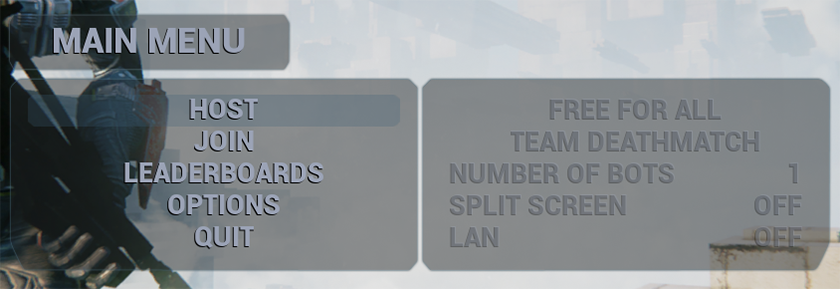
The main menu is opened automatically when the game starts by specifying the ShooterEntry map as the default. It loads a special
GameMode, AShooterGameMode, that uses the AShooterPlayerController_Menu class which opens the main menu by creating a new
instance of the FShooterMainMenu class in its PostInitializeComponents() function.
In-game Menu
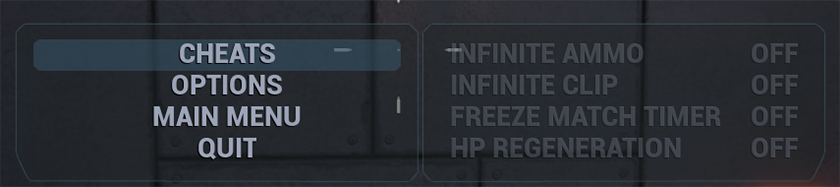
The in-game menu is created in the PostInitializeComponents() function of the AShooterPlayerController class, and opened or closed
via the OnToggleInGameMenu() function.
Options Menu
The options menu is available as a submenu of both the main menu and in-game menu. The only difference is how changes are applied:
- When accessed from the main menu, changes are applied when the player starts the game.
- When accessed from the in-game menu, changes are applied immediately when the menu is closed.
The settings in the options menu are saved to GameUserSettings.ini, and loaded automatically at startup.