This page provides a reference for Sequencer's Toolbar.

| Name | Icon | Description |
|---|---|---|
| World |  |
Lists information on the current world context, Level Sequence Actor, and playback realm. It contains options for specifying whether you want your sequence to autobind to Play In Editor (PIE), Simulation, or other runtime sessions. |
| Save |  |
Saves the current sequence and any subscenes or shots. |
| Find in Content Browser |  |
Locates the current sequence's Level Sequence asset in the Content Browser. |
| Create Camera |  |
Creates a new Cine Camera Actor. A new Camera Cut Track will also be created and will reference this camera if one had not already been created. |
| Render |  |
Opens the Render Movie Settings dialog, or the Movie Render Queue if its plugin is enabled. |
| Director Blueprint |  |
Opens the Director Blueprint for this sequence, from which Event Track logic can be accessed. |
| Actions |  |
Lists various sequence editor actions such as saving, import/export, baking, and selection editing. |
| View Options |  |
Lists various sequence view options. |
| Playback Options |  |
Lists various playback options such as playrate, start/end times, and playhead behavior. |
| Keyframe Options |  |
Lists settings for Auto Key transform keyframing behavior, and what default tangents are created. |
| Auto Key |  |
Enables Autokey mode, where keyframes are automatically created whenever a property or transform changes. |
| Edit Options |  |
Lists settings for how edits from the Details panel are interpreted by Sequencer when using Auto Key. |
| Snapping |  |
Enables snapping. The dropdown menu next to this lists options for setting snapping rules for keyframes, sections, and the timeline. |
| Frames Per Second |  |
Lists settings for various Frames Per Second (FPS) targets at runtime. Also contains options to enable the runtime to lock to the chosen frame rate. |
| Curve Editor |  |
Opens the Curve Editor which is used for fine tuning of animation keyframes and tangents. |
| Breadcrumbs |  |
Displays the current sequence name, and is used to navigate master sequences and shots. |
| Lock |  |
Locks the entire sequence to prevent editing. |
World
Sequencer's World menu contains options relating to the current Level, session, and the level sequence name.

The Actors options category lists the running sessions that Sequencer can bind to, and provides you the option to switch your binding between them.
In this example you can see there are now two sessions being run: Editor and Simulate. You have the option to switch between them which causes Sequencer to bind to that realm instead.
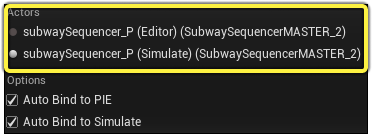
Auto Bind to PIE and Simulate enable the automatic binding of Sequencer to their respective realms when they begin to run.
Create Camera
Clicking the Create Camera button will automatically create a Cine Camera Actor and a Camera Cut Track with a binding to the new camera. Your viewport will also begin piloting the camera, which will prepare you to start framing your shot.
You can specify if this camera is spawnable or posessable by toggling Create Spawnable Camera in the Editor Preferences and Project Settings window.
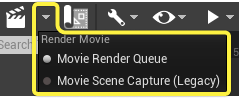
Render
Clicking the Render button will open the Render Movie Settings dialog box, from which you can render your sequence as a series of images.
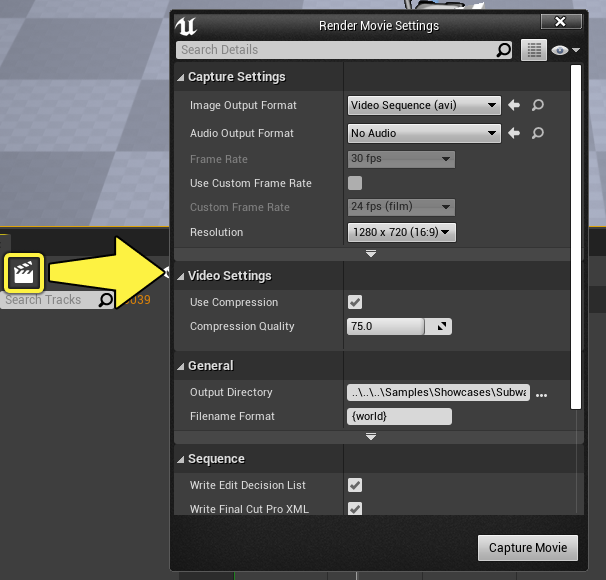
If you have enabled the Movie Render Queue (MRQ) plugin, then the button will have a dropdown menu from which you can choose between launching the new MRQ tool or the legacy rendering tool.
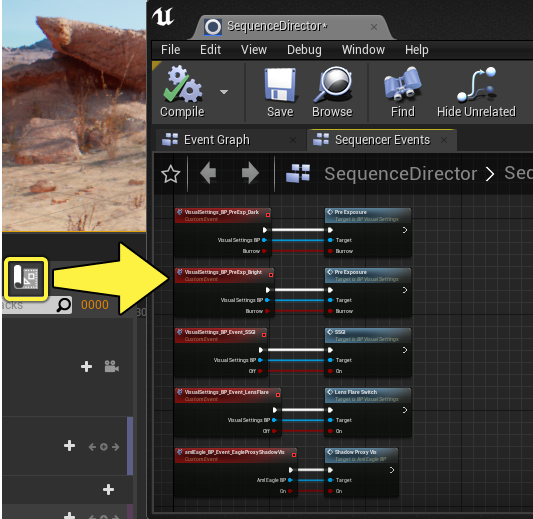
Director Blueprint
Clicking the Director Blueprint button opens the Sequence Director window, from which you can see your sequence's Event Track events.
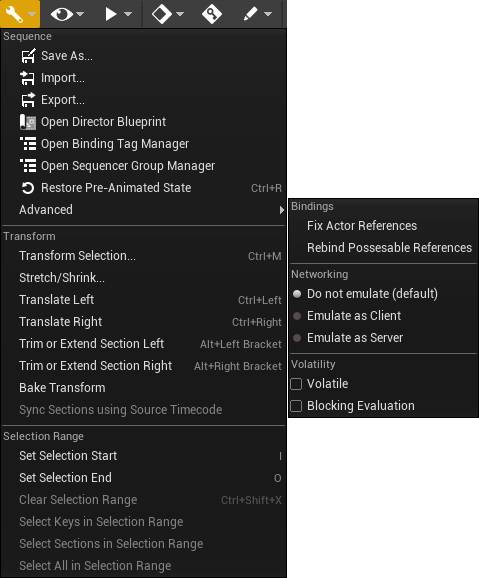
Actions
The Actions button displays a dropdown menu with the following tools, commands, and options:
| Name | Description |
|---|---|
| Save As... | Saves the current sequence and provides the option to select a different name. |
| Import... | Imports an FBX animation file to the selected Actor. If no Actor is selected then the importer will attempt to apply the animation to the entire sequence. Visit the Importing and Exporting FBX files page for more information. |
| Export... | Exports a selected Actor to an FBX file. If no Actor is selected then the entire sequence will be exported. Visit the Importing and Exporting FBX files page for more information. |
| Open Director Blueprint | Opens the Director Blueprint for this sequence, from which Event Track logic can be accessed. |
| Open Binding Tag Manager | Opens a tool from which you can create Tags. These tags are applied to Actors which allows them to be identified in a Blueprint to perform special functions. Visit the Sequencer Tags and Groups page for more information. |
| Open Sequencer Group Manager | Opens a tool that displays custom groups and the tracks applied to them. Visit the Sequencer Tags and Groups page for more information. |
| Restore Pre-Animated State | Snaps all Actors back to their default editor positions. Playing or scrubbing the sequence will snap them back to their Sequencer-determined positions. |
| Transform | |
| Transform Selection | Opens a tool you can use to modify keyframes and sections relative to the playhead time. You can move keys in a positive and negative numerical direction, or multiply and divide their relative distance from the playhead. 
|
| Stretch/Shrink | Opens a tool used for adding and removing time in your sequence relative to the playhead time. 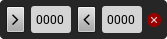
|
| Translate Left | Moves a selected keyframe 1 frame to the left relative to the sequence's frame rate. |
| Translate Right | Moves a selected keyframe 1 frame to the right relative to the sequence's frame rate. |
| Trim or Extend Section Left | Trims or extends a selected track's section from its left/start point to the playhead location. If no track is selected, then all sections will be trimmed or extended. |
| Trim or Extend Section Right | Trims or extends a selected track's section from its right/ending margin to the playhead location. If no track is selected, then all sections will be trimmed or extended. |
| Bake Transform | Selecting this will bake a selected Actor's transform in world space. Any existing attachment or transform tracks will be disabled. This behavior can be changed by locating the Disable Sections After Baking preference in the Editor Preferences and Project Settings window. If you disable it, any existing tracks overwritten during the bake will be deleted. |
| Sync Sections using Source Timecode | Synchronizes sections with the first selected section using its source timecode. |
| Selection Range | |
| Set Selection Start | Sets the start point of a custom timeline selection range to the playhead time. |
| Set Selection End | Sets the end point of a custom timeline selection range to the playhead time. |
| Clear Selection Range | Removes the selection range. |
| Select Keys in Selection Range | Selects all keyframes within the selection range. Does not select sections. |
| Select Sections in Selection Range | Selects all sections within the selection range. Does not select keyframes. |
| Select All in Selection Range | Selects all keyframes and sections within the selection range. |
| Advanced | |
| Fix Actor References | Attempts to automatically fix broken Actor bindings by matching the object binding name with an Actor in the Level with the same name. |
| Rebind Possesable References | Rebinds all posessable Actors in the current sequence to ensure they're using the most robust referencing mechanism. |
| Networking | Lists options for emulating the current sequence in a Client or Server context. |
| Volatile | Signifies that this sequence can change dynamically at runtime or during the game. This property must be set if any procedural changes will be made to the source sequence data in game. |
| Blocking Evaluation | Enables the sequence to fully evaluate and apply its state every time it is updated. |
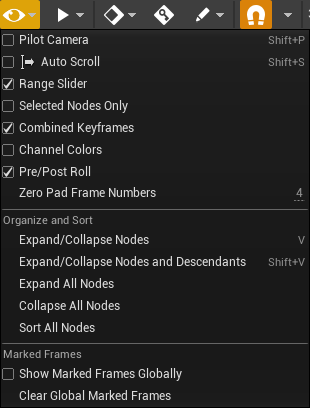
View Options
The View Options button displays a dropdown menu with the following tools, commands, and options:
| Name | Description |
|---|---|
| Pilot Camera | Toggles the piloted camera between the viewport camera and the camera cut track camera. |
| Auto Scroll | Enables automatic panning in Timeline view to keep the playhead in view when playing.  |
| Range Slider | Toggles the display of the bottom timeline region between a Maya-style range slider and a second timeline bar. 
|
| Selected Nodes Only | Automatically filters tracks when enabled to list only tracks or sub-tracks matching the selected Actor. |
| Combined Keyframes | Shows or hides a preview of a track's keyframes when collapsed. |
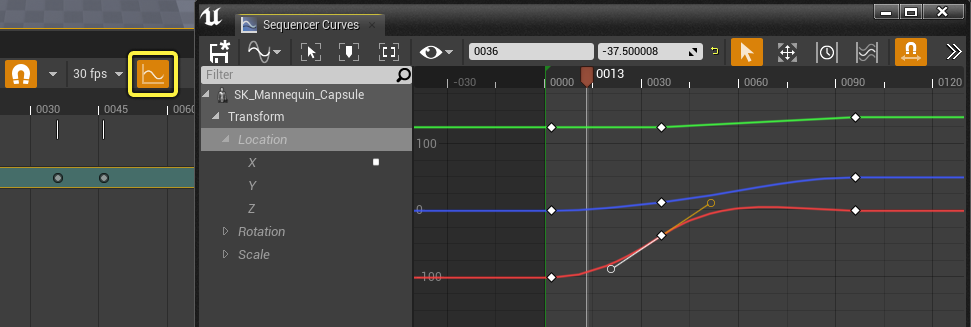
| Channel Colors | Enables the visualization of common colors for transform axes in the Timeline view. Red = X, Green = Y, and Blue = Z. 
|
| Pre/Post Roll | Toggles the display of the pre-roll and post-roll visualization for sections. |
| Zero Pad Frame Numbers | Applies the selected amount of digit padding to the displayed time. Only applies when you are displaying time as frames. |
| Organize and Sort | |
| Expand/Collapse Nodes | Expands or collapses a selected track. |
| Expand/Collapse Nodes and Descendants | Expands or collapses a selected track, including all sub-tracks. |
| Expand All Nodes | Expands all tracks and sub-tracks in the sequence. |
| Collapse All Nodes | Collapses all tracks in the sequence. |
| Sort All Nodes | Sorts all tracks by type, then alphabetically within the types. |
| Show Marked Frames Globally | Makes marked frames in a sub-sequence visible to its parent or sibling sequence. |
| Clear Global Marked Frames | Sets all marked frames in all sub-sequences to not display. |
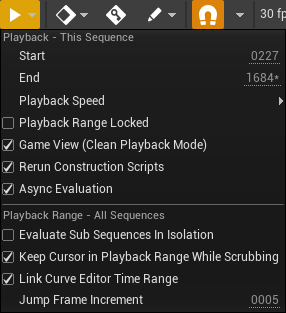
Playback Options
The Playback Options button displays a dropdown menu with the following tools, commands, and options:
| Name | Description |
|---|---|
| Start | Sets the start time of the sequence. |
| End | Sets the end time of the sequence. |
| Playback Speed | Displays options for previewing the current sequence's playback at different speeds. |
| Playback Range Locked | Locks the start and end times of the sequence and prevents editing. |
| Game View (Clean Playback Mode) | Automatically enables Game View whenever the sequencer is being played. |
| Rerun Construction Scripts | Enables the construction script from Blueprint Actors to run every tick. This also requires you to enable the Run Construction Script in Sequencer property in the Blueprint's Class Settings. |
| Async Evaluation | Enables a single asynchronous evaluation once per frame. When disabled, this forces a full blocking evaluation every time the sequence is evaluated. This should be enabled for sequences that run in real time. |
| Evaluate Sub Sequences in Isolation | Isolates a sub-sequence or a shot from the master sequence when viewing it. This will disable any tracks or content that may be propagating from the master sequence, as well as disable the shot range preview. |
| Keep Cursor in Playback Range While Scrubbing | Clamps the playhead within the start and end regions of the sequence when scrubbing.  |
| Link Curve Editor Time Range | Synchronizes the Curve Editor's view with Sequencer's timeline.  |
| Jump Frame Increment | Sets the number of frames to jump when pressing Shift + Left / Right Arrows to jump forward and backward in the timeline. |
Keyframe Options
The Keyframe Options button displays a dropdown menu with the following options:
| Name | Description |
|---|---|
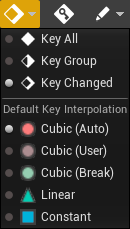
| Key All | All transform channels will be keyframed when a value is changed and if auto key is enabled. |
| Key Group | All axes within a channel will be keyframed when a value is changed and if auto key is enabled. |
| Key Changed | Only the axis that changes will be keyed if auto key is enabled. This is the default behavior. |
| Cubic (Auto) | When a new keyframe is created, the tangents will be automatically managed and smoothed during changes. This is the default behavior. |
| Cubic (User) | When a new keyframe is created, the tangents will be user controlled and will not change if the keyframe is adjusted. |
| Cubic (Break) | When a new keyframe is created, the tangents will use cubic interpolation and broken to allow for individual edits to in/out angles. |
| Linear | When a new keyframe is created, the tangents will use linear interpolation. |
| Constant | When a new keyframe is created, the tangents will use stepped interpolation meaning they retain the previous keyframe's value until the next keyframe. |
Auto Key
The Auto Key button enables Auto Key mode which automatically creates keyframes when channels or properties are changed.
Auto Key will only add keyframes if the track already contains at least one keyframe.
Edit Options
The Edit Options button displays options for automatic behavior when manipulating Sequencer-bound and Level-bound actors.
| Name | Description |
|---|---|
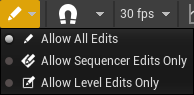
| Allow All Edits | Enables interaction with both Sequencer-bound and Level-bound Actors. Both edit operations occur in their respective realms (Sequencer or Level). |
| Allow Sequencer Edits Only | Manipulating any Level-bound Actor will automatically add the Actor to the current sequence under a folder named: Autotracked Changes.  |
| Allow Level Edits Only | Disables all interaction with Sequencer. You cannot set any keyframes and any edits can only occur in the Level. |
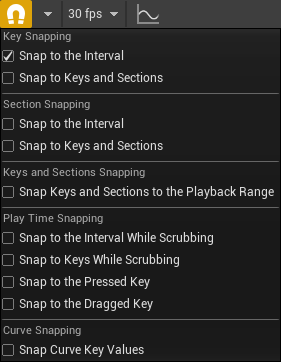
Snapping
The Snapping button enables the ability to have your keyframes or playhead marker snap to increments or other keyframes within the timeline.
The Snapping dropdown menu contains options for customizing the snapping behavior.
| Name | Description |
|---|---|
| Key Snapping | |
| Snap to the Interval | Snaps keyframes to time intervals when moving along the timeline.  |
| Snap to Keys and Sections | Snaps keyframes to other keys, or the start and end of sections when moving along the timeline.  |
| Section Snapping | |
| Snap to the Interval | Snaps sections to time intervals when scaling or moving sections in the timeline.  |
| Snap to Keys and Sections | Snaps sections to other keys, or the start and end of sections when moving along the timeline.  |
| Keys and Sections Snapping | |
| Snap Keys and Sections to the Playback Range | Clamps key and section placement to within the playback range.  |
| Play Time Snapping | |
| Snap to the Interval While Scrubbing | Snaps the playhead marker to time intervals while scrubbing.  |
| Snap to Keys While Scrubbing | Snaps the playhead marker to other keys, or the start and end of sections while scrubbing.  |
| Snap to the Pressed Key | Pops the playhead marker to a keyframe when clicked. This can also be done when holding Shift and clicking the keyframe if this option is disabled.  |
| Snap to the Dragged Key | Keeps the playhead maker at the same time as the keyframe when dragging the keyframe along the timeline. 
|
| Curve Snapping | |
| Snap Curve Key Values | Toggles value snapping in the Curve Editor.  |
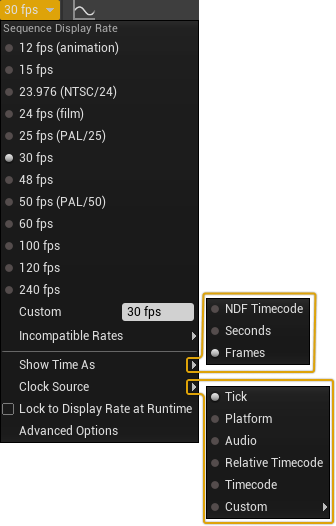
Frames Per Second
The Frames Per Second (FPS) menu displays options for specifying the frame rate of a sequence, the unit of time to be used, and other timing-related options.
| Name | Description |
|---|---|
| Show Time As | Specifies the unit of time to display in your sequence to Frames, Seconds, or Timecode. This affects all time displays in your sequence.  |
| Clock Source | Directs Sequencer to advance time in one of the following ways:
|
| Lock to Display Rate at Runtime | Locks the playback of this sequence to the chosen FPS display rate. |
| Advanced Options | Opens a window in which you can specify different tick intervals for your sequence. 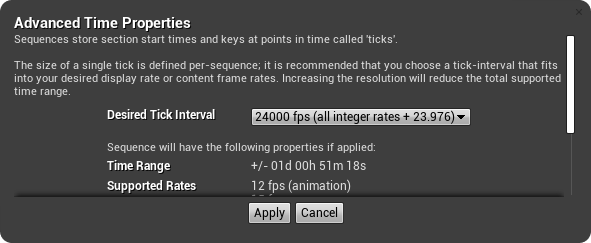
|
Curve Editor
The Curve Editor button displays the Curve Editor tab, which can be used to fine-tune your keyframes and tangents.
Visit the Curve Editor page to learn more about it.
Breadcrumbs
The breadcrumbs area of the toolbar displays the name of the current sequence. When using master sequences and shots, it can be used to navigate between your shots and the master sequence.
Use the forward and backward buttons to navigate through your view history, or use the folder button to navigate through all shots in a tree view.