
Parameters and functions exposed in the Remote Control Preset can be connected to widgets in a companion web application provided by the Remote Control Web Interface plugin to control the engine remotely. This web application has a built-in UI editor so you can customize its interface without any additional code to create or format it.

Since this is a web application, you can run multiple clients at the same time. Any properties that are modified in one client will have their changes propagated through the web server to all the other clients. This can help create a collaborative workflow in a live environment.
This page covers how to connect exposed properties and functions to widgets in the companion Remote Control web application, and build your own UI with the application's UI builder.
Prerequisites
The Remote Control Web Interface uses NodeJS to provide a companion web app with default widgets, such as gauges, sliders, and color pickers, for controlling the engine remotely without any additional code.
Follow these steps to connect the web application to your project:
-
Install NodeJS on your machine.
-
Minimum version: 8.
-
Maximum version: 14.15.5.
-
-
Open your project in the Unreal Editor.
-
In the Editor's main menu, choose Edit > Plugins to open the Plugins window.
-
In the Plugins window, find the Remote Control Web Interface plugin in the Messaging category. Check its Enabled checkbox.

-
Restart the engine.
-
Verify the web app launched successfully. In the Editor's main menu, choose Window > Developer Tools > Output Log and filter by "remote control web" to see a success log similar to: LogRemoteControlWebInterface:
[Success] Remote Control Web Interface is running - WebApp started, port: 7000
Getting Started with the Remote Control Web Application
Connect properties and functions in the Remote Control Panel to a web application. The web application will read any Remote Control Preset that you have open in your Unreal session. The following browsers are officially supported: Chrome, Firefox, and Safari.
To see updates in the Editor as you change property values in the web app, open Edit > Editor Preferences and, in the Performance section under General, disable Use Less CPU when in Background.

Follow these steps to launch the web application and add an exposed property:
-
Open your web browser on the same machine running the engine and enter the URL 127.0.0.1:7000. See the Remote Control Quick Start for details on how to expose the Remote Control API to other machines.

You can change which port the Remote Control Web Interface uses for your project. In the Editor's main menu, choose Edit > Project Settings… to open the Project Settings window. In the Project Settings window, select Remote Control in the Plugins section to see its settings, where you can change the default port.

You can also launch the web application from the Remote Control Preset. See Remote Control Panel Reference for more details.
-
When the page loads, you should see a blank Remote Control application. Click the Control toggle in the web application to switch to Design mode so you can start adding widgets.


-
Select the Properties tab.
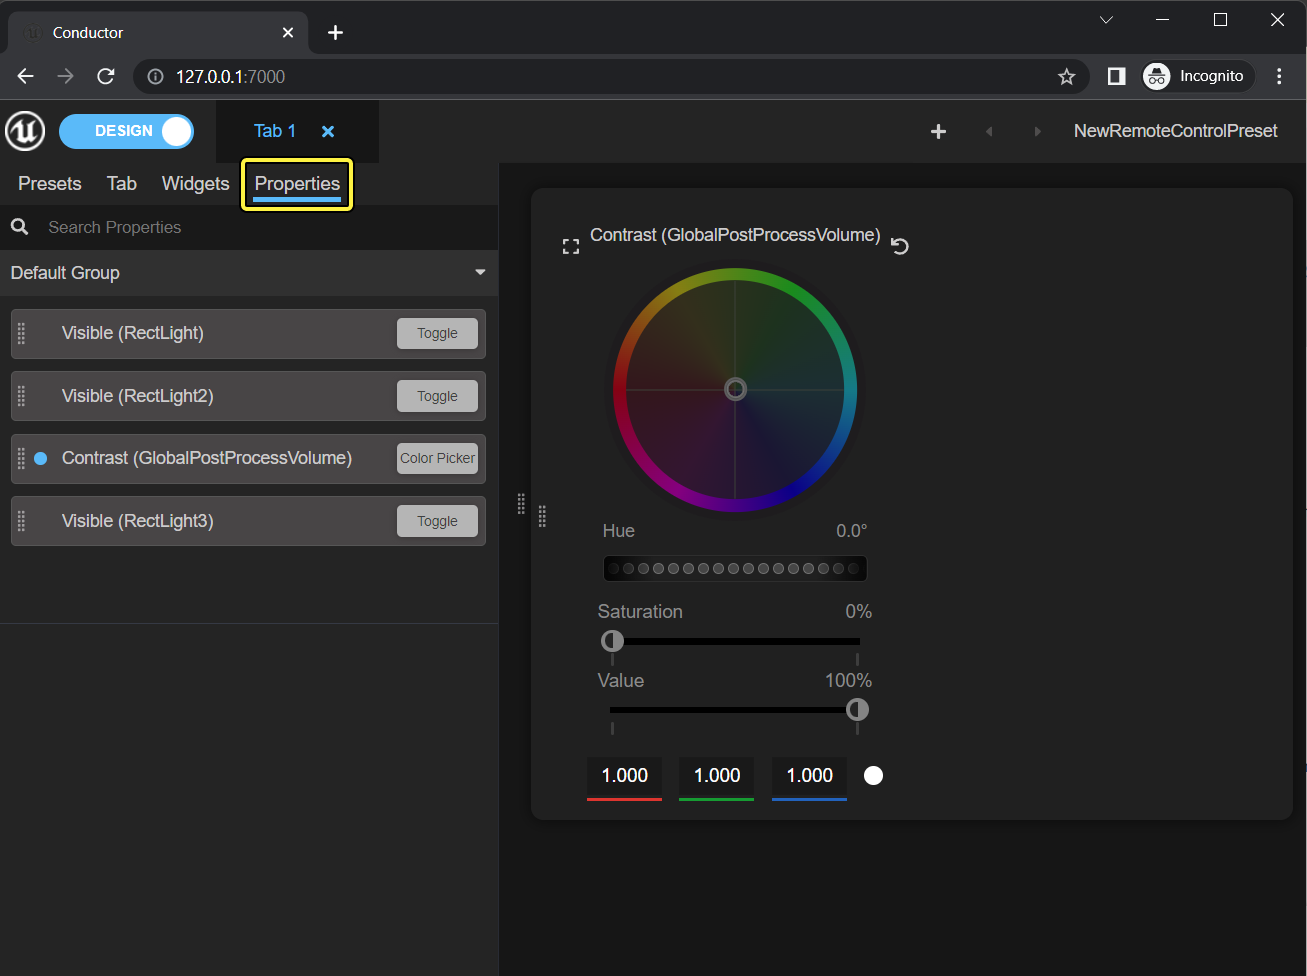
-
Drag and drop one of the exposed properties into the right panel. When you add a property from the Properties panel, a Panel Widget is created if one doesn't currently exist, and the associated widget for the property is added to the Panel Widget.
In the following example, a Panel Widget was created and a Color Picker Widget added to the Panel Widget. The Color Picker is bound to the Contrast field for the scene's PostProcessVolume.

-
Switch to Control mode.

-
Modify the exposed property in the web app and verify the associated property is updated in the Editor.

-
Save your changes to the web application by saving the corresponding Remote Control Preset in the Unreal Editor. The next time you open the web application, the layout will be the same as when you last saved the Asset.
Presets
You can have multiple remote presets available in the web application, but you can only have one Remote Control Preset open at a time. In Design mode, go to the Presets section to see the available remote presets on the left side of the window and select the one you want to view. The name of the currently opened Remote Control Preset is displayed in the top right of the window.

Tabs
You can have multiple Tabs in your web application. This is helpful for creating different views for the operators in a live environment.
-
You can change a Tab's label and choose an icon from a library of icons to differentiate the Tabs.
-
You can also duplicate a Tab to use as a starting point for a new interface.

There are two unique tabs you can add to your web application that are already set up to work with other Unreal tools: Level Snapshots and Sequencer. The sections below describe these integrations with Remote Control.
Level Snapshots Integration
In the Remote Control Web Application, you can take new snapshots of the level or switch to a previously taken snapshot remotely. For more details on using Level Snapshots in your project, see Level Snapshots.

The Level Snapshots plugin must be enabled to use this feature in the Remote Control Web Application.
Sequencer Integration
In the Remote Control Web Application, you can view all the sequences in your project, filter them by name, and select a sequence to view. For more details on using sequences in your project, see Sequencer. By clicking the Play button icon to the right of a sequence, you can start or resume a sequence in the current level. There may be a short delay before the sequence begins to play.
Sequences in the page will be listed by their asset name and not the name listed in the outliner. Assets renamed after being placed in the world will still be listed by their name in the content browser.

This tab shows all sequences in the project, but you can only play the sequences that exist in the current level. The filter is only based on the asset path, so you currently cannot filter based on which sequences are in the level.
Widgets
Widgets are included in the web application to represent interactable data formats in the engine, and to provide formatting for the web page.

The following list shows all of the available widgets you can add to your UI:
- Button
- Color Picker
- Dial
- Dropdown
- Joystick
- Label
- List
- MiniColorPicker
- Panel
- Slider
- Spacer
- Tabs
- Text
- Toggle
- Vector
A Panel widget is used to contain all the other widgets and must be placed before placing other widgets. A List widget is used to contain Panels and provide multiple UIs in the same Tab.

Properties
The properties and groups listed in the Properties tab of the Remote Control Web Application directly match the properties and groups in the Remote Control Preset.

Drag and drop a property from the left tray of the web application over the canvas area, to add a widget already bound to the property in your UI. If the property is released over a panel, it will automatically be added to it. If there are no panels it will create an empty one for you and wrap it inside.

Widget and Property Settings
When you select a widget in the web page during Design mode, a settings panel appears in the bottom left corner of the window. Different fields appear depending on the type of widget and data it represents.
For every widget type, you can change its label. If the widget is bound to a property, you can change which property it's connected to.
Widget Modes
Some data formats, such as vectors, can be represented in multiple ways in the UI.
Follow these steps to change the mode for your widget.
-
Select the widget you want to view to open its settings panel.
-
In the widget's settings panel, select the mode you want to use. For example, with vectors, you can choose a Joystick, Dial, or Sliders.

-
A game controller icon appears next to the property when you select a mode. Select this button to open the property in the mode you selected.

-
The mode appears at the bottom of the window.

Deleting Widgets
You can delete widgets individually, or delete all the widgets in a Panel at the same time. To delete a widget, select the widget to open its settings panel and select Delete Widget. To delete all the widgets in the Panel, select the Panel to open its settings panel and select Delete Widget.
