
As mentioned in the Vehicle Setup guide, the assets that make up a vehicle are a skeletal mesh, a physics asset, an Animation and Vehicle Blueprint, and one or more Wheel Blueprints.
This guide will go through the steps of converting a PhysX (legacy) vehicle to a Chaos vehicle.
Setup
Asset Configuration
At this time, the workflow involved with configuring assets remains the same — setting up physics collision, the camera, and vehicle controls do not change between PhysX and Chaos vehicles.
Animation Blueprint
The Animation Blueprint is the same with the exception of using the WheelController node in place of the WheelHandler node.
Class Layout
In most cases the class layout is similar, with different class names.
| PhysX Component | Chaos Component |
|---|---|
| VehicleWheel | ChaosVehicleWheel |
| VehicleMovement | ChaosWheeledVehicleComponent |
| VehicleAnimInstance | VehicleAnimationInstance |
| WheelHandler | WheelController |
| WheeledVehicle | WheeledVehiclePawn |
Conversion Steps
-
Create Front and rear wheel Blueprint classes based on the ChaosVehicleWheel class.
-
Copy the setup details from the PhysX vehicle wheels. The important details to copy are the wheel radius, the suspension max raise/drop values, steering angle, and whether the wheels have an engine, brake, or handbrake.
We recommend converting the front wheel first, setting its values, then creating a duplicate and renaming it the back wheel. By doing this, you will only need to set the values that are different from the front rather than repeating all of the wheel setups again — since in most cases, the wheels and suspension setup will be the same from the front to the rear.
-
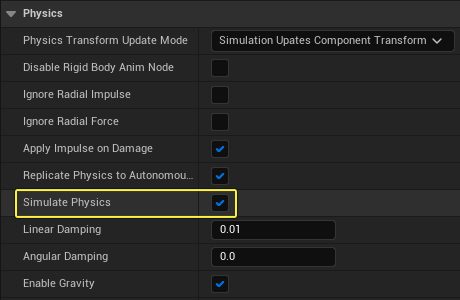
Select your vehicle's Skeletal Mesh and go to the Details panel. Scroll down to the Physics section and enable the Simulate Physics checkbox.

-
Add a ChaosWheeledVehicleComponent Component to the vehicle pawn.
-
Add the same number of wheels as in the PhysX Vehicle Component.
-
Copy the Bone Names from the PhysX Skeletal Mesh.
-
Set the wheels' classes to the matching wheels that were created earlier.

Example Wheel Class assignments
-
-
Set up other properties as needed, including mass and engine torque.
-
Create a Torque Curve and assign it to the engine torque.
-
Open the Animation Blueprint. Click File > Reparent Blueprint, and select VehicleAnimationInstance.
This will convert the PhysX VehicleAnimInstance to the Chaos equivalent.
-
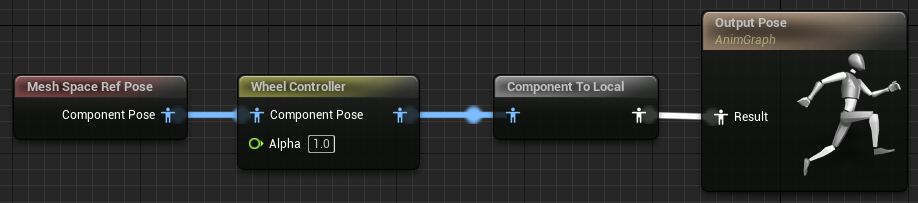
Edit the Vehicle Animation Blueprint by deleting the WheelHandler animation node and replacing it with the WheelController node.

The Animation Graph after replacing WheelHandler with WheelController.
All other setup that exists in the Blueprint can remain exactly as is. -
Verify the physics asset looks as expected. For example, the chassis should have a collision model and the wheels may have simple collision; however, the wheels should have collision disabled.
-
In any Blueprint code that references the PhysX WheeledVehicleMovementComponent4W reference, remove the PhysX movement component references and recreate the Blueprint using the ChaosWheeledVehicleMovement reference.
-
Add the following setup for your Throttle Input. This setup mimics the previous reverse behavior for PhysX vehicles.

After following these conversion steps, you should have a vehicle that uses the Chaos physics solver.
Troubleshooting common issues
Your vehicle does not move during gameplay
-
Select your vehicle's Skeletal Mesh and go to the Details panel. Scroll down to the Physics section and enable the Simulate Physics checkbox.
Your vehicle's wheels are not animating
Make sure you are using the Wheel Controller node inside the vehicle's Animation Blueprint.
Your vehicle's reverse is not working as before
Make sure you use the following setup for your Throttle Input. This setup mimics the previous reverse behavior for PhysX vehicles.
