
The Image Plate Actor supports the playback of movies and image sequences from a plate attached to the frustum of a Cine Camera Actor. Using these image plates, you can playback full-screen videos and image sequences, as well as including foreground elements within the camera's perspective.
Prerequisites
-
The Image Plate plugin must be enabled prior to use. Navigate in the Unreal Engine menu to Edit > Plugins, locate Image Plate in the Rendering section, and enable it. You may need to restart the editor for this change to come into effect.

- You are familiar with how to set up a video asset for playback, or how to set up image sequences for playback.
- You are familiar with the usage of the Media Track.
- You are familiar with the basics of Materials.
- You have an understanding of Sequencer and its Interface.
Creation
To fully set up the Image Plate Actor, you will need to add both a Cine Camera Actor and an Image Plate Actor to a Level, then attach the plate to the Cine Camera Actor.
First, add a Cine Camera Actor to your Level by navigating to the Cinematic tab in the Place Actors panel, and locate Cine Camera Actor. Drag it from the panel and into your viewport.

Next, add an Image Plate to your Level by dragging it from the Place Actors panel.

After both Actors have been added to your Level, attach the plate to the camera by dragging it onto the camera in the World Outliner panel. Once that is done, the Image Plate will snap to the front of the camera and resize to fit its view frustum.

Behavior
By default, the Image Plate will automatically adjust its size to fit the Cine Camera Actor's Sensor Dimensions, ensuring it will always be fully in the camera's view.

You can also move the plate toward and away from the camera to control the spacing between the plate and the camera. This spacing will allow more foreground elements to be included in the camera's view. The plate will also dynamically adjust its scale to ensure it will remain fully in view.

When Piloting the camera, the image plate will fill the screen and will stretch to conform to the camera's aspect ratio. You may also need to adjust your camera's focus distance to match the plate distance to ensure it remains in focus.

Properties
Selecting the Image Plate Actor will reveal its details in the Details panel.

The Fill Screen property enables automatic plate sizing to fit the camera's full view. When this is disabled, you can instead use the Fixed Size property to manually set the plate's size.

If Fill Screen is enabled, then you can use the Fill Screen Amount property to offset the plate's size as a percentage of the screen. X controls the percentage of the width of the screen, and Y controls the height.

Material
Expanding the advanced section of the Image Plate Details will reveal its Material properties. You can adjust the default material or texture here.

Material Setup
Regardless of if you are displaying an image sequence or a video on your plate, you will need to create a new Material that references a Media Texture. The Media Texture must also reference a Media Player.
Media Texture and Player
First, create the Media Player by clicking Add/Import in the , navigating to the Media category, and selecting the Media Player asset. Once selected, a dialog window will appear. Ensure that Video output MediaTexture asset is enabled, and click OK.
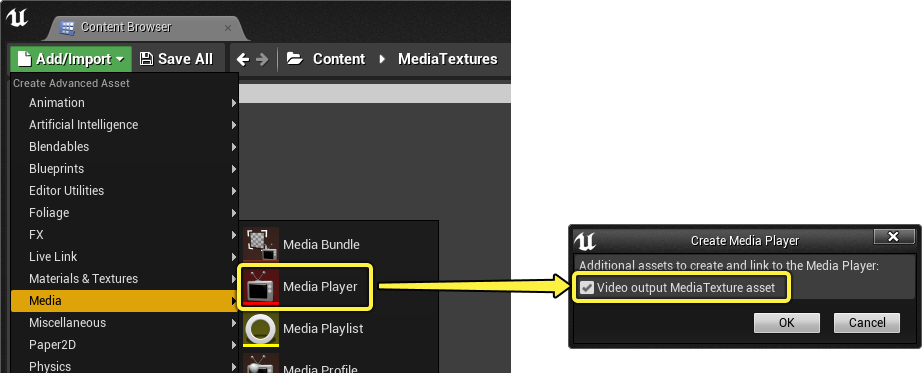
Doing this will ensure that both a Media Texture and Media Player are created and linked.

Material Graph
Create a new Material asset by clicking Add/Import in the Content Browser, and selecting Material. Once it is created and opened, set the Shading Model to Unlit, and enable the Two Sided property in its details. This is done so that the image plate is not affected by any lighting in the Level.

Drag the Media Texture asset into the material graph and connect its RGB pin to the material's Emissive Color input pin.

Lastly, you will need to assign the media material to the Material property of the Image Plate Actor.

Playback
Videos and image sequences can be played on the image plate through Sequencer's Media Track.
Media Track Setup
Start by creating a new Level Sequence, then click + Track and select Media Track.

Next select a File Media Source (for videos) or Image Media Source (for image sequences) asset to play by clicking + Media and selecting a source. If you do not have one of these assets, refer to their setup instructions in either the Video or Image playback documents.

Right-click the media section, navigate to its properties category, and assign your media texture to the Media Texture property.

Examples
Once finished, you will be able to play your sequence and preview the video or image sequence displayed on your image plate.

Video Example

Image Sequence Example