
For Unreal Engine 5 (UE5) projects that require more advanced input features, like complex input handling or runtime control remapping, Enhanced Input provides developers with an upgrade path and backward compatibility from the default input system from Unreal Engine 4 (UE4).
This implements features like radial dead zones, chorded actions, contextual input, and prioritization, as well as the ability to extend your own filtering and processing of raw input data in an Asset-based environment.
Dynamic and Contextual input mappings
When you use Enhanced Input you can add and remove Mapping Contexts at runtime for the player. This makes it easier to manage a large number of Actions. You can change how certain inputs behave depending on the current state of the player.
For example, if you have a player character that can walk, sprint, and be prone. For each of those Character Movement types, you can swap the Mapping Context to have the CTRL key do different actions. While walking and you press the CTRL key, you should crouch. While sprinting and you press CTRL, then you should slide. While prone and you press CTRL you should stand back up.
Creating Enhanced Input Assets
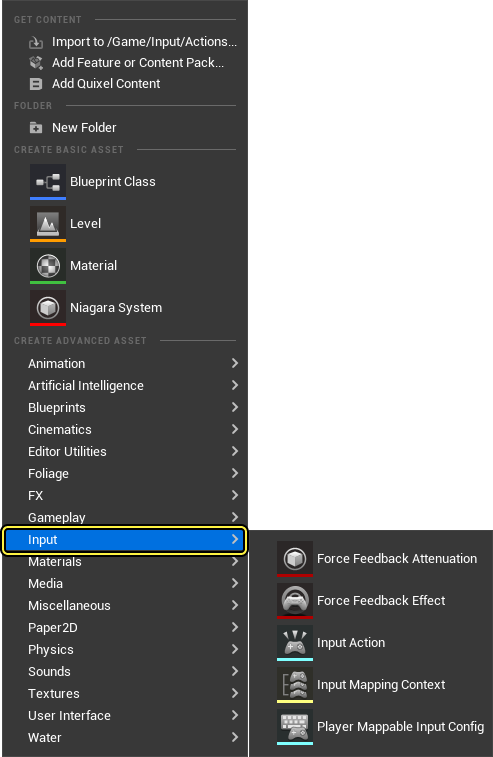
Enhanced Input is enabled by default. You can create input assets from the Content Browser, by clicking Add(+) and navigating to the Input category.
Core Concepts
The Enhanced Input system has four main concepts, Input Actions, Input Mapping Contexts, Input Modifiers, and Input Triggers.
Input Actions
Input Actions are the communication link between the Enhanced Input system and your project's code. Input Actions are the conceptual equivalent to Action and Axis mapping names, except they are data assets. Each Input Action should represent something that the user can do, like "Crouch" or "Fire Weapon". You can add Input Listeners in either Blueprints or C++ when the Input Action's state changes.
Input Actions can be several different types that will determine their behavior. You can make a simple boolean action or a more complex 3D axis. The type of action determines the value. Boolean actions have a simple bool value, an Axis1D is a float value, an Axis2D is an FVector2D, and Axis3D is a whole FVector.
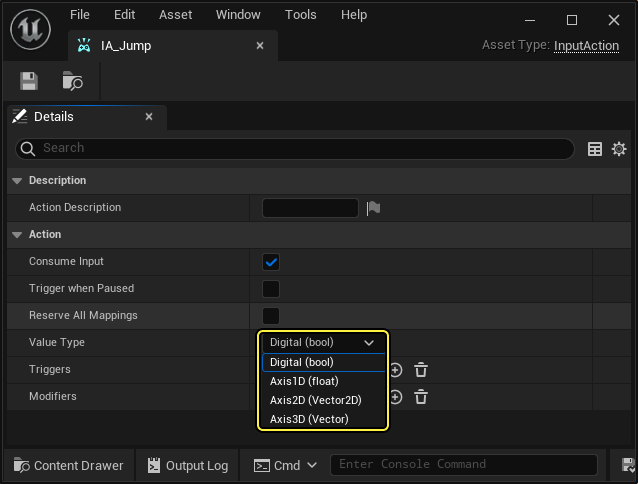
Input Actions can be different value types that will determine their behavior.
You should use bool actions for inputs that have an on or off state. This is the equivalent of the older Action mappings in the legacy input system. For controls like gamepad thumbstick values, you can use 2D axis actions to hold the X and Y value of the thumbstick position. You can use the 3D axis to hold more complex data, such as motion controller information.
As an example, a "pick up item" Action might only need an on / off state, indicating whether or not the user wants the character to pick something up, while a "walk" Action might require a 2D axis to describe the direction and speed at which the user wants the character to walk.
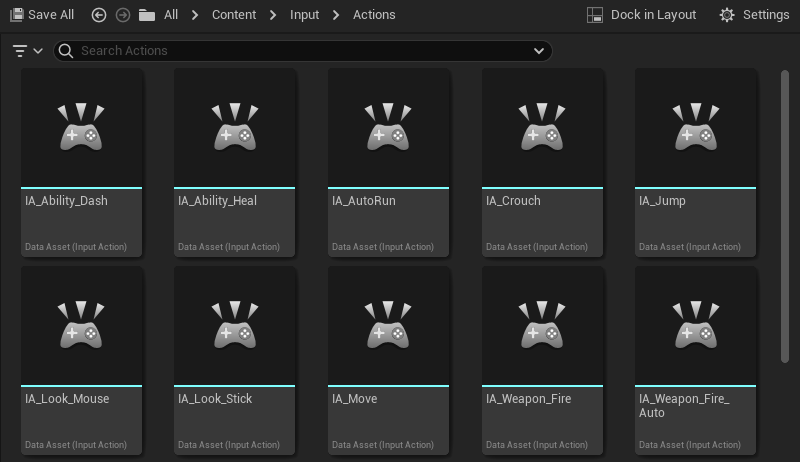
The different Input Actions used in the Lyra Game Sample.
Trigger States
A Trigger State represents the current state of an action, such as Started, Ongoing, Triggered, Completed, and Canceled. Often, you will use the "Triggered" state. You can bind to specific states in both C++ and Blueprint.
-
Triggered: The action was triggered. This means that it has completed the evaluation of all trigger requirements. For example, a "Press and Release" trigger is sent when the user releases the key.
-
Started: An event occurred that began trigger evaluation. For example, the first press of a "Double tap" trigger will call the "Started" state once.
-
Ongoing: The trigger is still being processed. For example, a "Press and hold" action is ongoing while the user is holding down the button before the specified duration is reached. Depending on the triggers, this event will fire every tick while the action is evaluated once it receives an input value.
-
Completed: The trigger evaluation process is completed.
-
Canceled: The triggering was canceled. For example, a user lets go of a button before a "Press and Hold" action can be triggered.
Adding Input Listeners
To add an Input action listener in Blueprints, you can right-click in the Blueprint's event graph and type in the name of your input action data asset.
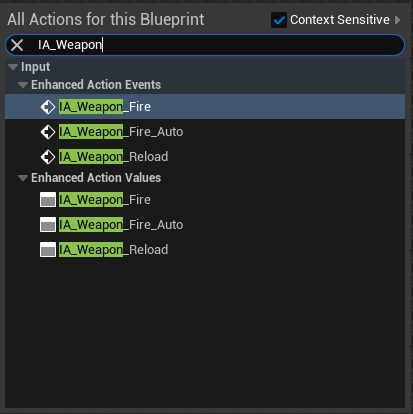
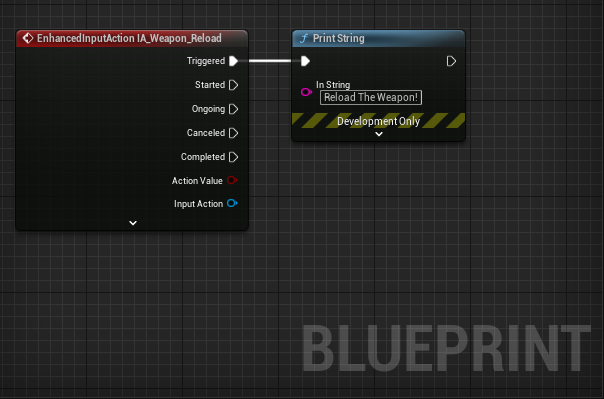
Adding an Input Action Event and setting it to execute a Print String.
You can also bind input actions in C++
void AFooBar::SetupPlayerInputComponent(UInputComponent* PlayerInputComponent)
{
UEnhancedInputComponent* Input = Cast<UEnhancedInputComponent>(PlayerInputComponent);
// You can bind to any of the trigger events here by changing the "ETriggerEvent" enum value
Input->BindAction(AimingInputAction, ETriggerEvent::Triggered, this, &AFooBar::SomeCallbackFunc);
}
void AFooBar::SomeCallbackFunc(const FInputActionInstance& Instance)
{
// Get the value of the Input Action for whatever type you want here...
FVector VectorValue = Instance.GetValue().Get<FVector>();
FVector2D 2DAxisValue = Instance.GetValue().Get<FVector2D>();
float FloatValue = Instance.GetValue().Get<float>();
bool BoolValue = Instance.GetValue().Get<bool>();
// Do your cool stuff here!
}
Input Mapping Contexts
Input Mapping Contexts are a collection of Input Actions that represents a certain context that the player can be in. They describe the rules for what triggers a given Input Action. Mapping Contexts can be dynamically added, removed, or prioritized for each user.
To create an Input Mapping Context, right-click the Context Browser, expand the Input option, and choose Input Mapping Context.

The basic structure of an Input Mapping Context is a hierarchy with a list of Input Actions at the top level. Under the Input Action level is a list of user inputs that can trigger each Input Action, such as keys, buttons, and movement axes.
The bottom level contains a list of Input Triggers and Input Modifiers for each user input, which you can use to determine how an input's raw value is filtered or processed, and what restrictions it must meet in order to drive the Input Action at the top of its hierarchy.

You can apply one or more of these Contexts to a local player through its Enhanced Input Local Player Subsystem, and prioritize them to resolve collisions between multiple Actions trying to consume the same input.
This is where you implement your actual Key to Input Action bindings and specify additional triggers or modifiers for each action. When you add an Input Mapping Context to the Enhanced Input subsystem, you can also give it priority. If you have multiple contexts mapped to the same Input Action, then, when the Input Action is triggered, the context with the highest priority will be considered and the others ignored.
As an example, you can give a character who can swim, walk, and drive vehicles multiple Input Mapping Contexts. One for common actions that are available and always mapped to the same user inputs, and another one for each individual mode of travel.
Developers can then place the vehicle-related Input Actions into a separate Input Mapping Context, which is added to the local player when entering a vehicle, and removed from the local player when exiting the vehicle.
Doing this helps to optimize and prevent bugs by ensuring that inappropriate Input Actions cannot run. Additionally, using mutually-exclusive Input Mapping Contexts will help avoid input collisions, which means when user input is used for different Input Actions the input will never accidentally trigger the wrong action.
You can add mapping contexts to the player in either Blueprints or C++
// Expose a mapping context as a property in your header file...
UPROPERTY(EditAnywhere, Category="Input")
TSoftObjectPtr<UInputMappingContext> InputMapping;
// In your cpp...
if (ULocalPlayer* LocalPlayer = Cast<ULocalPlayer>(Player))
{
if (UEnhancedInputLocalPlayerSubsystem* InputSystem = LocalPlayer->GetSubsystem<UEnhancedInputLocalPlayerSubsystem>())
{
if (!InputMapping.IsNull())
{
InputSystem->AddMappingContext(InputMapping.LoadSynchronous(), Priority);
}
}
}

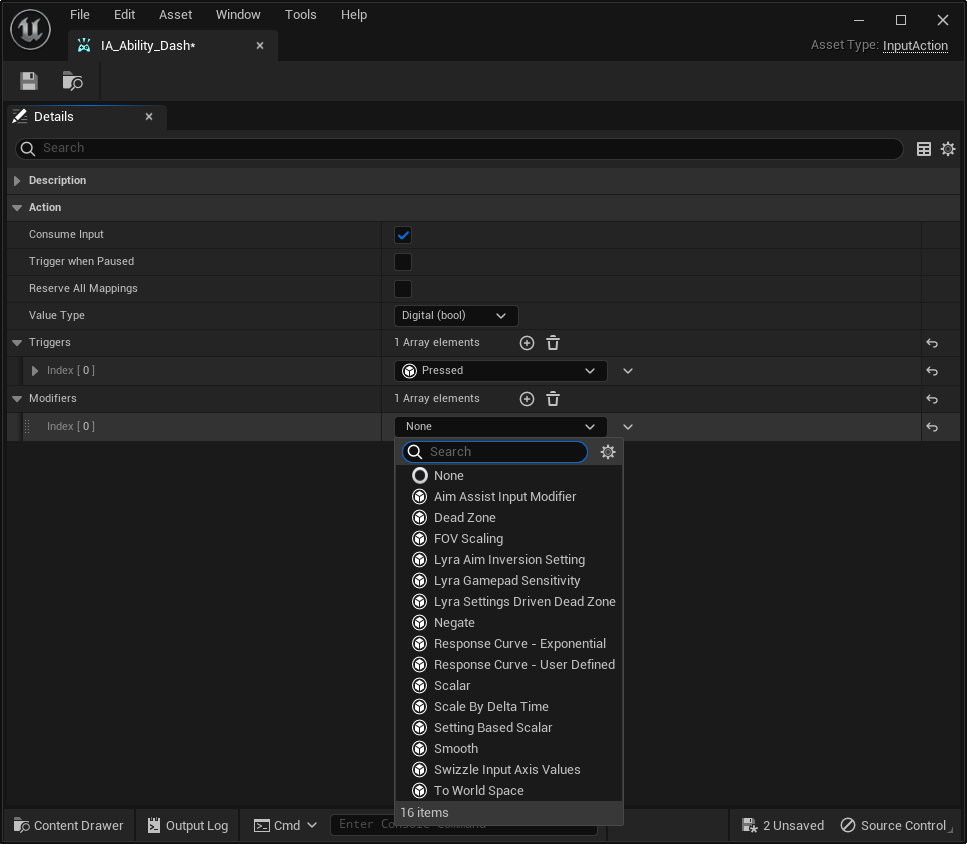
Input Modifiers
Input Modifiers are pre-processors that alter the raw input values that UE receives before sending them on to Input Triggers. The Enhanced Input Plugin has a variety of Input Modifiers to perform tasks like changing the order of axes, implementing "dead zones", and converting axial input to world space.
Input Modifiers are useful for applying sensitivity settings, smoothing input over multiple frames, or changing how input behaves based on the state of the player. Because you have access to the UPlayerInput class when making your own modifier, you can access the owning Player Controller and get any game state you want.
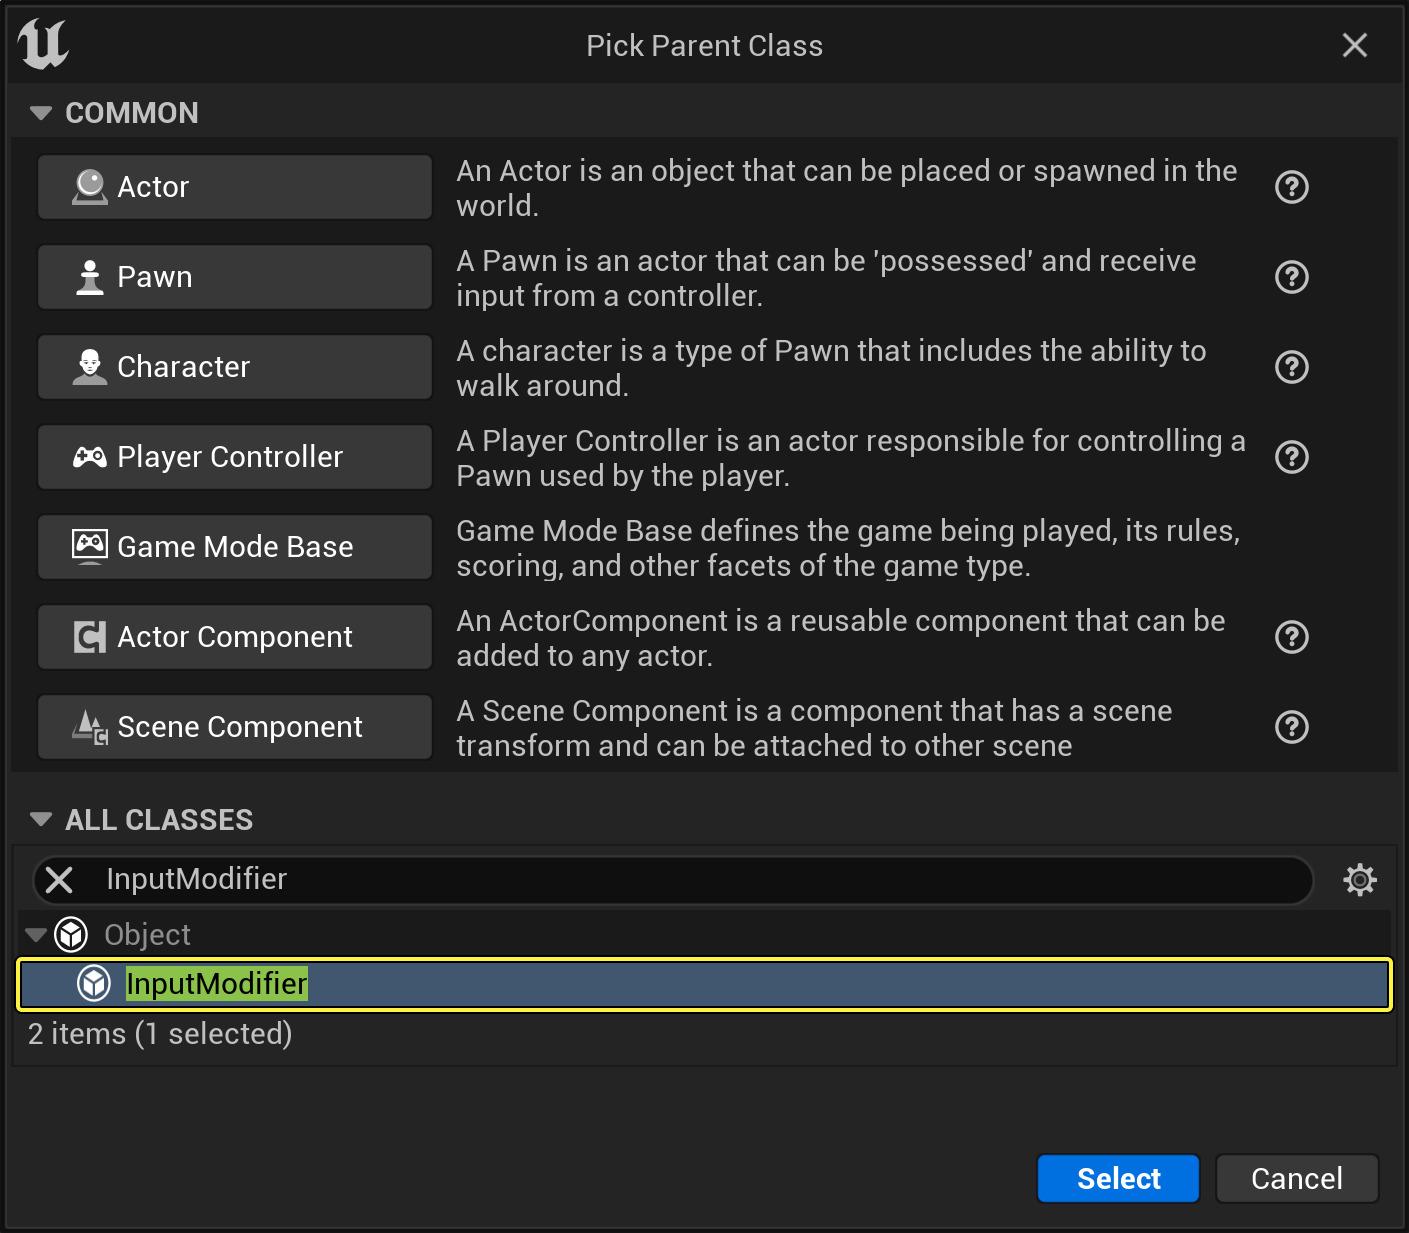
You can make your own Input Modifiers in C++ or Blueprints by creating a subclass of the UInputModifier class and overriding the ModifyRaw_Implementation function.
You can also create your own Input Modifier by creating a new Blueprint Child Class using Input Modifier as the parent.
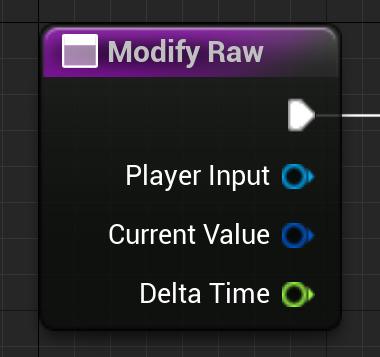
Next, navigate to My Blueprint > Functions > Override and from the dropdown menu select the Modify Raw function.
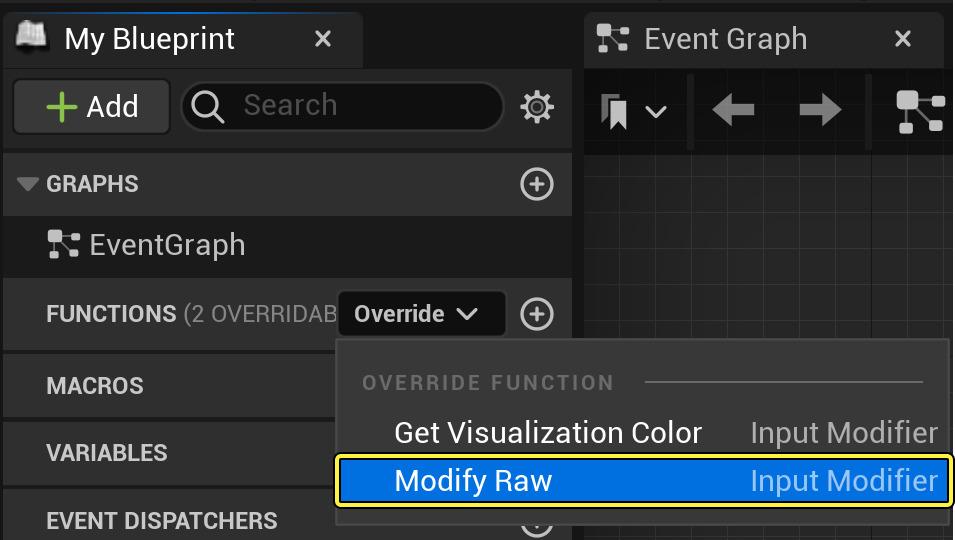
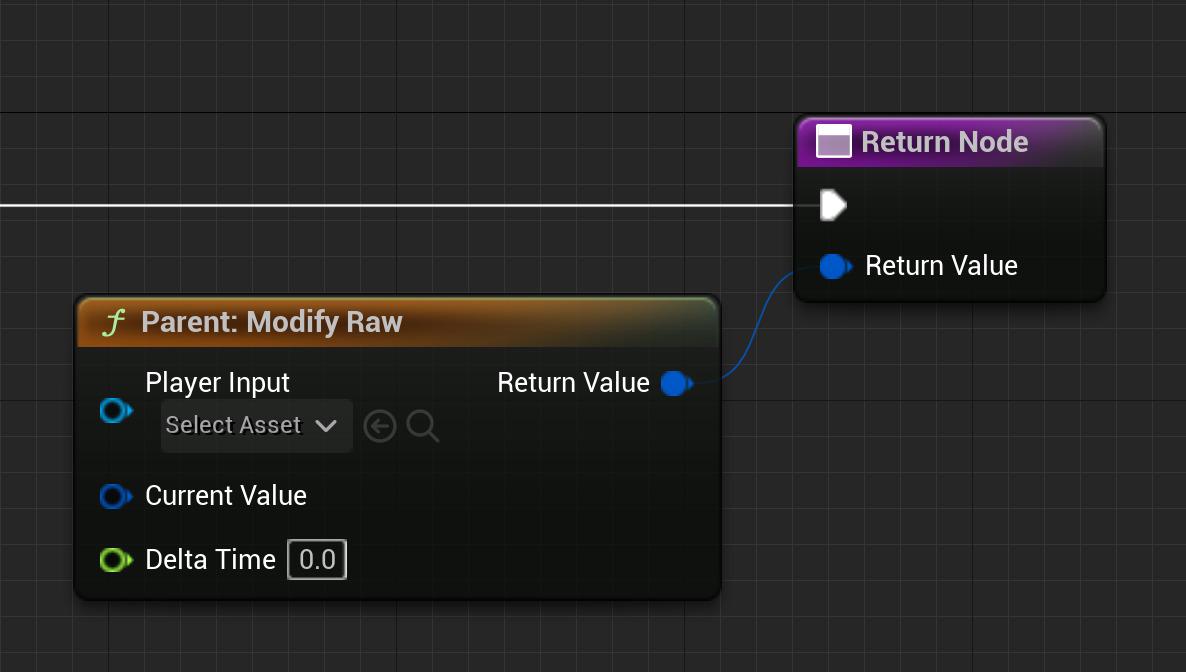
The output parameter is an Input Action Value, which contains three float values, much like a Vector. The function's input parameters contain the Player Input object, the Current Value from the input hardware or the previous Input Modifier, and a Delta Time value.
The Input Action Value you return from Modify Raw will go to the next Input Modifier, if there is one, or to the first Input Trigger.
Below is an example of an Input Modifier used in the Lyra Game Sample.
/** Applies an inversion of axis values based on a setting in the Lyra Shared game settings */
UCLASS(NotBlueprintable, MinimalAPI, meta = (DisplayName = "Lyra Aim Inversion Setting"))
class ULyraInputModifierAimInversion : public UInputModifier
{
GENERATED_BODY()
protected:
virtual FInputActionValue ModifyRaw_Implementation(const UEnhancedPlayerInput* PlayerInput, FInputActionValue CurrentValue, float DeltaTime) override
{
{
ULyraLocalPlayer* LocalPlayer = LyraInputModifiersHelpers::GetLocalPlayer(PlayerInput);
if (!LocalPlayer)
{
return CurrentValue;
}
ULyraSettingsShared* Settings = LocalPlayer->GetSharedSettings();
ensure(Settings);
FVector NewValue = CurrentValue.Get<FVector>();
if (Settings->GetInvertVerticalAxis())
{
NewValue.Y *= -1.0f;
}
if (Settings->GetInvertHorizontalAxis())
{
NewValue.X *= -1.0f;
}
return NewValue;
}
}
};
Directional Input
A good example of Input Modifier usage is two-dimensional directional input using a single Input Action. With a mouse or a gamepad's analog stick, reading two-dimensional movement is a simple matter of creating an Input Action that supports at least two axes and adding the appropriate input to the Input Mapping Context.
Enhanced Input supports input from one-dimensional sources, such as a keyboard's directional arrows or the popular "WASD" key configuration; you can achieve this control scheme by applying the correct Input Modifiers. Specifically, by using Negate to make some keys register as negative, and using Swizzle Input Axis Values to make some keys register as Y-Axis instead of the default X-Axis:
| Letter Key | Arrow Key | Desired Input Interpretation | Required Input Modifiers |
|---|---|---|---|
| W | Up | Positive Y-Axis | Swizzle Input Axis Values (YXZ or ZXY) |
| A | Left | Negative X-Axis | Negate |
| S | Down | Negative Y-Axis | Negate Swizzle Input Axis Values (YXZ or ZXY) |
| D | Right | Positive X-Axis | (none) |

This interpretation of the directional arrows or "WASD" keys enables one-dimensional inputs to map to a two-dimensional Input Action.
Since each key reports a positive, one-dimensional value, this value will always occupy the X-axis and will have a value of either 0.0 or 1.0 on any given tick. By negating the value for left and down inputs, and switching the axis order so that the input's X-axis value moves to the Y-axis for up and down inputs, you can use Input Modifiers to interpret a set of one-dimensional inputs as a single two-dimensional input value.
Input Triggers
Input Triggers determine whether user input, after passing through an optional list of Input Modifiers, should activate the corresponding Input Action within its Input Mapping Context. Most Input Triggers analyze the input itself, checking for minimum actuation values and validating patterns like short taps, prolonged holds, or the typical "press" or "release" events. The one exception to this rule is the "Chorded Action" Input Trigger, which is only triggered with another Input Action. By default, any user activity on an input will trigger on every tick.
There are three types of Input Triggers:
-
Explicit types cause the input to succeed if the Input Trigger succeeds.
-
Implicit types cause the input to succeed only if the Input Trigger and all other Implicit type Input Triggers succeed.
-
Blocker types cause the input to fail if the Input Trigger succeeds.
Below is a logical example of how each trigger type interacts in a situation against other trigger types:
Implicits == 0, Explicits == 0 - Always fires, unless the value is 0.
Implicits == 0, Explicits > 0 - At least one explicit has been fired.
Implicits > 0, Explicits == 0 - All implicits have been fired.
Implicits > 0, Explicits > 0 - All implicits and at least one explicit have been fired.
Blockers - Override all other triggers to force a trigger failure.
After processing user input, Input Triggers can return one of three states:
-
None indicates that the Input Trigger's conditions have not been met, so the Input Trigger fails.
-
Ongoing indicates that the Input Trigger's conditions are partially met, and the Input Trigger is processing but is not yet succeeding.
-
Triggered indicates that all of the Input Trigger's conditions have been met, and the Input Trigger succeeds.
You can create your own Input Trigger by extending the base Input Trigger class, or Input Trigger Timed Base.
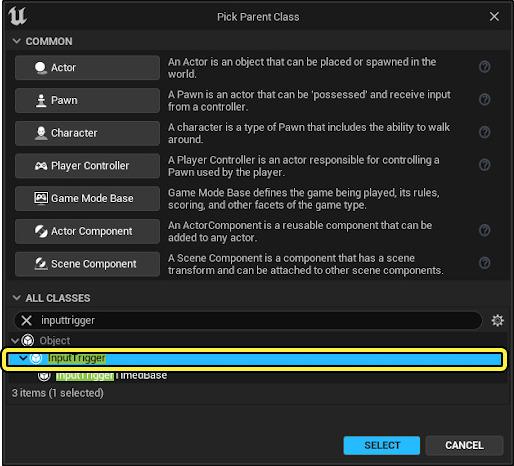
Input Trigger Timed Base checks that an input has been held down for a certain length of time before accepting it and returning to the Ongoing state.
The provided Input Trigger Timed Base class does not ever return the Triggered state. Override the functions within your new Input Trigger child class to determine how it responds to user input. The function Get Trigger Type determines the Input Trigger's type. Update State takes the player's input object, current Input Action Value, Delta Time, and returns the None, Ongoing, or Triggered state.
As a C++ example, you can navigate to InputTriggers.h and observe the UInputTriggerHold implementation.
UInputTriggerHold.H
/** UInputTriggerHold
Trigger fires once input has remained actuated for HoldTimeThreshold seconds.
Trigger may optionally fire once, or repeatedly fire.
*/
UCLASS(NotBlueprintable, MinimalAPI, meta = (DisplayName = "Hold"))
class UInputTriggerHold final : public UInputTriggerTimedBase
{
GENERATED_BODY()
bool bTriggered = false;
protected:
virtual ETriggerState UpdateState_Implementation(const UEnhancedPlayerInput* PlayerInput, FInputActionValue ModifiedValue, float DeltaTime) override;
public:
virtual ETriggerEventsSupported GetSupportedTriggerEvents() const override { return ETriggerEventsSupported::Ongoing; }
// How long does the input have to be held to cause trigger?
UPROPERTY(EditAnywhere, Config, BlueprintReadWrite, Category = "Trigger Settings", meta = (ClampMin = "0"))
float HoldTimeThreshold = 1.0f;
// Should this trigger fire only once, or fire every frame once the hold time threshold is met?
UPROPERTY(EditAnywhere, Config, BlueprintReadWrite, Category = "Trigger Settings")
bool bIsOneShot = false;
virtual FString GetDebugState() const override { return HeldDuration ? FString::Printf(TEXT("Hold:%.2f/%.2f"), HeldDuration, HoldTimeThreshold) : FString(); }
};
UInputTriggerHold.cpp
ETriggerState UInputTriggerHold::UpdateState_Implementation(const UEnhancedPlayerInput* PlayerInput, FInputActionValue ModifiedValue, float DeltaTime)
{
// Update HeldDuration and derive base state
ETriggerState State = Super::UpdateState_Implementation(PlayerInput, ModifiedValue, DeltaTime);
// Trigger when HeldDuration reaches the threshold
bool bIsFirstTrigger = !bTriggered;
bTriggered = HeldDuration >= HoldTimeThreshold;
if (bTriggered)
{
return (bIsFirstTrigger || !bIsOneShot) ? ETriggerState::Triggered : ETriggerState::None;
}
return State;
}
Player Mappable Input Config (PMI)
Mappable configs are a collection of Input Mapping Contexts that represent one "Config" or "Preset" of mappings. For example, you can have a "Default" and a "Southpaw" mappable config that holds different input mapping contexts for aiming.
You can use these configs to predefine a set of contexts and their priorities to add them all at once instead of having to manually add an array of input mapping contexts. Mappings provide various selections of metadata options that can make programming UI settings screens easier.
Debug Commands
There are several input related debug commands available to help you debug any input-related behavior you may be working on.
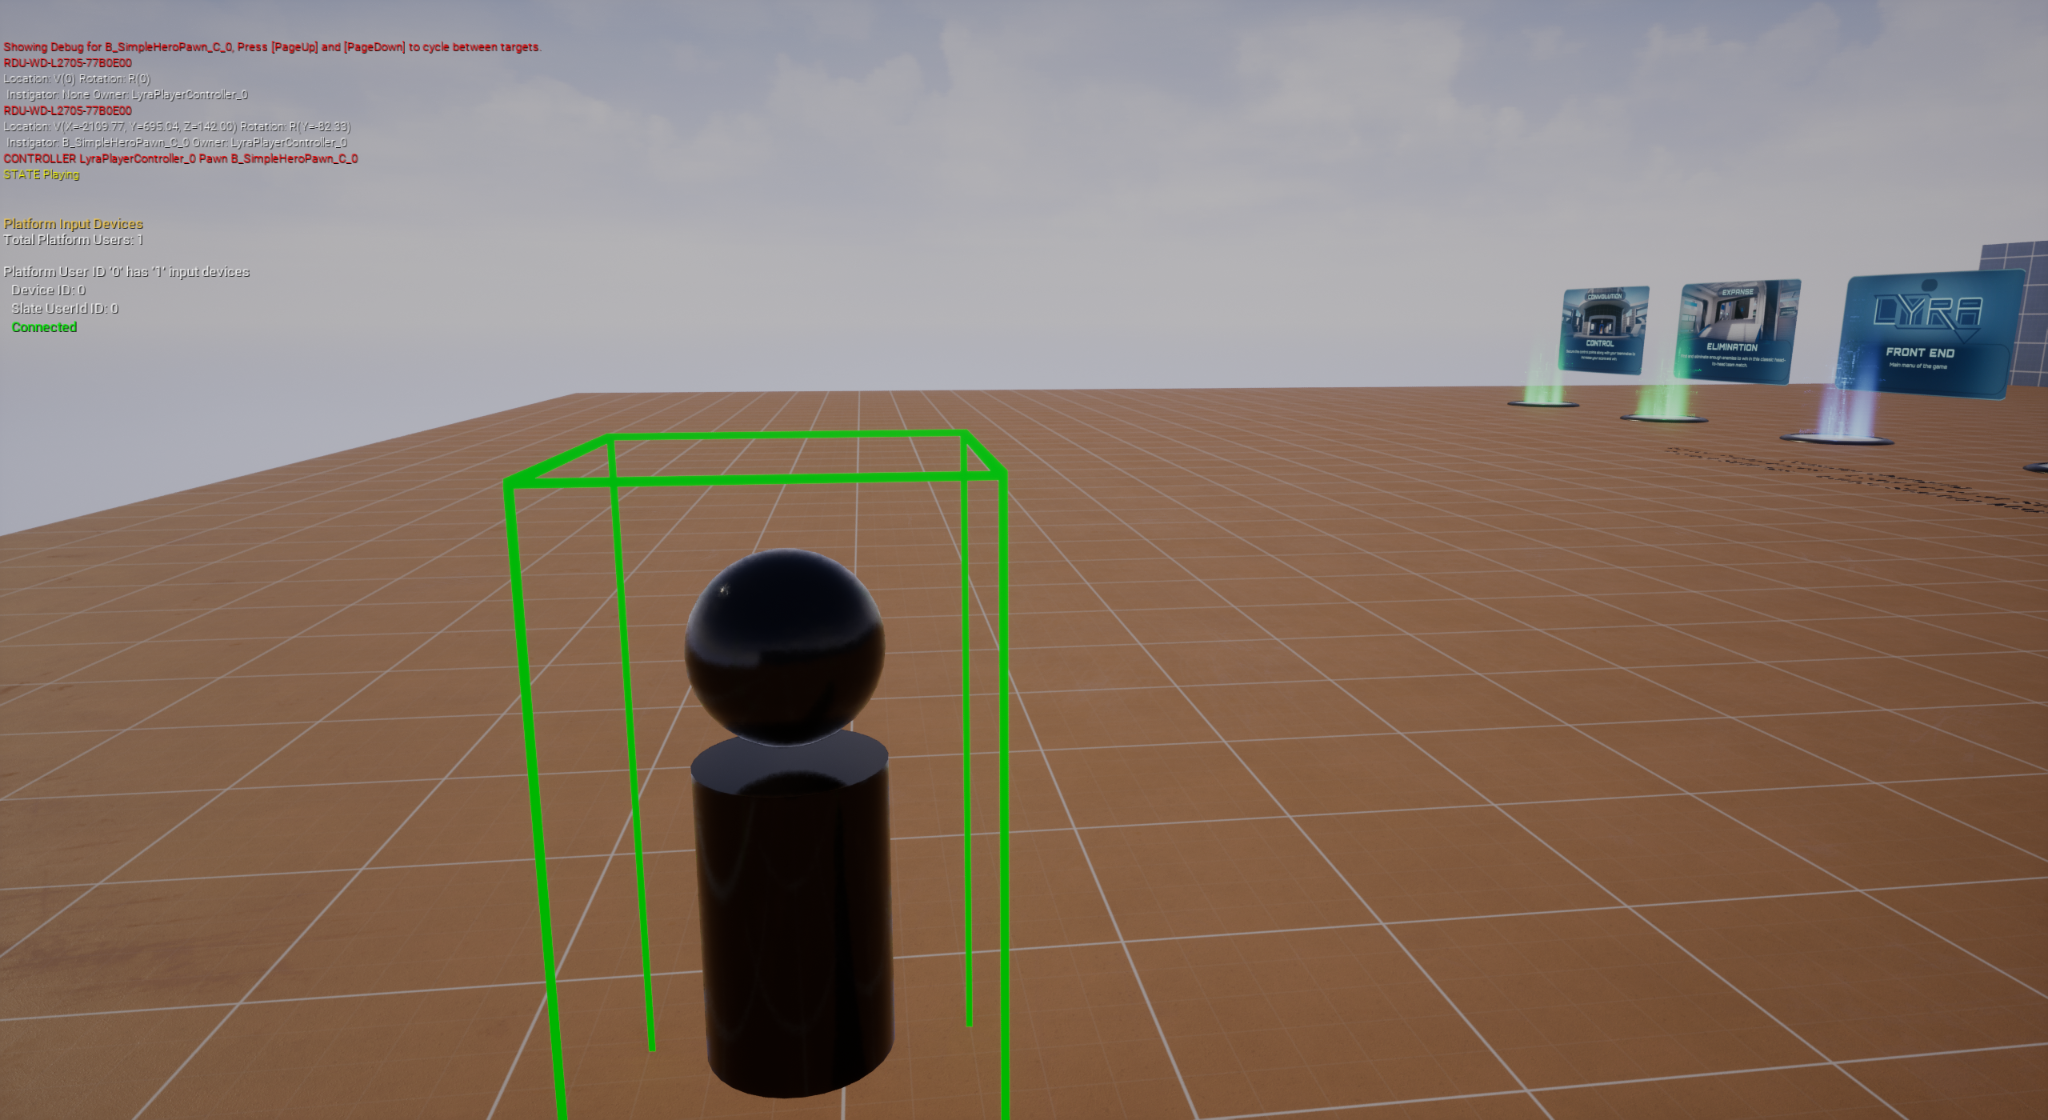
Using the command showdebug enhancedinput displays the available input action and axis mappings used by your project.

Using the command: showdebug devices
Injecting Input
Enhanced Input also brings along the concept of "Injecting Input" to your player. This provides the means for you to call a function in Blueprints, C++, or use a console command to simulate input on your player. You can use the Input.+key console command to start simulating input.
Below is an example of setting the Gamepad_Left2D key:
Input.+key Gamepad_Left2D X=0.7 Y=0.5
Input.-key Gamepad_Left2D
The key name is whatever the actual FKey name is, which you can find in the InputCoreTypes.cpp file, or in the key picker widget if you remove the spaces in the displayed key name.

Injecting input in Blueprints
UEnhancedInputLocalPlayerSubsystem* Subsystem = ULocalPlayer::GetSubsystem<UEnhancedInputLocalPlayerSubsystem>(PC->GetLocalPlayer());
UEnhancedPlayerInput* PlayerInput = Subsystem->GetPlayerInput();
FInputActionValue ActionValue(1.0f); // This can be a bool, float, FVector2D, or FVector
PlayerInput->InjectInputForAction(InputAction, ActionValue);
Platform Settings
You may want different input settings for different platforms, such as rotating the face buttons on the Nintendo Switch or altering the actions available on mobile devices. Enhanced Input provides a per-platform Mapping Context Redirect that allows you to do this easily.
You can make a Blueprint based on the Enhanced Input Platform Data class. This is a base class you can build upon for adding any platform-specific options to your game. By default, it contains a map of Input Mapping Contexts, allowing you to redirect one context to another.
Any time the mapping context is referenced on a specific platform, it will be replaced by the value in the map when the mappings are rebuilt.

To apply this redirect, add it to your Project Settings > Enhanced Input > Platform Settings > Input Data

These project settings add to the platforms DefaultInput.ini, so they are hot fixable and easily changed. Because the platform settings provide the base class of UEnhancedInputPlatformData, you can make custom platform settings by creating your own Blueprint or C++ subclass, which then provides access to the settings from anywhere.