Sequencer's Editor Preferences and Project Settings control Sequencer's project-wide default behaviors and local user preferences during editor usage and runtime. This document provides an overview of the options available to you for modifying Sequencer behavior at the local and project level.
Editor Preferences
Editor Preferences are used to configure Sequencer's tool and feature behavior at the local level. Changes here only apply to your machine only and not with others.
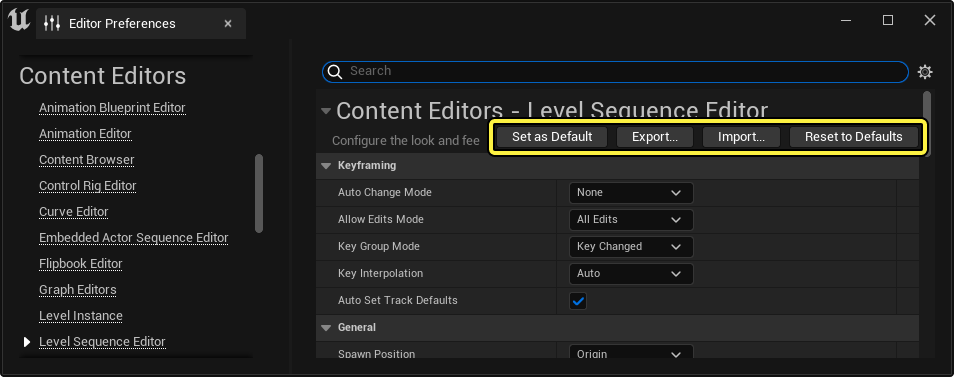
To view Sequencer's Editor Preferences, navigate to Edit > Editor Preferences… in Unreal Engine's top menu bar. Next, select Level Sequence Editor in the sidebar in the Content Editors category.

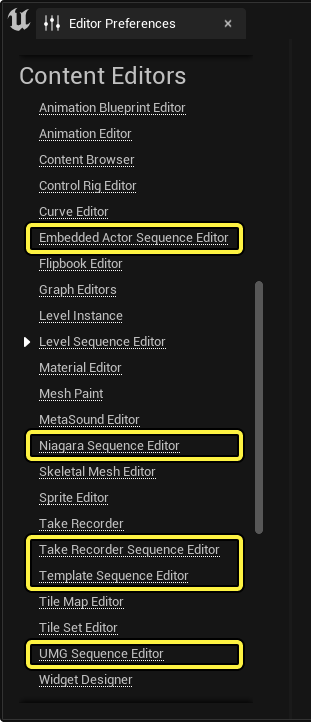
In addition to the Level Sequence Editor, you can also customize your preferences for other sequence editors. Under Content Editors, you can locate and modify preferences for:
- Embedded Actor Sequence Editor, when using the Actor Sequence Component.
- Niagara Sequence Editor, when using Sequencer in Niagara.
- Take Recorder Sequence Editor, when using Sequencer from Take Recorder.
- Template Sequence Editor, when using Template Sequences.
- UMG Sequence Editor, when using Sequencer with the Creating User Interfaces.
| Name | Description |
|---|---|
| Keyframing | |
| Auto Change Mode | Auto Change Mode describes the behavior when creating tracks or when keyframed changes occur to your Actor.
|
| Allow Edits Mode | Allow Edits Mode contains options for automatic behavior when manipulating Sequencer-bound and Level-bound Actors. These options are described in the Sequencer Toolbar page. |
| Key Group Mode | Key Group Mode controls the scope of keys set when using Auto Key. These options are described in the Sequencer Toolbar page. |
| Key Interpolation | The interpolation type for newly-created keyframes. |
| Auto Set Track Defaults | When enabled, this will allow Transform and Property Tracks to have custom default values without needing to set keyframes. When disabled, then setting any value will cause a keyframe to be created for that track at the chosen value. |
| General | |
| Spawn Position | The default location to create a Spawnable when it is added to Sequencer.
|
| Create Spawnable Cameras | When enabled, clicking Sequencer's Toolbar Camera Button will create the camera as a Spawnable. |
| Show Selected Nodes Only | Automatically filters tracks when enabled to list only tracks or sub-tracks that match the selected Actor. |
| Rewind on Record | When enabled, the sequence will jump back to the start when a recording has started. Only used with Sequence Recorder (deprecated). |
| Left Mouse Drag Does Marquee | Enabling this changes the Left Mouse dragging behavior in the level viewport so that it performs a box (marquee) selection, instead of moving the viewport camera laterally. |
| Clean Playback Mode | Automatically enables Game View whenever Sequencer is being played. |
| Activate Realtime Viewports | Automatically enables Realtime from the Viewport Options menu whenever Sequencer is open. |
| Show Debug Visualization | If enabled, a debug display will appear at the bottom of Sequencer. The debug sections are grouped by keyframes. These sections are assigned a color based on evaluation complexity. Blue is low complexity, whereas Red is high complexity. 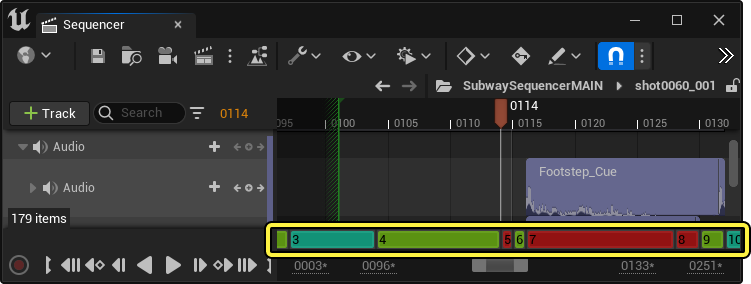
|
| Visualize Pre and Post Roll | Enables the drawing of pre and post-roll frame visualizers on your tracks if you are using them. 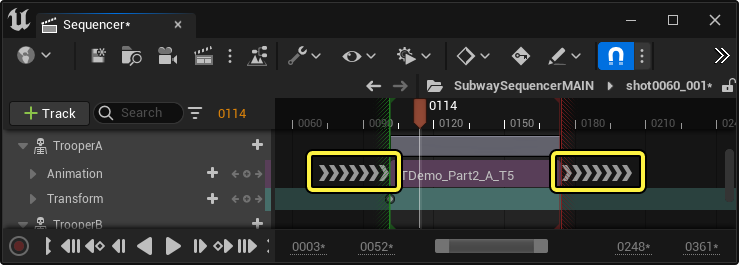
|
| Compile Director on Evaluate | When enabled, the Sequencer Director blueprint will automatically compile when playing or scrubbing if it is dirty from changes. |
| Trajectory Path Cap | Specifies the maximum number of keyframe segments to draw when rendering transform trajectories in the viewport. |
| Frame Number Display Format | Specifies the unit of time to display in your sequence to Frames, Seconds, or Timecode. This affects all time displays in your sequence.  |
| Movie Renderer Name | Describes which renderer to use. By default, this is set to "MovieSceneCapture", which uses the legacy rendering tool. If is enabled, then this field will be set to "Movie Render Queue". |
| Auto Expand Nodes on Selection | Enabling this automatically expands the Sequencer Outliner to the selected track. |
| Tree View Width | The default width of the Sequencer Outliner in normalized percent relative to the full width of the Sequencer Editor.  |
| Timeline | |
| Show Range Slider | Toggles the display of the bottom timeline region between a Maya-style range slider and a second timeline bar. 
|
| Snap Keys and Sections to Play Range | Clamps key and section placement to within the playback range.  |
| Zoom Position | What the focal point is when Zooming in the Sequencer UI. You can choose to either zoom relative to the Current Time playhead or to your Mouse Position. |
| Auto Scroll Enabled | Enables automatic panning in Timeline view to keep the playhead in view when playing.  |
| Keep Playhead in Play Range While Scrubbing | Clamps the playhead within the start and end regions of the sequence when scrubbing.  |
| Keep Play Range in Section Bounds | Enabling this will cause the playback range of your sequence to clamp its start and end times to the first and last keyframe or section.  |
| Zero Pad Frames | Applies the selected amount of digit padding to the displayed time. Only applies when you are displaying time as frames. |
| Jump Frame Increment | Sets the number of frames to jump when pressing Shift + Left / Right Arrows to jump forward and backward in the timeline. |
| Show Layer Bars | Enables Layer Bars. |
| Show Key Bars | Enables Key Bars. |
| Infinite Key Areas | If enabled, the first transform track created will include an infinite length section. If disabled, a non-infinite section will be created instead with a length of 0. |
| Show Channel Colors | If Show Key Bars is enabled, this draws red, green, and blue lines on transform Key Bars. 
|
| Show Status Bar | Shows the status indicator in the Sequencer Outliner.  |
| Show Tick Lines | Enables or disables vertical lines in the Timeline.  |
| Show Sequencer Toolbar | Shows or hides the Sequencer Toolbar. |
| Key Area Curve Extents | The key area curve extents, stored by channel name. |
| Key Area Height with Curves | The height of the track when Show Curve is enabled. You must restart Sequencer for this to update. |
| Reduce Keys Tolerance | Tolerance to use when reducing keyframes from the Edit > Reduce Keys menu. Higher numbers will cause more keyframes to be removed if they contain a value difference larger than the tolerance's value. |
| Delete Keys when Trimming | Deletes keyframes that fall outside a section when trimming from the Edit > Trim Left/Right menu. |
| Disable Sections After Baking | Enabling this will deactivate the previous transform sections when selecting Bake Transform from Sequencer's Actions Menu. Disabling it will instead delete any previous sections. |
| Snapping | |
| Is Snap Enabled | Enables Snapping. |
| Snap Key Times to Interval | Snaps keyframes to time intervals when moving along the timeline.  |
| Snap Key Times to Keys | Snaps keyframes to other keys, or the start and end of sections when moving along the timeline.  |
| Snap Section Times to Interval | Snaps sections to time intervals when scaling or moving sections in the timeline.  |
| Snap Section Times to Sections | Snaps sections to other keys, or the start and end of sections when moving along the timeline.  |
| Snap Playhead to Keys | Snaps the playhead marker to other keys, or the start and end of sections while scrubbing.  |
| Snap Playhead to Interval | Snaps the playhead marker to time intervals while scrubbing.  |
| Snap Playhead to Pressed Key | Pops the playhead marker to a keyframe when clicked. This can also be done when holding Shift and clicking the keyframe if this option is disabled.  |
| Snap Playhead to Dragged Key | Keeps the playhead maker at the same time as the keyframe when dragging the keyframe along the timeline. 
|
| Snap Curve Value to Interval | Toggles value snapping in the Curve Editor.  |
| Curve Editor | |
| Link Curve Editor Time Range | Synchronizes the Curve Editor's view with Sequencer's timeline.  |
| Synchronize Curve Editor Selection | Enabling this synchronizes the Curve Editor selection with the selected track in Sequencer. |
| Isolate Curve Editor to Selection | Enabling this will remove all other tracks from the Curve Editor outliner and will only show the currently selected track and its hierarchy from Sequencer. |
| Playback | |
| Evaluate Sub Sequences in Isolation | Isolates a sub-sequence or a shot from the master sequence when viewing it. This will disable any tracks or content that have been propagated from the master sequence, and will also disable the shot range preview. |
| Rerun Construction Scripts | Enables the construction script from Blueprint Actors to run on every tick. The Run Construction Script in Sequencer property must also be enabled in the Blueprint's Class Settings in order to use this option. |
Project Settings
Sequencer also has various Project Settings that affect Sequencer across the entire project. Changes here will affect all users and will require certain files be changed.
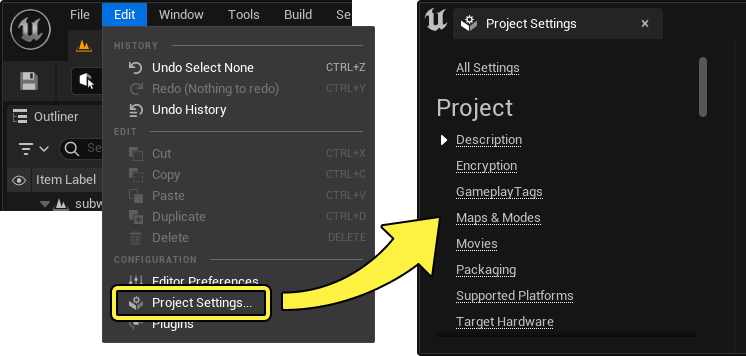
To view Sequencer's Project Settings, navigate to Edit > Project Settings… in Unreal Engine's top menu bar.
There are three main categories that contain Sequencer project settings: Engine, Editor, and Plugins.
Engine
In the sidebar, navigate to the Engine category and select Level Sequence. This will reveal Sequencer project settings for the DefaultEngine.ini file, which is located in the Config folder in your project's root directory.

| Name | Description |
|---|---|
| Default Lock Engine to Display Rate | Locks the playback of all newly-created sequences to the specified Default Display Rate. |
| Default Display Rate | The default playback rate for newly-created sequences. This can also be used to define the frame locked frame rate. Some of the valid formats include:
|
| Default Tick Resolution | Specifies the tick resolution for newly-created sequences. |
| Default Clock Source | The default Clock Source to use for newly-created sequences. |
Editor
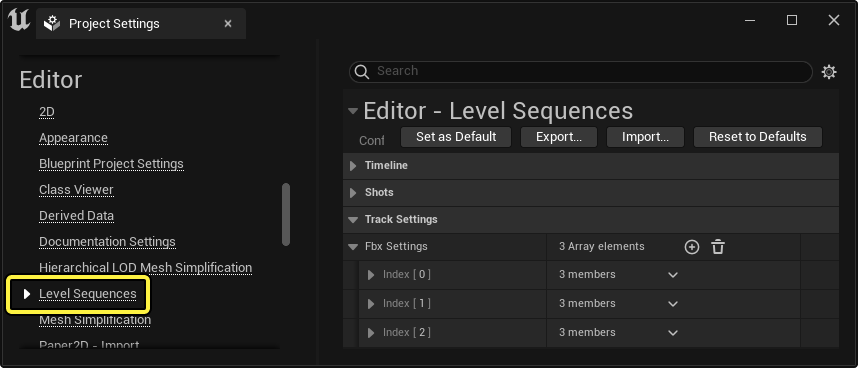
Navigate to the Engine category, and select Level Sequences. This will reveal Sequencer's engine project settings. Changes here will create a new file for your project named DefaultEditorPerProjectUserSettings.ini. It will be located in the Config folder in your project's root directory.
| Name | Description |
|---|---|
| Default Start Time | The default start time value for newly-created sequences. |
| Default Duration | The default duration for newly-created sequences. |
| Shot Directory | The default folder name when creating shots from the Shot Track. The folder will be relative to the master sequence asset's location. |
| Shot Prefix | The filename prefix when creating shots. |
| First Shot Number | The shot number to add to the filename after the Shot Prefix. |
| Shot Increment | The amount by which to increment the shot number when creating new shots. |
| Shot Num Digits | The amount of digit padding to use in the shot number field. |
| Take Num Digits | The amount of digit padding to use in the take number field. |
| First Take Number | The shot number to add to the end of the filename when creating takes. |
| Take Separator | The single-character separator between the shot number and the take number. |
| Sub Sequence Separator | The single-character separator between the take number and the subsequence name. |
| Fbx Settings | This array lists FBX property readers used to map properties and their keyframes to relevant tracks when Importing FBX's in Sequencer. By default this array includes property mappings for common FBX camera properties such as FieldOfView, FocalLength, and FocusDistance. 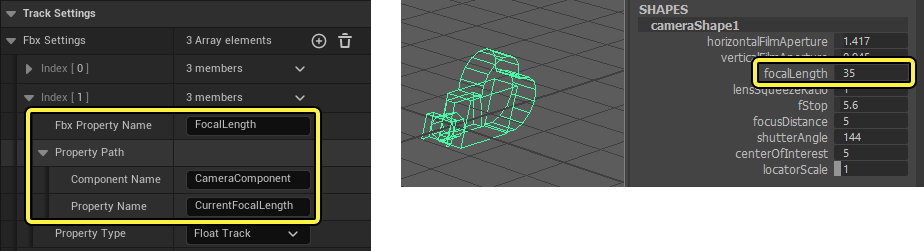
|
Plugins
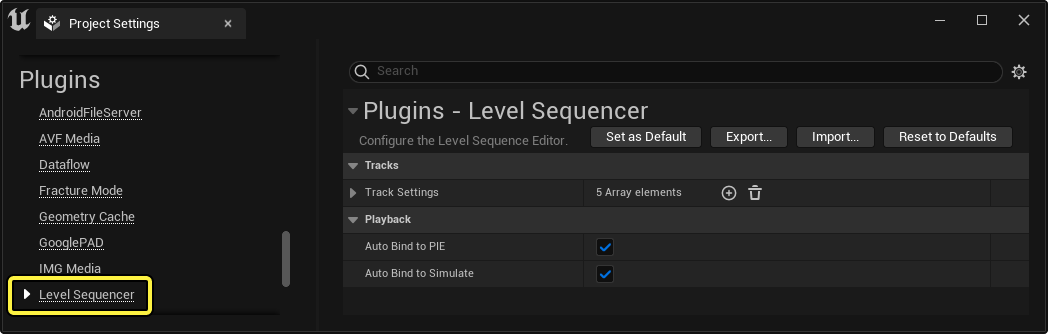
Navigate to the Plugins category, and select Level Sequencer. This will reveal Sequencer's plugin project settings. Changes here will create a new file for your project called DefaultEditorPerProjectUserSettings.ini and it will be located in the Config folder in your project's root directory.
| Name | Description |
|---|---|
| Track Settings | Track Settings is an array used to specify property or component tracks to be automatically created when binding certain Actor Classes to Sequencer. Refer to the Object Binding Track page for more information. |
| Auto Bind to PIE | Specifies whether or not newly-created sequences automatically bind to Play In Editor sessions. |
| Auto Bind to Simulate | Specifies whether or not newly-created sequences automatically bind to Simulate sessions. |
Saving and Resetting
With all Editor Preferences and some Project Settings, you can Save, Export, Import, or Reset them by using the menu beneath the top header.
-
Set as Default saves your current settings as your new default settings. Afterwards, when clicking Reset to Defaults, your settings will be reset to these values.
-
Export saves the current settings as a .ini file. You can then use this file to share your settings with others.
-
Import imports settings from a specified .ini file.
-
Reset to Defaults will set all settings and preferences to the default defined by the project or your Set as Default settings.