You can add a camera shake effect to your cameras using Unreal Engine's Camera Shake Blueprints. This guide provides an overview of how to create a CameraShakeBase Blueprint, the type of shakes that are available, and how to play them in Sequencer, Blueprints, and Camera Shake Sources.
Prerequisites
-
You have an understanding of Sequencer and know how to Create Camera Animation.
-
You have an understanding of Blueprints Visual Scripting.
-
If you are using custom sequence-based shakes, then you must have an understanding of Template Sequences.
-
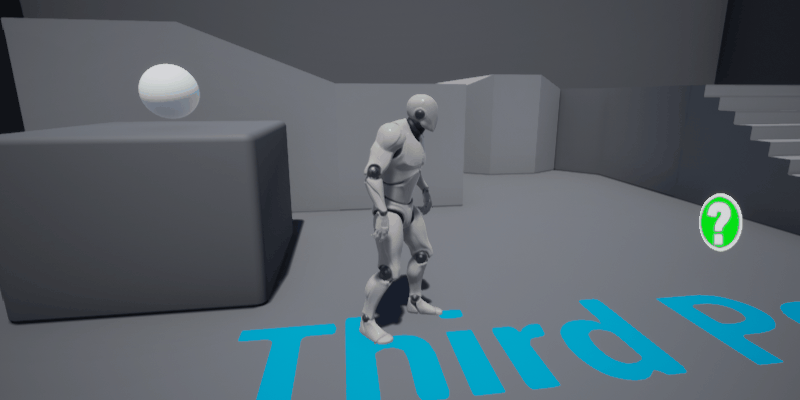
If you want to test camera shakes in gameplay, you can create a project using the Third Person Template.
Camera Shake Creation
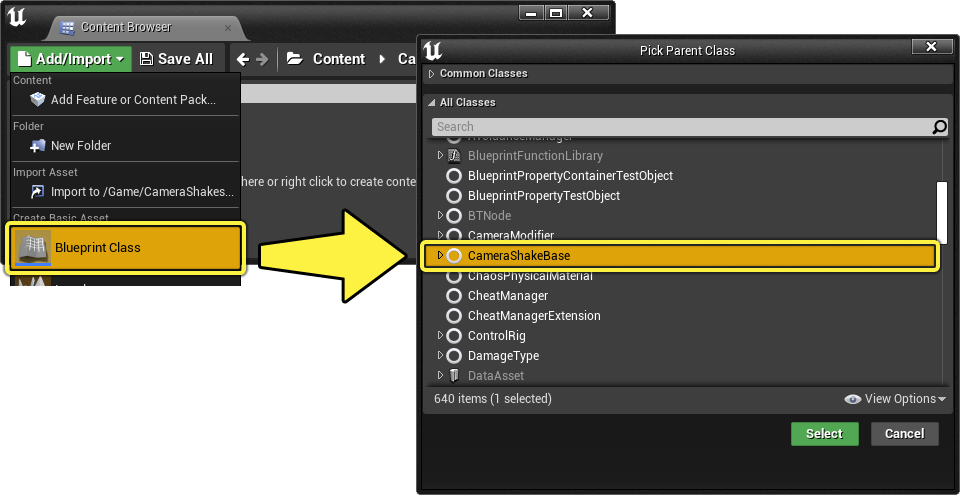
To create a shake asset, click Add/Import in the and select Blueprint Class. In the next window, locate or search for the CameraShakeBase class and click Select.
Once the asset is created, name and open it to view the camera shake details.
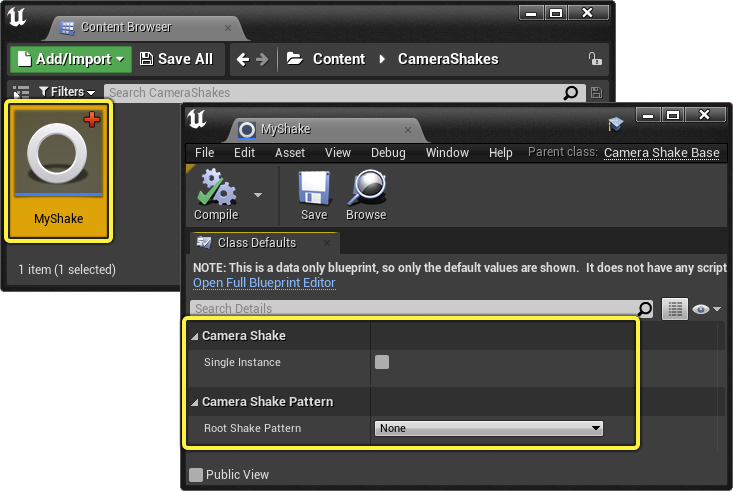
Details
Camera shake assets have the following base details:
| Name | Description |
|---|---|
| Single Instance | Enabling this will allow only a single instance of this shake to play at a time. Subsequent attempts to play this shake will restart it, instead of layering it additively. |
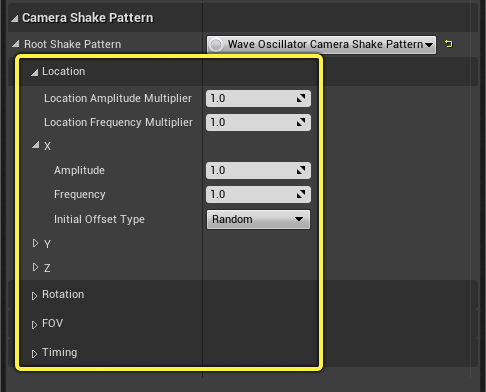
| Root Shake Pattern | The Shake Type to use. |
Root Shake Pattern Types
Shake patterns control the shape and behavior of the camera shake. You are able to select from the following patterns to create a camera shake.
Perlin Noise
Perlin generates noise over time by sampling random points based on a specified amplitude and frequency. These points are blended to by using the Smootherstep easing function. Typically, Perlin noise is useful for high-intensity camera shakes such as rumbles or nearby explosions.

When you select Perlin Noise Camera Shake Pattern for your Root Shake Pattern, additional details will appear which you can use to control the Perlin noise shake behavior. It is possible to create a shake effect for the location, rotation, and Field of View (FOV) properties of a camera.
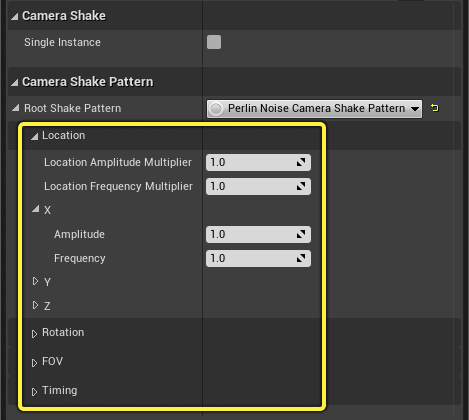
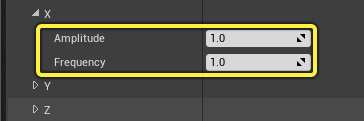
Both Location and Rotation property categories have their individual axes displayed, and you can expand them to reveal the Amplitude and Frequency properties.
-
Amplitude controls the size of the shake pattern. Increasing this will cause the shake on that axis to move a larger distance from the center.
-
Frequency controls the speed of the shake. Increasing this will cause the shake's movement to appear more rapid.
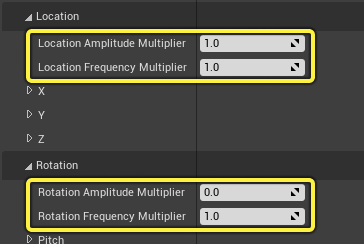
Additionally, you can multiply the combined Amplitude and Frequency results on your Location and Rotation axes by using their Amplitude and Frequency Multiplier properties. These properties are useful if you want to make global changes to your shake instead of needing to change each individual axis.
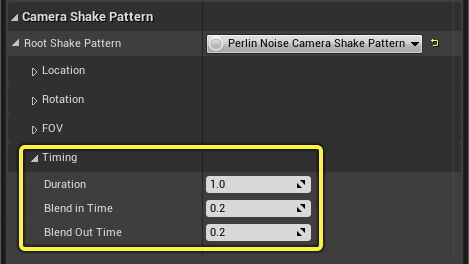
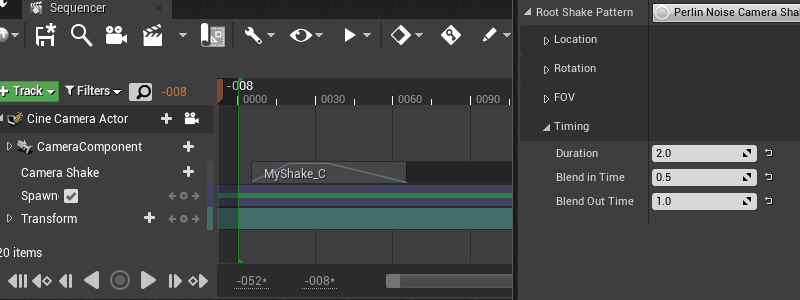
The timing of a shake can be controlled by expanding the Timing category.
-
Duration controls the length of the shake. If it is 0 or less than 0, then the shake will play infinitely.
-
Blend In/Out Time controls the length of a linear blend at the start and end of the shake. A value of 0 means no blending will occur.
Sinusoidal Wave
Sinusoidal Wave generates noise over time using a continuous wave with smooth periodic oscillation. Typically, wave noise is useful for lower-intensity shakes such as a rocking boat, or a dream-like drifting effect.

When you select Wave Oscillator Camera Shake Pattern for your Root Shake Pattern, additional details will appear which you can use to control the wave shake behavior. Similar to Perlin noise, it is possible to create a wave shake effect on the location, rotation, and Field of View (FOV) properties of a camera.
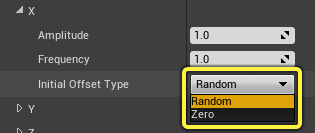
The properties of Location, Rotation, FOV, and Timing for Sinusoidal Wave noise are the same as Perlin Noise. However, when an axis is expanded, there is an additional property called Initial Offset Type from which you can specify if you want your waveform to begin at Zero or at a Random point along the curve.
Sequence Shake
Sequence shakes generates shakes using camera animation contained within Camera Animation Sequences. Sequence noise is useful in cases where you want full control over the camera's shake style and behavior.
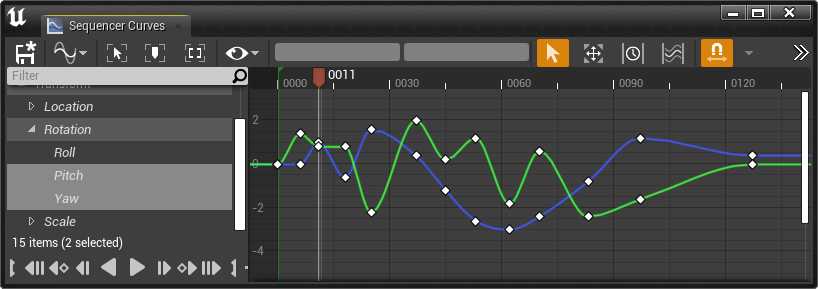
When you select Sequence Camera Shake Pattern for your Root Shake Pattern, additional details will appear which you can use to select the Camera Animation Sequence asset, and control its behavior. The duration of the shake is based on the length of the camera animation sequence.

| Name | Description |
|---|---|
| Sequence | Specifies your Camera Animation Sequence Asset. |
| Play Rate | The speed of the shake effect. A value of 1 is normal speed, values less than 1 will play the shake slower, and values higher than 1 will play faster. |
| Scale | A multiplier applied to the shake intensity. A value of 1 is normal intensity, values less than 1 will be less intense and values higher than 1 will be more intense. |
| Blend In/Out Time | Blend In/Out Time controls the length of a linear blend at the start and end of the shake. A value of 0 means no blending will occur. |
| Random Segment Duration | The duration of the random segment used if Random Segment is enabled. |
| Random Segment | Enabling this will start playing the shake at a random point in the camera animation sequence. You must also set a value in the Random Segment Duration property to define a new length for the shake. This is useful if you have a very long camera shake animation and want to play random smaller segments from it. |
Unlike in typical Template Sequence workflows, when creating a Camera Animation Sequence for use as a camera shake pattern, you do not need to set the section to additive.
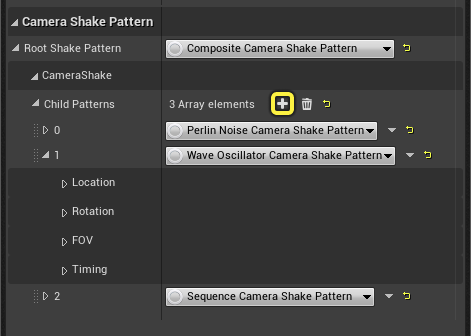
Composite
Composite shakes enable the combining of Perlin, Wave, and Sequence shakes in a layer system. Using Composite shakes, you can create more varied shakes that include elements from each shake type.
When you select Composite Camera Shake Pattern for your Root Shake Pattern, additional details will appear which you can use to add child patterns and layer different shake types together.
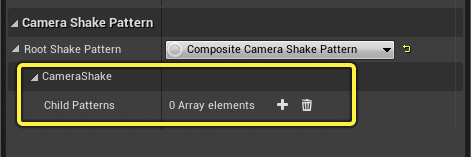
Clicking the + button next to Child Patterns will add a new shake pattern to the array. You can add as many shake patterns as you want. Each element contains details relevant to that pattern.
Playing Your Shake
Once you have created your camera shake, there are a couple of ways to play it.
Playing from Sequencer
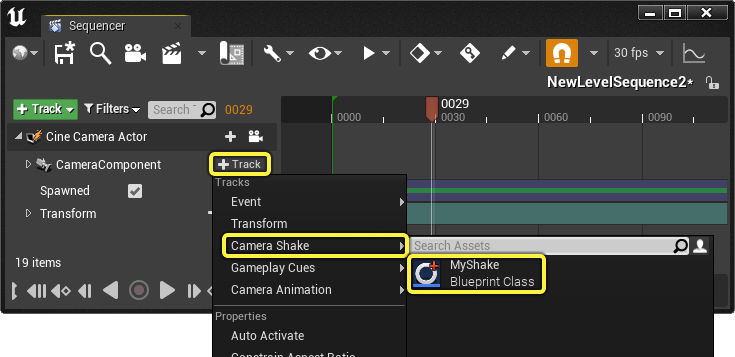
You can add your shake to a camera in Sequencer by clicking the + Track button on the Cine Camera Actor track, and selecting your camera shake asset in the Camera Shake menu.
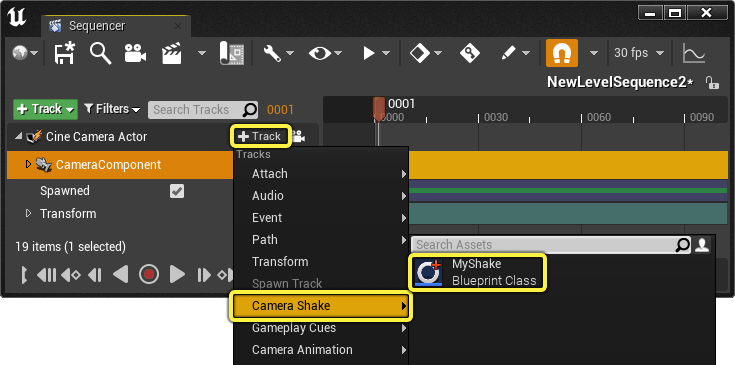
You can also add the shake to the CameraComponent track, which produces the same result.
Once added, you can play your sequence to see your shake in action.
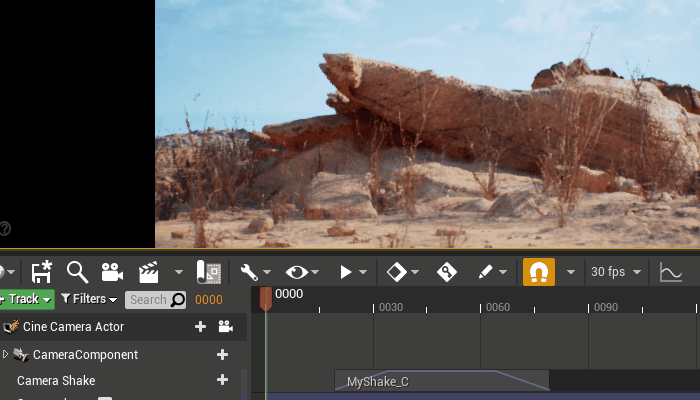
The camera shake section contains visualizations for its duration and blend in / out times determined by the Blueprint details. Changing these properties will update the section display.
Right-clicking the shake section and navigating to the Properties menu will reveal the shake properties in Sequencer.
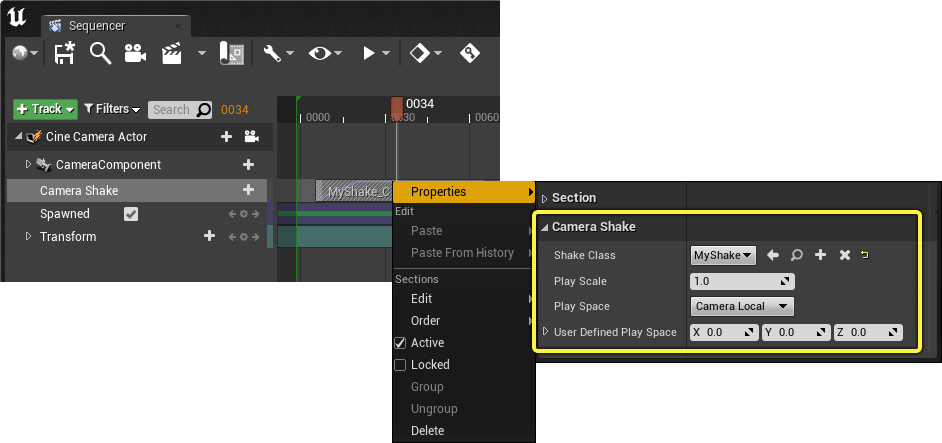
| Name | Description |
|---|---|
| Shake Class | Specifies the shake Blueprint class to use. You can change this shake to a different asset if another is available. |
| Play Scale | A global multiplier for the shake intensity. A value of 1 is normal intensity, values less than 1 will be less intense and values higher than 1 will be more intense. |
| Play Space | Specifies the coordinate space the shake should play in.
|
| User Defined Play Space | When Play Space is set to User Defined, you can input rotation coordinates here, which are relative to the World Rotation coordinates, but with a specified offset. |
Playing from Blueprints
You can also play shakes from Blueprints using the Start Camera Shake node. The node contains parameters for specifying the Shake, Scale, and Play Space.
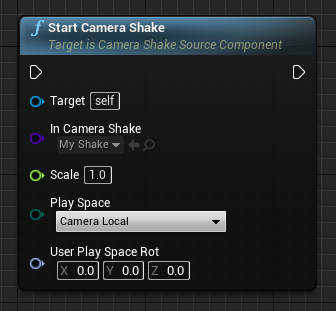
The Start Camera Shake function requires a Player Controller or a Camera Shake Source Component as the target.
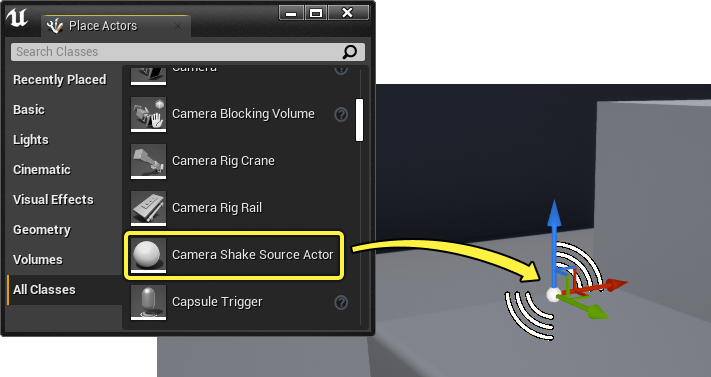
Camera Shake Source
The Camera Shake Source triggers camera shakes based on the camera's proximity to a location. It also contains controls for the size and radius of the shake influence. You can add it as an Actor in your Level, or as a Component in Blueprints.
To add a Camera Shake Source Actor to your Level, drag it from the Place Actors panel into your Level.
Selecting the Actor or Component will reveal the following details:
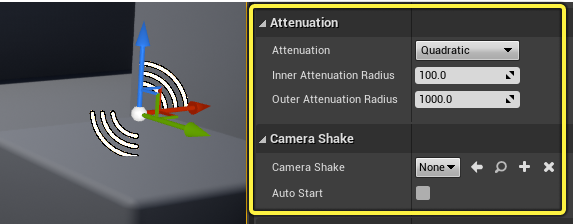
| Name | Description |
|---|---|
| Attenuation | The falloff curve type as the camera gets closer or further away from the source. This can either be Quadratic, which provides an ease in and out blend, or Linear, which provides a linear blend. |
| Inner Attenuation Radius | The radius from the source in which the shake will play at its full intensity. |
| Outer Attenuation Radius | The radius from the source in which the shake will no longer be visible. The shake will blend its intensity between the outer and inner radius as the camera moves between them. |
| Camera Shake | The shake Blueprint class to use. |
| Auto Start | Enabling this will cause the shake to automatically start when playing the game. |
Looping Shake Example
You can quickly create a source shake effect by doing the following:
- In the Camera Shake Blueprint, set all Timing properties to 0. This will make the shake loop indefinitely with no blending. Also ensure you have set an appropriate amplitude and frequency on your axes so that the shake is visible.
- Assign the Blueprint to the camera shake source Camera Shake property, and enable Auto Start.
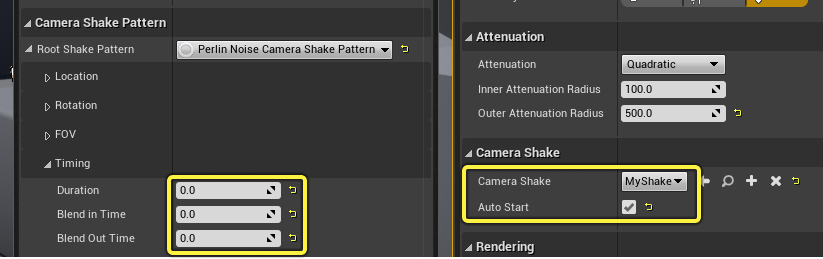
Now when you play the game and approach the source point, you should see the shake blend on and off as the camera enters the influence of the camera shake source.
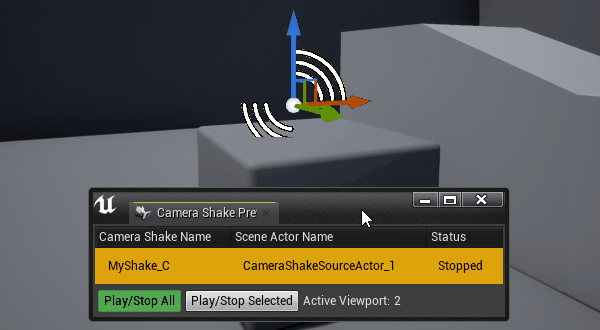
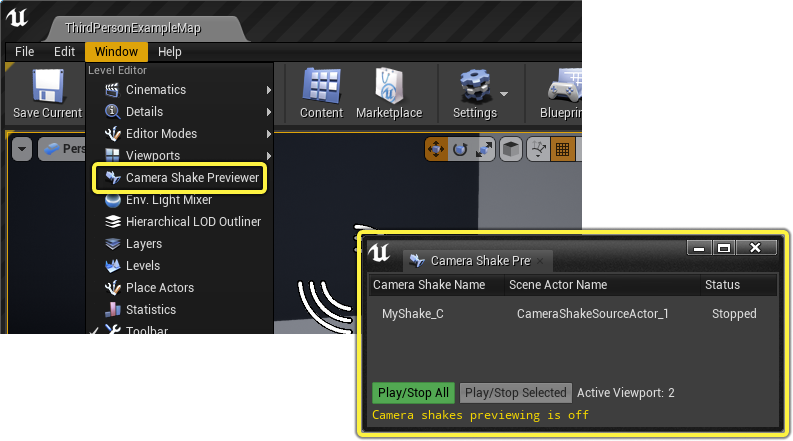
Camera Shake Previewer
The Camera Shake Previewer can be used to preview Camera Shake Sources in the editor without needing to start the game or simulation.
To open the previewer, navigate to Unreal Editor's main menu and select Window > Camera Shake Previewer.
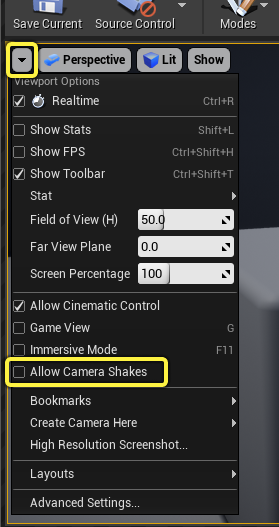
In order for camera shakes to play in the editor, you will need to enable Allow Camera Shakes in the viewport options menu.
Next, select the shake source entry you want to preview and click Play/Stop Selected to enable the shake preview. You can also click Play/Stop All if you want to preview multiple sources at once. Once it is playing, you can move the editor's camera towards the source and see the shake effect.