Blueprint Namespaces
Blueprint Namespaces optimize the time it takes to open a Blueprint Asset in the editor by preventing unnecessary Assets from loading. This behavior is useful for large projects because the Engine performs initialization tasks by loading all Blueprint Function Libraries and Macro Library assets regardless of whether the Blueprint you were opening was referencing those Libraries.
By grouping Assets into Blueprint Namespaces, you can defer loading the Asset until its is needed. This provides an additional benefit when working inside the Blueprint Editor, as any actions that a Blueprint Asset can take from its context menu will be filtered into its Blueprint Namespace.
Using the Feature
To see a working example of this feature, follow the steps below:
-
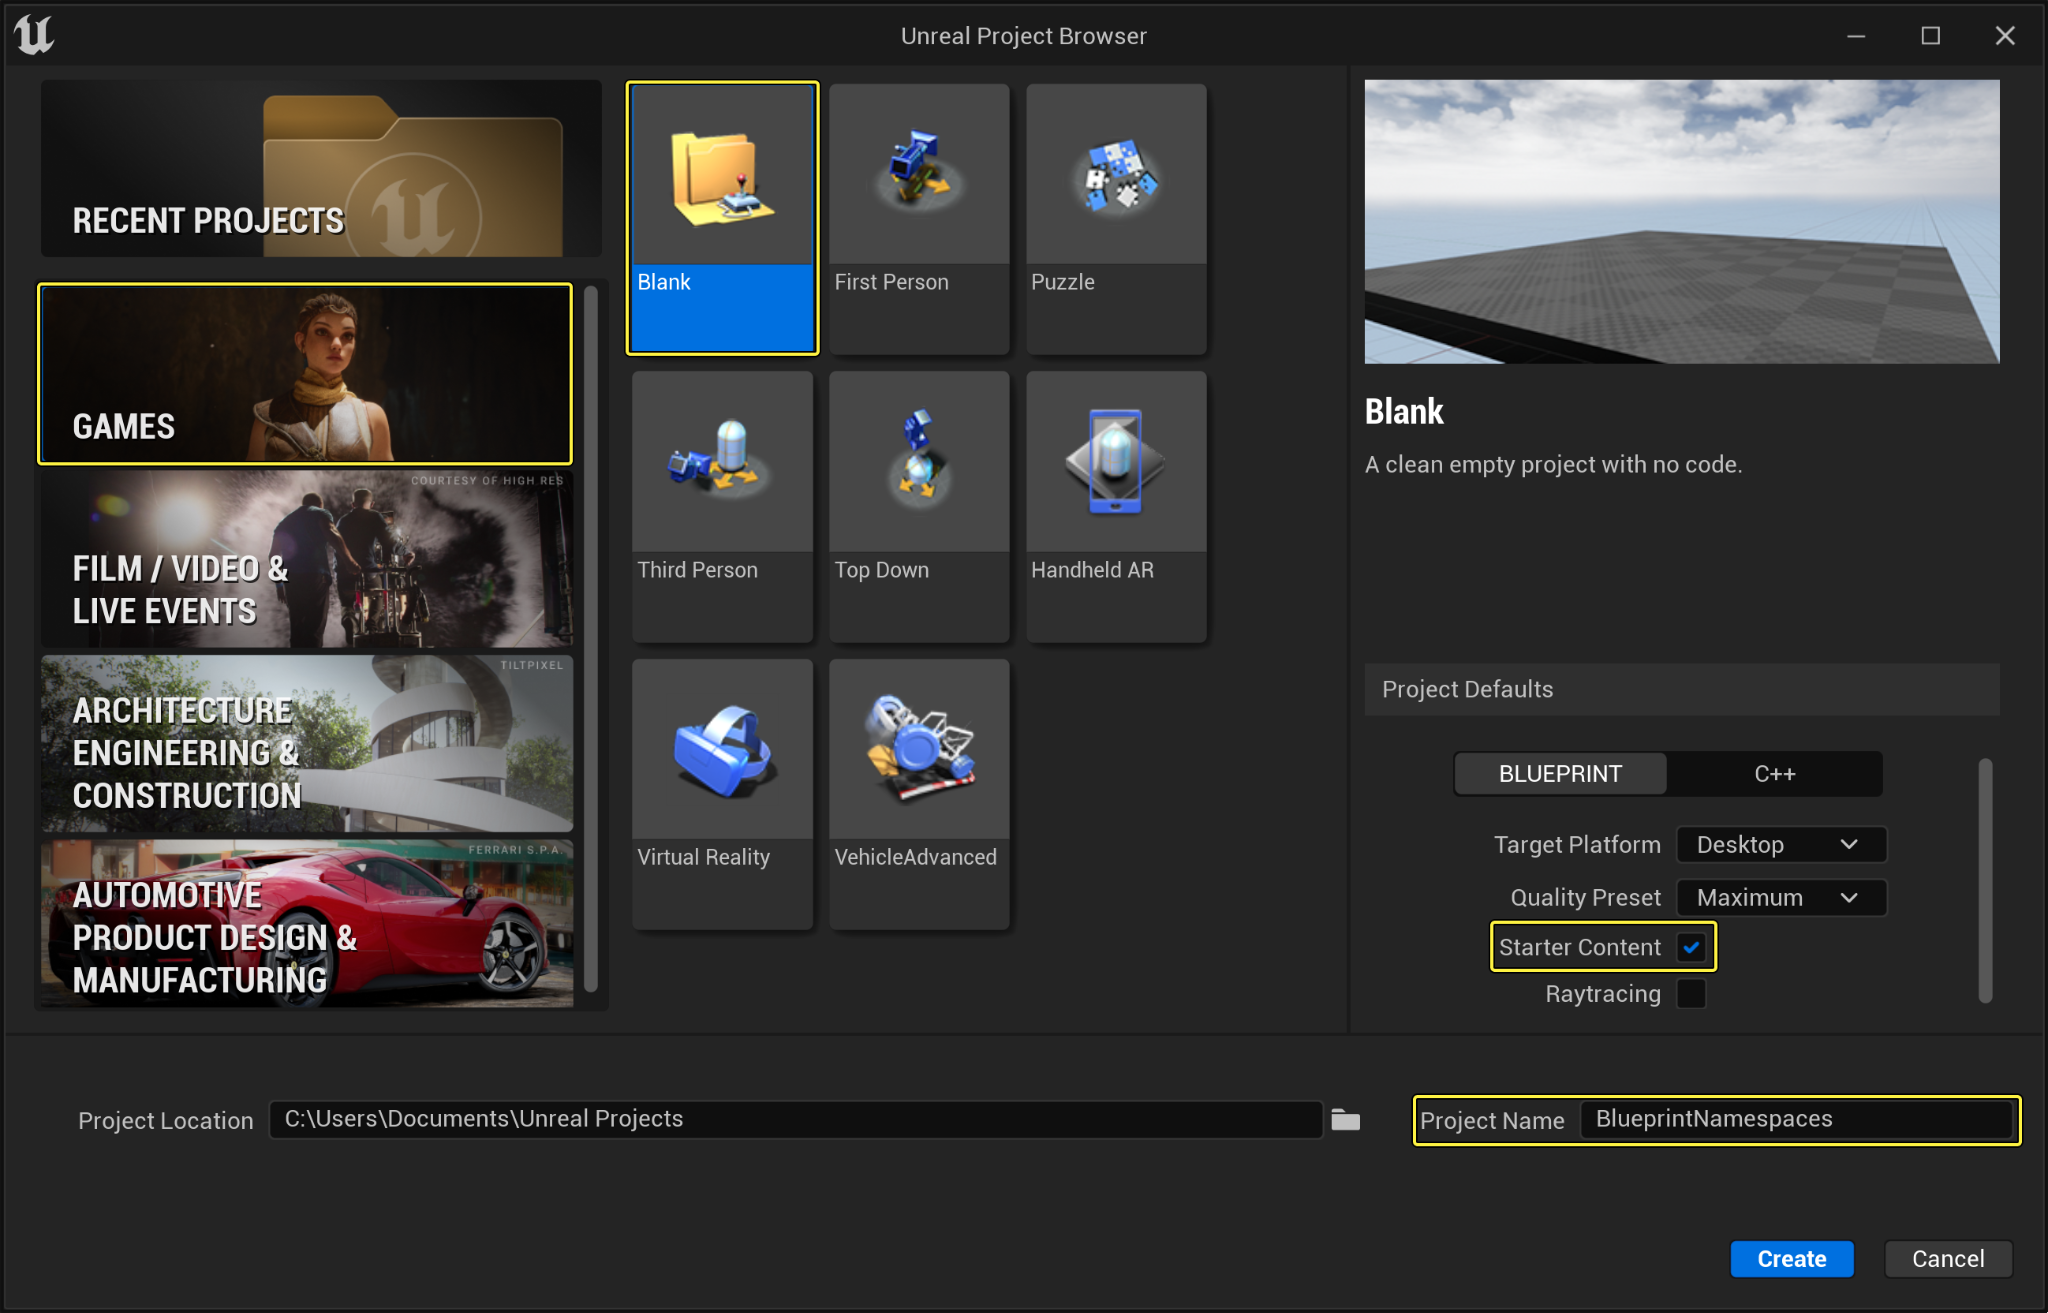
Begin by creating a new Games > Blank Project > with Starter Content enabled named BlueprintNamespaces.
-
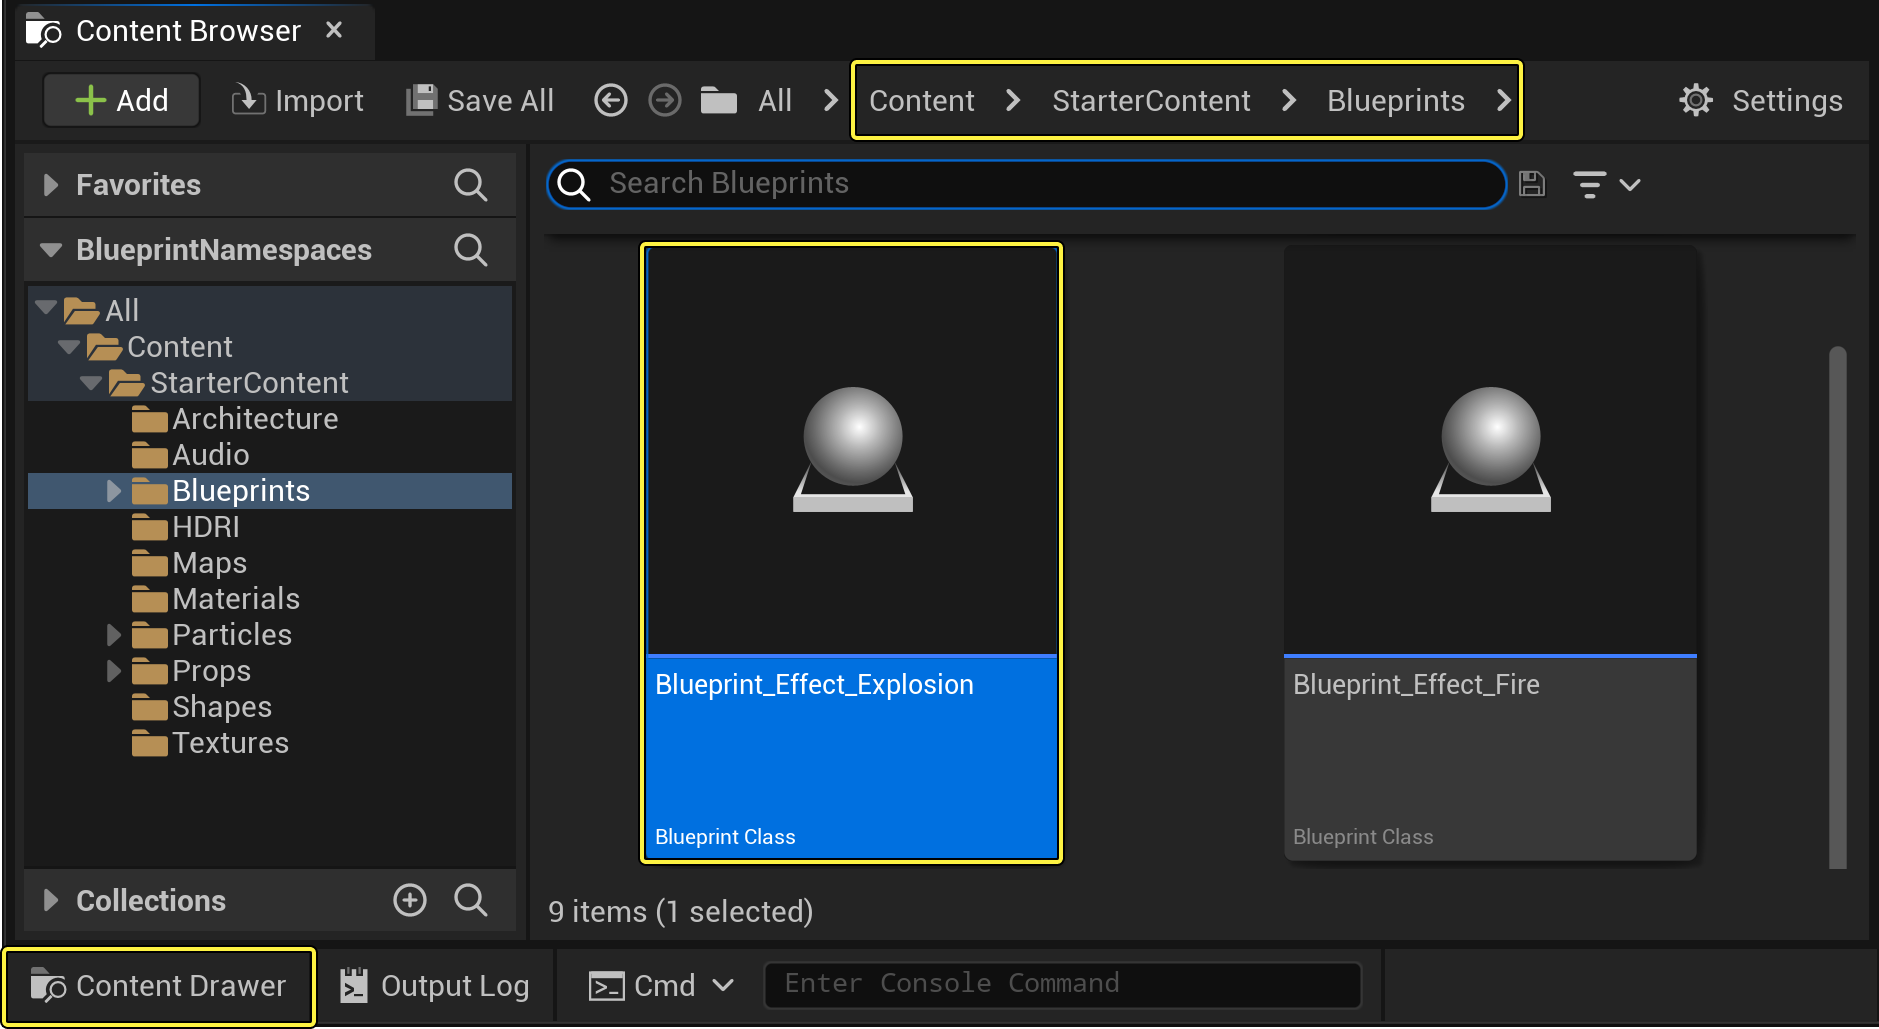
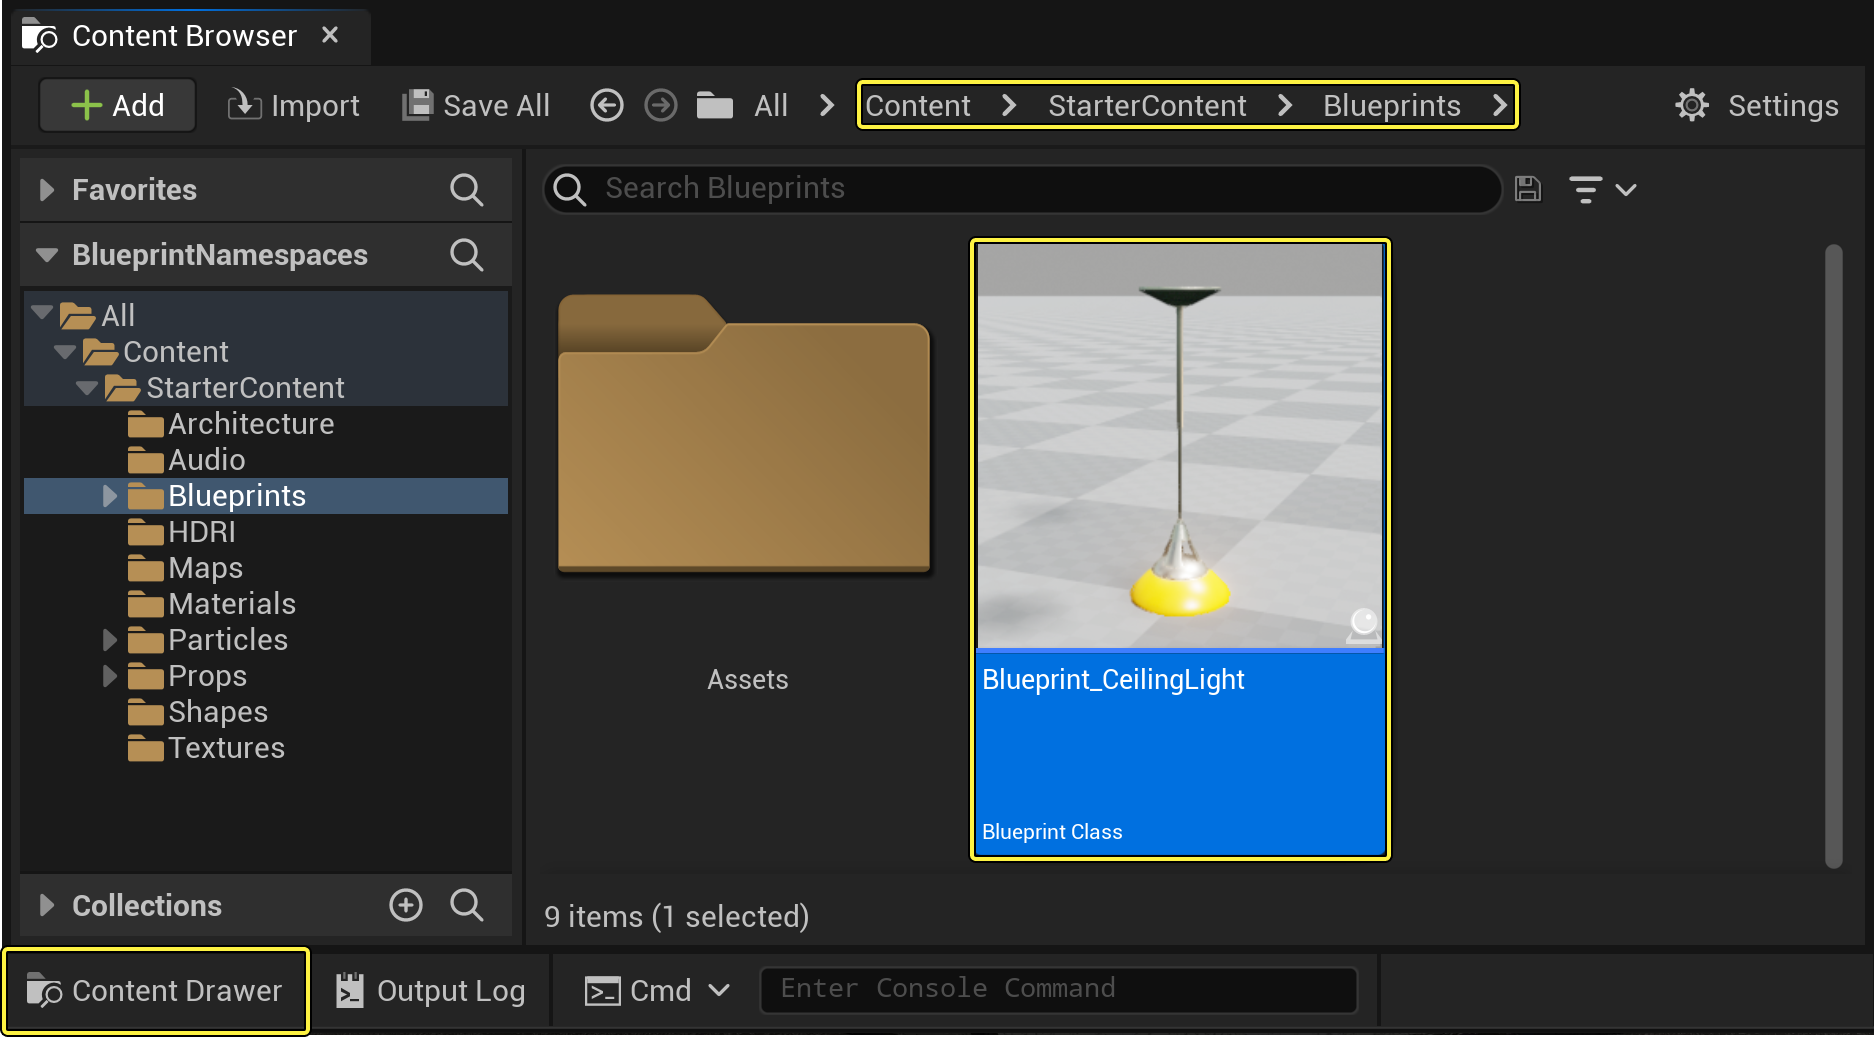
Click the Content Drawer to open it, then navigate to StaterContent > Blueprints and double-click the Blueprint_CeilingLight Blueprint to open its Class Defaults.

-
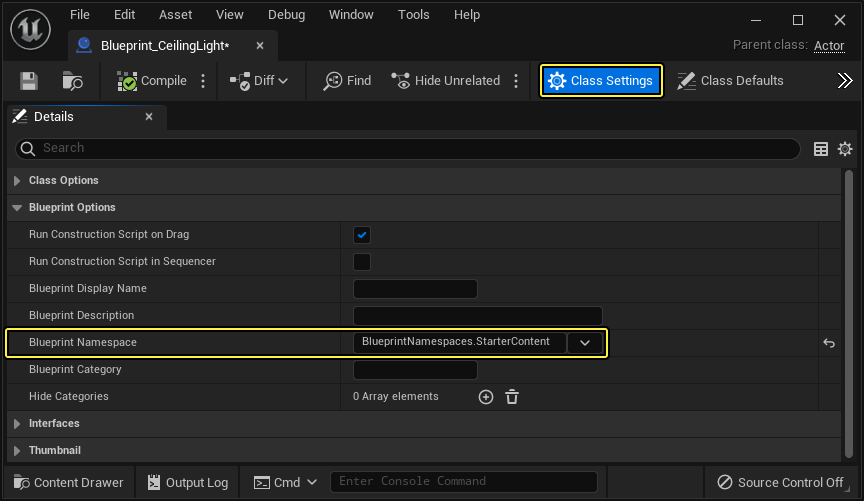
From the Toolbar, click the Class Settings, then navigate to the Details panel Blueprint Options category. In the Blueprint Namespace variable, type your namespace into the text field.

In our sample we named the Blueprint Namespace "BlueprintNamespaces.StarterContent"
When entering your namespace into the Blueprint Namespace text field, the editor will validate the string to ensure it does not contain any incompatible characters such as "#" or ",".
-
Click Compile and Save the Blueprint.

-
Navigate to the Content Browser, and hover your mouse over the Blueprint_CeilingLight asset to read the tooltip displaying your namespace data.

After launching the editor, you can see which library assets have already been assigned a namespace by searching for "BlueprintNamespace=StarterContent" in the Content Browser.
When you open a Blueprint asset that contains a reference to one of your newly-created assets, it is loaded as a package import dependency of the referencing Blueprint. The same behavior occurs if you base a new Blueprint on a parent Blueprint class that already references one of these assets.
Importing Namespaces
Importing is a similar process to adding an "#include" for a library header in a .cpp source file. When working with Blueprint Namespaces You can import a namespace through any of the following methods:
Setting the Blueprint Namespace
You can add the Blueprint Namespace to the namespace group you want to have access to in the Editor, by following the steps below:
-
Open the Content Drawer, then double-click your Blueprint to open it's Class Defaults.
-
From the ToolBar, click the Class Settings and navigate to the Details panel Blueprint Options > Blueprint Namespace category, then type your namespace into the text field.
-
From the Toolbar, click Compile and Save.

When you open your Blueprint, any shared library assets set to the same namespace are automatically imported when the Blueprint editor initializes.
Modifying the Editor Preferences or Project Settings
If you prefer a workflow where your shared library assets are automatically imported for all Blueprint assets, you can modify the Editor Preferences or Project Settings to ensure your specified subset of shared library assets is imported by the Editor, regardless of whether the Blueprint opened will belong to or import that namespace.
Editing the Editor Preferences will affect the local instance per user while editing the Project Settings will apply to the scope of your entire project. This will affect all users who are sharing source control on your project.*
To set up a default import set for your local editor instance:
-
From the Toolbar, navigate to Edit > Editor Preferences > Content Editors > Blueprint Editor > Experimental, and from the Namespaces to Always Include field, click the Add(+) button to add your namespace as an element to the list.
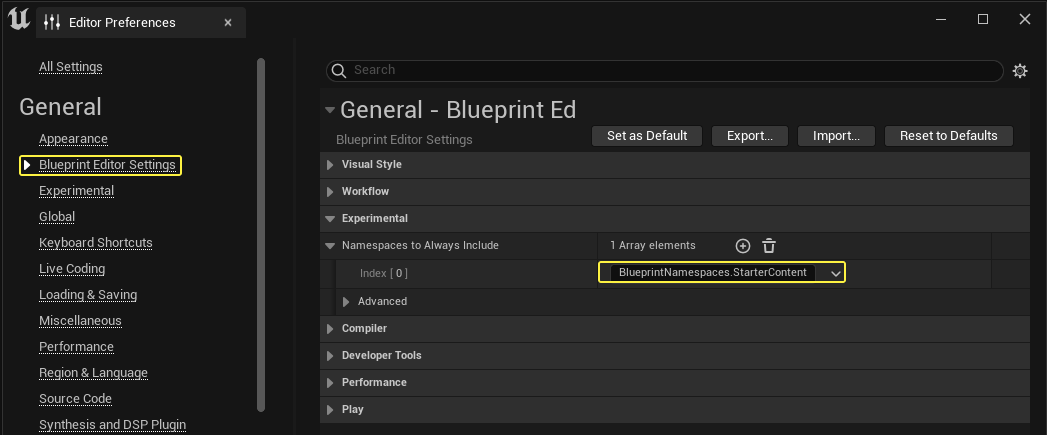
Navigating to Editor Preferences provides you with the ability to locally modify the Global Namespace set for the Blueprint Editor.
To customize your project for all users to ensure a certain subset of shared library assets is always imported project-wide, you can enable the feature by following the steps below:
-
Navigate to the Edit > Project Settings > Editor > Blueprint Project Settings > Experimental, then in the Namespaces to Always Include Array List, click Add(+) to add your namespace to the list:
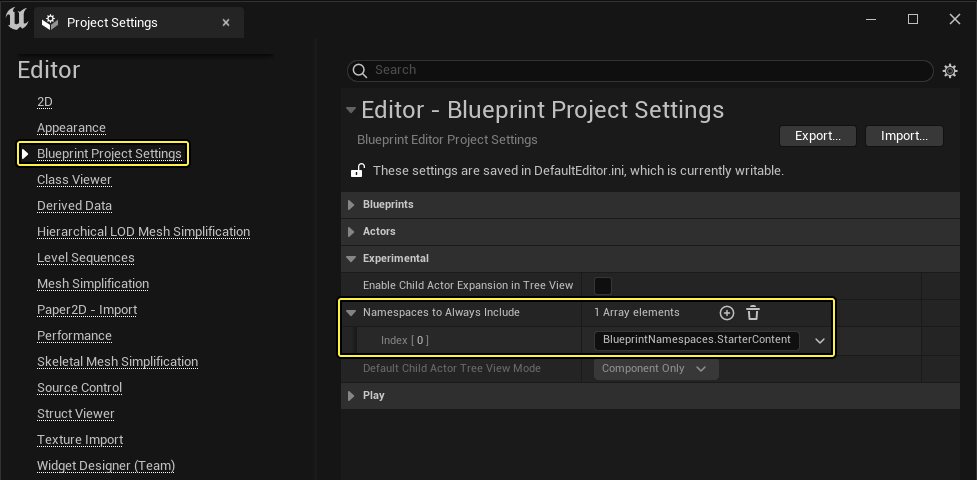
In the Project settings, we have edited the Blueprint Project Settings to include a Namespace called "BlueprintNamespaces.StarterContent".
-
You can choose to explicitly import one or more namespaces for your Blueprint by clicking the Add(+) button.
-
Adding an import will immediately load any shared libraries that are currently assigned to the namespace.
-
Removing an import does not have any negative performance effects in the editor, however you will no longer have the type and action menu filtering behavior associated with that namespace.
Implicitly Importing a Namespace
You can implicitly import a namespace by selecting a non-imported type or action item in the context menu. When you select an unloaded type picker, then that type's package is loaded on the selection of a strong reference type.
This may seem to compromise the auto-import behavior, however, selecting a non-imported type takes the additional step of implicitly adding that type's namespace into the Blueprint's explicit import set described in the method above.
To see this feature working:
-
Create a new Blueprint asset named TestType, then navigate to the Class Settings > Details > Blueprint Options and assign it to a namespace called "YourNameSpace.AutoImportTest":

In our example we named our Blueprint Namespace as BlueprintNamespaces.AutoImportTest.
-
Click Compile and Save, then re-launch the editor.

-
Click the Content Drawer, then navigate to Content > StarterContent > Blueprints and double click Blueprint_CeilingLight to open its Class Defaults.
You can open any of your existing Blueprints, or create a new one. In our example, we chose to use the existing Blueprint_CeilingLight.
-
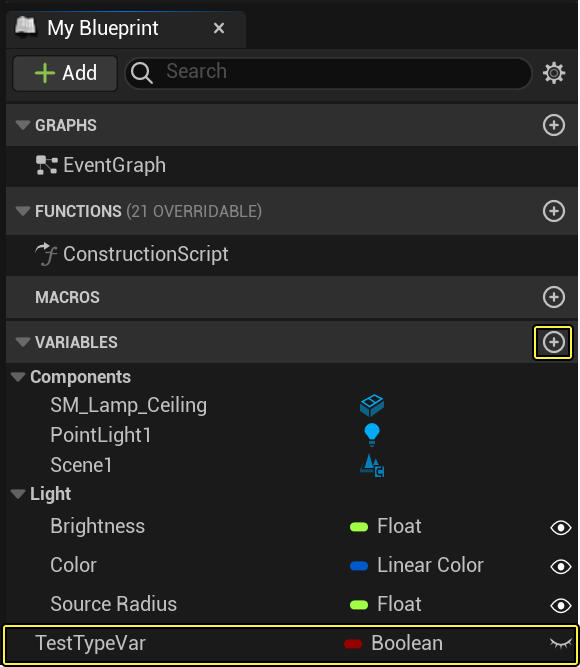
From the Class Defaults, navigate to My Blueprint > Variables and click Add(+) to create a new variable named TestTypeVar.
-
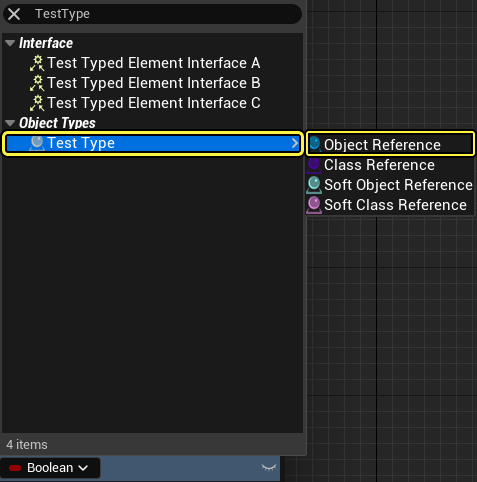
Click the Boolean drop-down arrow to bring up the pin type selector, then In the text field search and select TestType then choose Object Reference.
-
Click the Class Settings, then navigate to the Details panel > Imports > Imported Namespaces, and you will see YourNamespace.AutoImportTest is now listed among the Imported Namespaces category.

Using Auto-import doesn't require the type to be unloaded. Your namespace (if non-global and not yet imported) is auto-imported upon selection. Enabling namespace import features will auto-import that asset's namespace into the Blueprint.
-
If you change a default value on any function input argument, then the local variable will import any namespace associated with the value.
-
Changing the default value of a struct or container type will import any namespace associated with the container's inner value and struct child member property.
-
Adding any new component in the Components panel will automatically import any namespace associated with that selected component type. This behavior also applies to non-imported component types.
Filtering Non-Imported Types and Actions
By default, non-imported types and actions are displayed in the context menu, but if you wish to enable an additional layer of filtering for non-imported types:
-
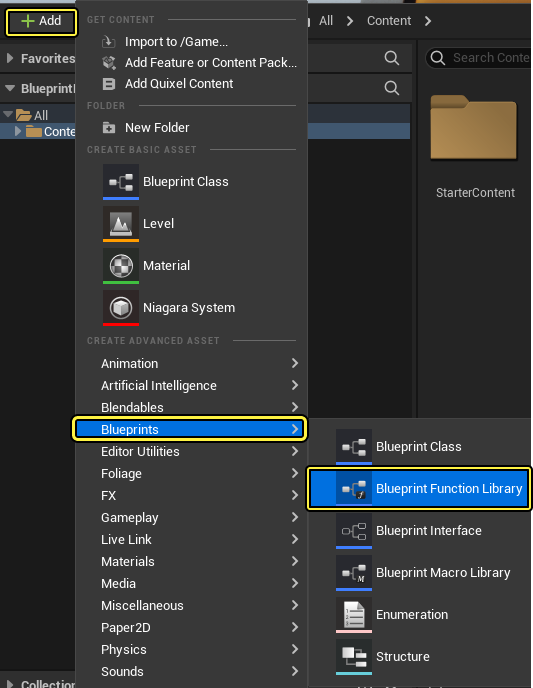
Click the Content Drawer, then click Add(+) > Create an Advanced Asset > Blueprints > Blueprint Function Library named Bp_FilterFunctionLibrary.
-
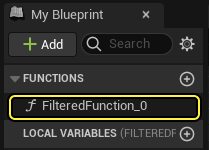
Double-click the Bp_FilterFunctionLibrary to open its Class Defaults. From the My Blueprint panel, navigate to the Functions category and rename NewFunction_0 to FilteredFunction_0. Class Settings and navigate to Details > Blueprint Options > Blueprint Namespaces, then enter "YourNamespace.FilterTest".
In our example, this becomes "BlueprintNamespaces.FilterTest".
-
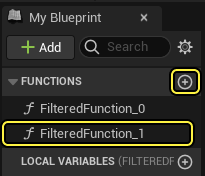
Click the Add(+) button to create a new function named FilteredFunction_1.
-
Click the Class Settings then from the Details panel, navigate to Blueprint Options > Blueprint Namespace, then select Your namespace from the drop down menu "YourNamespace.FilterTest" (in the example shown below, this becomes "BlueprintNamespaces.FilterTest").

-
Click Compile and Save.

-
Navigate to Content > StarterContent > Blueprints and double click the Blueprint_CeilingLight to open its Class Defaults.

-
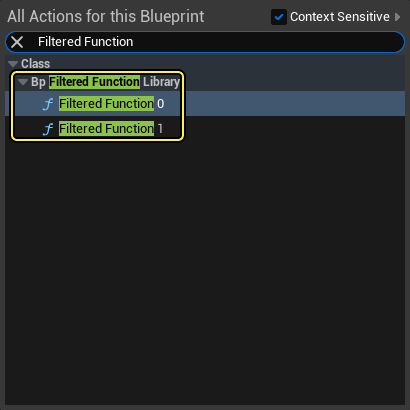
From the Class Defaults, navigate to the Event Graph then right click to open the Actions menu. When you search for your Filtered Function it will appear in the context menu.