Animation Notifications (Animation Notifies or just Notifies) provide a way for you to create repeatable events synchronized to Animation Sequences. These events can be sounds (such as footsteps for walk or run animations), spawning particles, and other types. Animation Notifies have any number of different uses, and the system can be extended with custom types.
This document provides an overview of the different types of Animation Notifies, how to create them, and how to use them in a variety of ways.
Prerequisites
- Animation Notifies are created within Animation Sequences, therefore your project needs a Skeletal Mesh and an Animation Sequence.
Getting Started
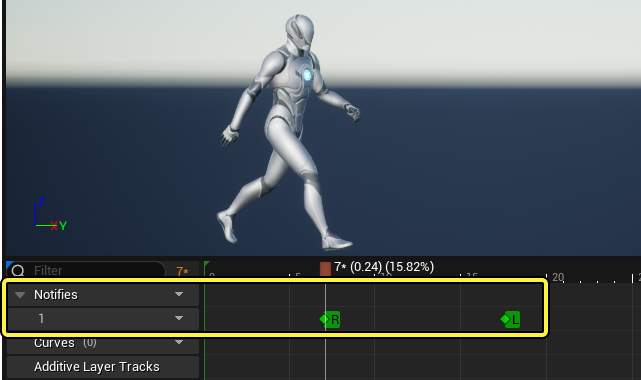
Animation Notifies are commonly accessed and created within Animation Sequences. To get started, open an Animation Sequence Asset, and locate the Notifies track in the timeline.
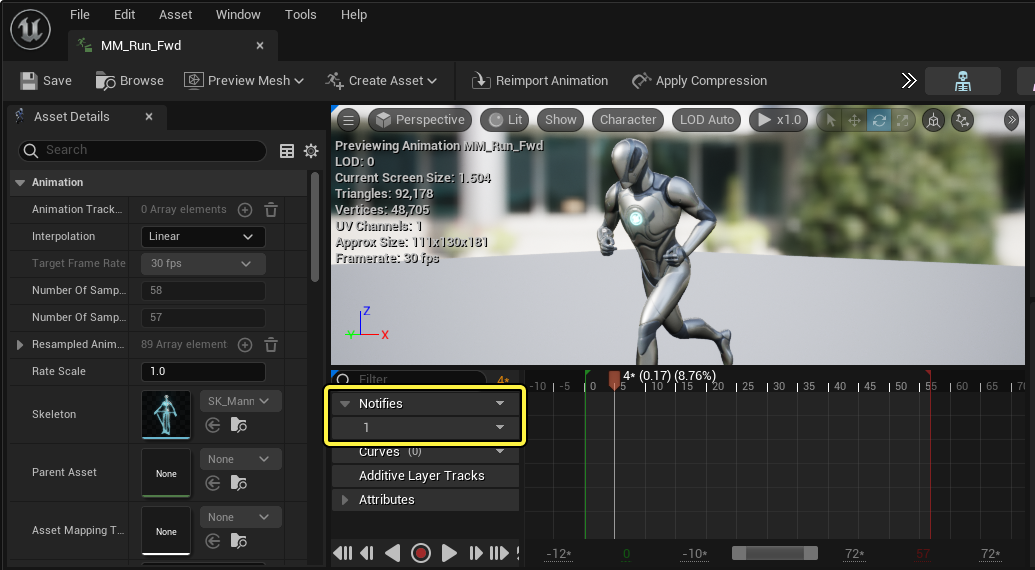
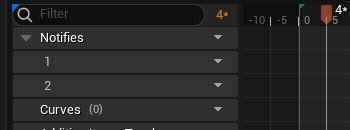
The Notifies track itself is a parent group for individual child tracks below, which contain the actual notify keyframes. By default, a single child track should exist (named 1). If no child tracks exist, or if you want to add extra notify tracks, click Add Track (+) > Add Notify Track on the Notifies track.

You can also insert or remove notify tracks by clicking the Add Track (+) dropdown menu on the child track itself and selecting either Insert Notify Track or Remove Notify Track.

To rename a Notify track, triple-click on the track text to enable text editing.
Animation Notify Types
There are several types of Animation Notifies you can create, which are viewed when creating Notifies by right-clicking in the Notify track's timeline region.
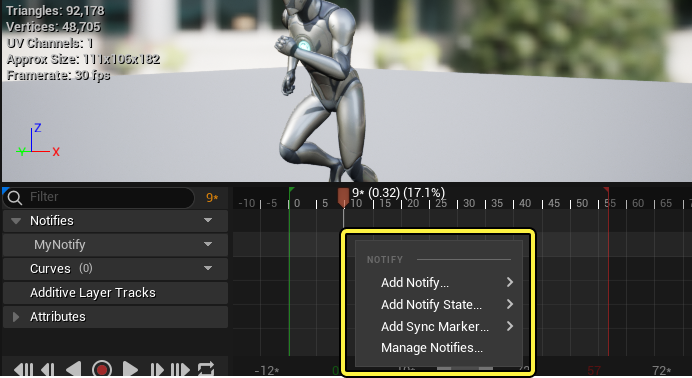
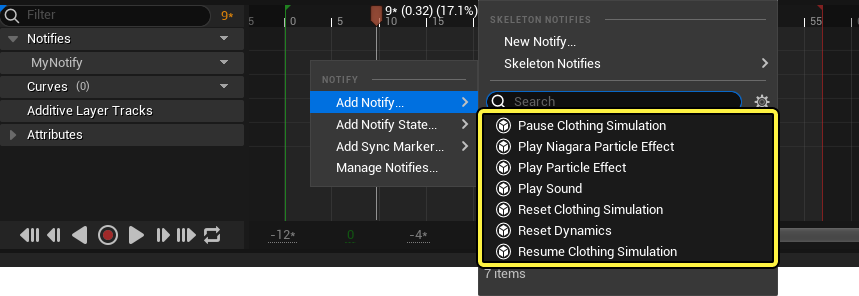
Notify
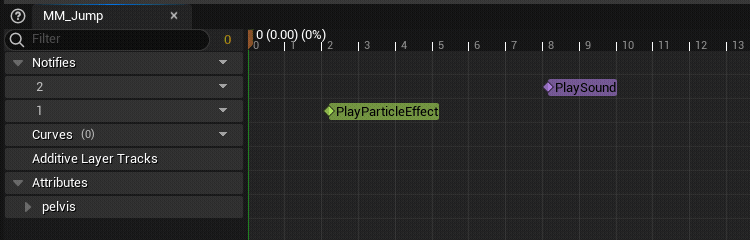
The most basic kind of Animation Notify you can create is simply called a Notify, which causes different pre-made events to be triggered at a specified time. The following Notifies can be found when viewing the Add Notify… menu. Selecting one will create the Notify keyframe at your cursor position.
Notify keyframes can be edited by dragging them in the timeline. You can also hold Shift, which will move the Playhead in sync with the Notify, making it easier to align the Notify with a specific time in the animation.

Particle Effect
Particle Effect Notifies are used to spawn and play non-looping particle systems. You can select either:
- Play Niagara Particle Effect, which spawns Niagara particles.
- Play Particle Effect, which spawns legacy Cascade particles.
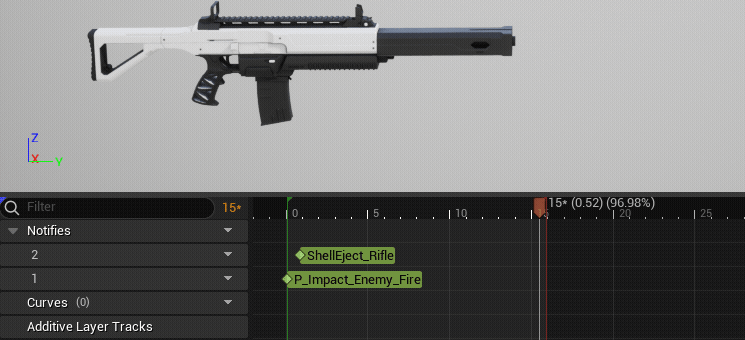
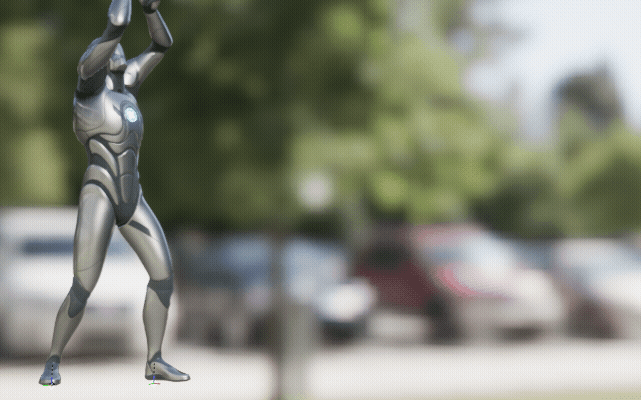
This Notify is useful for creating repeatable particle effects, such as an effect when a character lands from jumping, shooting effects for a Skeletal Mesh weapon, or other similar effects.
When selecting the Particle Notify keyframe, the following relevant properties are located in the Details panel:
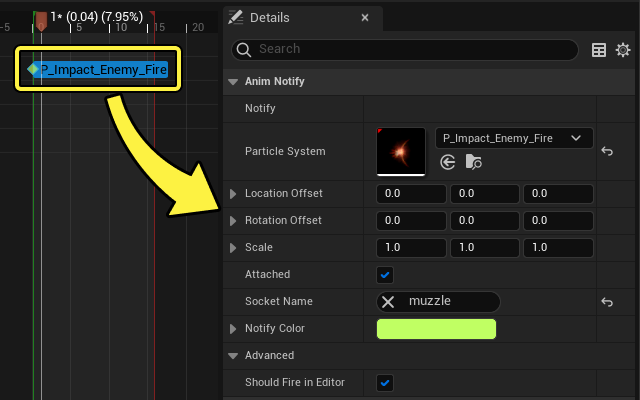
| Name | Description |
|---|---|
| Particle System / Niagara System | The Cascade or Niagara system to spawn for this Notify. |
| Location / Rotation / Scale Offset | An array of location, rotation, and scale transform properties to offset the system from its spawn point. |
| Attached | When spawned on a Socket, enabling this causes the particle system to follow the Socket for its full duration. Disabling this still spawns the particle system at the Socket location, but the system does not continue to follow the Socket. |
| Socket Name | You can specify a bone or Socket here, which spawns the particle system at its location. If nothing is specified here, then the system spawns at the root of the object. |
Sound
Sound Notifies are used to play sound effects from imported Sound Waves, Sound Cues, and MetaSounds. These Notifies are useful for synchronizing foley-type sounds to animations, such as footsteps, cloth movements, and similar repeatable sounds.
When selecting the Sound Notify keyframe, the following relevant properties are located in the Details panel:
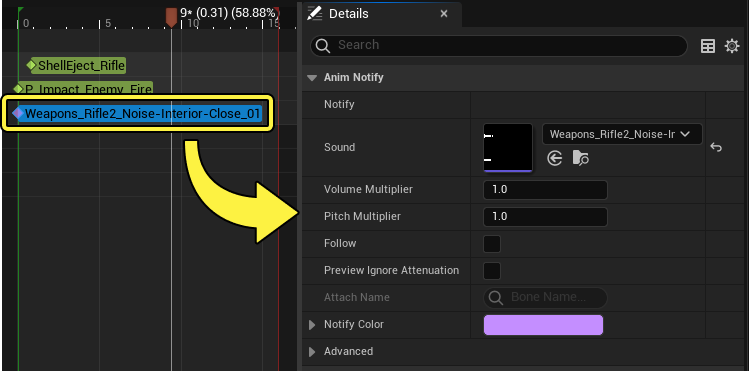
| Name | Description |
|---|---|
| Sound | The sound asset to play for this Notify. You can select the following assets:
|
| Volume Multiplier | A multiplier to increase or decrease the volume of the playing sound. |
| Pitch Multiplier | A multiplier to increase or decrease the pitch of the playing sound. |
| Follow | If enabled, the sound effect source follows the animated mesh as it moves. If disabled, the sound remains behind at the location it spawned. |
| Preview Ignore Attenuation | If enabled, sound attenuation is disabled when playing the sound. This setting is editor-only and does not impact normal sound attenuation operation when playing or simulating the game. |
| Attach Name | If Follow is enabled, you can specify a bone or Socket to attach to. If nothing is specified here, then the sound spawns at the root of the object. |
Clothing Simulation
Clothing Simulation Notifies are used to pause, resume, and reset cloth simulations on a character. These Notifies are useful if you are teleporting the character during the animation and need to pause or reset cloth evaluation. They can also be useful if your animations are causing the cloth simulation to overreact.
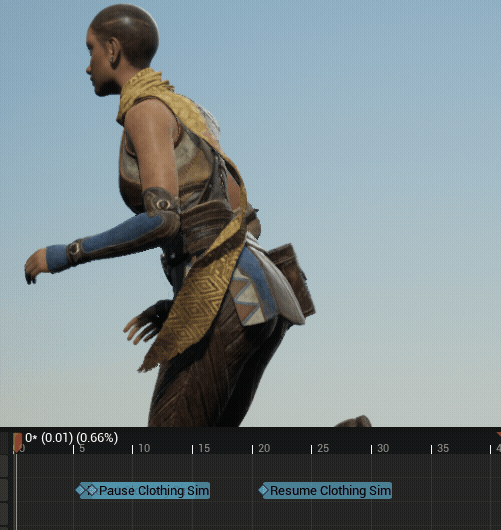
You can select the following Notifies:
- Pause Clothing Simulation, which pauses the simulation.
- Resume Clothing Simulation, which restores the simulation after having been paused.
- Reset Clothing Simulation, which initializes the simulation back to its default reference pose.
Reset Dynamics
The Reset Dynamics Notify can be used to restore any AnimDynamics used on this Skeletal Mesh back to their original state. This Notify is useful if your animations are causing the AnimDynamic simulation to overreact or enter broken-looking states.
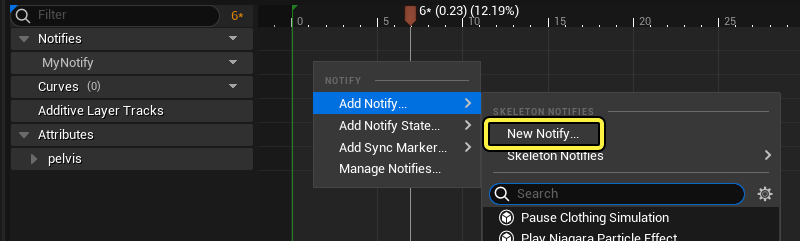
Skeleton Notify
Skeleton Notifies are custom Notifies saved on the Skeleton Asset, and then used as events within your Animation Blueprint. These Notifies are useful for creating any arbitrary Blueprint logic you want a Notify to execute.
To create a Skeleton Notify, right-click on a Notify track, then select Add Notify > New Notify…
You will be prompted to enter a name for the newly created Notify. Name it and press Enter to create the Skeleton Notify.
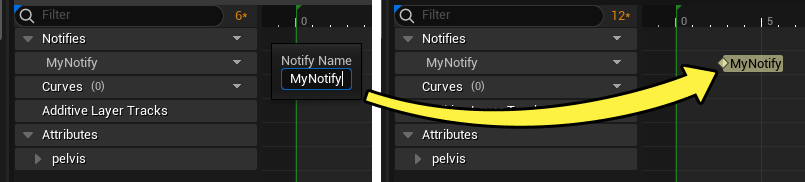
Skeleton Notifies are stored on the Skeleton Asset. Therefore, when creating them, you are also editing the Skeleton, which requires you to save it.
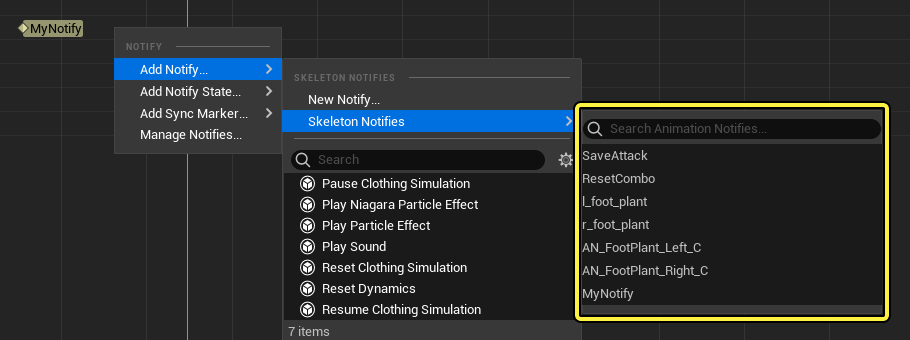
You can also add currently-existing Skeleton Notifies to the timeline by right-clicking a Notify track, then selecting one from the Add Notify > Skeleton Notifies menu.
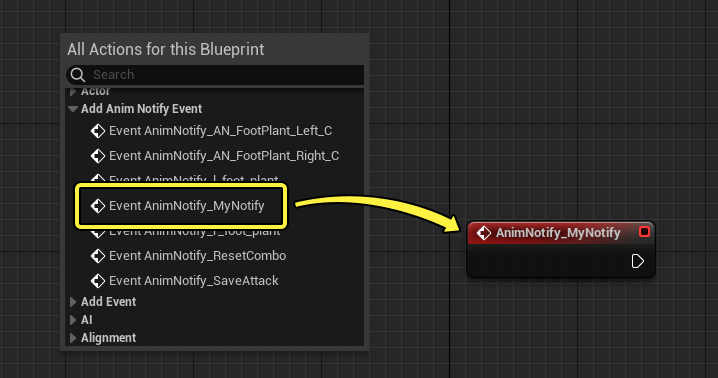
Skeleton Notifies are used as Notify Events within Animation Blueprints, either in the Event Graph or Transition Graph. To add a Skeleton Notify Event, right-click in the Event or Transition Graph of your Animation Blueprint and select the Notify from the Add Anim Notify Event menu. This adds the event node to the Graph which is executed when the Notify is called from the animation it resides in.
Notify State
Notify States work similar to standard Notifies, however they operate over a duration, rather than a single event. Because of this, they provide three distinct events: a start, an update, and an end. These events can be accessed when creating Notify State child classes.
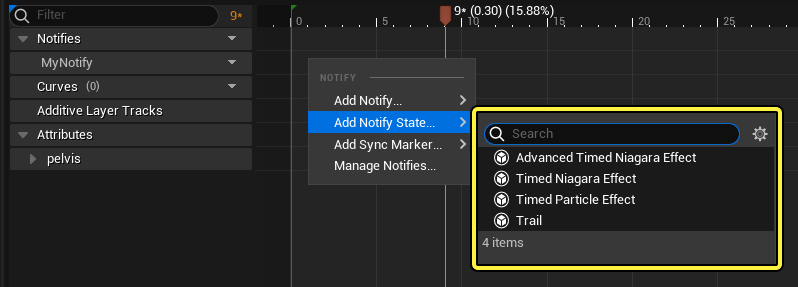
Also like standard Notifies, they provide several different pre-made classes to choose from. You can find the following notifies when viewing the Add Notify State… menu. Selecting one creates the Notify keyframes at your cursor position.
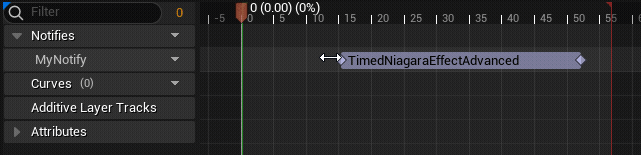
Notify State keyframes are edited similar to normal Notifies by dragging them in the timeline. You can either drag the start or end to edit the range, or drag the whole Notify.
Timed Particle Effect
Similar to Particle Effect Notifies, Timed Particle / Niagara Effects Notifies are used to play particles during an animation. The main difference is that you can also define the duration of the particle, if the particle is set to loop. You can select the following types of Particle Notifies:
- Timed Particle Effect, which spawns legacy Cascade particles.
- Timed Niagara Effect, which spawns Niagara particles.
- Advanced Timed Niagara Effect, which spawns Niagara particles with extra options for driving parameters within them.
Timed Particle Notifies share the same details with normal Particle Effect Notifies, however Advanced Timed Niagara Notifies contain the following additional properties:
| Name | Description |
|---|---|
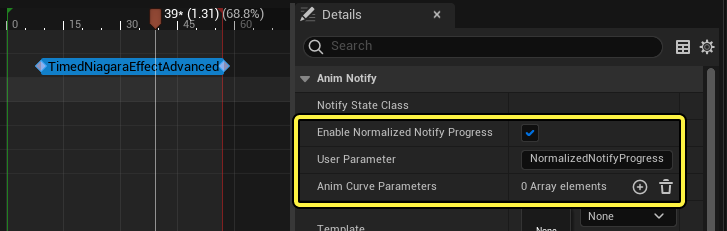
| Enable Normalized Notify Progress | When enabled, causes the Notify state to output a normalized (0-1) value over the duration of the Notify to the Niagara User Parameter specified in User Parameter. The parameter starts at 0 and interpolates to 1 upon the notify finishing. This property is useful if you want to link certain particle parameters to the lifetime of the notify. |
| User Parameter | The name of the Niagara User Parameter to drive if Enable Normalized Notify Progress is enabled. |
| Anim Curve Parameters | An array where you can link Animation Curve values to Niagara User Parameters. You can add items to the array by clicking Add (+), then specify the following properties:
|
Trail
Trail Notifies are similar to Timed Particle Effects in that they spawn a particle system over the duration of the Notify. It differs because it is primarily used for AnimTrail Cascade Particles, and contains additional properties for controlling trail attachment and properties.
Selecting the Trail Notify reveals the following properties in the Details panel.
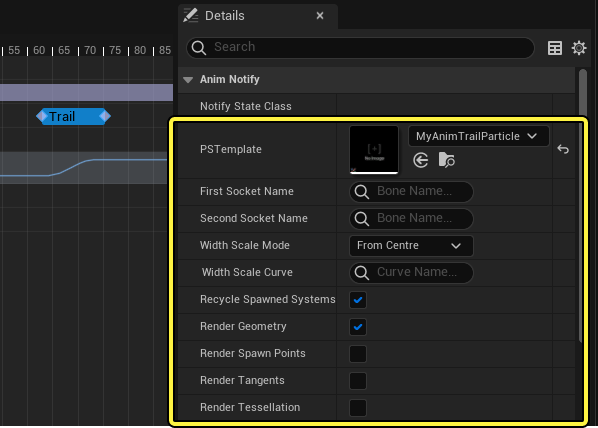
| Name | Description |
|---|---|
| PSTemplate | The AnimTrail Cascade Particle system to use. |
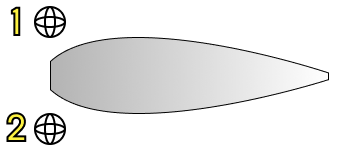
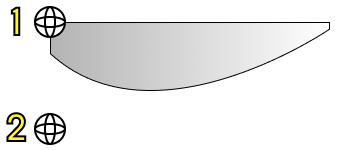
| First / Second Socket Name | You can specify a separate bone or Socket here for each property, which are used to define the attach points for the AnimTrail. This also defines the trail's default width, based on the distance between these two attach points. |
| Width Scale Mode | If Width Scale Curve is used, this defines the relative scale point of the trail's width. You can select the following options:
|
| Width Scale Curve | You can optionally specify an Animation Curve here, which can be used to animate the scale width of the trail during the animation. A value of 1.0 maintains the default width, higher numbers increase the width, and lower numbers decrease the width. |
| Render Geometry | Enables rendering of the main trail geometry, leave this enabled. |
| Render Spawn Points | Enables debug rendering of the primary spawn points for the trail. |
| Render Tangents | Enables debug rendering of the curve tangents. |
| Render Tessellation | Enables debug rendering of all vertices on the curve, showing how the curve is tessellated between the spawn points. |
Sync Marker
Sync Markers are Notifies used to inform marker-based animation syncing, which is useful for blending animations together and keeping overall motion synchronized. Similar to Skeleton Notifies, Sync Markers save to the Skeleton Asset, which requires you to save the Skeleton when adding them. You can then use the same Sync Markers repeatedly in any animation you want to synchronize while blending.
To learn more about using Sync Markers, refer to the Sync Groups page.
Montage Notifies
When creating Animation Montages, additional Animation Notify types are available to you to support montage-specific workflows. The following Notifies can be added in montages:
- Montage Notify, which can be added by right-clicking on the Notify timeline and selecting Add Notify > Montage Notify.
- Montage Notify Window, which can be added by right-clicking on the Notify timeline and selecting Add Notify State > Montage Notify Window.
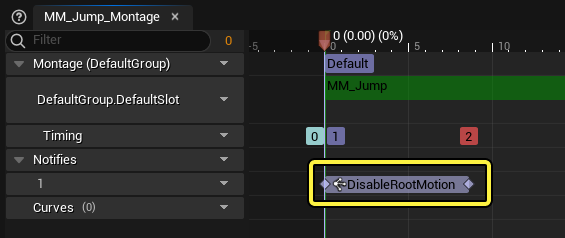
- Disable Root Motion, which can be added by right-clicking on the Notify timeline and selecting Add Notify State > Disable Root Motion.
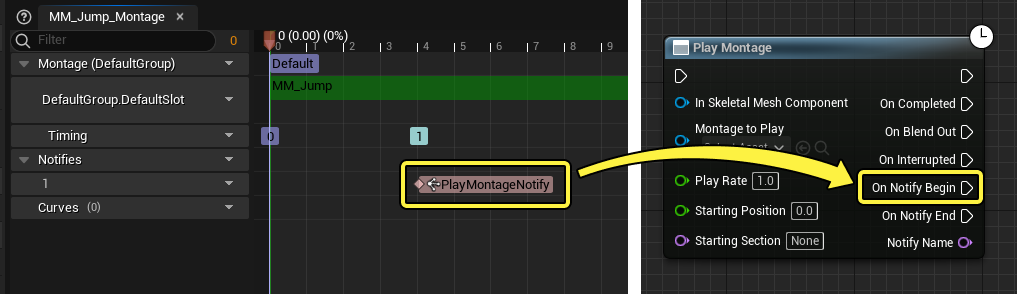
Montage Notify
A Montage Notify operates similarly to standard Notifies in that it executes an event upon reaching the Notify keyframe. When reached, the On Notify Begin event is executed on the Play Montage Blueprint function. This requires playing the montage using the Play Montage node, instead of the Play Anim Montage node.
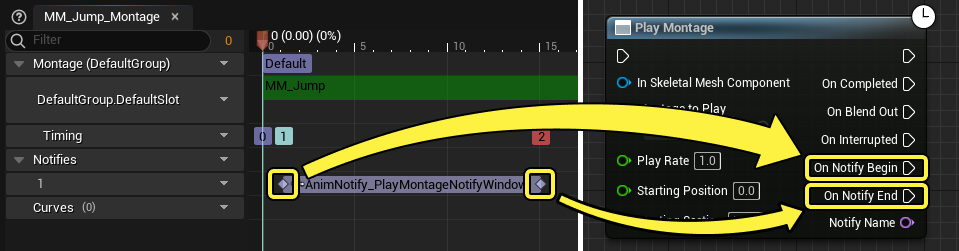
Montage Notify Window
A Montage Notify Window operates similarly to Notify States, in that the Notify operates over a duration you define. This causes both On Notify Begin and On Notify End to execute when the start and end of the Notify are reached. This requires playing the montage using the Play Montage node, instead of the Play Anim Montage node.
Disable Root Motion
A Disable Root Motion Notify operates similarly to Notify States, in that the Notify operates over a duration you define. This Notify suppresses root motion, allowing for user-input to control a character for its duration. This can be useful if you want to allow input control during parts of a montage, which locks out input by default.
Managing Your Notifies
As you create and use Animation Notifies, there are several features and properties that you can use to customize your workflow and Notify behavior.
Keyframe Editing
You can view information and commands for your Notify keyframes by right-clicking on them. The context menu shows the following:
| Name | Description |
|---|---|
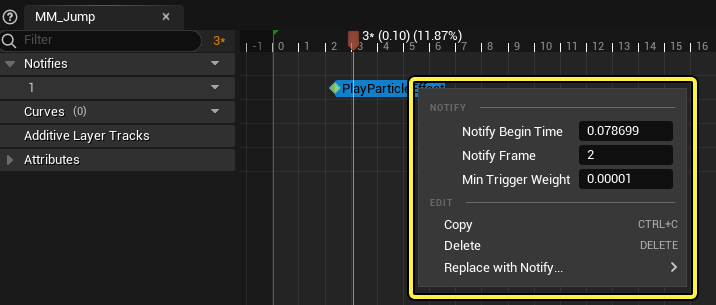
| Notify Begin Time | The time (in seconds) that this Notify is placed in the animation. |
| Notify Frame | The time (in frames) that this Notify is placed in the animation. |
| Min Trigger Weight | Determines how much weight (between 0 and 1) the animation needs to have to trigger the Notify. This is only relevant if the animation is being blended with another. The default value of 0.00001 means that even if this animation is barely blended in, the Notify will still execute. Setting it to higher numbers means that the animation must be blended in more fully in order for the Notify to successfully execute. |
| Anim Notify State Duration | The time (in seconds) of this Notify State's duration. |
| Anim Notify State Frames | The time (in frames) of this Notify State's duration. |
| Copy | Copies this Notify. |
| Delete | Deletes this Notify |
| Replace with Notify… | Replaces this Notify with another of the same type. |
To assist with keyframe alignment, you can enable snapping options by right-clicking the top of the timeline and enabling either Frames or Notifies.
Common Notify Properties
In addition to the properties that can be modified for each type of Notify, Notifies also contain the following common properties:
| Name | Description |
|---|---|
| Notify Color | Sets the color of the Notify keyframe. |
| Should Fire in Editor | Enables the Notify executing when previewing it in the Editor. This does not impact normal gameplay or simulation. |
| Notify Trigger Chance | Defines the chance of the Notify executing successfully. A value of 0 means the Notify never executes, and 1 means the Notify always executes. |
| Trigger on Dedicated Server | Enabling this causes the Notify to execute on dedicated servers. |
| Trigger on Follower | If enabled, this Notify also triggers when the animation is a follower, when using Sync Groups. By default, only Sync Group leader animations execute their Notifies. |
| Notify Filter Type | Defines a method for filtering Notifies to control if they should execute or not. You can filter by LOD and specify the maximum LOD to filter the Notify from. |
| Trigger Weight Threshold | Determines how much weight (between 0 and 1) the animation needs to trigger the Notify. This is only relevant if the animation is blended with another. The default value of 0.00001 means that even if this animation is barely blended in, the Notify still executes. Setting it to higher values means the animation must be blended in more fully for the Notify to successfully execute. |
| Montage Tick Type | When using Montage Notifies, this property determines how the Notify is ticked and executed in regards to its accuracy and sequential ordering. You can select either:
|
| Slot | When using Montage Notifies, this property links the Notify to an animation within a specific Slot, as some montages can have more than one Slot. |
| Link Method | When using Montage Notifies, this property defines the method to link a Notify to an animation. Linking will cause the Notify keyframes to follow the montage animation section if they are adjusted. You can select from:
|
| Linked Sequence | A read-only property that displays the currently-linked Animation Sequence. This changes if you align the Notify with a different sequence in a multiple-sequence montage. |
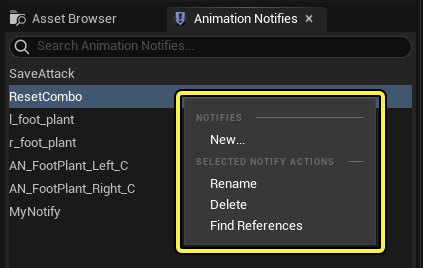
Animation Notify Panel
The Animation Notifies panel can be used to manage your currently existing Skeleton Notifies. You can access it by right-clicking in the Notify timeline area and selecting Manage Notifies.
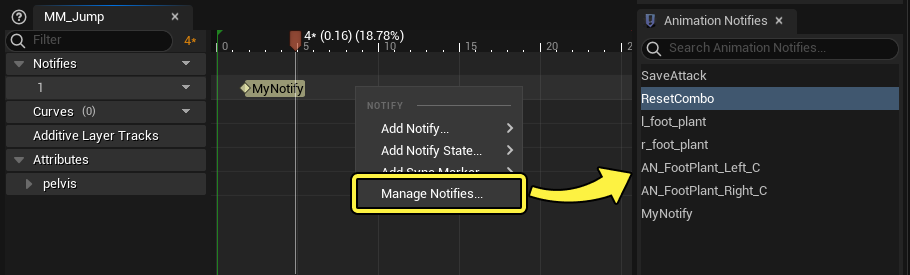
You can right-click on a Notify and perform the following actions:
| Name | Description |
|---|---|
| New… | Creates a new Skeleton Notify. |
| Rename | Renames the currently-selected Skeleton Notify. |
| Delete | Deletes the currently-selected Skeleton Notify. |
| Find References | Opens the Animation Asset Browser Panel and filters the list to only show animation assets that use this Notify. |
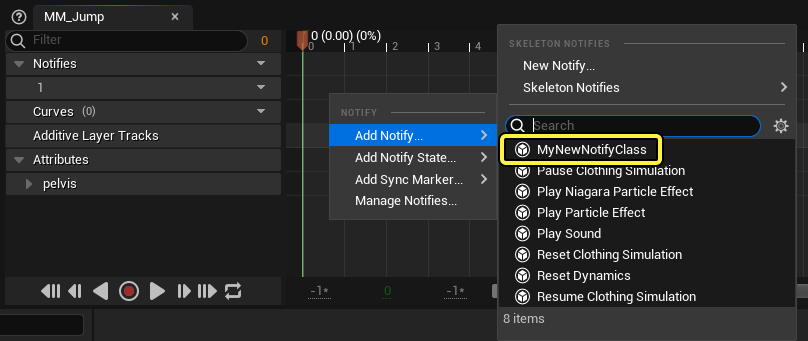
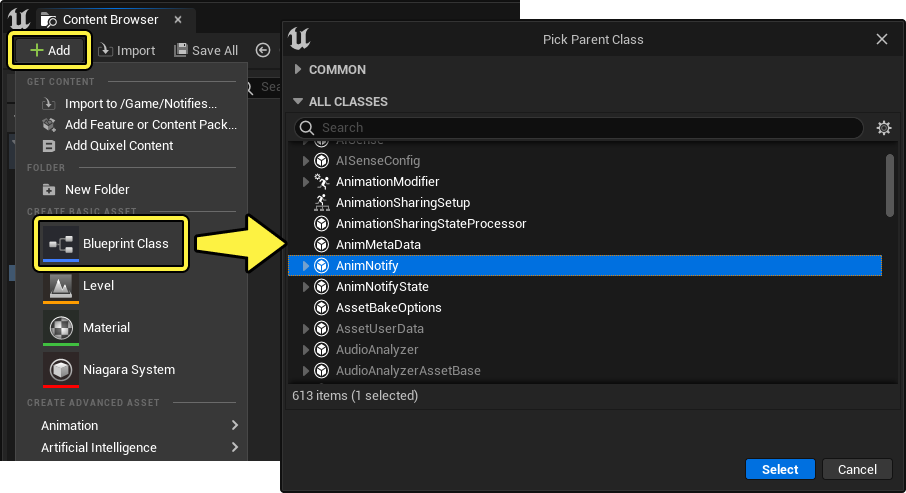
Custom Notify Classes
If your project requires different Notify classes from those provided, you can create custom Notifies and Notify States with their own pre-defined Blueprint logic. This is a way for you to extend and create different Notify templates.
To create new Notify classes, navigate to the Content Browser and click Add (+) > Blueprint Class. Navigate in the All Classes section and select either AnimNotify, to create a child class of a Notify, or AnimNotifyState, to create a child class of a Notify State.
To start building unique functions for AnimNotify classes, click the Override function drop down menu in My Blueprint and select Received Notify. This opens the function graph where you can now script custom logic from the Received Notify entry node.

You can override and implement the following functions in either AnimNotify or AnimNotifyState classes:
| Function | Description |
|---|---|
| Get Default Trigger Weight Threshold | This function sets the default value of Trigger Weight Threshold for this Notify, however it can be overridden in the Notify keyframe details. |
| Get Notify Name | This function sets the name of the Notify or State keyframe in the timeline. |
| Received Notify | Used in standard Notifies, this function executes once when the Notify keyframe is reached. |
| Received Notify Begin | Used in Notify States, this function executes once when the Notify region begins. |
| Received Notify End | Used in Notify States, this function executes once when the Notify region ends. |
| Received Notify Tick | Used in Notify States, this function executes continuously throughout the duration of the Notify State. |
Once you have created your custom Notify class, you can add it to the Notify timeline from either the Add Notify or Add Notify State menu.