
Editing Animation Montages
If you are new to Animation Montages, you should read the Animation Montage Overview document before proceeding.
This document shows you how to set up an Animation Montage and the properties within the Animation Sequence Editor relevant to working with Animation Montages.
Adding Animations
To add an Animation to your Montage, drag the desired Sequence from the Asset Browser and drop it in the Animation Sequence Editor Timeline in a Montage Slot track.

You can add additional Animations to the Montage by dragging a Sequence into the same Slot track. Additional animations are added sequentially and are visually staggered to indicate the breaks between Animations.

You can click and drag the Animations on the Slot track to re-order them.
Right-clicking on an Animation in a Montage track provides the following context menu:
| Property | Description |
|---|---|
| Delete Segment | Deletes the selected Animation from the Montage. |
| Open Asset | Opens the selected Animation Asset in the relevant editor window. When working within more than one Animation Asset at once, it can be helpful to have more than one Asset open at the same time. You can open more than one Animation Asset at once in a new editor tab by holding Shift when clicking on an asset from the Content Browser or an asset linking instance. |
| New Montage Section | Creates a new Montage Section. See Creating Montage Sections for more information. |
| New Slot | Creates a New Slot track after defining which slot to occupy. See Defining Track Slots for more information. |
| Delete Slot | Deletes the selected Slot, including all contained instances of assets. |
| Duplicate Slot | Duplicates the selected Slot, including all contained assets. Two or more tracks cannot occupy the same Slot on the same Skeleton. One of the duplicated tracks must be redefined with a new Slot. |
| Set Elements To… | This property defines the nature of the associated Notifies and Sections tied to the selected Sequence. The options include: Absolute: The Notify location is tied to the location it occupies in the Montage timeline as a whole, regardless of sequence length or order. Relative: The Notify is tied to the location relative to the ordered Sequence when this option is enabled. For example, a Notify that occurs one second after the beginning of the first Sequence in a Montage, will be tied to the location of one second after the beginning of the first Sequence regardless of which Sequence is the first Sequence, even after the property has been enabled. Proportional: The Notify will be attached to the associated sequence even when reordering Sequences. |
Creating Montage Sections
To create a Section, right-click on the Slot track or the Montage track and select New Montage Section from the context menu. When prompted, define the Section's Name.

The new Section appears in the Montage track and is indicated by a purple header and timing tag.
By default, all Animation Montages include a Default Section that, when used by itself, will sequentially play the entire Montage.

You can edit the location of Sections by dragging the Section header to the desired location.

A section must be present at the beginning of an Animation Montage. If an edit is made moving or modifying the Section at the beginning of the timeline, the editor corrects the position of either the edited section or the next closest section to the beginning of the montage.

Defining Track Slots
Slots are a management system for animation playback on Skeletal Meshes that are assigned to areas or parts of a mesh. In the Anim Graph within a character's Animation Blueprint, Slots can be used to organize which region on a character an animation is played back on. You can organize which Slot an animation will play on, by declaring what Slot the Montage track uses when creating a New Track or with the dropdown menu.
All sequence tracks must use Slots from the same Slot Group.
For more information about slots and Slot Management see the Slots documentation.
Using Multiple Slots
Montages can contain many animation tracks using multiple slots in order to play animations on different regions of the mesh at the same time, or in instance of different states. Using Montages you can consolidate a group of related animations, and assign them to different Slots to playback in their respective circumstance using the same Asset. A single reload Montage can be used for any state a character occupies. For example, using Blueprints, a single reload Montage can be commanded to play animations from one Slot if the character is standing, and play animations from a different Slot if the character is lying prone.
For best results when using multiple Slots in an Animation Montage, ensure that the length of each of your animation tracks are the same.
Playing Animation Montages
After having created and modified your Animation Montage in the Animation Sequence Editor, you can now play the Montage from a Blueprint as long as your character actor is able to be referenced. You can use the Play Anim Montage node to playback an Animation Montage.

With the Play Anim Montage Node, you can activate the playback of an Animation Montage from a Blueprint. You need to specify the target to play the Montage. When using the Play Anim Montage Node the target is the Self object by default.
Other options include changing the In Play Rate of the montage by a factor of the value assigned. For example, a value of 2 will play the montage back at double speed, while a value of 0.5 will playback at half speed.
With this node you can also define which section to begin playback if you want to use a section other than Default as the starting section. The sections play based on the behavior you define in the Montage Sections panel in the Animation Sequence Editor.
For a more powerful and feature rich node, you can use the Play Montage node. With the Play Montage node you need to connect the Mesh you want to animate and assign the Montage to Play.

You can also set a Play Rate factor, or set a custom Starting Position, in seconds, or Starting Section, by name, for playback.
From the node's output, there are several events that you can use to activate connected nodes and functions based on the state of the Montage:
| Output Pin | Description |
|---|---|
| On Completed | Functions can be connected from this pin to be activated when the Montage finishes playing and is fully blended out. |
| On Blend Out | Here, functions can be activated when the Montage is starting to Blend Out, using Blend Out Trigger Time or if the Montage ends. |
| On Interrupted | From this pin, functions can be activated when Montage playback is Interrupted. |
| On Notify Begin | Functions can be activated from this pin when a Play Montage Notify is activated or a Play Montage Notify Window begins. For more information about the different types of Notifies and how to implement them into Animation Sequences or Montages, see the Notifies documentation. |
| On Notify End | When a Play Montage Notify Window ends, this pin will activate any connected functions. |
| Notify Name | This pin outputs the active Notify's name. |
In order for the Montage to play, in the Character Blueprint of the Skeletal Mesh you should set the Animation Mode to Use Animation Blueprint and connect the Animation Blueprint being used in the Anim Class property.

Inside your Animation Blueprint, on the AnimGraph, you can use a Slot node referencing the corresponding Slot used in your Montage to integrate the Montage playback with the rest of your characters animation system.

Animation Blueprints Class Defaults
When using Layered Animation Blueprints you can also define the behavior of montage playback in the Animation Blueprint's Class Defaults panel.
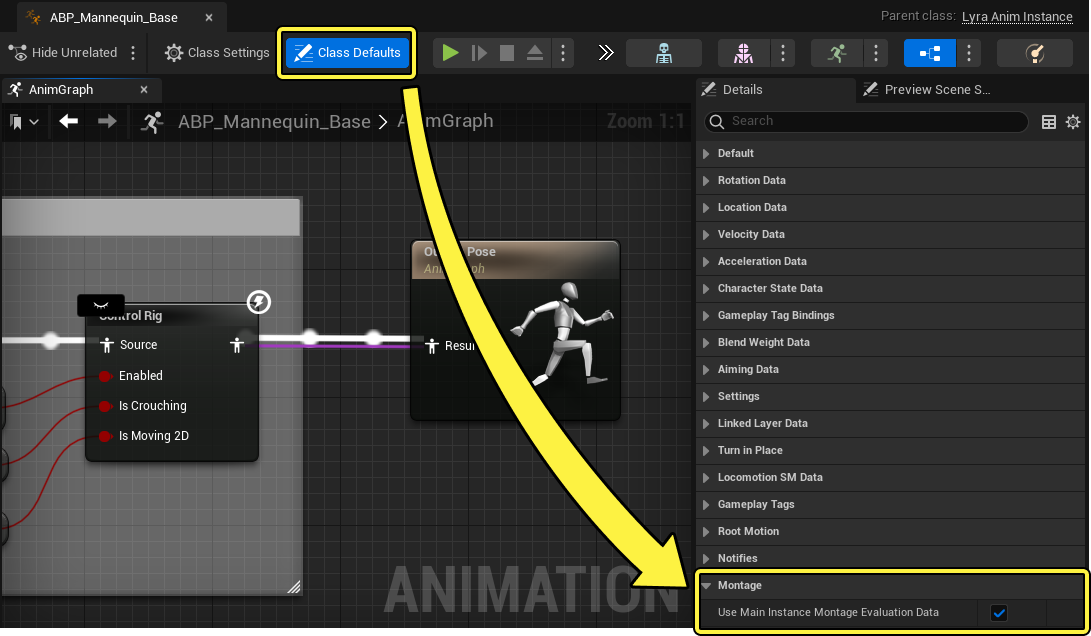
When you want a montage to play on all linked layers, you can enable the Use Main Instance Montage Evaluation Data property, which will use the main instance's montage data on all linked instances. For example, playing a montage on a main instance will play it on the linked layer too. This can be helpful for ensuring that montages are played in full, and not overridden by animation layers. For more information about using Linked Animation Blueprint Layers, see the Using Layered Animations for an example of how Montages can be used with layered animation systems.
Montage Properties Reference
Animation Montages are an assembly of many assets working together. Here you will find a reference guide to each asset type and the accessible properties you can use when working within animation montages.
Asset Details
Here you can reference a list of properties that you can use to define the behaviors of the Animation Montage currently open in the Animation Sequence Editor.

| Property | Description |
|---|---|
| Blend Mode In | Select the Mode used when blending into the Montage. You can select either Standard and Initialization. |
| Blend Mode Out | Select the Mode used when blending out of the Montage. You can select either Standard and Initialization. |
| Blend In | When assigning blend behaviors, into an Animation Montage, you can set the following options in this property:
|
| Blend Out | When assigning blend behaviors, out of an Animation Montage, you can set the following options in this property:
|
| Blend Out Trigger Time | Set the threshold for a blend out process to begin. The assignable value is the time (in seconds) from the end of the Montage. Using a value of less than 0 results in using BlendOutTime, so BlendOut finishes as the Montage ends. Using a value greater than or equal to 0 results in using the Montage End subtracting the BlendOutTriggerTime to trigger blend out. |
| Enable Auto Blend Out | When toggled, the montage automatically blends out when the montage reaches its end. When disabled, no blending will occur and the final pose will last until stopped explicitly by another function. |
| Blend Profile In | Select the Blend Profile to use when Blending In to the Montage. For more information on Blend Profiles, refer to the Blend Profiles documentation. |
| Blend Profile Out | Select the Blend Profile to use when Blending Out of the Montage. For more information on Blend Profiles, refer to the Blend Profiles documentation. |
| Sync Group | Define the name of the Sync Group the Montage is a part of. For more information about Sync Groups and using them in conjunction with Animation Montages, see the Sync Groups documentation. |
| Sync Slot Index | Define the Sync Group Slot Index. For more information about Sync Groups and using them in conjunction with Animation Montages, see the Sync Groups documentation. |
| Time Stretch Curve | With Time Stretch Curves you can specify play-rate adjustments using an Animation Curve during animation playback. A Time Stretch Curves will only be referenced during playback when the montage has a non-default play rate. In this property you can define the following properties.
|
| Time Stretch Curve Name | Define the name of the Time Stretch Curve you want to use to affect the Animation Montage playback. |
Sections
While working with an Animation Montage in the Animation Sequence Editor you will find properties in the Details Panel related to each asset type. Here you will find a reference of the available properties you can use to edit Sections while working within Animation Montages. To access these properties, select the desired Section and the relevant properties will populate within the Details Panel.

| Property | Description |
|---|---|
| Section Name | Reference or rename the selected section. |
| Next Section Name | Reference the next section from the selected section as defined in the Montage Section panel. |
| Slot Index | Definable Slot Index value that can be referenced when using a Linked Montage. |
| Link Method | When using Linked Montages, you can define the Link Method in this property as well as in the Right-Click context menu on the relevant Animation Sequence. Refer to the Set Elements To… property in the Adding Animations section. |
| Linked Sequence | Reference of the Animation Sequence the Notify is linked to. |
Animations
Here you will find a reference for the available properties you can use to edit Animations while working within Animation Montages. To access these properties, select the desired Animation and the relevant properties will populate within the Details Panel.

| Property | Description |
|---|---|
| Animation Reference | Lists the Animation Sequence to play when the selected segment is activated. |
| Start Time | Indicates the Start Time in seconds of the selected Animation in relation to the Sequence. |
| End Time | Lists the End Time of the selected Animation in seconds in relation to the Sequence. |
| Play Rate | Factor of Play Rate. Where a value of 2 makes the montage playback at double speed, while a value of 0.5 plays back at half speed. |
| Loop Count | Define the number of Loops the Animation performs by default. Changing this value alters the Animation in the Montage, resulting in any loops to be innate to the Animation. To have a dynamic looping Animation, you should set any Animation to only perform one loop, and use game logic to decide how many loops should be performed based on context. |
| Preview Window | With the Preview Window you can see a preview of the animation playback on the mesh. You can pause or play this animation preview with the Play/Pause button. You can also scrub through the animation using the simplified timeline under the preview window. |
| Start Position | Lists the Start Position, in seconds, in relation to the entire Montage. The first animation in an Animation Montage must have a Start Time of 0. |
For Notify properties, see the Animation Notifies documentation.