In the AnimGraph of a character's Animation Blueprint you can use blend nodes to blend multiple source animation poses together to create new animation poses.
With each blend node you can input multiple animation poses using the node's pose input pins, to generate a blended pose that will be accessible from the node's output pose pin.
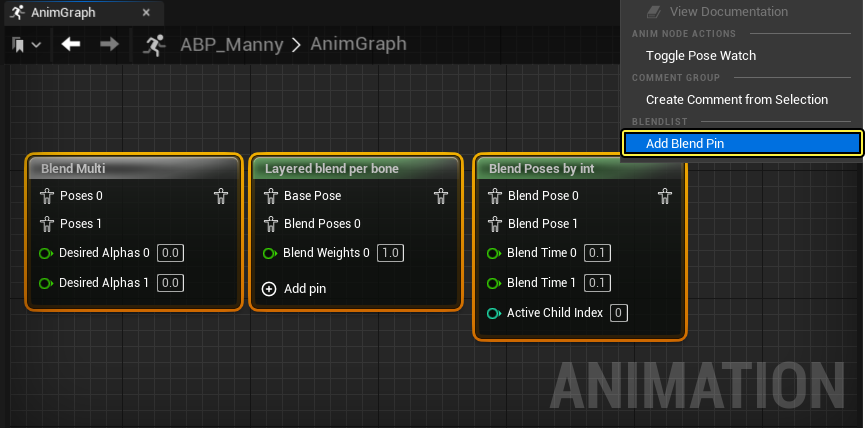
Some Blend Nodes can accept and blend more than two animation poses, with these nodes you can right-click the node in the AnimGraph and select Add Blend Pin to add another pose input pin.
You can also remove additional pose input pins by right-clicking the specific input pin you want to remove and selecting Remove Blend Pin from the context menu.
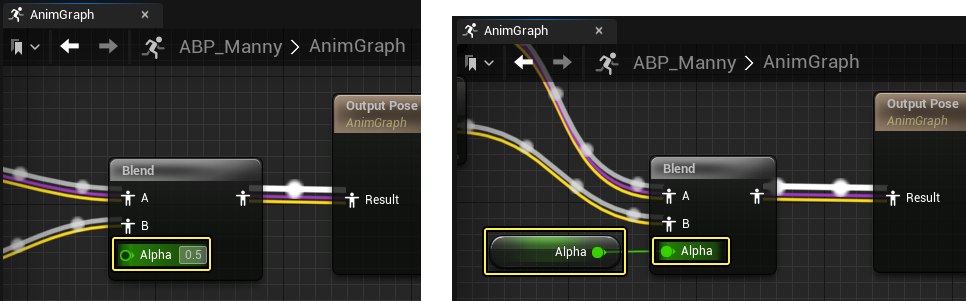
While using blend nodes, you can control the degree of blending with an Alpha value. You can manually assign a blend node's alpha value, by selecting the variable input node, or the alpha property in the node's details panel, and entering a value. You can also assign a blend node's alpha by connecting an alpha variable node to the alpha input pin in the AnimGraph. An alpha value of zero will typically favor the primary pose, while a value of 1 will favor the secondary pose.
Using more advanced blend nodes that can incorporate additional animation data, you can create unique animation blending results in your project. Here you will find a reference to the available blend nodes you can use to blend animation poses in Unreal Engine.
Blend Nodes
Categorized with a gray title color, standard blend nodes perform simple blends of animation poses based on node specific parameters. Here you can reference a list of the standard blend nodes that you can use in your project to blend animation poses in the AnimGraph
Apply Additive
Both the Apply Additive and the Apply Mesh Space Additive nodes add an additive pose to a base-normal animation pose, based on an alpha value.
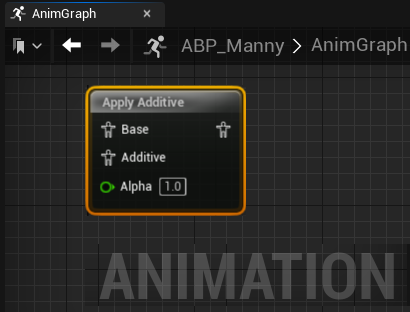
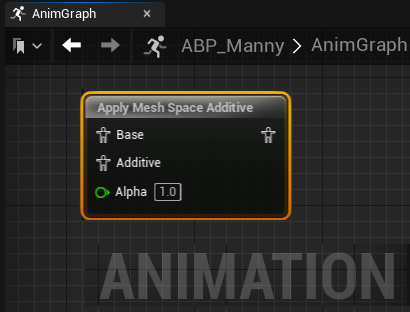
Using the nodes input pins, you can connect a base pose and an additive pose with which to apply.
Apply Additive nodes are also affected by the LOD Threshold system. You can adjust the LOD level threshold that the blend occurs in the Apply Additive and Apply Mesh Space Additive's Details panel.
In addition, you can use a Make Dynamic Additive node, to negatively blend additive animation poses. With this node, you can subtract the additive pose from the base pose to create an output pose.
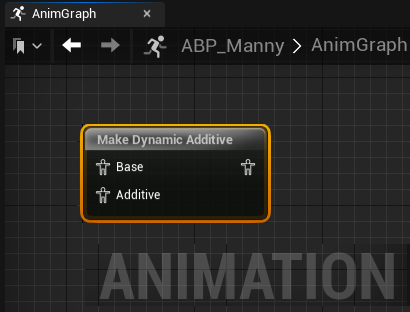
In the Make Dynamic Additive node's details panel you can also enable the node to operate in the Mesh Space.
Blend
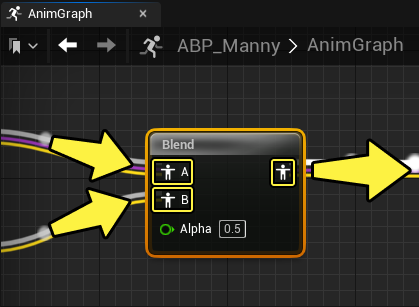
The standard Blend node is a simple combination of the two input poses that scales the weight of which input is prioritized based on an alpha value from the Alpha input pin.
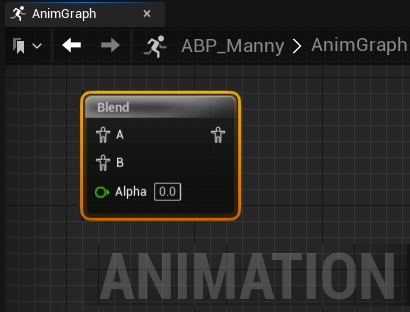
You can connect animation poses to the A and B input pins, and control the degree of blending between the poses with the Alpha pin.
Blend Bone by Channel
With a Blend Bone by Channel blend node you can specify individual bones, in which to apply specific blending transforms.
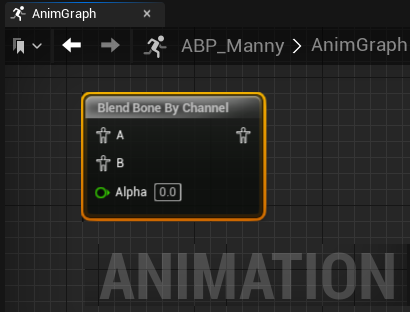
In the Blend Bone by Channel's Details panel you can add a Bone Definitions section with (+) Add. After creating a definition, you can define a source bone to pull transform data from, and a Target bone to apply the blend. You can also define what aspects of the transform you want to incorporate in the blend, such as Translation, Rotation and Scale by toggling the available properties. In addition you can define in what Transform Space the transform data is being calculated, such as World Space, Component Space, Parent Bone Space and Bone Space.
The present alpha value will facilitate the weight of the blend.
Blend Multi
With a Blend Multi node, you can blend more than two blend poses, between a range of alpha values.
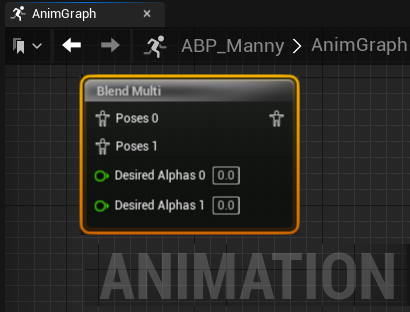
In the Blend Multi's Details panel you can also toggle the node to behave as additive with the Additive Node property.
Function Blend Nodes
Categorized with a green title color, function blend nodes perform more advanced calculation-based blends of animation poses based on node specific parameters. Here you can reference a list of the function based blend nodes that you can use in your project to blend animation poses in the AnimGraph.
Blend Poses by bool
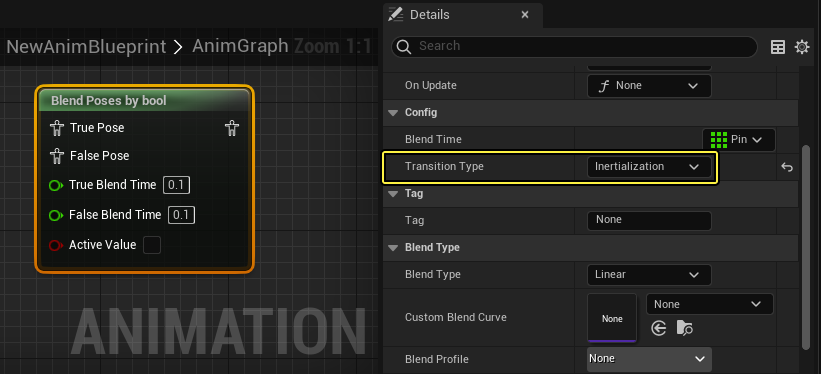
The Blend Poses by bool node performs a time-based blend between two poses using a Boolean value as the trigger. When the Boolean reads true, the pose connected to the True Pose input pin is used; when the Boolean is false, the False Pose is used. Each pose has a float value Blend Time that is used to control how long it will take to blend into the pose.
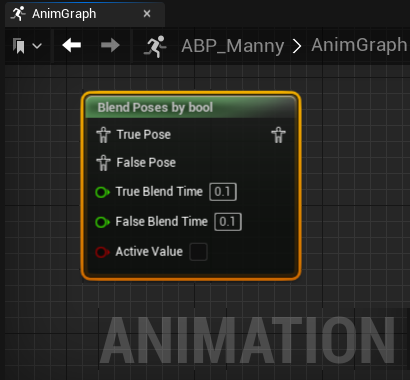
In the Details panel, you can toggle the Blend Time pins to be visible in the AnimGraph as well as set the Transition Type.
Blend Poses by int
The Blend Poses by int node performs a time-based blend between any number of poses using an integer value as the key. For each input integer value, the pose associated with that value's input pin is used. For instance, when the integer is set to 0, the pose connected to Blend Pose 0 is used. Each pose has a float value Blend Time that is used to control how long it will take to blend into the pose.
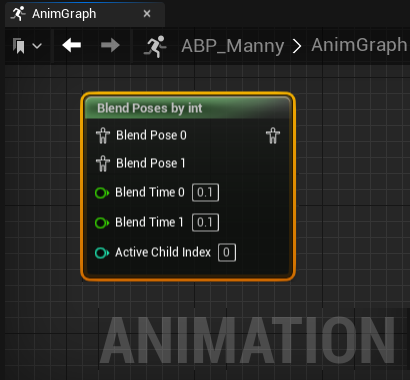
In the Details panel, you can toggle the Blend Time pins to be visible in the AnimGraph as well as set the Transition Type.
Blend Poses by Enumeration (Enum)
The Blend Poses by Enum node performs a time-based blend between poses using an Enumeration (Enum) value as the key. A default pose can be used, and additional poses can be added for the values identified within the enum connected through the Active Enum Value pin. Additionally, each pose has a float value Blend Time that is used to control how long it will take to blend into the pose.

In the Details panel, you can toggle the Blend Time pins to be visible in the AnimGraph as well as set the Transition Type.
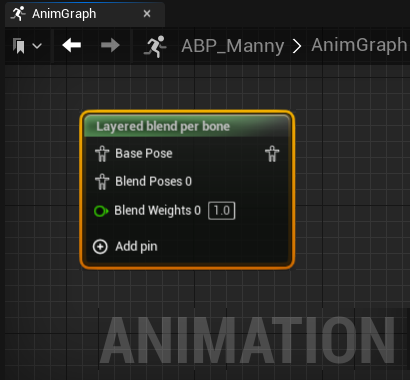
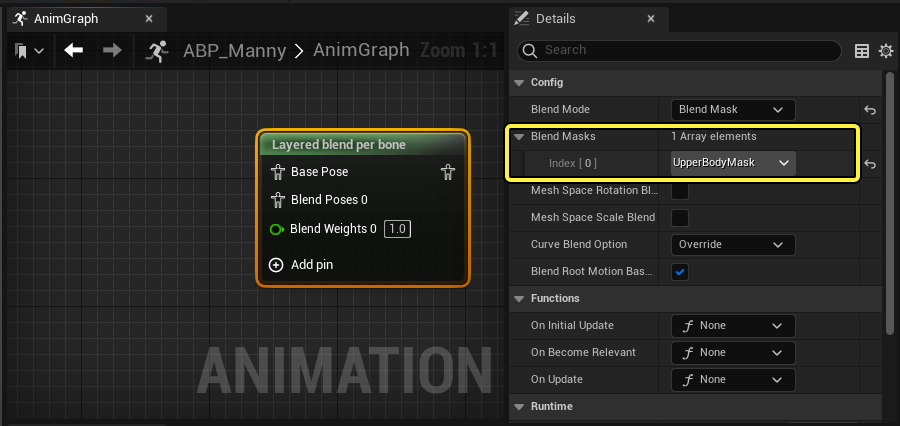
Layered blend per bone
With the Layered blend per bone node you can blend between any number of dynamic blend poses based on a defined set of bones.
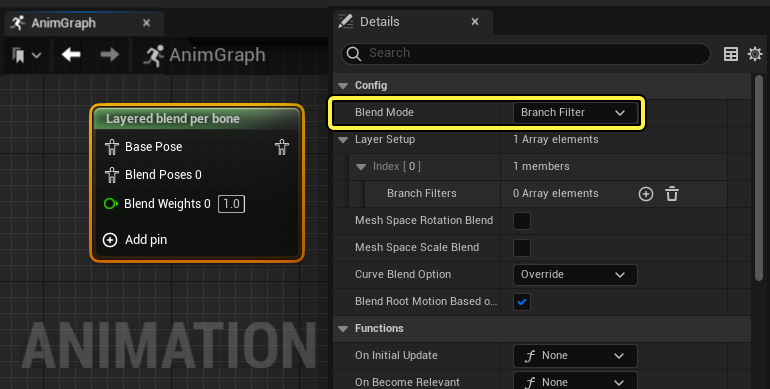
In the Details panel of the Layered blend per bone node, you can define the blend mode as either a Branch Filter or a Blend Mask.
You can enable the Mesh Space Rotation Blend and Mesh Space Scale Blend properties to control whether the Rotation and Scale blending occurs in the Mesh Space or Local Space.
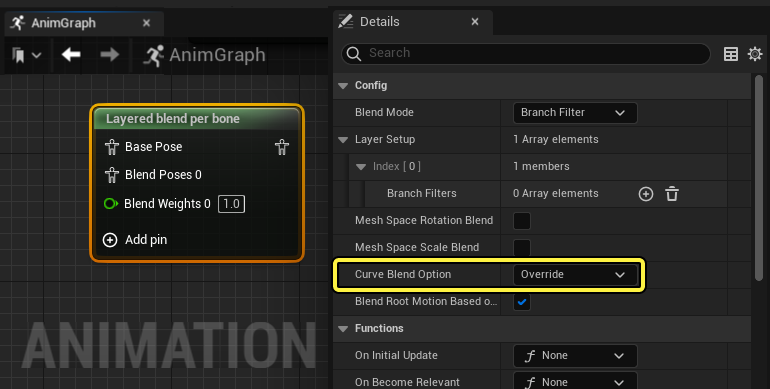
With the Curve Blend Options property you can set the curve blend behaviors from a set list to control how the animation layers blend together. Here you can reference a list of the available Curve Blend Options.
| Blend Option | Description |
|---|---|
| Override | Overrides the pose to the last pose that contains a valid curve value. |
| Do Not Override | Does not override the pose. Best used when the desired previous pose doesn't have a curve value. |
| Normalize by Weight | Normalizes the pose blend by the sum of all blend weights. |
| Blend by Weight | Blends the poses by blend weight without normalizing. |
| Use Base Pose | Uses the Base Pose for all curve values. |
| Use Min Value | Selects the highest curve value from all connected poses and uses it to blend. |
| Use Max Value | Selects the lowest curve value from all connected poses and uses it to blend. |
You can also enable the Blend Root Motion Based on Root Bone property to incorporate the per-bond blend weight of the root bone when lending Root Motion.
Branch Filter
With the Branch Filter option, you can define an Index of bones the blend will affect.
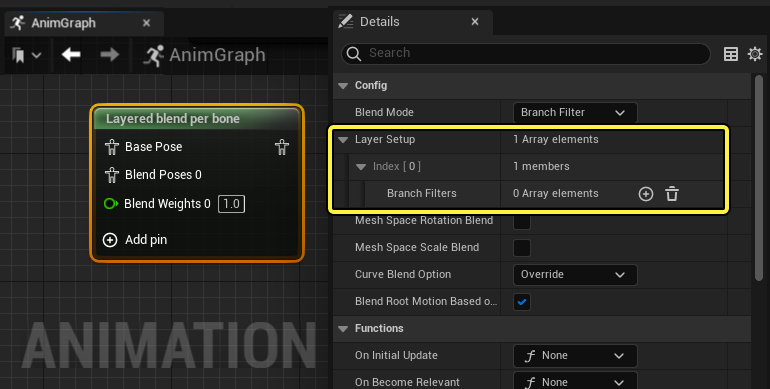
After adding an element to the Branch Filters property, you can input a bone as the Bone Name to use as a reference point to control localized animation blending. Using the Blend Depth property, you can control the wight the blend has on the children bones of the Bone Name.
| Value | Example | Description |
|---|---|---|
| Positive |  |
Positive Blend Depth values will offset the weight by the same number of bones and taper the weight through the chain to the Bone Name. For example, a Blend Depth of 2 will apply a blend weight of 1 to the next child bone and a blend weight of .5 to the Bone Name. |
| Zero |  |
A Blend Depth of 0 will apply a blend weight of 1 to the Bone Name and all connected child bones. |
| Negative |  |
Negative Blend Depth values will disable any Blend Poses and favor the Base Pose. Lesser values than -1 will offset the weight by the same number of bones and taper the disabled blend weight through the chain to the Bone Name. For example, a Blend Depth of -2 will apply a blend weight of -1 to the next child bone and a blend weight of -.5 to the Bone Name. |
Blend Mask
With the Blend Mask option, you can define the character's Blend Masks as reference points to control the blending between the Base Pose and the Blend Poses.
Inertialization
Inertial blending is a high-performance alternative to traditional animation crossfading that produces natural transitions as a post-process. Once an inertial blend is activated, the source pose is no longer evaluated at all. By contrast, traditional blending evaluates both source and target poses for the duration of the transition to combine them into a blended pose.
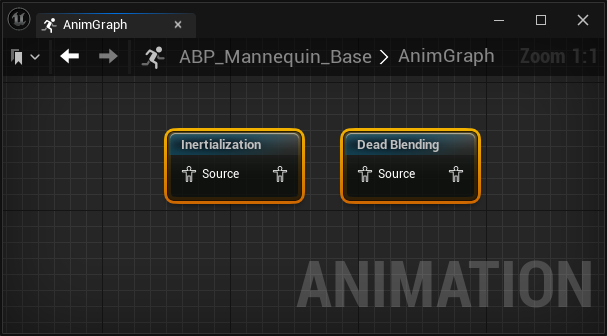
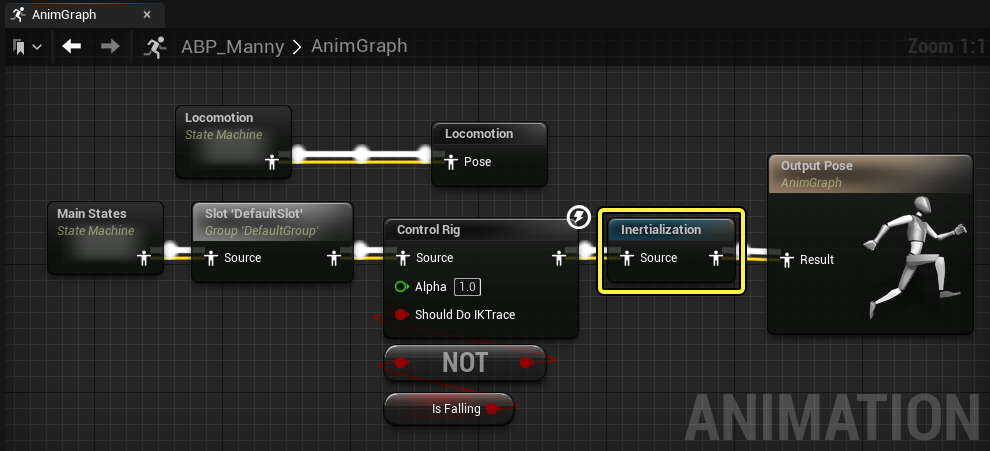
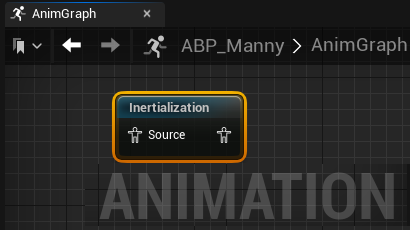
To use inertial blending, you can add an Inertialization or Dead Blending node to the AnimGraph after the source animation blend you want inertially blended. Each node approaches inertial blending using different methods.
Both the Inertialization and Dead Blending node tracks the animation pose motion and changes within Animation Curves, so that the motion can continue moving toward the target animation when an inertial blend is activated. These nodes are activated by any inertial blend requests connected to its Source input pose pin. State Machine Transitions, Blend Nodes, Linked Anim Graphs and Linked Anim Layers, can all trigger inertial blends. The Inertialization or Dead Blending node must be connected after the source of the inertial blend request, but does not have to be immediately adjacent. Deferring an Inertialization or Dead Blending node closer to the Output Pose node can help reduce or eliminate standard blends from your graph and improve your animation system's performance. A single Inertialization or Dead Blending node can handle many inertial blend requests. When processing multiple inertial blend requests, the minimum requested blend duration will be used.
If your AnimGraph contains a Inertialization request but is missing an Inertialization or Dead Blending node, a runtime error will be logged in the Message Log panel.
When authoring animations and graphs with inertial blending in mind, it's best to begin transitions while the outgoing animation is still in motion. There is no need to return to a neutral pose, as inertial blending will handle smooth and natural easing to a rest position. Short blends work best since inertial blending is a post-process for easing motion toward a target animation. Inertial blends can be interrupted with other inertial blends, but try to avoid scenarios that could cause continuous interruptions because animation quality can degrade.
Using Multiple Inertial Blends
You can place multiple Inertialization or Dead Blending nodes in your graph as needed, and each will handle inertial blend requests from their source pose. This means you can perform inertial blending in different spaces. For example, you may want to create separate Inertialization or Dead Blending nodes that operate on your character's upper and lower body separately, followed by a Layered Blend per bone node to blend them together into a final pose.
Additive Inertial Blending
You can also use inertial blending with additive poses by inserting an Inertialization or Dead Blending node before applying to the base pose. For final pose fixups, you will generally apply an inertial blend before any IK, which effectively does inertial blending in IK space.
A Source pose stops being evaluated once inertial blending begins. As a result, Animation Notifies from the source animation Sequence will no longer trigger after inertial blending begins. You may need to refactor existing game logic and Anim Notifies to be compatible with Inertialization.
Inertialization Node vs Dead Blending
There are two kinds of inertial blend nodes available in Unreal Engine; the Inertialization node and the Dead Blending node.
| Inertialization Node | Dead Blending Node |
|---|---|
 |
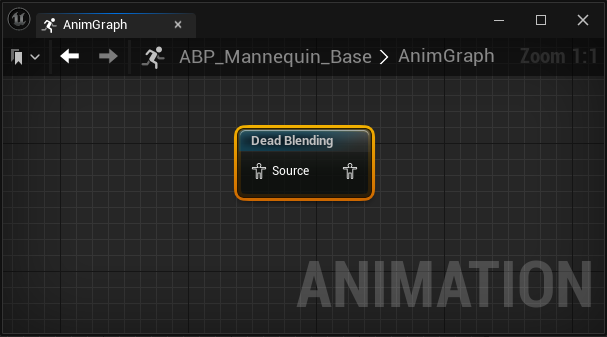 |
| The Inertialization node records the offset between the incoming and outgoing animations and fades this out to prevent the pose from popping. | The Dead Blending node tries to predict future poses of the outgoing animation and blends these with the incoming animation. This node is an experimental node, and therefore we do not recommend shipping projects that rely on its functionality. |
In general the Dead Blending node tends to perform better, in particular when transitioning between animations with large pose differences, but it can sometimes produce more stiff movements. It also takes into account transition blend curves, which are ignored by the Inertialization node.
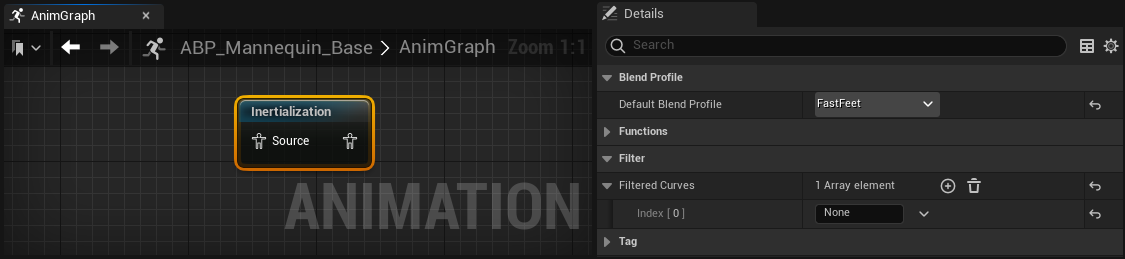
Initialization Node Reference
Here you can reference a list of the Inertializtion nodes properties and a description of their function.
| Property | Description |
|---|---|
| Blend Profile | Optionally set a default Blend Profile to use when no blend profile is supplied by the source node with the inertial blend request. You can set a Blend Profile using the drop-down menu. |
| Filtered Curves | Set a list of animation curves that should not use inertial blending. These curves will instantly change when inertial blending. To filter a curve, use (+) to add a new array to the property, then set the curve by typing the curve's name in the provided Index field. |
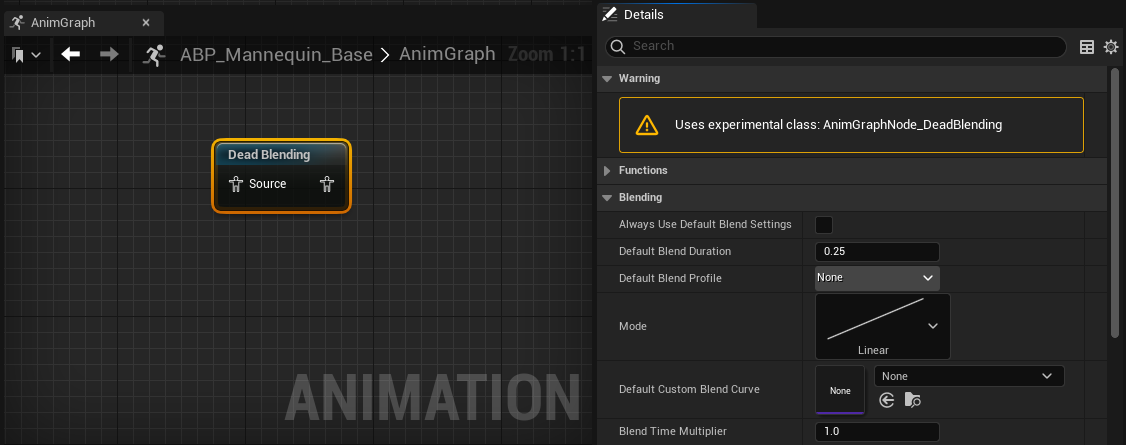
Dead Blend Node Reference
Here you can reference a list of the Dead Blend nodes properties and a description of their function.
This node is an experimental node, and therefore we do not recommend shipping projects that rely on its functionality.
| Property | Description |
|---|---|
| Always Use Default Blend Settings | When enabled, the default blend settings will be used rather than those coming from the source node providing the inertial blend request. |
| Default Blend Duration | Set a default blend duration to use when the source node providing the inertial blend request does not specify a blend duration, or when the Always Use Default Blend Settings property is enabled. |
| Default Blend Profile | Set a default blend profile to use when the source node providing the inertial blend request does not specify a blend profile, or when the Always Use Default Blend Settings property is enabled. You can set a blend profile using the drop-down menu. |
| Mode | Set the default blend mode to use when the source node providing the inertial blend request does not specify a blend mode, or when the Always Use Default Blend Settings property is enabled. You can set a blend mode using the drop-down menu and selecting one of the provided curves. |
| Default Custom Blend Curve | Optionally set a default blend curve to use in conjunction with the blend mode when the source node providing the inertial blend request does not specify a blend curve, or when the Always Use Default Blend Settings property is enabled. You can set a blend curve using the drop-down menu and selecting a curve asset from your project. |
| Blend Time Multiplier | Set a blend time multiplier that can be used to scale the overall lend durations coming from the inertial blend request. |
| Linearly Interpolate Scales | When enabled, bone scales will be linearly interpolated. This is slightly more performant and consistent with the rest of Unreal Engine but visually gives the appearance of the rate of change of scale being affected by the overall size of the bone. |
| Filtered Curves | Set a list of animation curves that should not use inertial blending. These curves will instantly change when inertial blending. To filter a curve, use (+) to add a new array to the property, then set the curve by typing the curve's name in the provided Index field. |
| Filtered Bones | Set a list of bones from the character's Skeleton that should not use inertial blending. The motion from these bones will instantly change when inertial blending. To filter a bone, use (+) to add a new array to the property, then select the bone from the Skeleton hierarchy using the drop-down menu in the provided Index field. |
| Extrapolation Half Life | Set the average half-life of decay in seconds to use when extrapolating the animation. To get the final half-life of decay this value will be scaled by the amount to which the velocities of the animation being transitioned from are moving toward the animation being transitioned too. |
| Minimum Extrapolation Half Life | Set the minimum half-life of decay in second to use when extrapolating the animation. This will be used when the velocities of the animation being transitioned from are very small or moving away from the animation being transitioned too. |
| Maximum Extrapolation Half Life | Set the maximum half_life of decay in seconds to use when extrapolating the animation. This will dictate the longest decay duration possible when velocities of the animation being transitioned from are small and moving towards the animation being transitioned too. |
| Maximum Translation Velocity | Set the maximum velocity to allow for extrapolation of bone translations, in centimeters per-second. Smaller values may help prevent the pose from breaking during blending but too small values can make the blend less smooth. The default value is 500.0. |
| Maximum Rotation Velocity | Set the maximum velocity to allow for extrapolation of bone rotations in degrees per second. Smaller values may help prevent the pose from breaking during blending but too small values can make the blend less smooth. The default value is 360.0. |
| Maximum Scale Velocity | Set the maximum velocity to allow for extrapolation of bone scales. Smaller values may help prevent the pose from breaking during blending but too small values can make the blend less smooth. The default value is 4.0. |
| Maximum Curve Velocity | Set the maximum velocity to allow for extrapolation of curves. Smaller values may help prevent extreme curve values during blending but too small values can make the blending of curves less smooth. The default value is 100.0. |
| Preallocate Memory | When enabled the Dead Blending node will pre-allocate memory, rather than allocate and deallocate memory when blending becomes active and inactive. This property can improve performance, but causes larger memory usage, in particular when you have multiple Dead Blending nodes in an Animation Graph that are not all used at once. |
| Show Extrapolations | When enabled, the Dead Blending node will output a pose that matches the extrapolation. A debug drawing will be rendered that shows what the extrapolation of the animation being generated looks like. |
Request from Blend Nodes
In the Details panel of any inertialization compatible node, you can set the Transition Type property to Inertialization, to activate an inertial blend request. To use inertial blending, the Inertialization node must be placed in the animation graph anywhere after the blend node making the inertial blend request.
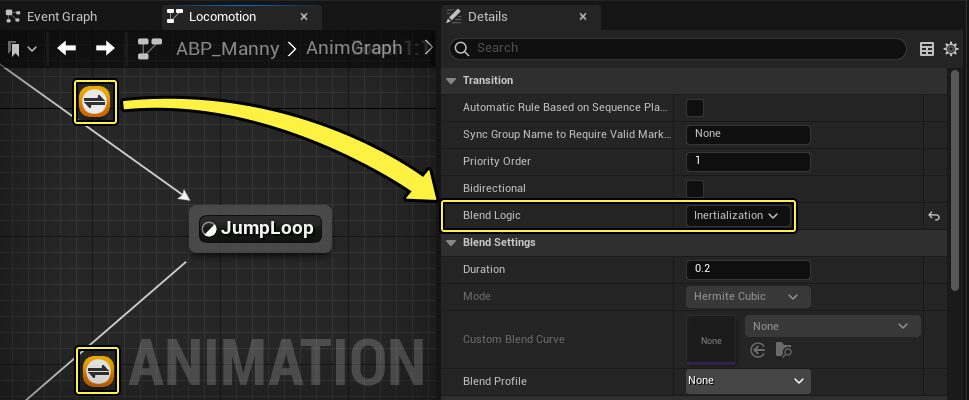
Request from State Machine Transitions
A Inertial Blend request can be made by a State Machine's transition logic. In the Details panel of a Transition Rule, you can set the Blend Logic property to Inertialization, to activate an inertial blend request.
Request from Linked and Layered AnimGraphs
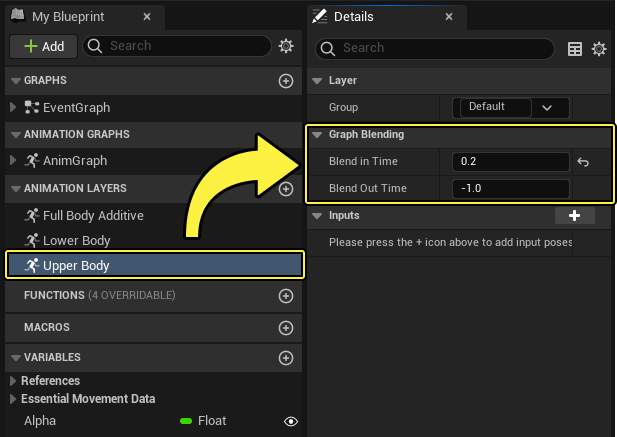
Inertialization properties can also be defined in an Animation Layers or from a Linked Anim Graph. After selecting a Graph from the My Blueprints panel you can find the Graph Blending section of properties in the Details panel. An Animation Layer can blend in or out, but only via inertial blending. An Inertialization or Dead Blending node must be placed anywhere after the Linked Anim Layer node that links this Animation Blueprint. A negative value means the blend time will be determined by the other incoming or outgoing Animation Layer.